# Welcome to Akinon Documentation

## <mark style="color:purple;">From Quick Start to Custom Frontends - Connect It All</mark>

Explore practical guides to launch your Akinon project, make Project Zero your own, and connect your own storefront — faster than ever.

<table data-view="cards" data-full-width="false"><thead><tr><th></th><th data-hidden data-card-target data-type="content-ref"></th><th data-hidden data-card-cover data-type="files"></th></tr></thead><tbody><tr><td><mark style="color:purple;"><strong>Quick Start: Launch Akinon in Minutes</strong></mark><br><br>Set up your Akinon project with essential configurations.</td><td><a href="/quick-start">Launch Your Akinon in Just 6 Steps</a></td><td><a href="https://631770939-files.gitbook.io/~/files/v0/b/gitbook-x-prod.appspot.com/o/spaces%2FqYgu8awT5gZVeBgfOLiK%2Fuploads%2FAJ94Ao0JFtf5ksclN06R%2FFrame%2016.png?alt=media&amp;token=7bffc3a8-c30a-4250-8416-cfebc1c35467">Frame 16.png</a></td></tr><tr><td><mark style="color:purple;"><strong>Customize Project Zero to Fit Your Brand</strong></mark><br><br>Update styling, structure, and components.</td><td><a href="/technical-guides/project-zero">Project Zero</a></td><td><a href="https://631770939-files.gitbook.io/~/files/v0/b/gitbook-x-prod.appspot.com/o/spaces%2FqYgu8awT5gZVeBgfOLiK%2Fuploads%2FPus9M899OF0BlPkHcAPR%2FFrame%2012%20(2).png?alt=media&amp;token=55705bb1-af6e-4070-a3c2-06da5f5ac1ed">Frame 12 (2).png</a></td></tr><tr><td><mark style="color:purple;"><strong>Connect and Bring Your Storefront to Akinon</strong></mark><br><br>Connect your existing storefront to Akinon.</td><td></td><td><a href="https://631770939-files.gitbook.io/~/files/v0/b/gitbook-x-prod.appspot.com/o/spaces%2FqYgu8awT5gZVeBgfOLiK%2Fuploads%2F7BTh69ciOva7Dgm5Zhfm%2FFrame%2015.png?alt=media&amp;token=1749fd36-61a2-49de-ac13-9ebdfc38329c">Frame 15.png</a></td></tr></tbody></table>

***

## Flows

Connect and configure essential business flows.

<details>

<summary><img src="https://631770939-files.gitbook.io/~/files/v0/b/gitbook-x-prod.appspot.com/o/spaces%2FqYgu8awT5gZVeBgfOLiK%2Fuploads%2FiR7jk2vCY1fyQx2hN776%2FFrame%2030.png?alt=media&amp;token=a8bf8e1a-91b8-4bb7-aeb7-85c4d6128e63" alt="" data-size="line">   Start shipments, update addresses, and manage returns</summary>

Create new shipments, update delivery or return addresses, schedule delivery or pickup dates, and initiate return processes.

[Learn more](https://apidocs.akinon.com/flows/shipment-flows)

</details>

<details>

<summary><img src="https://631770939-files.gitbook.io/~/files/v0/b/gitbook-x-prod.appspot.com/o/spaces%2FqYgu8awT5gZVeBgfOLiK%2Fuploads%2FZvLCTC2UuJjQBxhCMWyo%2FFrame%2027%20(2).png?alt=media&amp;token=adf7fc78-f52f-4992-b1a3-982a3da9cbba" alt="" data-size="line">   Start payments, finalize transactions, and manage void and refunds</summary>

Start a new payment session, redirect the customer, handle return URLs, confirm transactions, and take post-payment actions like refunds or cancellations.

[Learn more](https://apidocs.akinon.com/flows/payment-flows)

</details>

<details>

<summary><img src="https://631770939-files.gitbook.io/~/files/v0/b/gitbook-x-prod.appspot.com/o/spaces%2FqYgu8awT5gZVeBgfOLiK%2Fuploads%2FqS6Nfy1Md01boYnL8KS6%2FFrame%2028%20(1).png?alt=media&amp;token=434416e7-6de7-46fb-a5e8-39c5350b059f" alt="" data-size="line">   Attach SMS alerts to your flows</summary>

Send real-time SMS notifications as part of your Shipment or Payment Flows. Keep customers informed about their order or payment status.

[Learn more](https://apidocs.akinon.com/flows/sms-flows)

</details>

<details>

<summary><img src="https://631770939-files.gitbook.io/~/files/v0/b/gitbook-x-prod.appspot.com/o/spaces%2FqYgu8awT5gZVeBgfOLiK%2Fuploads%2FTEXq6jFquLoKhl2humxc%2FFrame%2029%20(2).png?alt=media&amp;token=7534cd07-02ad-4877-b0c3-8f298e20cf10" alt="" data-size="line">   Integrate dynamic discount engines with your checkout</summary>

Connect third-party systems to evaluate and apply real-time discount offers to a customer's basket.

[Learn more](https://apidocs.akinon.com/flows/basket-offer-flows)

</details>

***

## <mark style="color:red;">Get to Know Akinon Products</mark>

Browse Akinon’s products designed to help you launch, manage, and scale your e-commerce operations.

<table data-view="cards"><thead><tr><th></th><th data-hidden data-card-cover data-type="files"></th><th data-hidden data-card-target data-type="content-ref"></th></tr></thead><tbody><tr><td><strong>Akinon Commerce Cloud (ACC)</strong></td><td><a href="https://631770939-files.gitbook.io/~/files/v0/b/gitbook-x-prod.appspot.com/o/spaces%2FqYgu8awT5gZVeBgfOLiK%2Fuploads%2FkagPWASwiC4PI292j7xX%2FScreenshot%202025-04-28%20at%2017.24.47.png?alt=media&amp;token=fa537dfc-cbba-41d2-a07a-db67116a31c0">Screenshot 2025-04-28 at 17.24.47.png</a></td><td><a href="/products/acc">ACC</a></td></tr><tr><td><strong>Omnitron</strong></td><td><a href="https://631770939-files.gitbook.io/~/files/v0/b/gitbook-x-prod.appspot.com/o/spaces%2FqYgu8awT5gZVeBgfOLiK%2Fuploads%2FT7np4QdISLAuMGEhKoLm%2FScreenshot%202025-04-28%20at%2017.22.52.png?alt=media&amp;token=cb9c68b6-ac83-493d-952d-9ae43f3812e1">Screenshot 2025-04-28 at 17.22.52.png</a></td><td><a href="/products/omnitron">Omnitron</a></td></tr><tr><td><strong>Commerce</strong></td><td><a href="https://631770939-files.gitbook.io/~/files/v0/b/gitbook-x-prod.appspot.com/o/spaces%2FqYgu8awT5gZVeBgfOLiK%2Fuploads%2FLaaG9iOqOEBp5P1mEZXi%2FScreenshot%202025-04-28%20at%2017.30.08.png?alt=media&amp;token=1a5f3d7b-5dec-4502-94ae-9f0c4e210688">Screenshot 2025-04-28 at 17.30.08.png</a></td><td><a href="/products/commerce">Commerce</a></td></tr><tr><td><strong>Order Management System (OMS)</strong></td><td><a href="https://631770939-files.gitbook.io/~/files/v0/b/gitbook-x-prod.appspot.com/o/spaces%2FqYgu8awT5gZVeBgfOLiK%2Fuploads%2FkIQdENo2ygPLRPSKAKsS%2FScreenshot%202025-04-28%20at%2017.31.12.png?alt=media&amp;token=8cddb19b-5272-4314-bf01-c52a9c677dc8">Screenshot 2025-04-28 at 17.31.12.png</a></td><td><a href="/products/order-management-system-oms">Order Management System (OMS)</a></td></tr><tr><td><strong>Instore</strong></td><td><a href="https://631770939-files.gitbook.io/~/files/v0/b/gitbook-x-prod.appspot.com/o/spaces%2FqYgu8awT5gZVeBgfOLiK%2Fuploads%2F3IJEfYqjZubm1rxms3vG%2FScreenshot%202025-04-28%20at%2017.32.35.png?alt=media&amp;token=428e01bc-93d5-4ebd-8555-8b1a893bd4c2">Screenshot 2025-04-28 at 17.32.35.png</a></td><td><a href="/products/instore">Instore</a></td></tr><tr><td><strong>Integrator</strong></td><td><a href="https://631770939-files.gitbook.io/~/files/v0/b/gitbook-x-prod.appspot.com/o/spaces%2FqYgu8awT5gZVeBgfOLiK%2Fuploads%2FA3XJB5FIsaB3kbCKo34F%2FScreenshot%202025-04-28%20at%2017.34.44.png?alt=media&amp;token=7a37fd3b-6dba-4dea-bbe0-8a30149d59e7">Screenshot 2025-04-28 at 17.34.44.png</a></td><td><a href="/products/integrator">Integrator</a></td></tr><tr><td><strong>Marketplace Dashboard (MPD)</strong></td><td><a href="https://631770939-files.gitbook.io/~/files/v0/b/gitbook-x-prod.appspot.com/o/spaces%2FqYgu8awT5gZVeBgfOLiK%2Fuploads%2FZQ5pufdrPe65kwkw8Uyn%2FScreenshot%202025-04-28%20at%2017.35.10.png?alt=media&amp;token=c8a8e7fd-76ec-4007-9e62-d86bf2ea05ab">Screenshot 2025-04-28 at 17.35.10.png</a></td><td><a href="/products/marketplace-dashboard-mpd">Marketplace Dashboard (MPD)</a></td></tr><tr><td><strong>Project Zero (PZ)</strong></td><td><a href="https://631770939-files.gitbook.io/~/files/v0/b/gitbook-x-prod.appspot.com/o/spaces%2FqYgu8awT5gZVeBgfOLiK%2Fuploads%2FOxQMG7kHatMmFVwAteT2%2FScreenshot%202025-04-28%20at%2017.37.30.png?alt=media&amp;token=dfa8a996-b76a-44fb-9104-8e9752147c3b">Screenshot 2025-04-28 at 17.37.30.png</a></td><td><a href="/products/project-zero-pz">Project Zero (PZ)</a></td></tr><tr><td><strong>Seller Center</strong></td><td><a href="https://631770939-files.gitbook.io/~/files/v0/b/gitbook-x-prod.appspot.com/o/spaces%2FqYgu8awT5gZVeBgfOLiK%2Fuploads%2FyEichi5K16aTFakKBG0Y%2FScreenshot%202025-04-28%20at%2017.39.05.png?alt=media&amp;token=ea5aeb50-f625-4ea8-a97a-d4f03e3d3414">Screenshot 2025-04-28 at 17.39.05.png</a></td><td><a href="/products/seller-center">Seller Center</a></td></tr><tr><td><strong>Akifast</strong></td><td><a href="https://631770939-files.gitbook.io/~/files/v0/b/gitbook-x-prod.appspot.com/o/spaces%2FqYgu8awT5gZVeBgfOLiK%2Fuploads%2FuCLkngp7k6Rx63FrCVm9%2FScreenshot%202025-04-28%20at%2017.39.35.png?alt=media&amp;token=1aebd0a6-2a4e-4952-880e-7d3aa0cfd27d">Screenshot 2025-04-28 at 17.39.35.png</a></td><td><a href="broken://pages/zJsTWtuDvOf0Su5uFZ7B">Broken link</a></td></tr><tr><td><strong>App Maker</strong></td><td><a href="https://631770939-files.gitbook.io/~/files/v0/b/gitbook-x-prod.appspot.com/o/spaces%2FqYgu8awT5gZVeBgfOLiK%2Fuploads%2FSggikP3P7IoRH882Gzej%2FScreenshot%202025-04-28%20at%2017.39.49.png?alt=media&amp;token=6add05f1-eb75-42b9-b3d7-2a2b3651a492">Screenshot 2025-04-28 at 17.39.49.png</a></td><td><a href="/products/app-maker">App Maker</a></td></tr></tbody></table>

***

## <mark style="color:blue;">**Native AppBuilder**</mark> <mark style="color:blue;"></mark><mark style="color:blue;">— Build Mobile Apps, Fast</mark>

Create production-ready mobile apps with React Native. Customize, extend, and deploy with full control.

{% tabs %}
{% tab title="Setup Essentials" %}
Set up your development environment and launch your first project with ease. From installing the CLI to deploying your app, covers all the essentials.

<img src="https://631770939-files.gitbook.io/~/files/v0/b/gitbook-x-prod.appspot.com/o/spaces%2FqYgu8awT5gZVeBgfOLiK%2Fuploads%2FaFw8EcIVLTQeGUVeKwLM%2FFrame%2031.png?alt=media&amp;token=4e2d146a-42be-4b91-8c12-e00f29298753" alt="" data-size="line">  [<mark style="color:blue;">Learn more</mark>](/technical-guides/app-maker)
{% endtab %}

{% tab title="Build and Customize Your App" %}
Learn the core framework and how it functions, managing and customizing pages and data containers, integrating and configuring plugins to extend app capabilities.

<img src="https://631770939-files.gitbook.io/~/files/v0/b/gitbook-x-prod.appspot.com/o/spaces%2FqYgu8awT5gZVeBgfOLiK%2Fuploads%2F9YDUIzaHZBQdTcyWFlld%2FFrame%2033.png?alt=media&amp;token=13d71d1e-8863-4983-91a6-ee529d4ad1fe" alt="" data-size="line">  [<mark style="color:blue;">Learn more</mark>](/technical-guides/app-maker/mobile/mobile-app-framework)
{% endtab %}

{% tab title="Publishing App to Stores" %}
Ready to go live? Learn how to publish your mobile app on Apple App Store and Google Play with step-by-step instructions.

<img src="https://631770939-files.gitbook.io/~/files/v0/b/gitbook-x-prod.appspot.com/o/spaces%2FqYgu8awT5gZVeBgfOLiK%2Fuploads%2FFzlaAC4NzFAYhLYTRx5N%2FFrame%2032.png?alt=media&amp;token=3699166e-c1e8-461b-a724-8f4b16d254a5" alt="" data-size="line">  [<mark style="color:blue;">Learn more</mark>](/tutorials/app-maker/create-app-on-stores/creating-app-on-apple-app-store)
{% endtab %}
{% endtabs %}


# ACC

ACC is a cloud-native SaaS solution that provides a flexible and scalable digital commerce platform. It offers a comprehensive set of services and tools to build, deploy, and manage digital commerce applications. Leveraging a headless architecture and API-first approach, it allows for easy creation and management of applications and gives flexibility to customize and extend e-commerce applications according to specific requirements.

ACC follows cloud-native principles and supports the 12-Factor methodology, enabling the creation of modern cloud-native applications effortlessly. It offers a single-tenant SaaS architecture, ensuring enhanced security, scalability, and control. With ACC, you can benefit from horizontal auto-scaling mechanisms, enabling efficient resource allocation through automated application deployment.

## <mark style="color:red;">ACC Capabilities​</mark> <a href="#acc-capabilities" id="acc-capabilities"></a>

At the core of ACC is Flora, a robust cloud orchestration tool developed by Akinon to address your diverse cloud requirements. Flora acts as a centralized hub for managing and automating various aspects of your cloud infrastructure. It simplifies application building, SSL certificate management, scalability across availability zones, DNS configuration management, and database provisioning. By abstracting the complexities of the underlying infrastructure, Flora allows you to focus on developing and enhancing digital commerce solutions. In conjunction with Flora, ACC offers additional tools and interfaces such as APIs, a CLI (Command Line Interface) tool, monitoring and management screens. These resources provide you with complete control over your applications, empowering you to rapidly manage and optimize your cloud-based infrastructure with heightened security and scalability.

The architecture of ACC creates a reliable and isolated environment, allowing users to concentrate on their specific requirements and operate with confidence. By leveraging the combined capabilities of Flora and ACC, you can streamline your operations, reduce complexities, and maximize the efficiency of your digital commerce ecosystem. This includes integrating Akinon's services, applications, and desired extensions seamlessly, allowing for a cohesive and optimized user experience.

<figure><img src="https://631770939-files.gitbook.io/~/files/v0/b/gitbook-x-prod.appspot.com/o/spaces%2FqYgu8awT5gZVeBgfOLiK%2Fuploads%2FI6AQX7Uld8o4giSrBN28%2Fimage.png?alt=media&amp;token=0ca98f33-b517-4504-a045-2958ebfad0d9" alt=""><figcaption></figcaption></figure>

## <mark style="color:red;">API-First Integration​</mark> <a href="#api-first-integration" id="api-first-integration"></a>

Akinon API-first design philosophy enables you to build and customize digital commerce experiences with ease. The comprehensive set of RESTful and REST APIs allows integration with existing systems, third-party applications, and external services.

Akinon offers a wide range of APIs that provide developers with the necessary tools to integrate, extend, and customize the platform's digital commerce capabilities. These APIs enable seamless interaction with ACC's core functionalities, applications and services. ACC streamlines tasks, such as discovering available extensions and provisioning them for projects, which makes it easy to add new extensions without disrupting existing services. Additionally, each API is well-documented, with clear specifications, endpoints, and data structures, making it easier for developers to understand and integrate applications and services operating on the ACC.

Akinon also offers the option to subscribe to webhooks or utilize APIs within your extensions. These self-contained modules operate with their own dependencies and can be easily published, loaded, and managed. This opens up possibilities for implementing notifications, sales channels, data synchronization, and integration with other tools or services. ACC empowers you to decouple the front-end presentation layer from the underlying commerce functionality. This approach provides unparalleled flexibility, enabling developers to leverage their preferred front-end frameworks and technologies while connecting with ACC's Commerce capabilities via APIs.

## <mark style="color:red;">CI/CD Tools​</mark> <a href="#cicd-tools" id="cicd-tools"></a>

ACC integrates continuous integration and continuous delivery (CI/CD) tools to automate the application development process. By utilizing these tools, you can create and manage consistent and reliable CI/CD pipelines. ACC ensures that pipelines are developed consistently, allowing swift deployment of new applications across multiple projects. To facilitate efficient troubleshooting during the CI/CD process, ACC offers comprehensive logs and metrics through Flora. These insights play a vital role in quickly identifying and resolving issues, ensuring the timely delivery of high-quality applications.

### <mark style="color:red;">Continuous Inspection​</mark> <a href="#continuous-inspection" id="continuous-inspection"></a>

ACC involves automatically analyzing code quality and identifying potential issues or vulnerabilities throughout the software development process via continuous inspection. This analysis is performed on source code, bytecode, or compiled binaries to identify bugs, vulnerabilities, code smells, and other code quality concerns. It provides a wide range of built-in rules and checks. The reports generated as part of CI/CD pipelines in ACC include valuable metrics such as code coverage, complexity, duplication, and adherence to coding standards, providing essential insights for improving software quality. Each issue is categorized and prioritized based on severity, allowing developers to focus on the most critical problems first. If the code does not meet the quality gate criterias, you can consider the versions as unstable and see what improvements could be made. By regularly monitoring these metrics, teams can identify areas for improvement, set goals, and track their progress. This integration on ACC helps teams deliver higher-quality code, improve software maintainability, and mitigate security risks throughout the development lifecycle.


# Omnitron

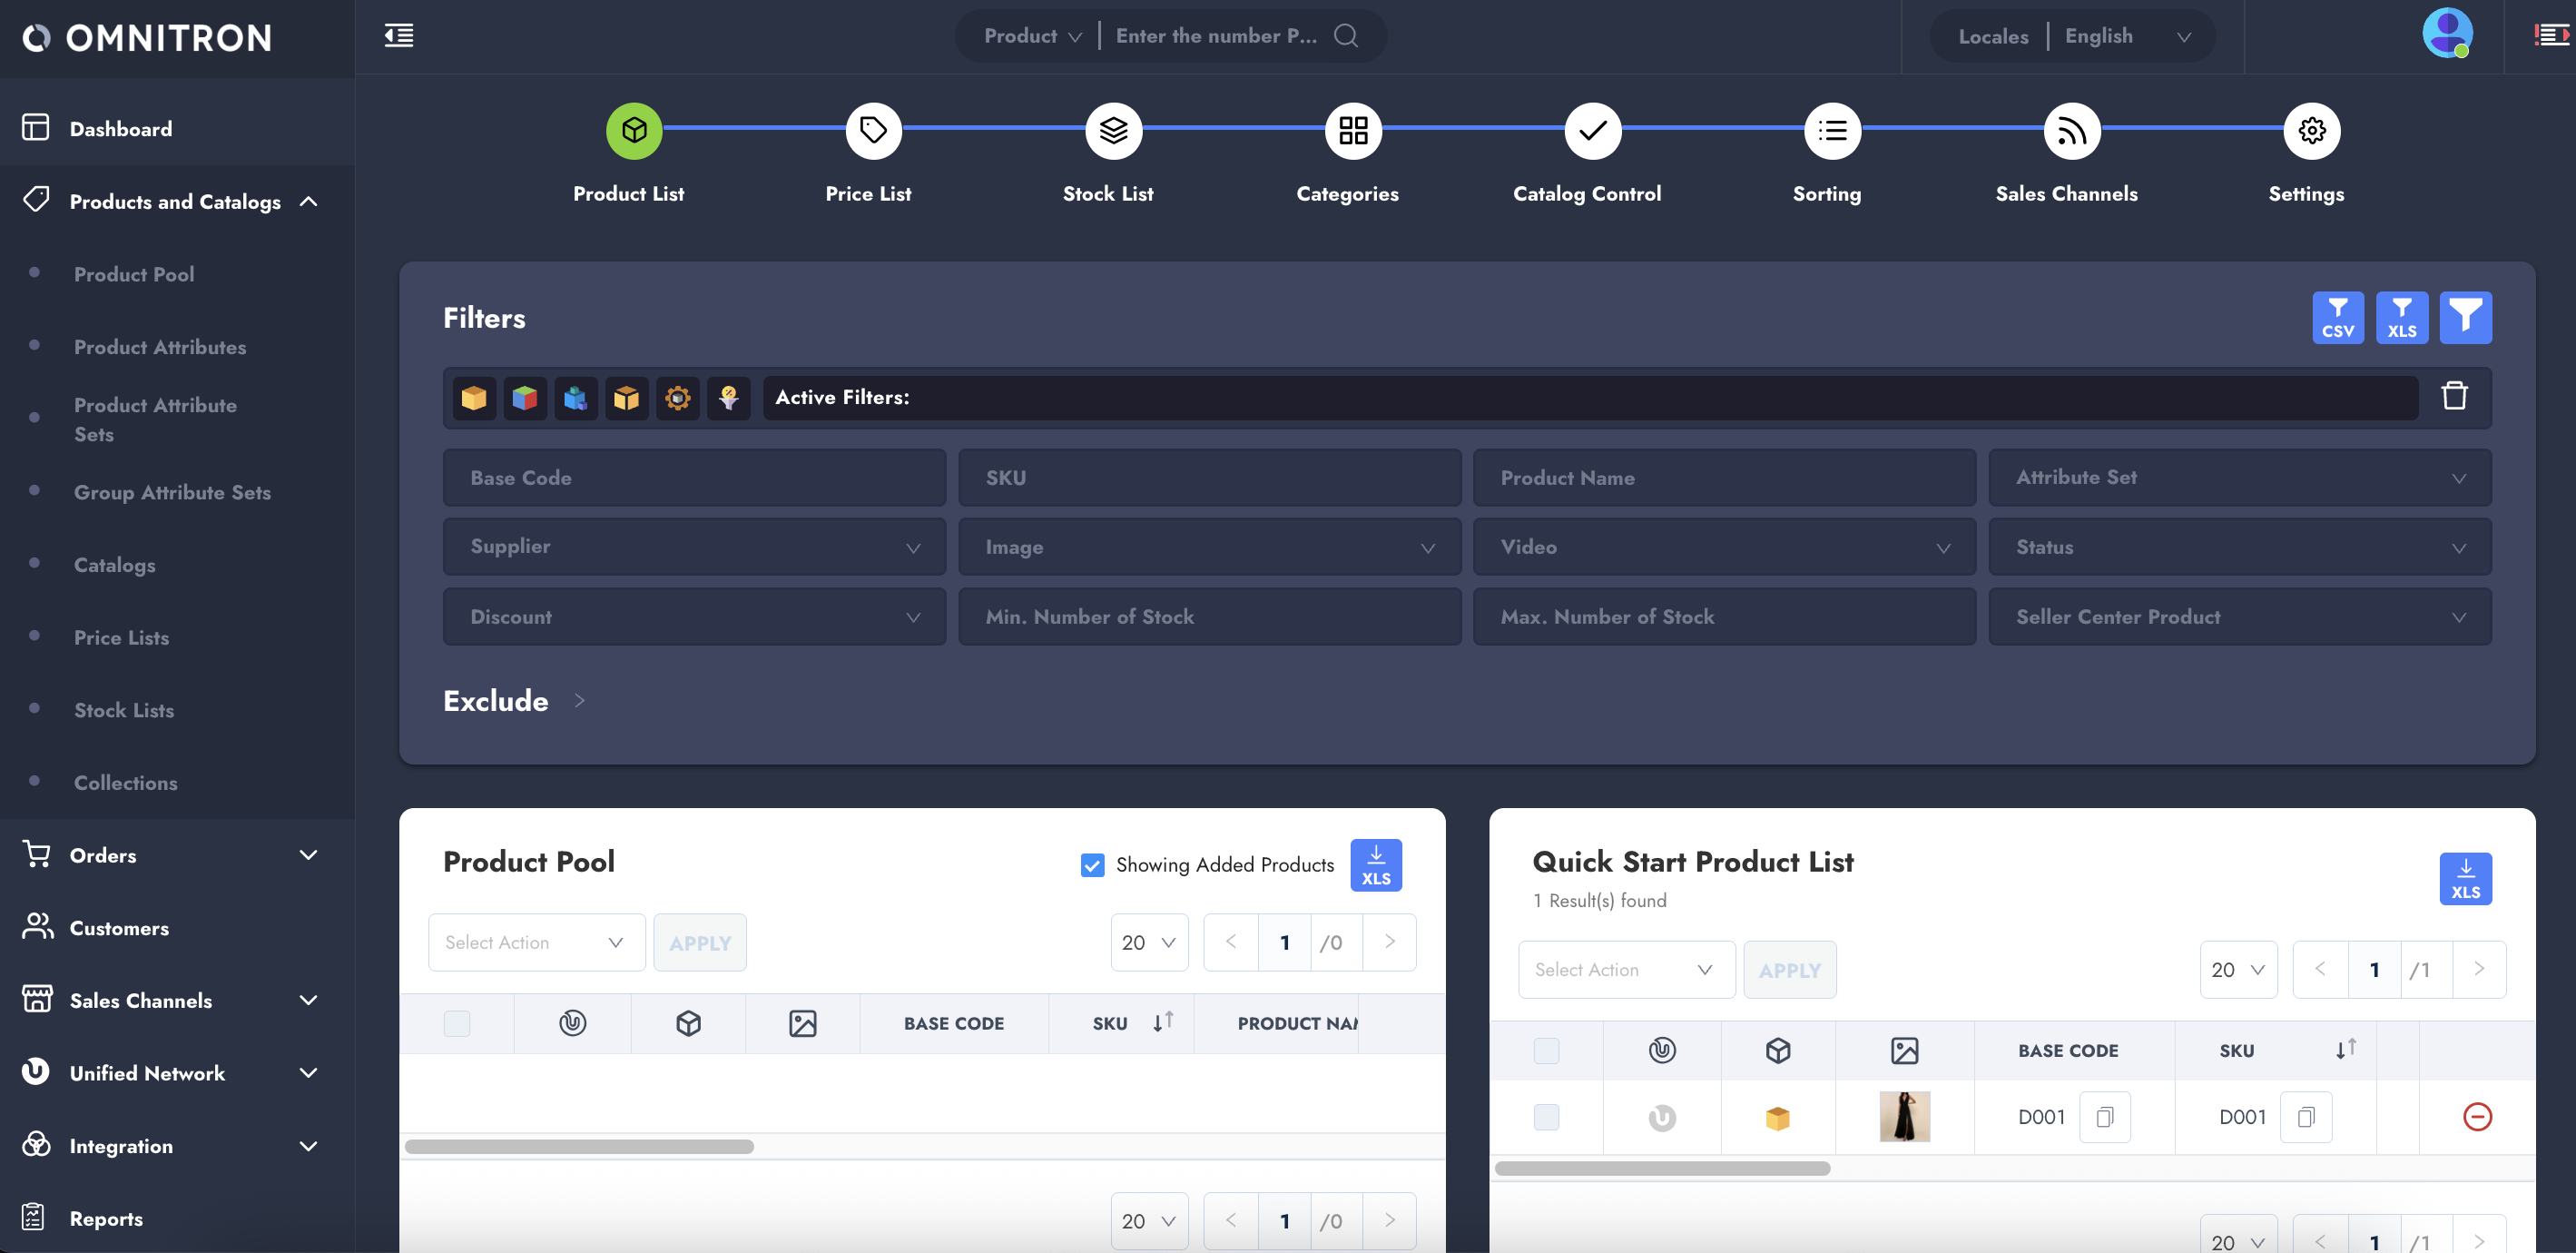
Omnitron stands as a **centralized operational hub** in Akinon, adeptly managing omnichannel operations **within a single center**. Users can easily control web sales channels and marketplaces using only Omnitron. It's the main product, and other products work together with it. While other tools rely on Omnitron to function, **Omnitron can also work on its own.**

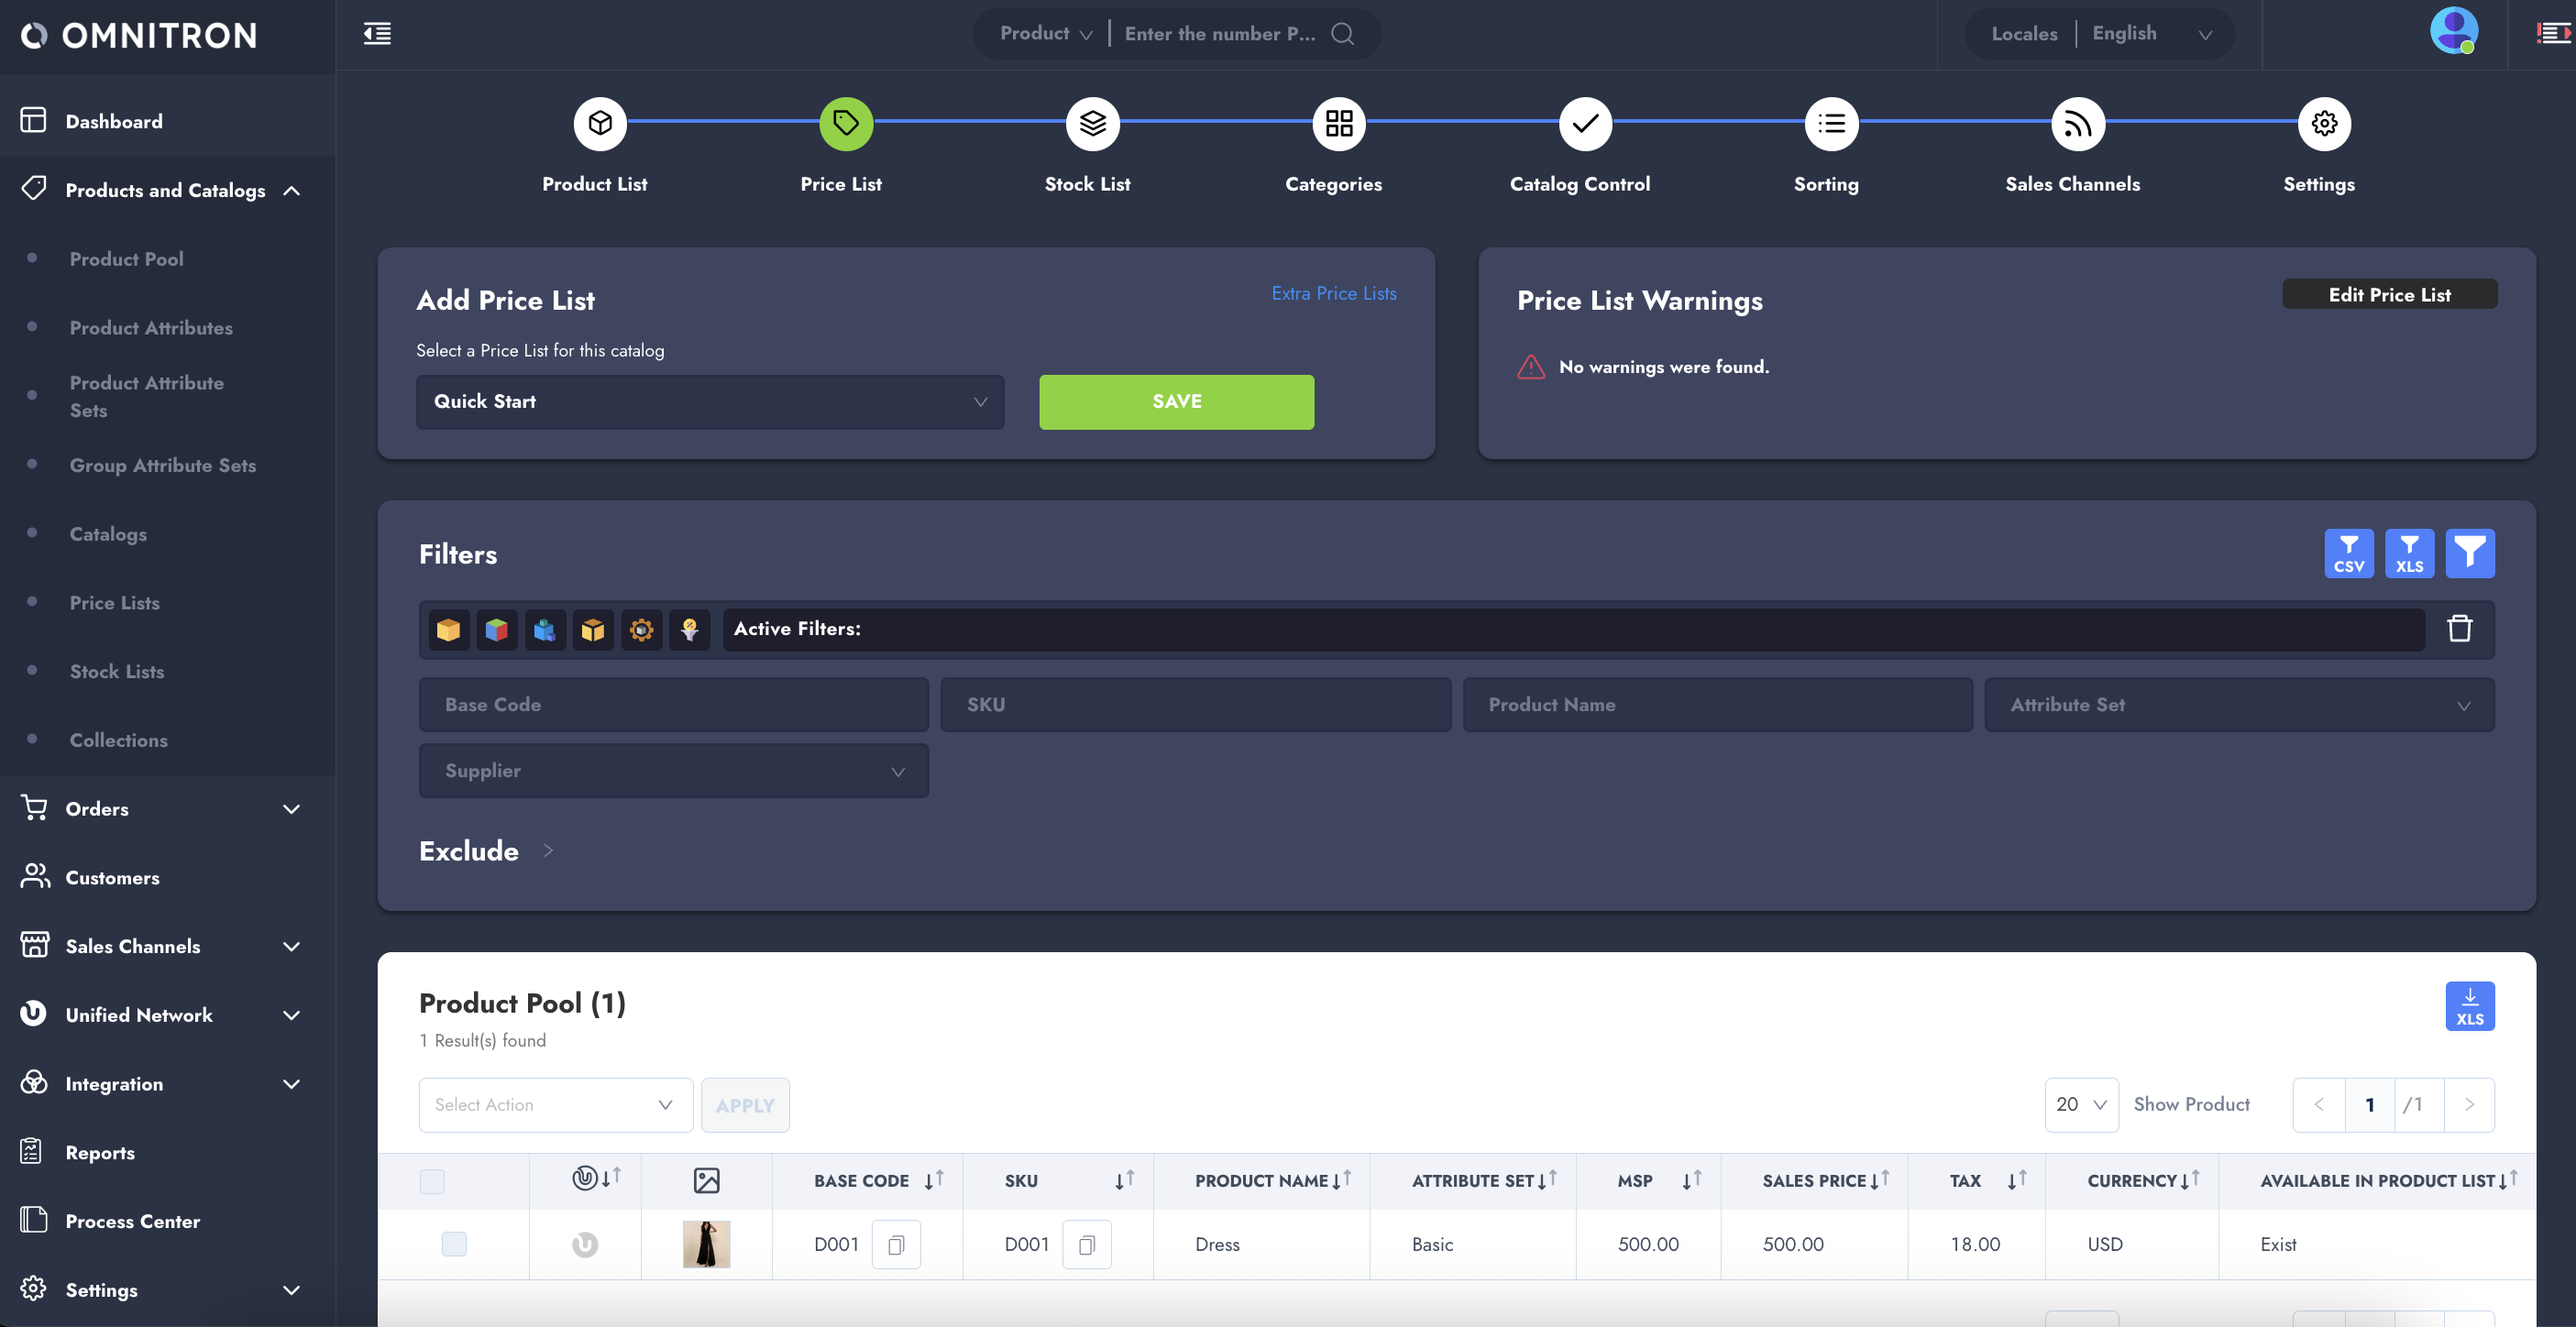
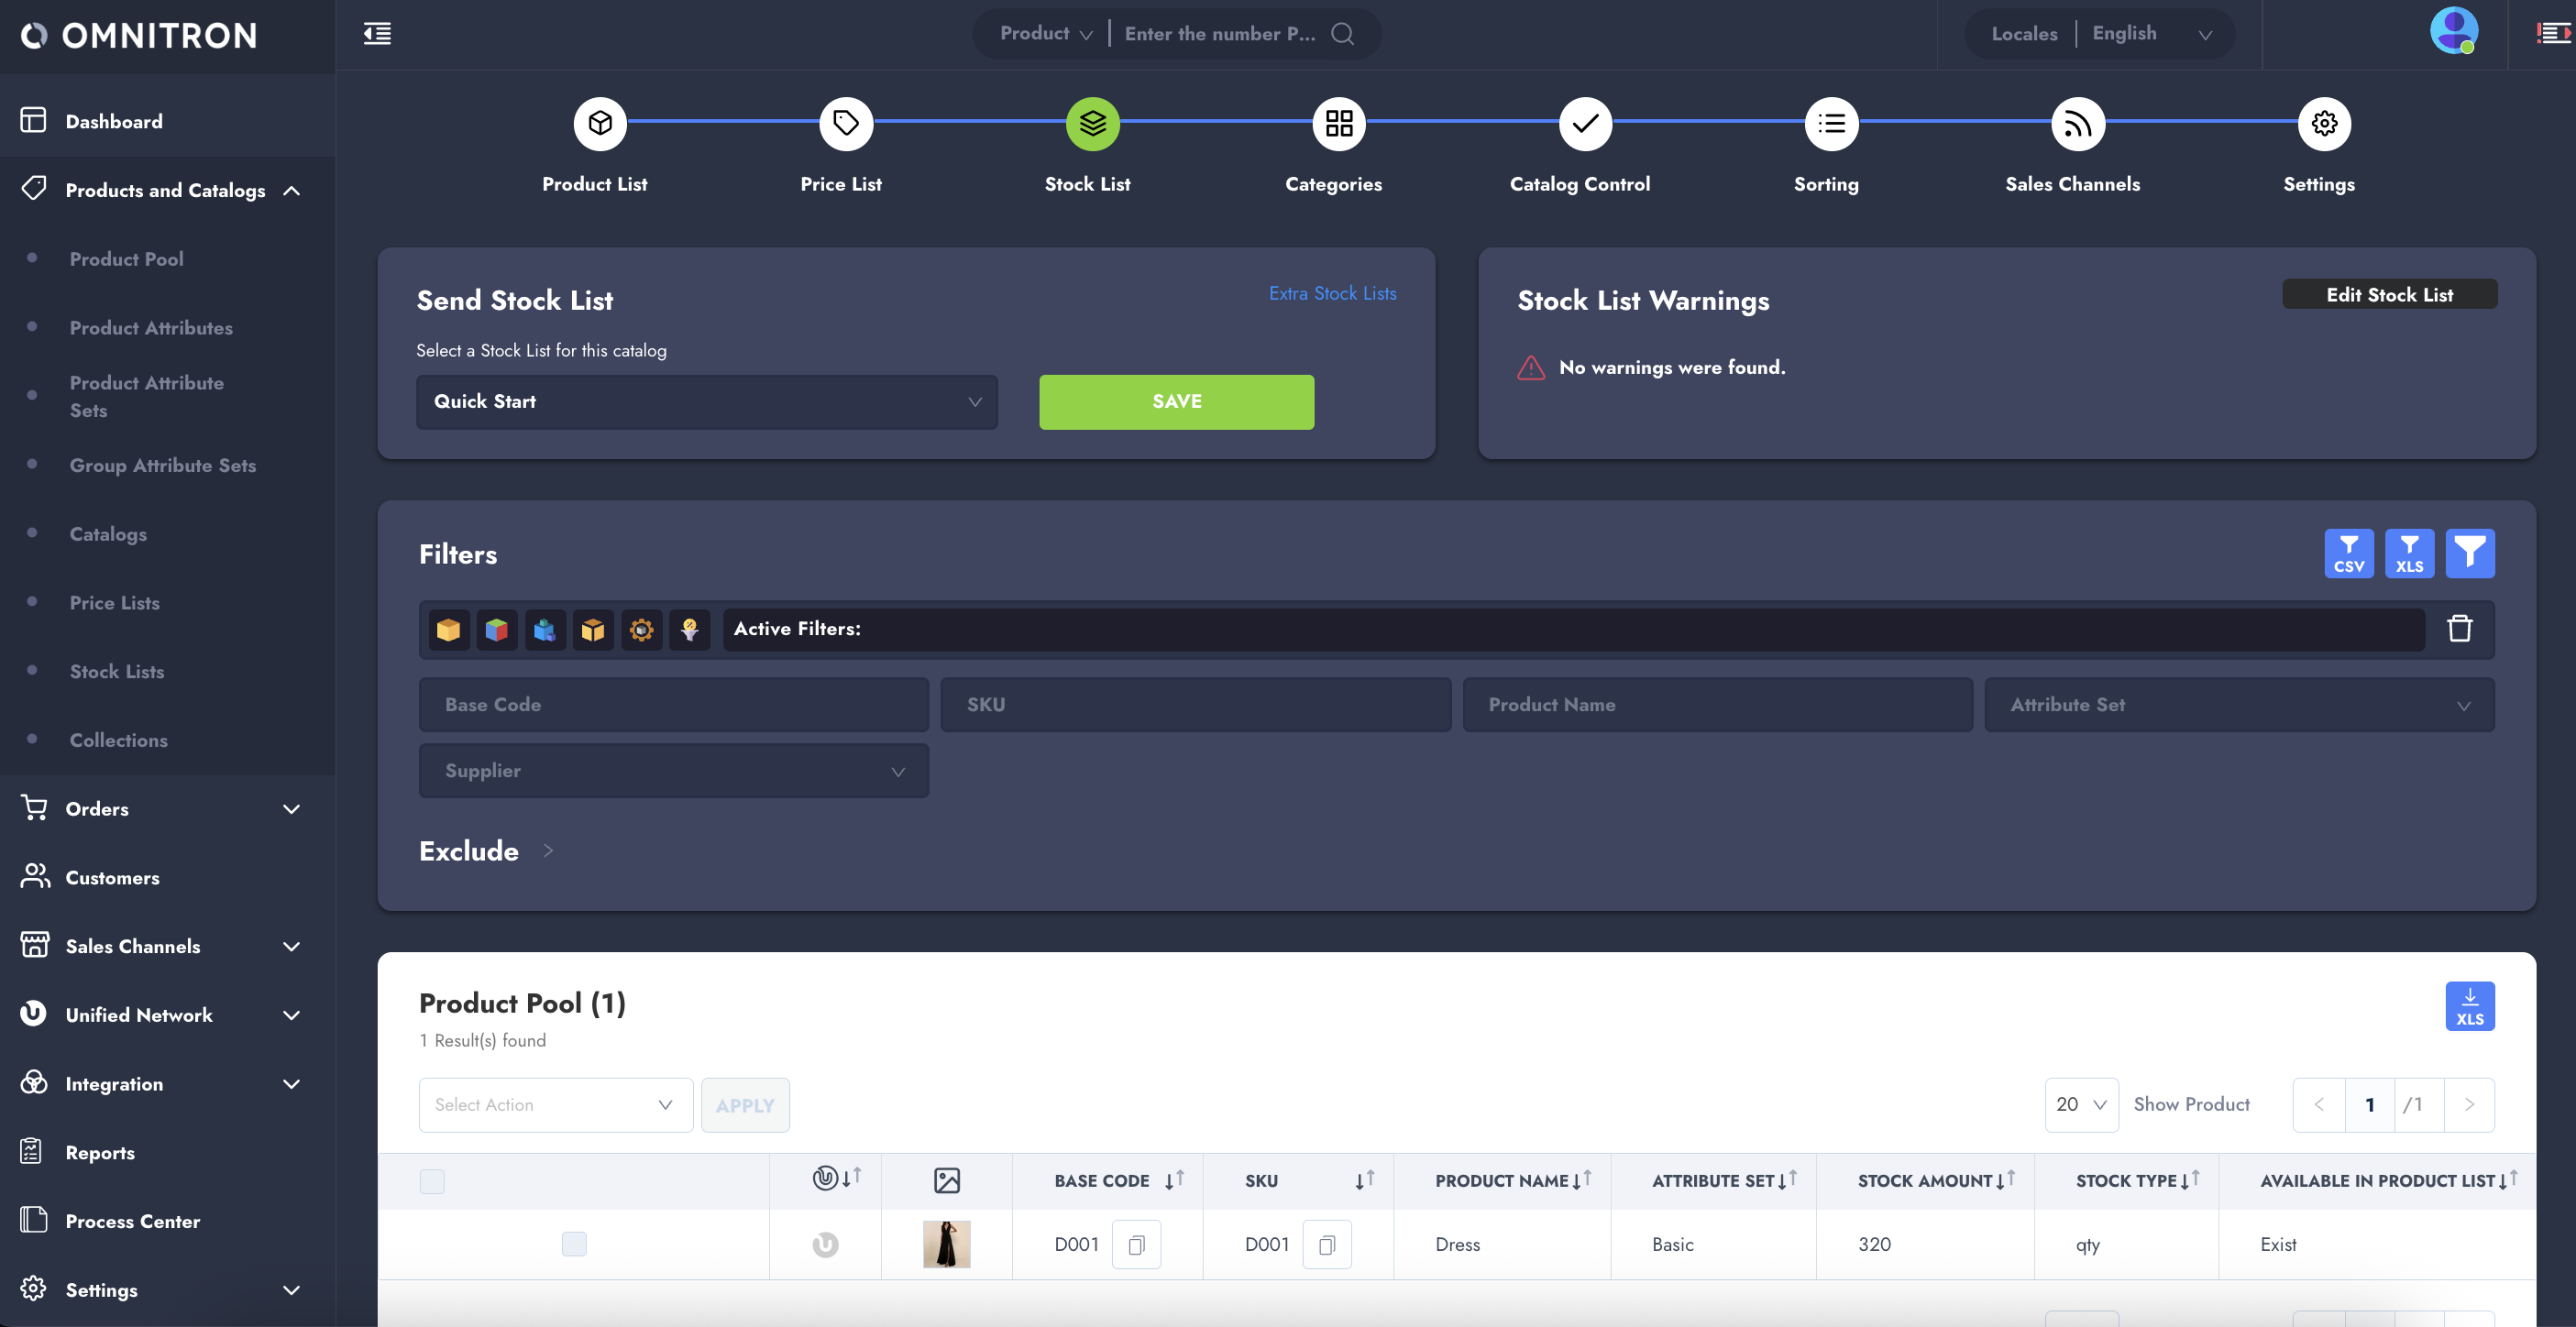
Integrating with existing ERP applications, Omnitron empowers business partners to digitally transform their product. Through its advanced catalog management system, along with integrated price and stock modules, products can be **managed across all digital channels**.

Moreover, Omnitron functions as a **dynamic operational hub**, providing business partners with the capacity to efficiently monitor and analyze customer interactions and orders across diverse digital sales platforms—ranging from websites and mobile apps to in-store e-commerce setups. This, in turn, equips them with the tools needed to effectively steer their omni-channel sales strategies.

<figure><img src="https://631770939-files.gitbook.io/~/files/v0/b/gitbook-x-prod.appspot.com/o/spaces%2FqYgu8awT5gZVeBgfOLiK%2Fuploads%2FuIU2oz9ax3MgBbAYbBLG%2Fimage.png?alt=media&amp;token=c69fea6a-8338-4173-a3a7-55d5350a3d7d" alt=""><figcaption></figcaption></figure>

## <mark style="color:red;">Omnitron Capabilities​</mark> <a href="#omnitron-capabilities" id="omnitron-capabilities"></a>

#### **Dashboard​**

Omnitron Dashboard provides users with extensive business statistics based on sales channels. It offers the option to filter by start and end dates along with sales channels to visualize business metrics. The dashboard presents an order table by time zone, showcasing top 5 products, cities, and categories.

#### **Product Information Management​**

Omnitron streamlines product management across multiple sales channels. Enhance product information through a user-friendly interface, covering addition, editing, and enrichment. This includes product attributes, attribute sets, types, and dynamic collections based on attributes.

#### **Catalog Management​**

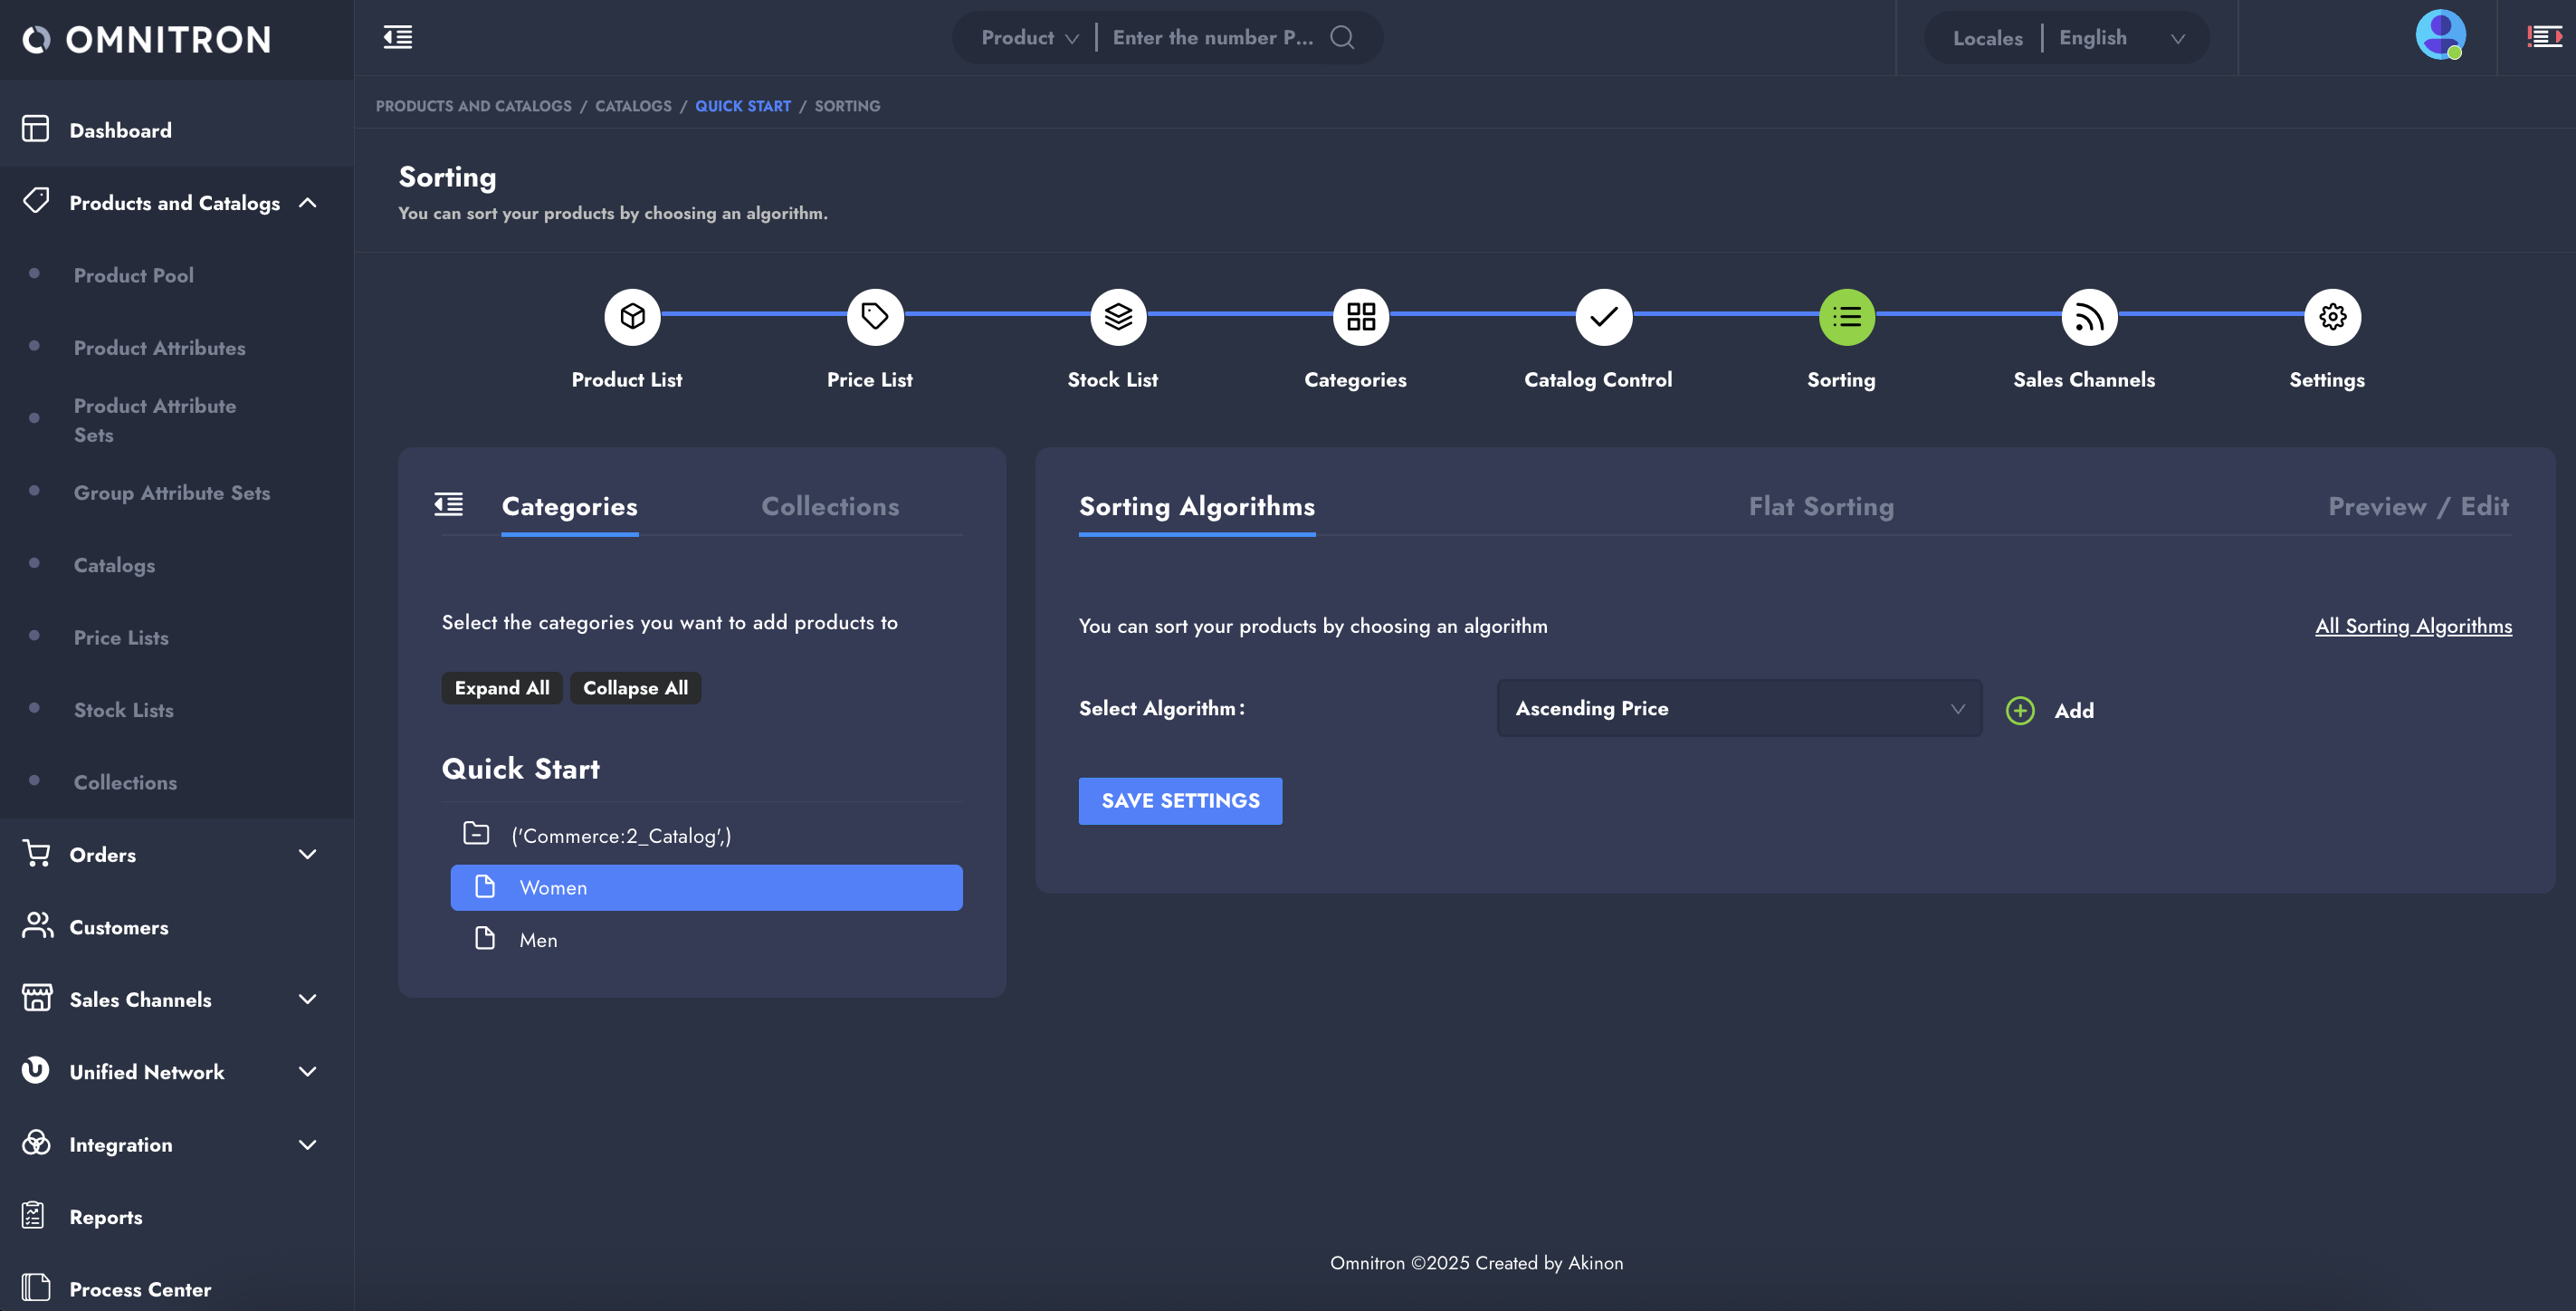
Users utilize catalog management to build a structured catalog and category tree, adding products and linking them to prices, stock lists, and sales channels. Relevant products are placed within their corresponding category in the tree. Products are sorted within categories or collections using algorithms or manual arrangement, ensuring optimal frontend display.

#### **Order Management​**

Omnitron enables order management across all sales channels, including cancellations, pending approvals, and transaction details. Omnitron periodically executes tasks to fetch and update order information for each sales channel.

#### **Content Management​**

Omnitron empowers dynamic website creation through content management. Widgets, flat pages, navigation menus, recommendation systems, custom campaigns, and mailing templates can be configured for enriched online experiences.

#### **Campaign Management​**

Digital campaigns and online marketing are oversaw for selected web sales channels using Omnitron. Campaigns, bulk coupons, and customized discount codes with specific customer conditions can be managed through campaign management.

#### **Payment and Shipping Options​**

Omnitron simplifies payment management by enabling POS integrations, bank and card management, and more for the selected sales channel. It also streamlines shipping options, allowing customization of fees, discounts, and shipping companies based on regional limits or product attributes.

## <mark style="color:red;">Key Features​</mark> <a href="#key-features" id="key-features"></a>

* **Unified Data Integration:** Omnitron offers a unified platform for integrating data from diverse sources, including databases, APIs, cloud services, and more.
* **Data Transformation:** Omnitron's intuitive mapping features effortlessly convert between diverse formats and structures for smooth data flow across applications.
* **Real-time Data Exchange:** Real-time data exchange between connected systems ensures critical information is always up-to-date and readily available.
* **Scalability and Performance:** Omnitron is engineered to handle large volumes of data and complex integration scenarios. Its scalable architecture ensures that the data integration processes remain smooth and responsive.
* **Security and Compliance:** Akinon places great importance on data security and compliance. Omnitron incorporates robust security measures, such as encryption and access controls, to safeguard sensitive information and adhere to industry regulations.
* **Monitoring and Analytics:** Omnitron's built-in monitoring and analytics tools provide valuable insight into data integration processes.
* **Seamless Integration with Akinon Ecosystem:** Omnitron seamlessly integrates with other Akinon products and services, expanding its capabilities and providing a comprehensive ecosystem for end-to-end data management.


# Commerce

Online shopping sites are one of the most popular internet components today. Thanks to the increasing sense of security and easy access in the recent years, its area of use has expanded and it has attracted larger audience groups. Many new companies and members of the traditional commerce industry who wish to respond to this interest and demand now take an interest in e-commerce. Various technologies and systems are developed to help the development of e-commerce platforms in line with user experience. One of such systems is the platform model called “Headless E-commerce”.

In the simplest terms, “Headless E-commerce” refers to e-commerce platforms where front-end and back-end codes are designed, constructed and developed individually and separately. In shopping sites serving on Headless E-commerce platforms, these two ends are designed separately. While back-end is used for content and application management, front-end is responsible for visuals and design.

In traditional e-commerce models, back-end and front-end layers are intertwined and interdependent. However, those models slow down adaptation of the system to changing business models and rapidly evolving industrial developments. Therefore, companies have started to opt for Headless E-commerce model.

<figure><img src="https://631770939-files.gitbook.io/~/files/v0/b/gitbook-x-prod.appspot.com/o/spaces%2FqYgu8awT5gZVeBgfOLiK%2Fuploads%2Fu67xJueaH4viFrHOI8Y1%2Fimage.png?alt=media&amp;token=97ea968c-347f-46a2-8dab-ec720b414872" alt="" width="563"><figcaption></figcaption></figure>

APIs are one of the main components of Headless E-commerce system. When users interact with the front-end components of an online shopping website (such as clicking on an item to go to the product details page), API (Application Programming Interface) sends a request to the server, which is a back-end component. The server reads the request and in response, sends required data to the API link. This data is processed by a browser and the interaction launched on the site is performed.

While the back-end platforms such as CMS, CRM and OMS run products, content and orders, front-end functions serve as a shopfront. The Headless E-commerce structure allows you to use the same infrastructure to design your shopfront individually and uniquely to suit your products, brand and customers.

{% hint style="warning" %}
For brands using Akinon, appending `?format=json` to the end of their shop URLs allows them to access their shop data in JSON format.&#x20;

Alternatively, the same result can be achieved by sending the `Accept: application/json` header in the request.&#x20;

This functionality provides a structured and standardized way to retrieve information such as product details, categories, basket details, and more.
{% endhint %}


# Order Management System (OMS)

Order management system (OMS) is the **orchestration tool that manages the process of preparing and shipping the order** conducted by the supplier. It coordinates the **selection of warehouses for order packaging** and **manages the necessary transfers on a warehouse-specific basis**. After the packaging phase is completed, OMS also handles the **delivery of packages to customers and ensures order owners are promptly informed**, regardless of the sales channel.

OMS is a highly **integrated system that connects within Akinon Infrastructure and third-party systems**, including cargo companies and ERP systems. Its operation is closely tied to **Omnitron**, as orders from various sales channels are channeled through Omnitron. When an order reaches Omnitron, OMS duplicates the order using **webhooks and celery tasks**, capturing all order specifications for processing.

The **Instore backend** relies on OMS API endpoints for managing packages, transfers, and associated commands. Essentially, it acts as a front-end interface for store and warehouse personnel, providing them direct access to OMS functionalities.

Furthermore, OMS can be integrated into an **Integrator flow** for tasks such as invoice processing and stock management. This integration streamlines and automates these crucial aspects.

In the context of tracking shipment statuses, OMS maintains multiple **integrations with various cargo companies**. These integrations enable real-time queries into the current status of shipments.

<figure><img src="https://631770939-files.gitbook.io/~/files/v0/b/gitbook-x-prod.appspot.com/o/spaces%2FqYgu8awT5gZVeBgfOLiK%2Fuploads%2F7SDFcVl3x6aaNjrQdSBO%2Fimage.png?alt=media&amp;token=54a6e703-60ca-4b6d-8e25-5a434abb3712" alt="" width="375"><figcaption></figcaption></figure>

## <mark style="color:red;">OMS Capabilities​</mark> <a href="#oms-capabilities" id="oms-capabilities"></a>

OMS allows businesses the capability to consolidate inventory data from diverse global locations, consolidating it into a singular, easily accessible platform. Moreover, it enables the streamlined processing of orders that originate from different sales channels, presenting a unified overview and control over the entire order management process from a single, centralized interface. This not only simplifies operations but also enhances efficiency and accuracy when it comes to inventory management and fulfilling customer orders.

### **Scenarios​**

Scenarios are predefined process workflows within the OMS that dictate how orders are managed and processed. Each scenario is configured with specific rules and conditions that guide the system on how to handle different order types, considering their unique characteristics and demands.

When an order is placed through any of your sales channels, Akinon OMS activates the appropriate scenario to determine how the order should be fulfilled. This scenario evaluates the order's attributes, such as the items in the order, customer preferences, delivery location, and other relevant factors.

### **Fulfillment​**

The OMS fulfillment process starts when a customer places an order. Then, based on scenarios and stock integration with Inventory Locations, the OMS determines the sourcing of items, packing methods, and the shipping route for the order. Once the order reaches the customer successfully, the OMS concludes the process and updates relevant records.

### **Package and Transfer Commands​**

Commands act as the drivers of actions within the order fulfillment process. They consist of a set of predefined instructions that dictate how packages and transfers are to be managed at various stages. When an order is received, the system generates one or more packages that contain the purchased items. These packages are then prepared for shipping and delivering them to the customer by using these commands.

### **Inventory Locations & Engine​**

Inventory Locations in Akinon OMS represent physical locations where products are stored within your business's supply chain. These locations can include retail stores, warehouses, or distribution centers. Each Inventory Location holds details about available products, like quantities and variations.

During the fulfillment process, the OMS utilizes the rules defined within the predefined scenarios to determine how to fulfill the products specified in an order. It checks the Inventory Engine to understand the current stock levels across the diverse inventory locations in your supply chain.

### **Event Listeners and Webhooks​**

Event Listeners and Webhooks serve as a bridge for communication between OMS and external systems or services. Within the context of the OMS, Webhooks provide a way for external applications to receive real-time updates about specific events that occur within the OMS. When a particular event, such as order fulfillment, takes place in the OMS, a Webhook is triggered to send a secure notification to an external endpoint specified by the receiving system.

### **Package and Transfer Services​**

Services refer to the collection of programming interfaces or endpoints within Akinon OMS that allow external applications or systems to interact with the packaging, transfering and shipping processes. These APIs enable businesses to programmatically generate packaging and transferring instructions, create packages and transfers, and retrieve shipping information. Through Packages API Services, developers can integrate external systems with Akinon OMS to automate packaging and transfer commands, and track the movement of packages.

## <mark style="color:red;">General Order Flow​</mark> <a href="#general-order-flow" id="general-order-flow"></a>

When a customer places an order through any sales channel, Akinon's (OMS) initiates a flow. It transforms this incoming order into a structured **Work Order**. To guide this transformation process, the OMS relies on a set of predefined rules called **Packaging** and **Transfer Rules**, which are configured within the system's **Scenarios**. These rules are essentially a set of instructions that dictate how the Work Order should be handled.

Once these rules are applied, the Work Order is divided into two distinct types: **Packaging Orders** and **Transfer Orders**. This categorization is not random; it adheres to the rules defined earlier. Packaging Orders deal with products that will be packed and shipped from the same location, while Transfer Orders deal with items that need to be moved from one store to another before shipping.

Now comes the next step: assigning these categorized orders to the right place for further processing. The OMS excels at this task, using its knowledge of your inventory and locations to make the best possible decisions. **Packaging Orders** are sent to appropriate **Packaging Locations**, where items are prepared for shipment, while **Transfer Orders** are assigned to **Stock Locations**, ensuring that the required products are in the right place for efficient shipping.

The following flowchart is provided for a better understanding of the order flow within OMS.

<figure><img src="https://631770939-files.gitbook.io/~/files/v0/b/gitbook-x-prod.appspot.com/o/spaces%2FqYgu8awT5gZVeBgfOLiK%2Fuploads%2FNV5ARzJ3GJpfXRq8YGTL%2Fimage.png?alt=media&amp;token=e366205b-3f64-4988-ac77-423a2a803836" alt=""><figcaption></figcaption></figure>


# Instore

The Akinon Instore application is a **versatile web application compatible with mobile and tablet devices**. It facilitates Instore users' swift access to and **management of customer profiles, product stocks, packaging, and transfer processes**, with the overarching goal of creating a flawless omnichannel customer experience.

<figure><img src="https://631770939-files.gitbook.io/~/files/v0/b/gitbook-x-prod.appspot.com/o/spaces%2FqYgu8awT5gZVeBgfOLiK%2Fuploads%2FCXtPpsDpfDcOzfPvTOjj%2Fimage.png?alt=media&amp;token=055ac7cc-5714-48cf-83e9-4090d27784ea" alt="" width="357"><figcaption></figcaption></figure>

Integrated with Commerce, Omnitron BE, Omnitron FE, and OMS, the Instore application empowers **store and warehouse employees to efficiently utilize Akinon applications** and their functionalities. The subsequent section provides an in-depth exploration of the capabilities and concepts inherent in the Akinon Instore application.

## <mark style="color:red;">Instore Capabilities​</mark> <a href="#instore-capabilities" id="instore-capabilities"></a>

#### Customer Management​ <a href="#customer-management" id="customer-management"></a>

Akinon Instore is a dynamic application enabling brands to generate new customer profiles and place orders for customers directly within the store.

#### Product Management​ <a href="#product-management" id="product-management"></a>

The Instore application compiles a list of products entered through the Omnitron channel. Store employees can check the listed products, filtering, sorting, and searching according to specific criteria. Instore facilitates sales transactions for the designated customer.

#### Completing an Order​ <a href="#completing-an-order" id="completing-an-order"></a>

The Instore application interacts with Commerce APIs, streamlining order transactions. By selecting a customer through the Instore app, basket information becomes accessible. This basket serves as the foundation for completing payment transactions and converting in-store orders. During checkout, various transactions, such as creating a new customer address, selecting a shipping company, and choosing a payment method, can be effortlessly executed. Instore provides diverse payment options, including Pay with QR, Cash, and IVR, ensuring a swift and efficient payment process.

#### Order Management​ <a href="#order-management" id="order-management"></a>

* **Order Returns**

  Order returns involve cancellation/return requests initiated for orders or products through the Instore platform. Requests received via the Akinon Instore application are transferred to Omnitron.
* **Click & Collect Orders**

  The Click & Collect system empowers store employees to manage package and order operations, even if the OMS system is not fully integrated into the Instore app.
* **Click & Collect Acceptance**

  Click & Collect Acceptance involves the transfer of prepared orders from one store to another, particularly if the order contains out-of-stock products. Customers are notified via email once the product reaches the store where the order originated.
* **Click & Collect Delivery**

  This process allows for the delivery of in-store pickup orders directly to the customer by the store using the assigned order number.

#### Package Management​ <a href="#package-management" id="package-management"></a>

* **Package Orders**

  Managing the packaging operation of an order is facilitated through Package Orders, employing defined scenarios. Instore utilizes Akinon OMS functionalities to list, filter, print, and sort packages based on their status. Operations such as shipping, preparing for customer delivery, marking a package as out of stock, and rescheduling the package transfer can be executed.
* **Transfer Orders**

  Transfer Orders manage the transfer processes of orders between stores, also managed through Akinon OMS functionalities. The Transfer Orders page allows for listing, filtering, printing, and sorting transfers based on desired statuses, simplifying brand-wide transfer operations.

#### Settings Management​ <a href="#settings-management" id="settings-management"></a>

The Instore application allows for the definition of special settings for individual stores. This includes tasks such as adding a logo, changing language preferences, adjusting font styles, and defining general color schemes. Additionally, stores have the flexibility to customize layouts and functionalities according to their specific preferences.


# Integrator

Integrator offers a suite of integration services for **synchronizing pricing, stock, product information, image handling** (including Image and ImageS3), and **optimizing order-related operations** (including Order, Order Status, and Order Cancellation). It provides a robust and flexible solution to meet all your integration needs.

**The data originating from the ERP system** (including stock, pricing, product information, image, order status, etc.) is **processed and written into Omnitron**. In the case of order data, Integrator efficiently reads it from Omnitron and securely writes it back into the ERP systems.

Once brands upload product images to S3 Buckets, Integrator **reads and writes these images into Omnitron** using the Image S3 flow within the Integrator.

Integrator also includes a built-in **logging system as part of its internal logging mechanisms**. It retains logs for **up to 15 days** before automatically deleting them. These logs hold a record of data transmitted through the Integrator.

Moreover, Integrator allows for the integration of [OMS](/products/order-management-system-oms) (Order Management System) into its flow, enabling streamlined tasks such as invoice processing and stock management.

<figure><img src="https://631770939-files.gitbook.io/~/files/v0/b/gitbook-x-prod.appspot.com/o/spaces%2FqYgu8awT5gZVeBgfOLiK%2Fuploads%2FHm5FoReXM0wDfES56Kaf%2Fimage.png?alt=media&amp;token=2eb6d54a-419e-44be-ab98-25a410353c10" alt="" width="375"><figcaption></figcaption></figure>

## <mark style="color:red;">Main Functionalities of Integrator​</mark> <a href="#main-functionalities-of-integrator" id="main-functionalities-of-integrator"></a>

#### **1. User-Friendly Integration Flow Designer:​**

* Integrator offers an intuitive integration flow designer interface.
* It comes equipped with a library of pre-defined flow components developed by Akinon, making it effortless for partners to configure every step of an integration flow.
* This includes tasks like reading data from a source, defining transformation maps, and sending data to the target system.

#### **2. Alert Configuration:​**

* Integrator provides the capability to set up and configure multiple alerts to proactively handle potential errors or issues in the integration process.
* These alerts ensure that any anomalies or disruptions are promptly addressed, minimizing downtime and data discrepancies.

#### **3. Comprehensive Log Monitoring:​**

* The platform boasts a comprehensive log monitoring functionality that serves as an invaluable tool for identifying errors and diagnosing issues in the integration processes.
* This robust monitoring system allows for efficient troubleshooting, ensuring that problems are quickly resolved to maintain data integrity and system reliability.

#### **4. Web-Accessible Performance Monitoring​**

* Integrator offers a web-accessible performance monitoring interface based on predefined performance metrics.
* Users can assess the efficiency and effectiveness of their integration flows using metrics such as success rates and average flow times.
* These insights into the system's overall performance allow for continuous optimization and fine-tuning of integration processes.

Integrator is a robust platform that facilitates data integration while prioritizing reliability, stability, and performance of essential processes. It offers technical tools and extensive functionalities for configuring intricate integration flows and monitoring system performance.


# Marketplace Dashboard (MPD)

**Marketplace Dashboard** is a centralized management tool that enables brands to integrate and manage their product listings, orders, and operations across multiple third-party marketplaces—such as **Trendyol, Hepsiburada, Amazon, n11**, and others.

In today’s ecommerce landscape, selling through marketplaces is essential for reaching a wider customer base. However, each marketplace has its own set of rules, operational workflows, and data requirements. Managing them individually can be time-consuming, error-prone, and inefficient.

Marketplace Dashboard solves this problem by acting as a **unified control panel** for marketplace operations. It connects with **Omnitron**—the brand’s central data hub—and ensures that product data, stock levels, order statuses, shipment details, and returns are all synchronized between the brand and each marketplace in real time.

Instead of building a separate integration for each marketplace, brands can use Marketplace Dashboard to:

* Configure each marketplace channel individually
* Adapt to marketplace-specific capabilities
* Track and resolve operational issues
* Maintain consistent and up-to-date product information
* Automate complex workflows like partial cancellations, returns, and package splits

By simplifying the technical complexity of multi-channel e-commerce, Marketplace Dashboard helps brands scale their marketplace presence efficiently and reliably.

## <mark style="color:red;">Marketplace Dashboard Capabilities</mark>

### <mark style="color:red;">**Marketplace-Specific Setup and Management**</mark>

Each Marketplace Dashboard instance is deployed and configured independently for every marketplace platform. This modular approach allows brands to tailor configurations based on the specific requirements, and operational structures of each marketplace. While **Omnitron** acts as the central data source, each dashboard operates as an isolated unit, enabling marketplace-specific workflows and integrations.

### <mark style="color:red;">**Smart Channel Compatibility**</mark>

Marketplace Dashboard intelligently adapts to the supported capabilities of each marketplace. Only the available and relevant functions are activated for use—ensuring a clean, efficient, and compliant integration setup. This eliminates unnecessary configuration overhead and guarantees operational alignment with the marketplace's native capabilities.

### <mark style="color:red;">**Real-Time Order Synchronization**</mark>

Orders generated on marketplaces are instantly transferred to Omnitron. In return, updates made in Omnitron—such as order statuses, shipping details, or invoice data—are transmitted back to the respective marketplaces. This **real-time, bidirectional sync** ensures seamless and uninterrupted order lifecycle management.

### <mark style="color:red;">**Advanced Logging and Monitoring**</mark>

Marketplace Dashboard includes a powerful logging system that retains data for up to 15 days. These logs provide complete traceability for all data transactions, helping teams to track integration flows, monitor success and error logs, and quickly identify and resolve potential issues during synchronization or operational processes.

### <mark style="color:red;">**Flexible Operational Workflows**</mark>

The platform supports a wide range of marketplace-specific operational scenarios such as **package splitting**, **return approval**, **return rejection**, and **partial cancellations**. This flexibility allows brands to easily manage complex operations that may arise from diverse marketplace rules and customer behaviors.

### <mark style="color:red;">**Full Integration for Media and Product Data**</mark>

Product images, price lists, and descriptions are fully synchronized from Omnitron to connected marketplaces. This ensures that all product data is **always accurate, up to date, and complete** across all platforms. Marketplace Dashboard eliminates manual updates and provides confidence in consistent data presentation.


# Project Zero (PZ)

Project Zero is a foundational framework designed to **create scalable, user-friendly, and feature-rich e-commerce websites**. This project is built with consideration for both developers and end-users, **serving as a storefront project that caters to the needs of both**.

Project Zero conducts its operations **through continuous communication with Commerce**. Commerce, functioning as a bridge, facilitates integration with other Akinon products, enhancing Project Zero's efficiency.

<figure><img src="https://631770939-files.gitbook.io/~/files/v0/b/gitbook-x-prod.appspot.com/o/spaces%2FqYgu8awT5gZVeBgfOLiK%2Fuploads%2FCy1H8VynvGYchvht5pIc%2Fimage.png?alt=media&amp;token=4303958b-0e48-4c79-99f7-641a15c603c1" alt="" width="260"><figcaption></figcaption></figure>

## <mark style="color:red;">Technological Advancements​</mark> <a href="#technological-advancements" id="technological-advancements"></a>

In the development of Project Zero, we are committed to **staying at the forefront of the latest technologies** and seamlessly integrating these cutting-edge advancements into our project's development process. At Akinon, we don't just keep a watchful eye on technological innovations; we **actively participate in the integration and testing of these technologies** within the project.

This approach ensures that our project is continually **open to refinement**, with the goal of **enhancing the user experience, boosting performance**, and **meeting the evolving needs of the future**, all while being built on the following latest technologies.

<figure><img src="https://631770939-files.gitbook.io/~/files/v0/b/gitbook-x-prod.appspot.com/o/spaces%2FqYgu8awT5gZVeBgfOLiK%2Fuploads%2FXgcSmGndIOOfzElHuWzG%2Fimage.png?alt=media&amp;token=eb8b3441-6f05-4b4a-89e1-3501af05b028" alt="" width="494"><figcaption></figcaption></figure>

## <mark style="color:red;">Project Zero Capabilities​</mark> <a href="#project-zero-capabilities" id="project-zero-capabilities"></a>

#### **Multi-Language Support​**

Project Zero offers multi-language support to meet users’ needs. This feature simplifies the transition between different languages, aiming to deliver a user-friendly experience.

#### **Multi-Currency Support​**

Project Zero also provides support for multiple currencies, allowing for the display of product prices in the preferred currency and enabling payments in that currency.

#### **Theme System​**

Project Zero enables users to create customizable themes, providing the flexibility to create themes tailored to specific needs with different color palettes, layouts, and style options.

#### **Plugin System​**

One of the key features of Project Zero is its modular plugin system, offering flexibility and extensibility. This system allows for the integration of various plugins stored in separate repositories, each serving specific functions.

The active list of plugins includes:

* **Masterpass:** This package allows users to make payments with cards registered with Masterpass on the payment page. It also enables actions such as listing registered cards, adding new cards, and removing cards.
* **GPAY:** This package facilitates payments with 'Garanti Pay' on the payment page.
* **OTP:** This package provides SMS verification (OTP) support for processes like registration and updating profile information.
* **Click & Collect:** This package activates the in-store pickup option.
* **Basket Gift Pack:** This package allows for the addition of gift wrapping and gift notes to products on the cart page, or simply the inclusion of gift notes.
* **Checkout Gift Pack:** This package enables the addition of gift wrapping for products on the payment page.
* **Checkout Providers:** This package is used to incorporate various payment methods, including the Akifast payment method.
* **Redirection Payment:** This package is used to enable payment options involving redirection on the payment page.


# Seller Center

Seller Center is Akinon’s dedicated interface designed to empower marketplace owners (MPOs) and third-party vendors (marketplace sellers) by enabling seamless integration and management of their operations within the Akinon ecosystem. While Omnitron serves as the operational hub for brands and retailers, Seller Center provides MPOs with a streamlined portal to manage their products, orders, and campaigns for the marketplace.

By offering a modular and intuitive platform, Seller Center enables Sellers to onboard easily, update their product catalogs, track inventory, monitor order status — all within a secure, role-based access environment.

With its native integration to Omnitron and Akinon Commerce Cloud, Seller Center ensures real-time synchronization of key business data, enhancing operational efficiency for marketplaces and contributing to a unified omnichannel experience for end customers.

## <mark style="color:red;">Seller Center Capabilities</mark>

#### **Product Onboarding & Management**

Sellers can effortlessly add and manage product information, including titles, descriptions, images, stock levels, and pricing. Bulk uploads and dynamic editing options enable seamless catalog updates. These actions constitute as “offers” and are subject to approval by MPOs. MPOs’s role enables them to either approve or reject such changes or additions before publishing them through the marketplace.

#### **Order Tracking & Fulfillment**

Seller Center offers full visibility into order lifecycle from placement to shipment. Sellers and MPO’s based on their authorization can manage cancellations, shipment details, shipment vendors and returns directly through the interface.

#### **Campaign Participation & Reconciliations**

Sellers can join platform-wide marketing campaigns, apply discount rules, and create personalized offers with predefined approval flows. Such campaigns are created by MPOs with the help of Omnitron and visible in Seller Center for further participation and control.Also Reconciliations tab allows MPOs to adjust payable amounts to the sellers based on the agreements made through the system between MPOs and Sellers.

#### **Inventory & Pricing Sync**

Sellers can define their own inventory and pricing as they are the ones who are selling their products in the marketplace. Automatic synchronization with Omnitron ensures accurate stock and price data, minimizing overselling or inconsistencies.

#### **Role-Based Access**

Different capabilities and authorizations are given to the role of MPOs and Sellers to ensure operational clarity and efficiency. As the overall control of the platform is given to the MPOs, they are responsible for approving or rejecting any changes or additions made in the system.

#### **Reporting & Analytics**

Seller Center provides sellers and MPOs with insights into product performance, order trends, and campaign effectiveness through dashboards and downloadable reports.

## <mark style="color:red;">**Key Features**</mark>

* Secure Seller Environment: Isolated workspaces for vendors with user-based access controls.
* Real-Time Sync: Ensures consistency of data across Seller Center and Omnitron.
* Performance Insights: Track key KPIs including top-selling products, order volumes, and customer locations.
* Quick Onboarding: Guided flows and API-based integrations for seamless seller setup.
* Collaboration-Ready: Designed for being the bridge between MPOs and Sellers in a marketplace environment.


# App Maker

**App Maker** is a powerful and flexible mobile application framework designed to help partners and customers build feature-rich, user-focused e-commerce apps. Built with **React Native**, it offers reliability, cross-platform compatibility, and a robust development ecosystem. App Maker delivers smooth shopping experiences for users and efficient workflows for developers.

Integrated with the **Akinon ecosystem** via Commerce, App Maker enables seamless collaboration with other Akinon products. It allows partners to easily create, customize, and deploy e-commerce apps. This introduction gives you a clear overview of App Maker’s capabilities, technology stack, and the value it brings to businesses, developers, and technology providers.

## <mark style="color:red;">Technologies Used</mark>

* **React**
* **React Native**
* **JavaScript**
* **Node.js**

## <mark style="color:red;">App Maker Capabilities</mark>

### <mark style="color:red;">**Reusable Components**</mark>

App Maker includes a library of pre-built components to speed up development and maintain consistency across your app. These cover essential ecommerce functionalities like:

* Add to basket
* Checkout
* Order tracking

All components are fully integrated with **Akinon Commerce endpoints** to ensure reliable performance.

### <mark style="color:red;">**Customizable Configurations**</mark>

Manage native app settings—such as splash screens, logos, app name, notifications, and versioning—using the `akinon.json` file. This JSON-based configuration acts as a **single source of truth**, allowing you to declaratively define how your app behaves on both iOS and Android. These settings are applied during the build, runtime, and deployment phases for consistent app behavior across environments.

### <mark style="color:red;">**Plugin Ecosystem**</mark>

App Maker supports a stable mobile development environment where you can integrate custom modules or third-party services like:

* Analytics
* Push notifications
* Product recommendations etc.

This is where plugins come in. They enable you to incorporate necessary modules and write integrations.

Plugins follow a two-step process:

1. **Installation** – Scripts (written in Node.js) modify platform files (e.g., `AndroidManifest.xml`, `Info.plist`).
2. **Integration** – Components and services used in the app are developed and connected.

### <mark style="color:red;">**Organization Management**</mark>

With the App Maker platform, easily manage your organization by:

* Creating user accounts
* Assigning roles (e.g., developer, release manager)
* Controlling access permissions

This ensures secure and streamlined collaboration across your teams.

### <mark style="color:red;">**App Maker CLI**</mark>

The **App Maker CLI** simplifies development with tools for:

* Project setup
* Plugin management
* Local deployment

It supports multiple platforms including iOS, Android, and Huawei. You can initialize new projects from default templates and integrate third-party services like analytics and notifications.

Additional features include:

* Seamless Git integration
* Efficient build and release management

### <mark style="color:red;">**Deployment Workflow**</mark>

App Maker’s deployment process includes:

* Preparing credentials
* Building app binaries (IPA, APK, AAB)
* Testing builds
* Submitting to the **App Store** and **Google Play**

It also supports **over-the-air (OTA) updates**, which allow you to instantly deliver new features, bug fixes, and content changes directly to users—without requiring a new version to be submitted to the App Store or Google Play.

You can enforce critical updates by redirecting users to the latest app version, ensuring a consistent, secure, and up-to-date user experience.


# Launch Your Akinon in Just 6 Steps

This section serves as a **Quick Start guide for users who are setting up a project on Akinon for the first time**. Its primary goal is to walk you through all the necessary configurations and deployments required to complete a successful order on the system.

ACC is a scalable, cloud-native platform based on microservice architecture. To ensure that all systems work seamlessly, a set of core services—especially **Omnitron** (for product and configuration management) and **Commerce** (for order processing and sales channel management)—must be deployed and correctly configured.

This guide outlines, step by step, the essential actions users need to take after logging into ACC for the first time. It covers:

* Creating a new project
* Deploying core services like Omnitron, Commerce, and Project Zero
* Setting up language and currency configurations
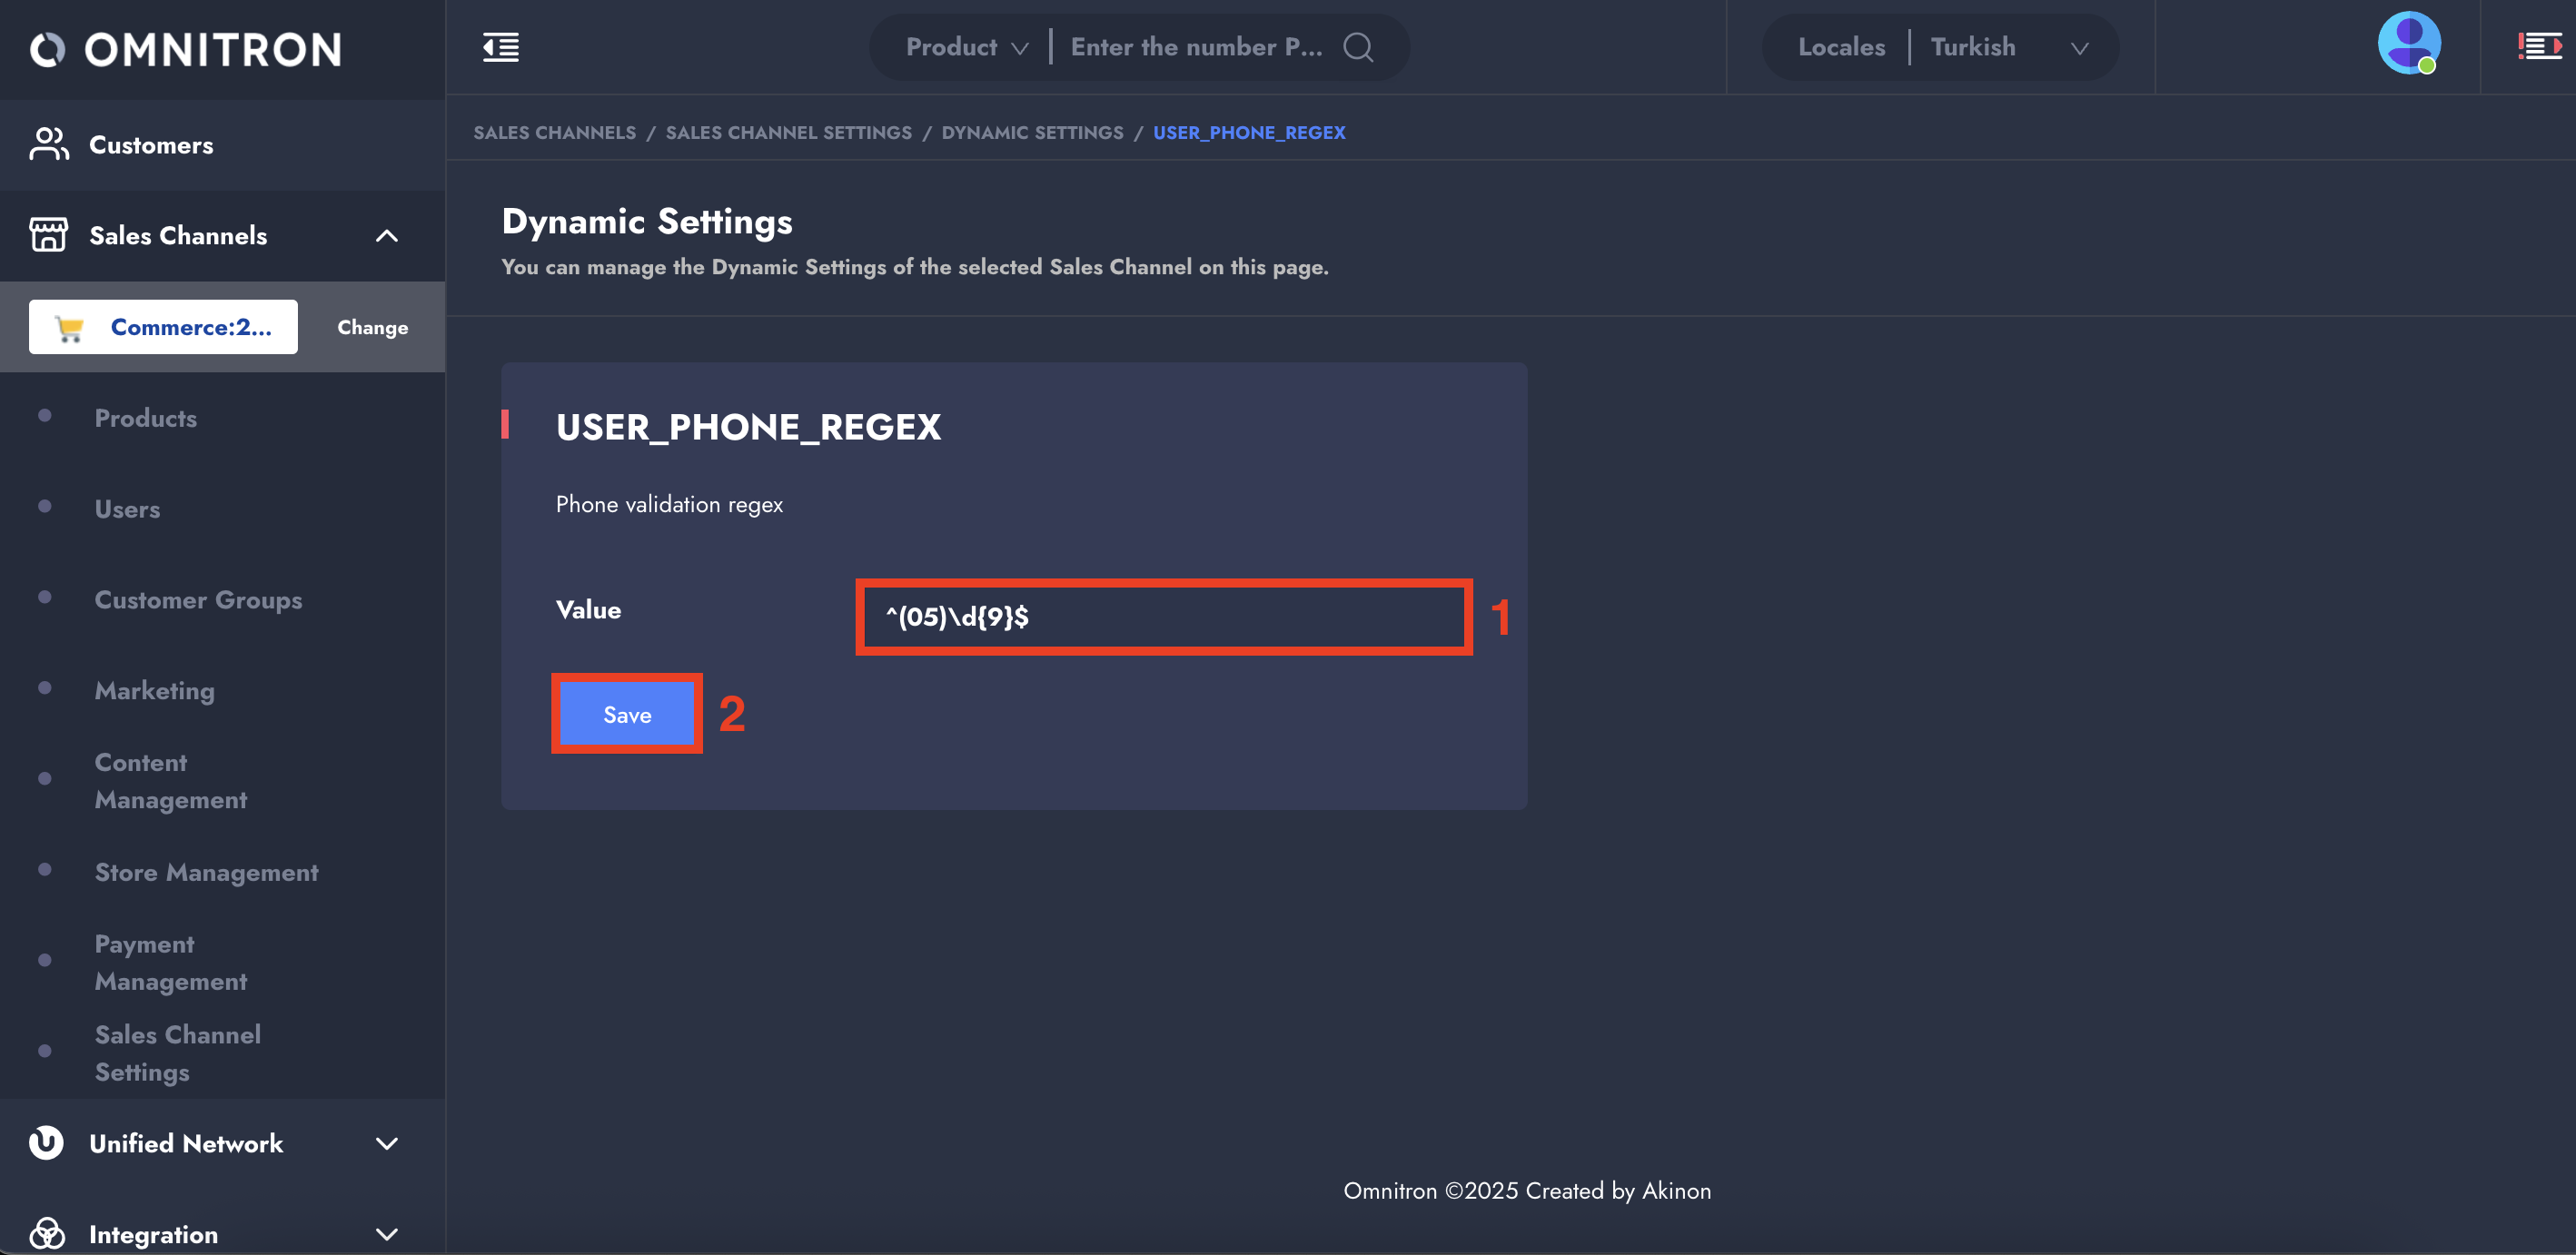
* Defining phone number validation rules
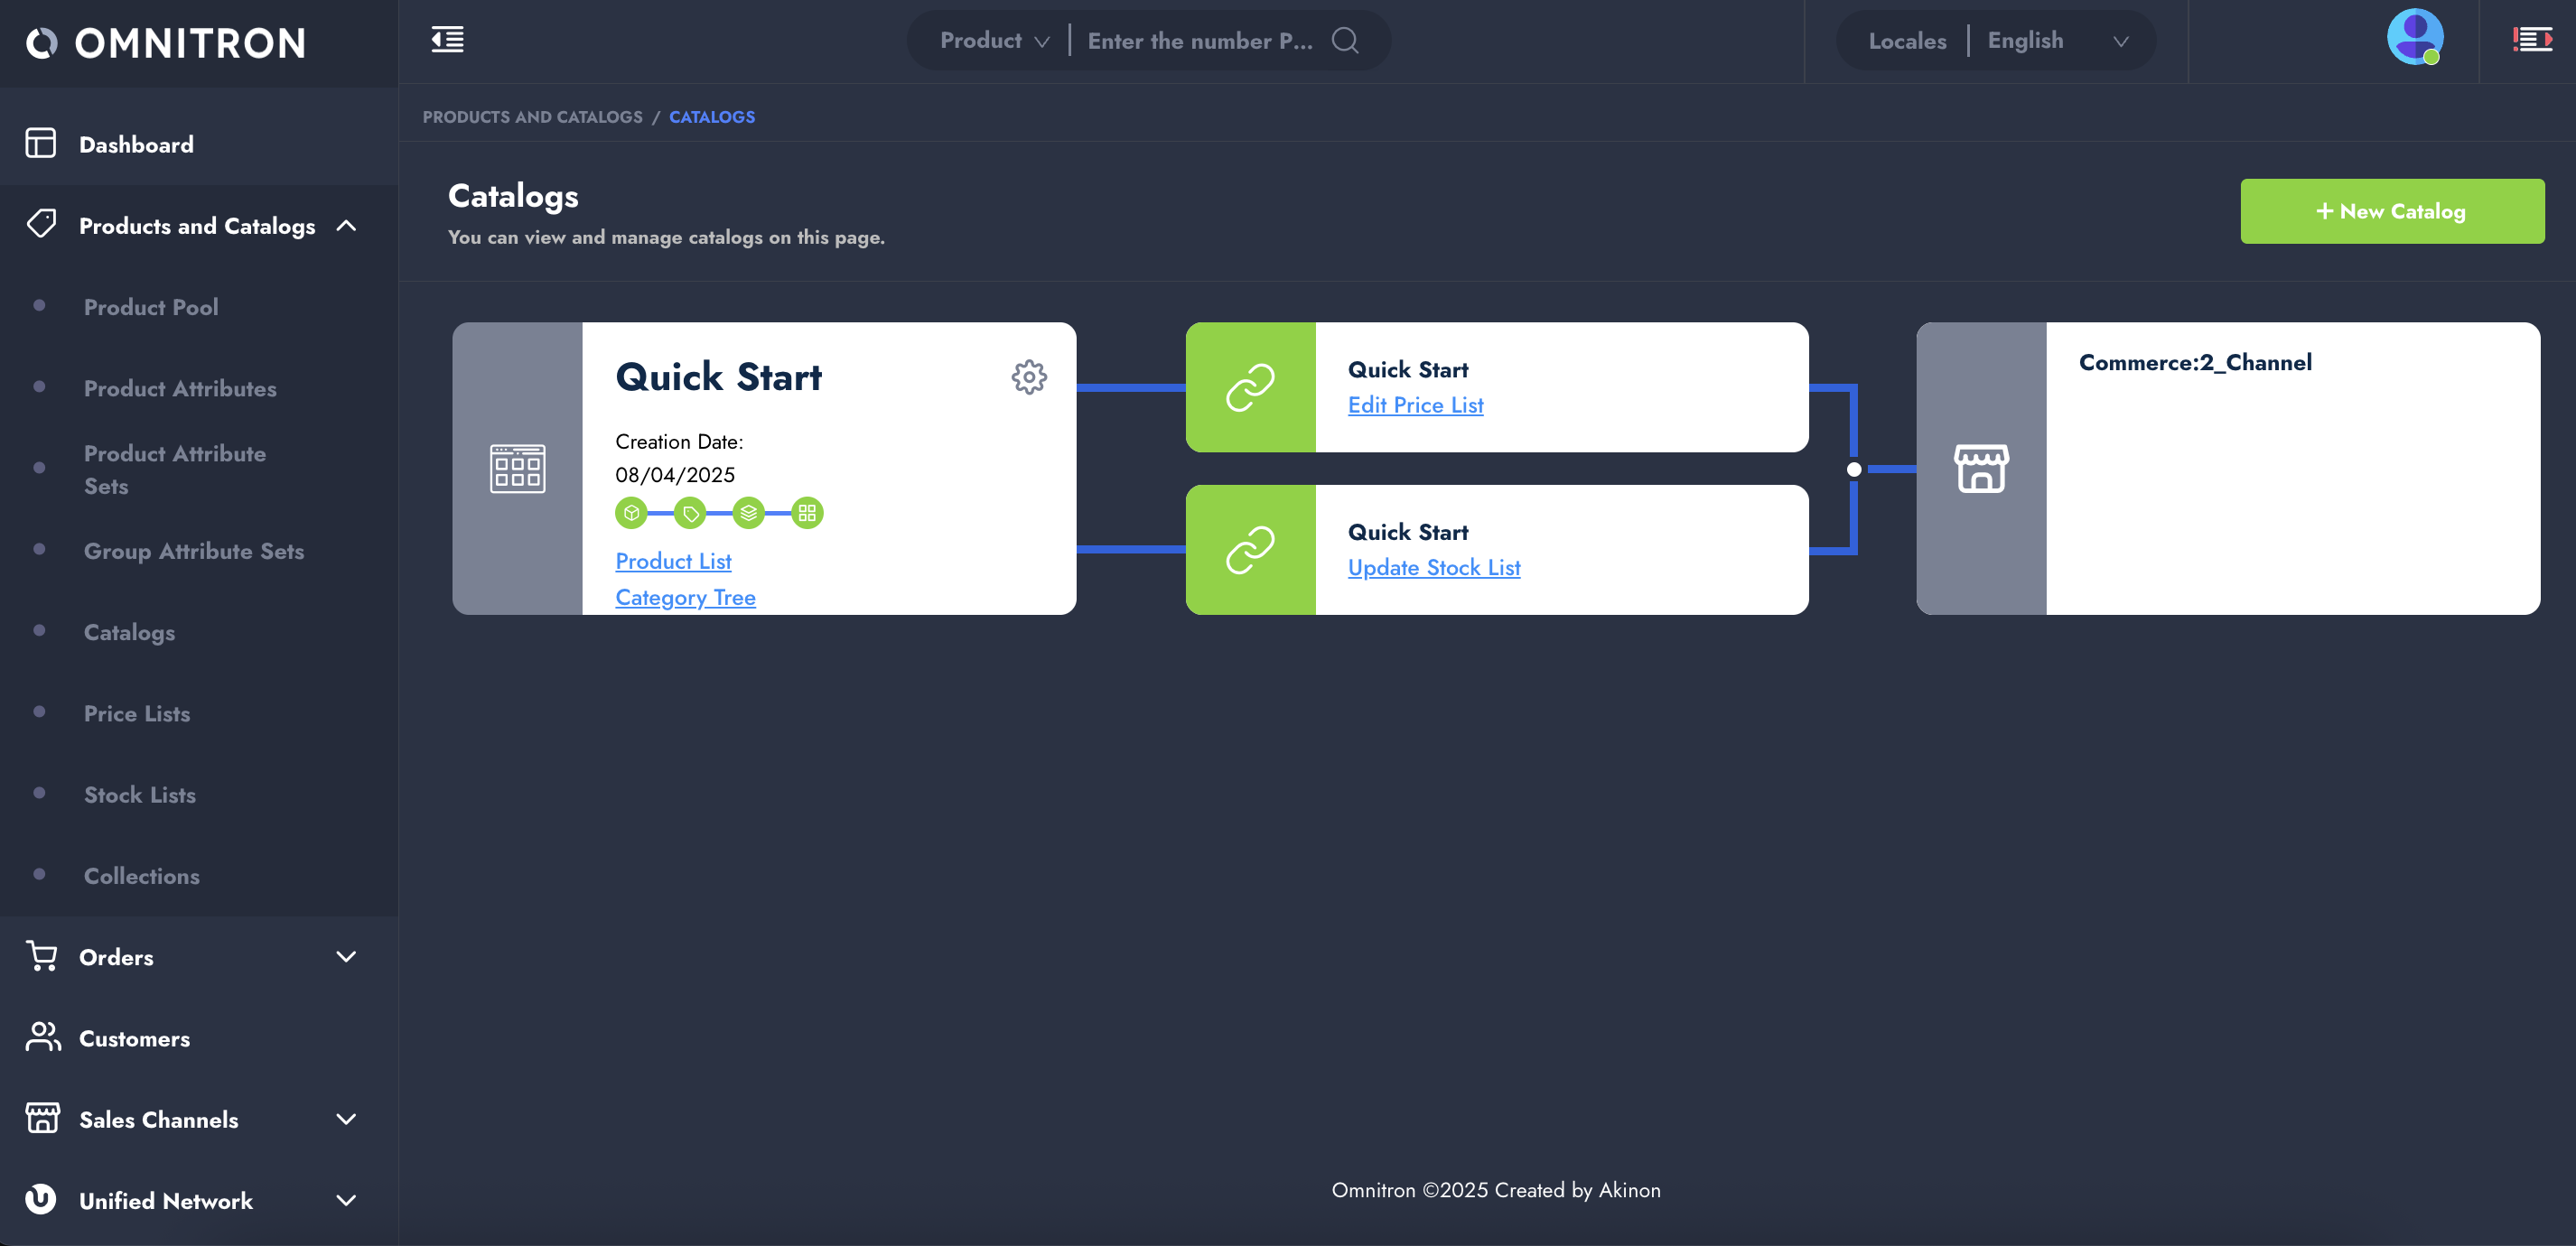
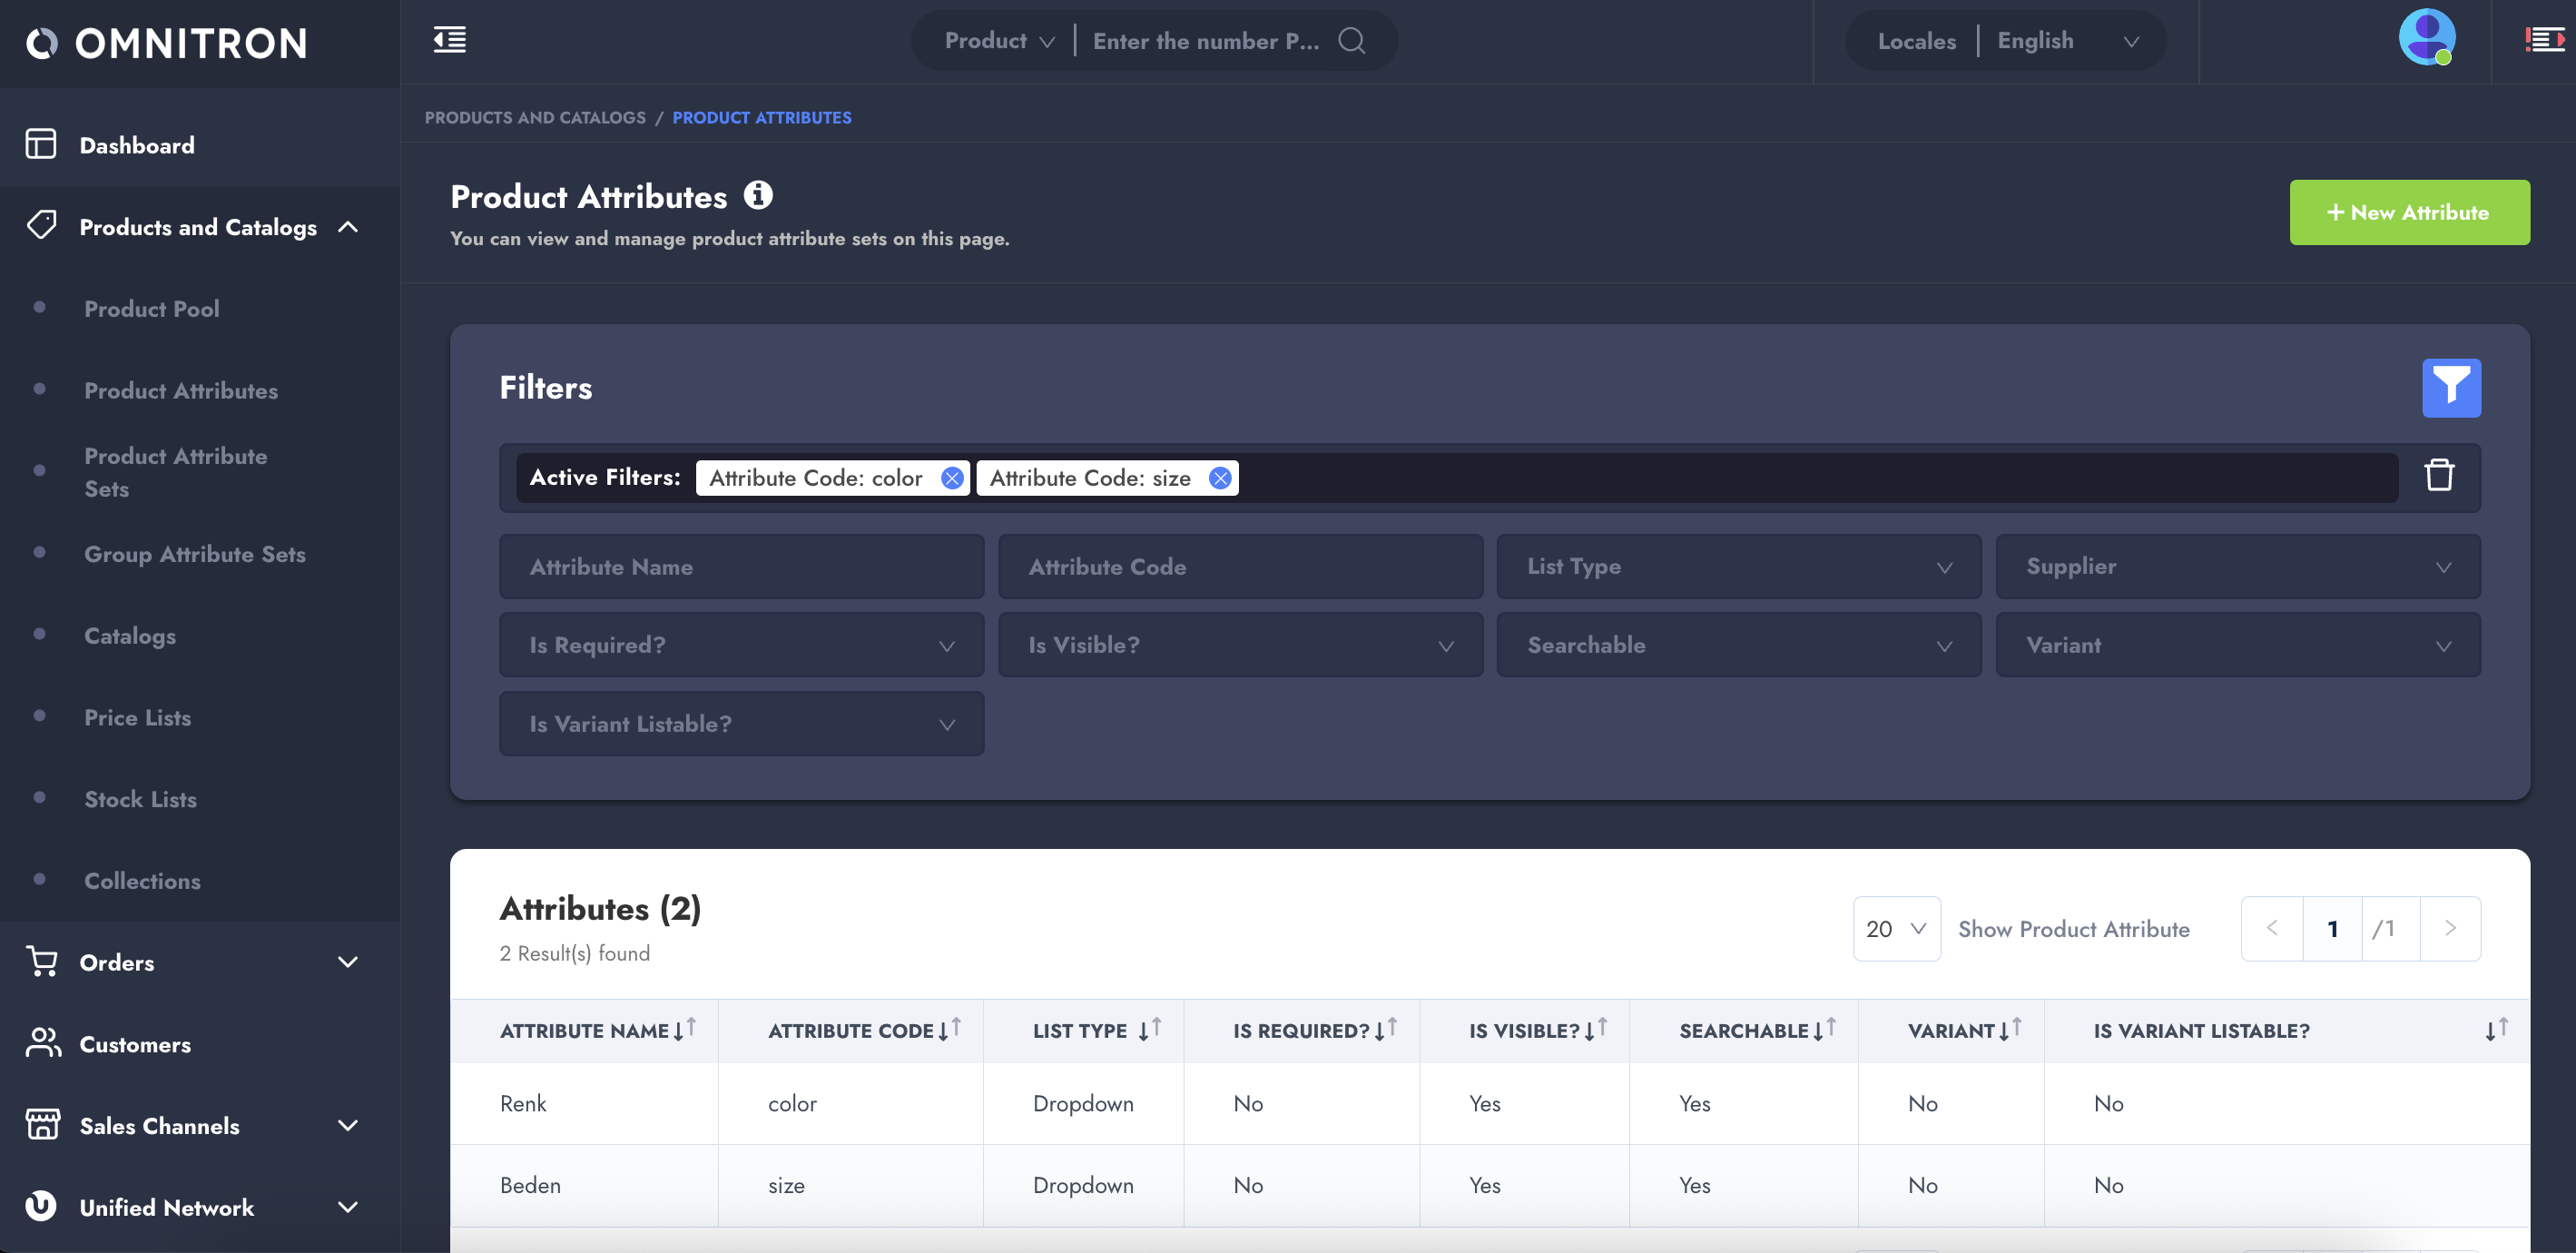
* Creating catalogs, products, attributes, stock, and pricing data in Omnitron
* Setting up payment and shipping options
* Integrating with Project Zero for storefront development and deployment

The document is designed to help technical teams and project stakeholders bring a new Akinon project to life in the shortest time possible, with minimal friction and dependency on support teams. By following this guide, you will have a fully functioning project environment capable of handling real product data, processing orders, and supporting a frontend application through Project Zero.

Whether you're a developer, integrator, or product manager, this Quick Start guide ensures that your first steps into the Akinon ecosystem are clear, structured, and complete.

**Let’s get started and complete the six essential steps ahead to launch your project with confidence.**


# 1. Start Your Journey with ACC

The very first step in this Quick Start journey is to **create a new project in** [**ACC**](https://apidocs.akinon.com/products/acc). This project will serve as the foundation for all other services and configurations that follow. Here’s how to set up your project:

{% stepper %}
{% step %}

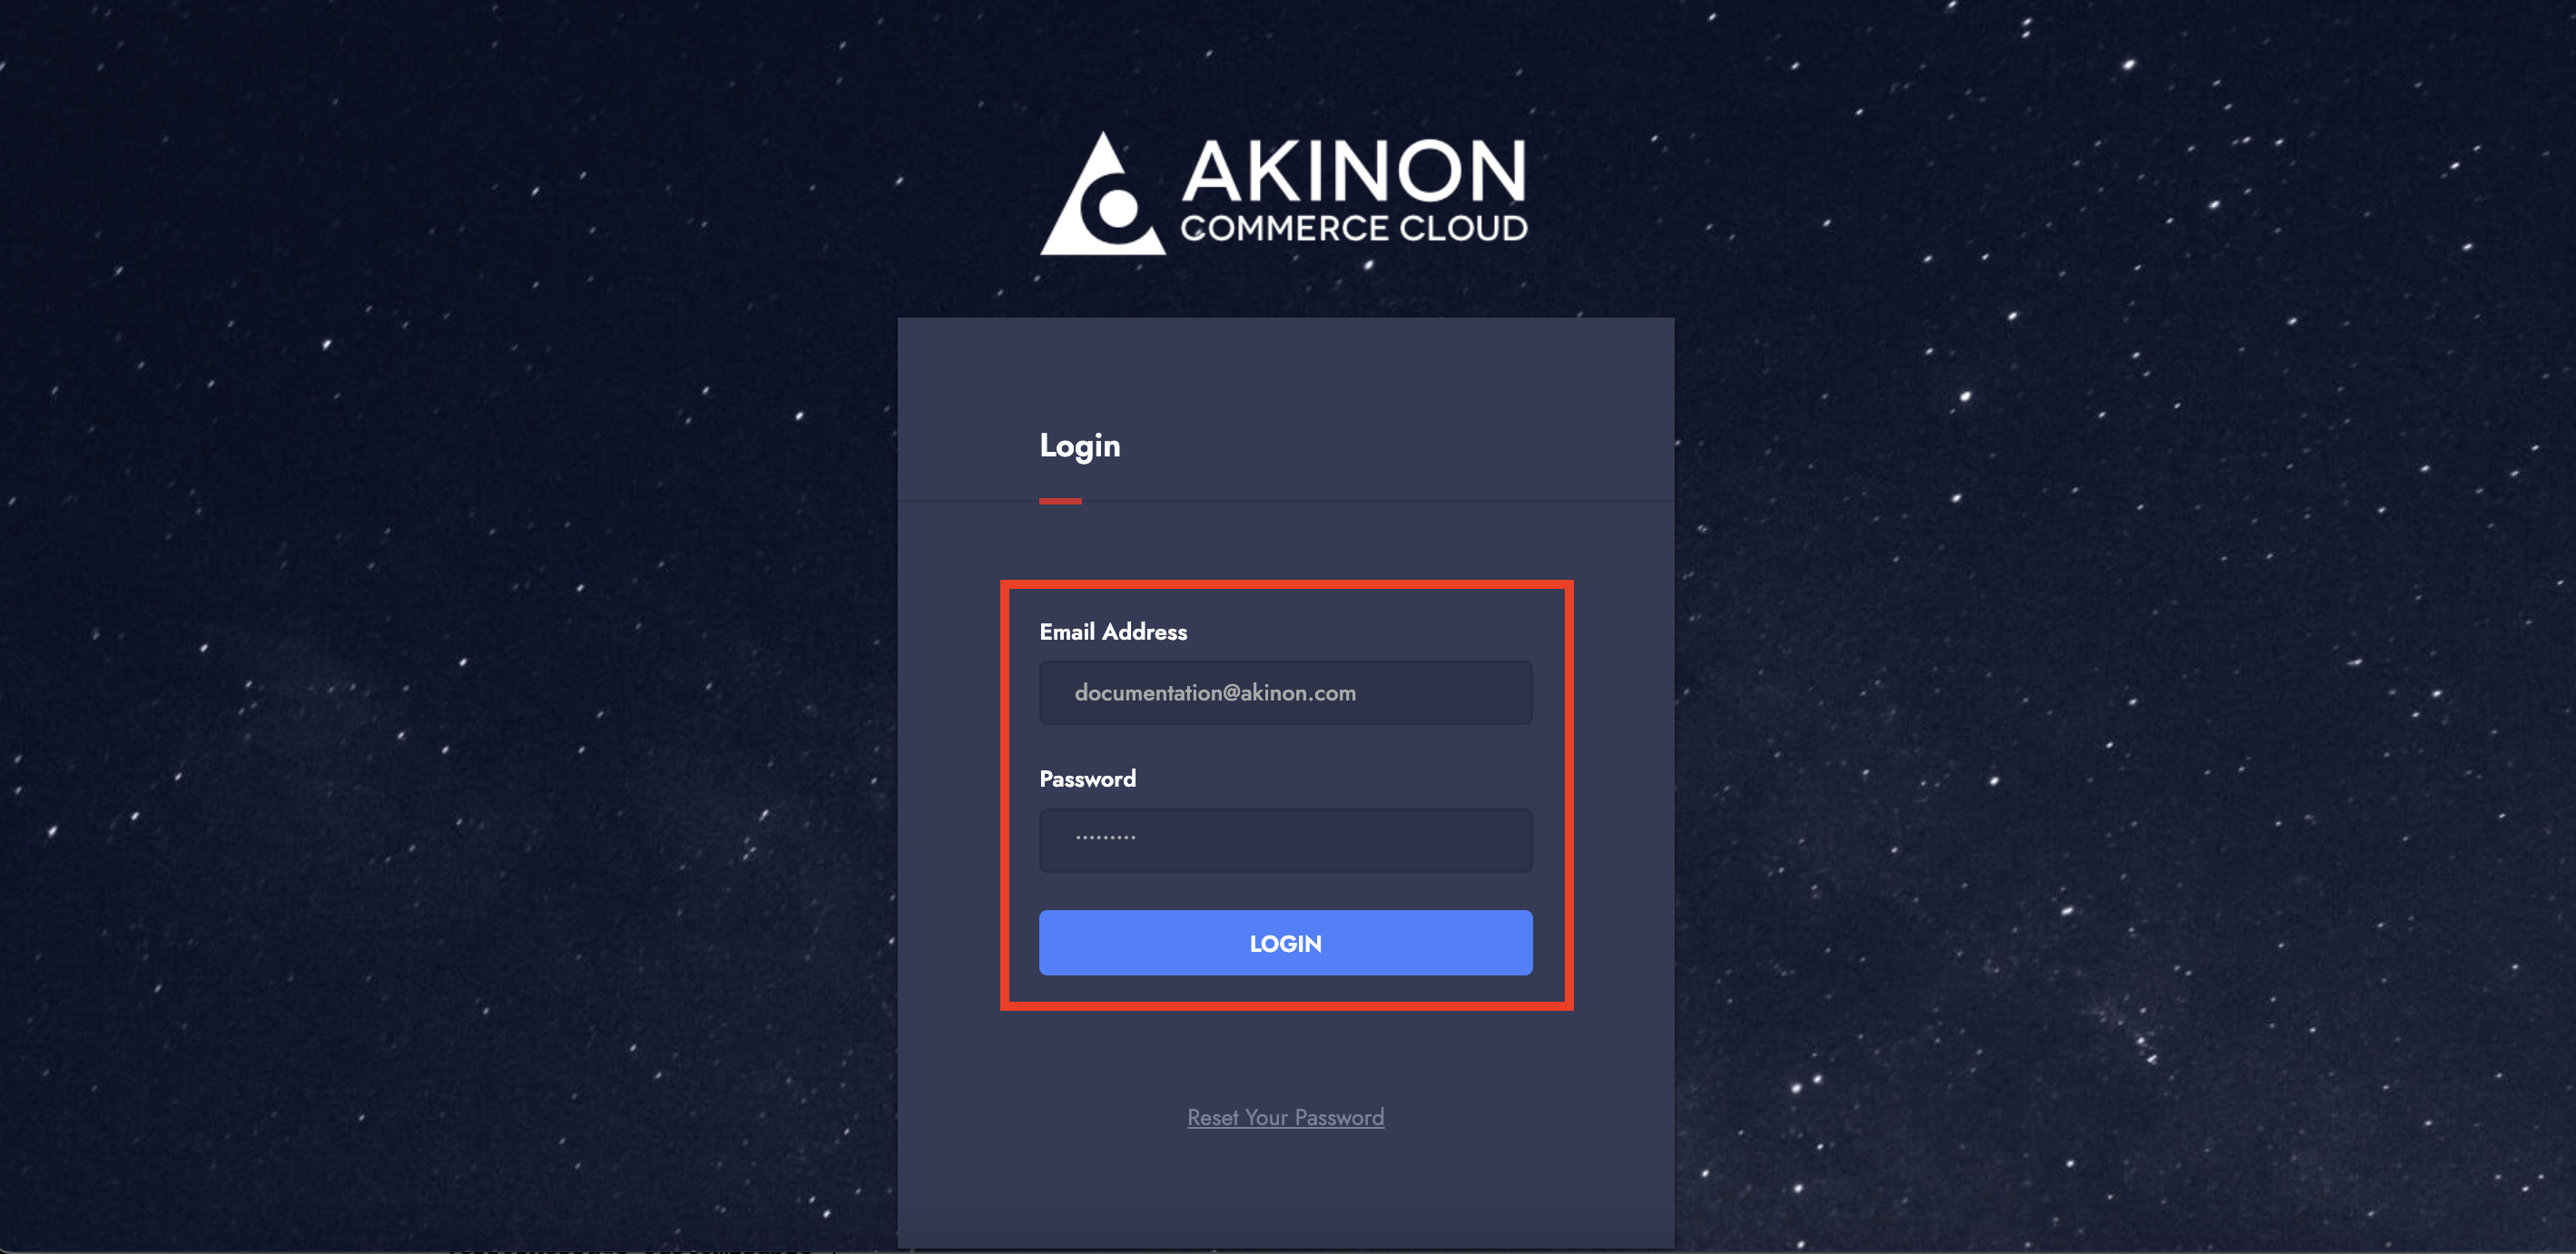
### Log in to ACC

* Visit <https://console.akinoncloud.com/>
* Use the credentials provided to you by Akinon.

{% hint style="warning" %}
To kick-start your project, your ACC account must already be set up.\
If you haven’t received your login info yet, please reach out to Akinon.\
Alternatively, you can try the **Reset Password** option on the login page using your registered email.
{% endhint %}

* ACC uses email-based One-Time Password (OTP) for authentication. An OTP will be sent to your authorized email address—use it to log in securely.

<figure><img src="https://164766933-files.gitbook.io/~/files/v0/b/gitbook-x-prod.appspot.com/o/spaces%2FszVHHD4skw8SftKawRsw%2Fuploads%2FkRiDi3cOSyxgMQbSyHLE%2FScreenshot%202025-04-08%20at%2012.34.40.png?alt=media&amp;token=f39140b7-3a53-481f-8a50-2cda09e1a1f3" alt=""><figcaption></figcaption></figure>
{% endstep %}

{% step %}

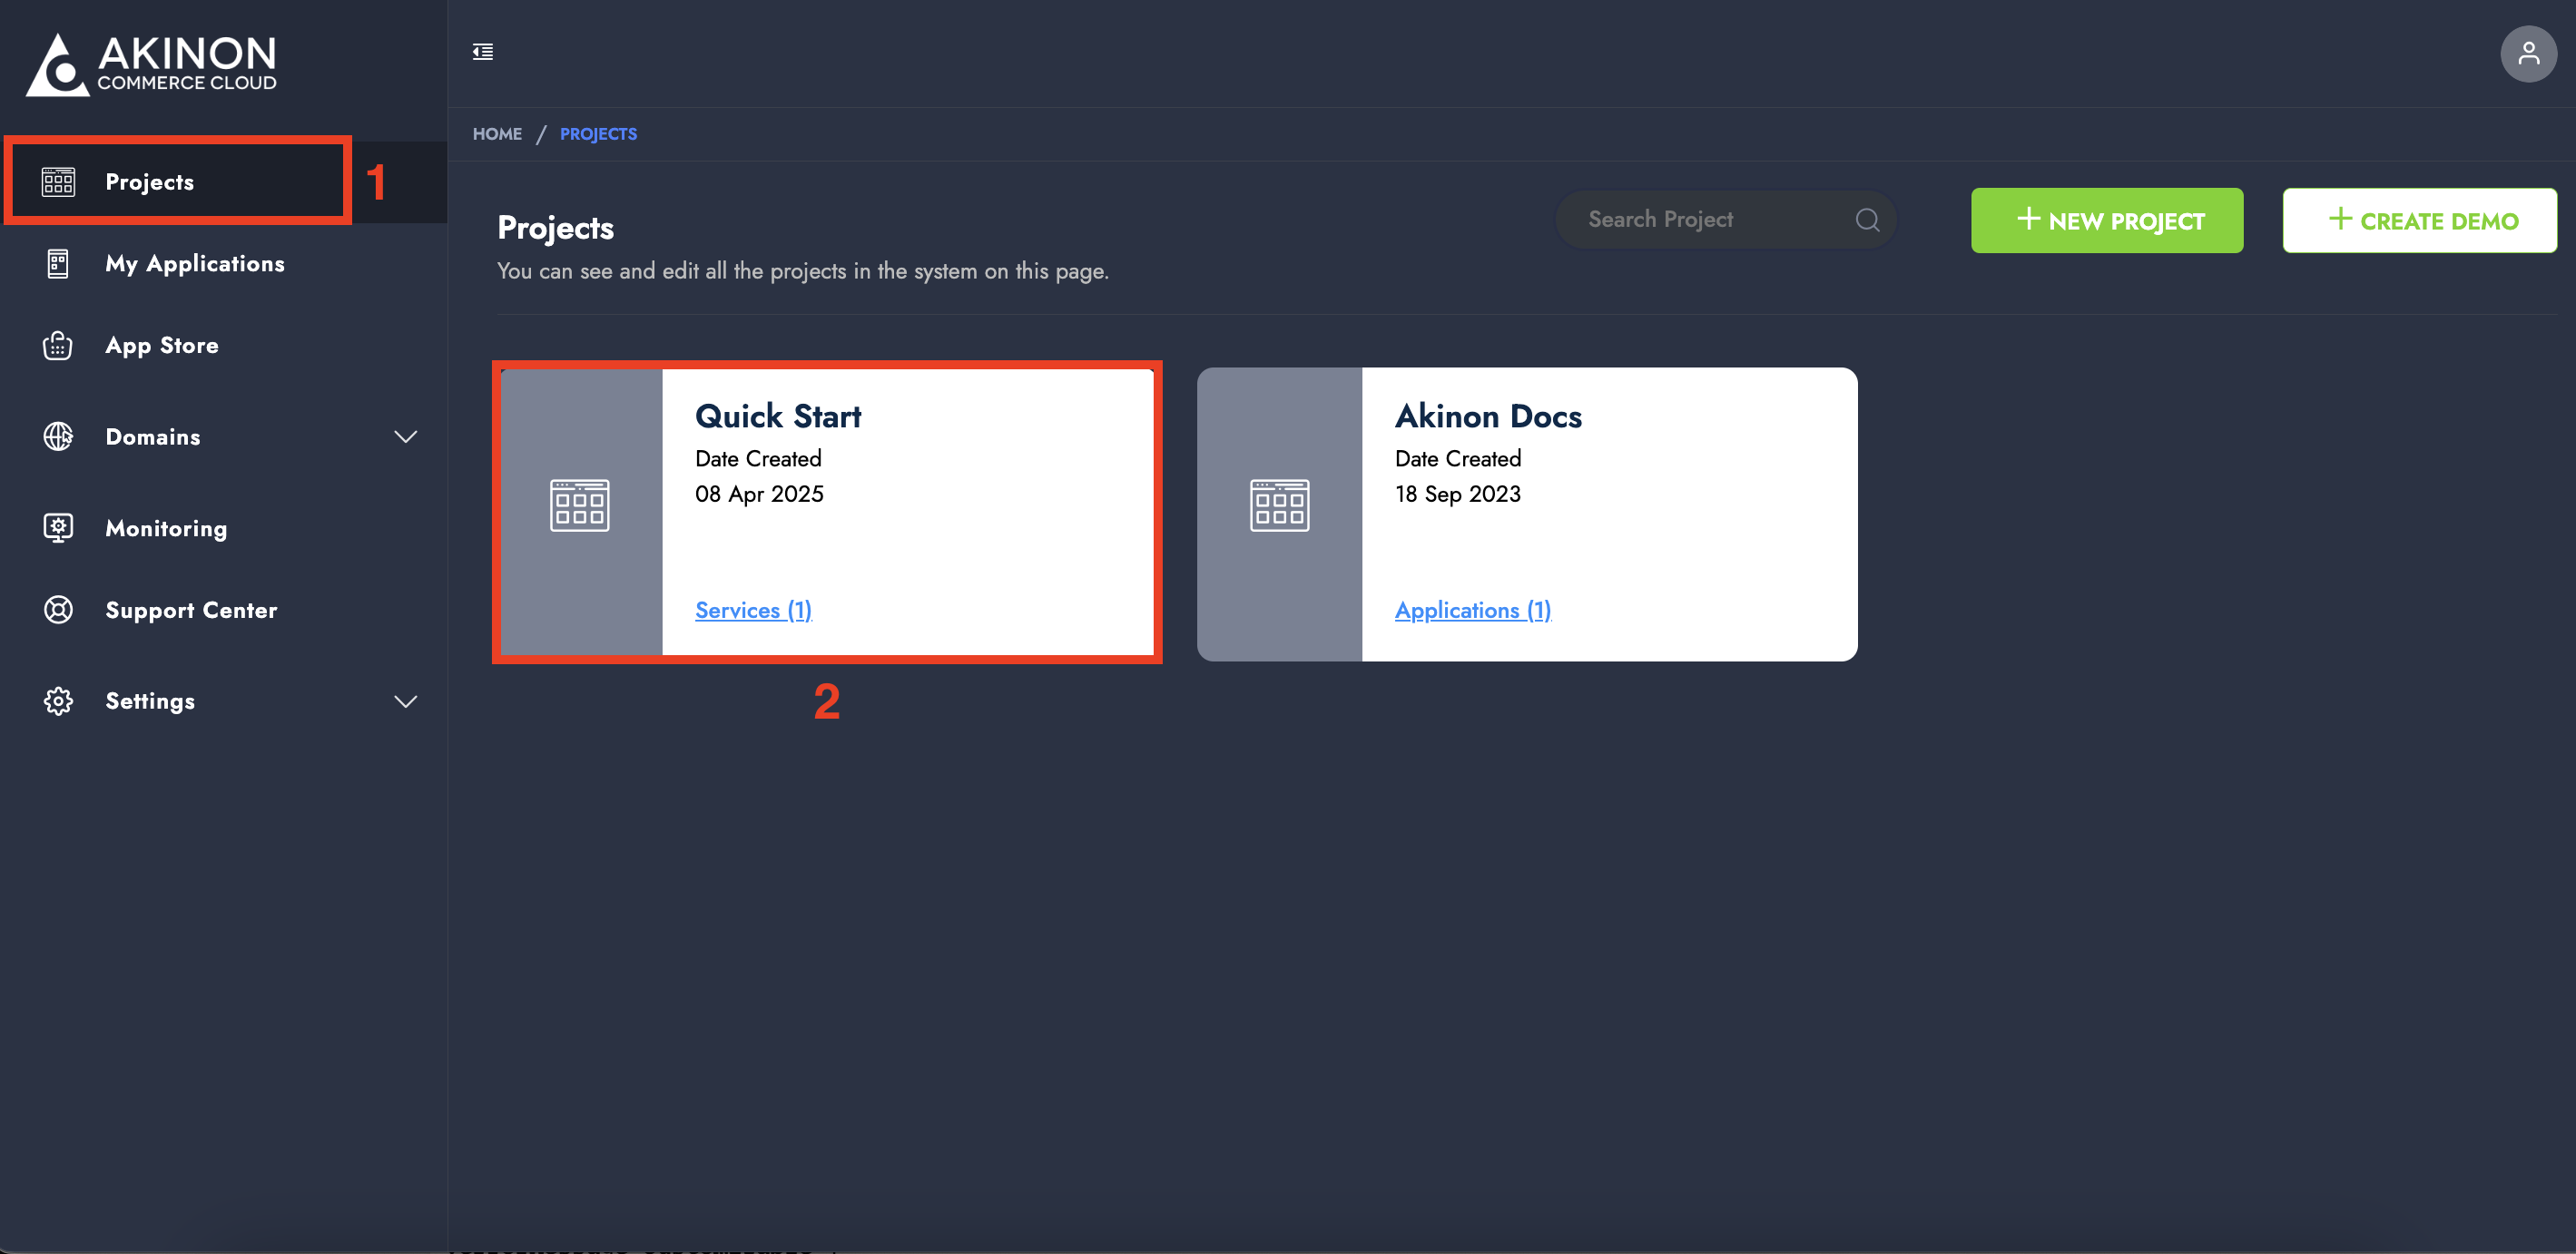
### Create a New Project

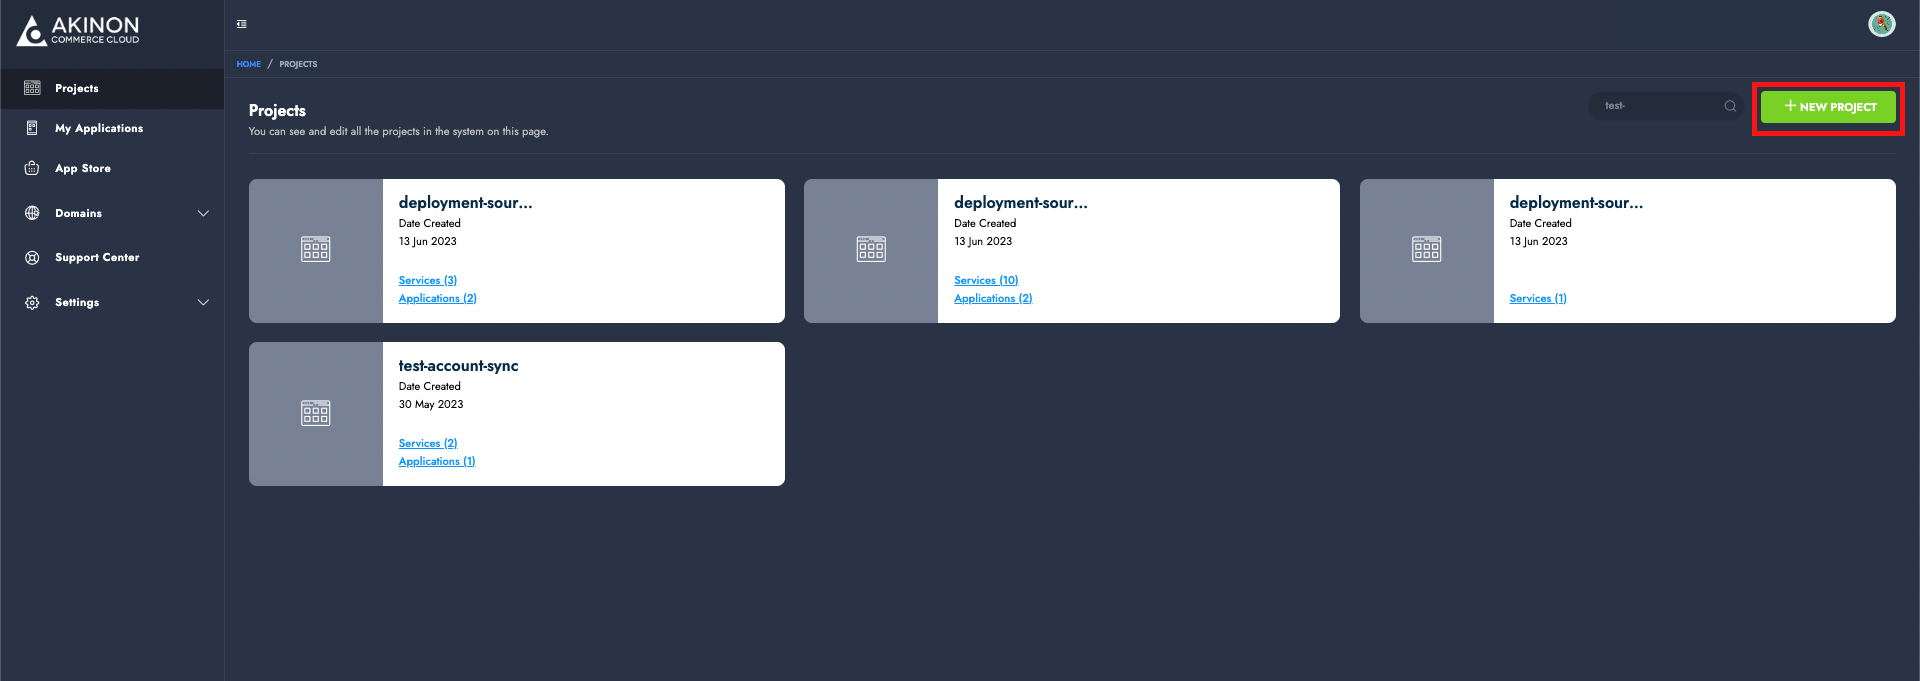
* Once logged in, navigate to the **"Projects"** page.
* Click the **+ NEW PROJECT** button to start creating a new project.

<figure><img src="https://164766933-files.gitbook.io/~/files/v0/b/gitbook-x-prod.appspot.com/o/spaces%2FszVHHD4skw8SftKawRsw%2Fuploads%2FwJ5ql8bEJtx6Gr1DNUc3%2FScreenshot%202025-04-08%20at%2012.22.18.png?alt=media&amp;token=9885a755-36c9-4e82-9fb7-508e70e11992" alt=""><figcaption></figcaption></figure>
{% endstep %}

{% step %}

### Fill in the Project Information

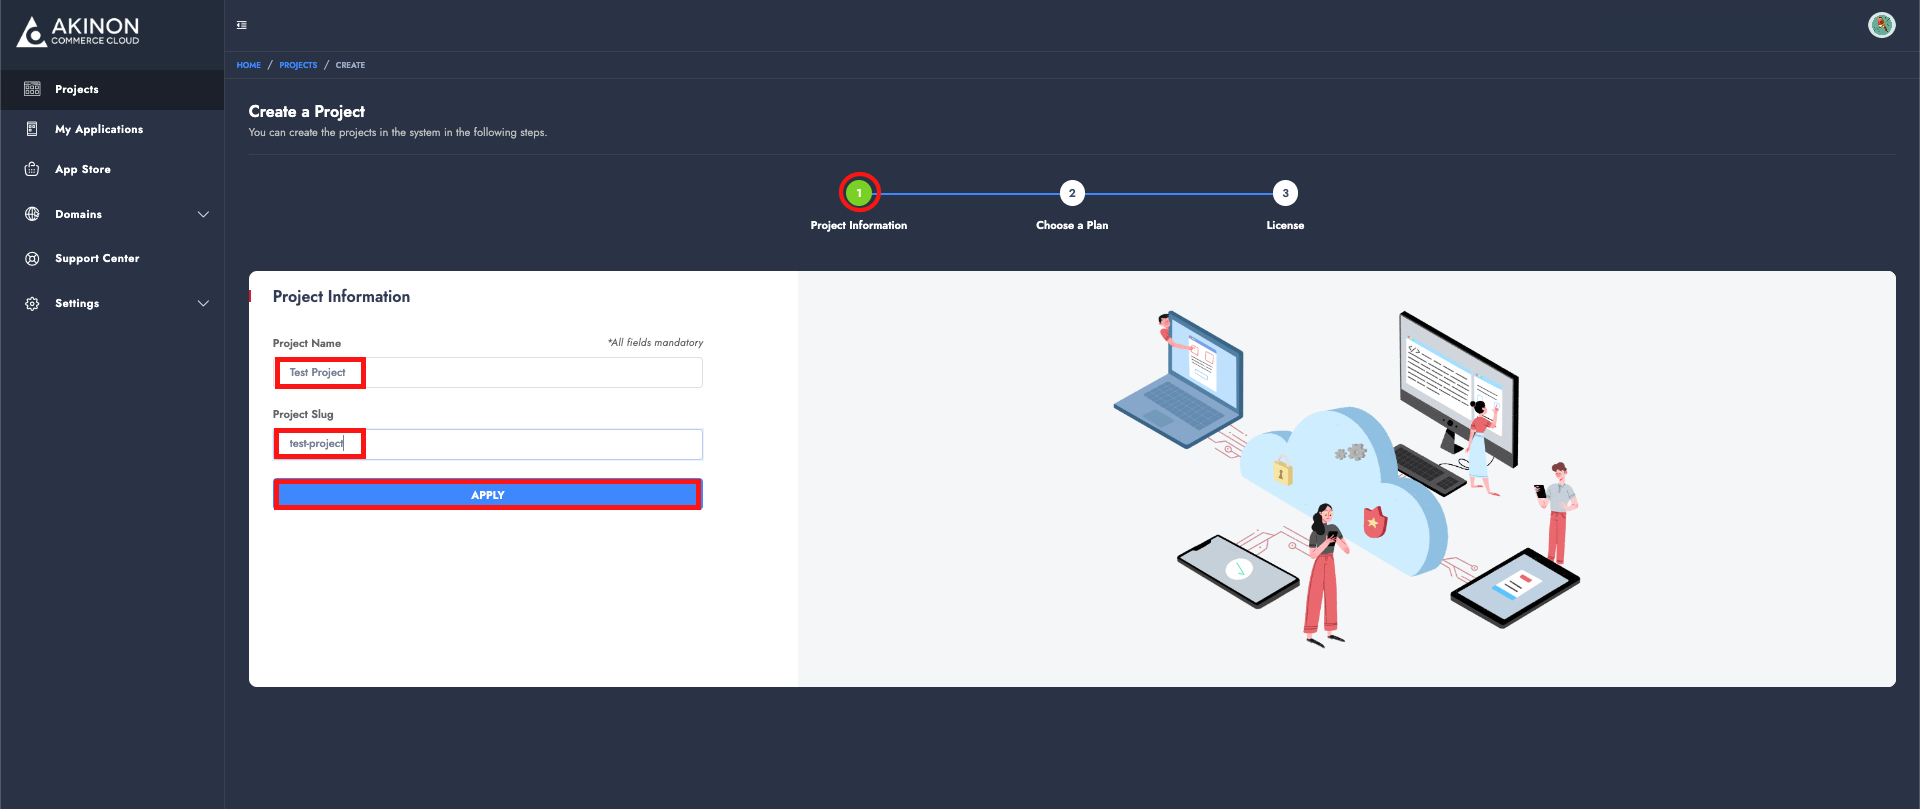
* A form will appear asking for the project details.
  * **Project Name**: Enter a clear and descriptive name (e.g., your brand name).
  * **Project Slug**: This is a unique identifier used internally and across services. For example, the slug is required when creating a dedicated Sentry account for monitoring.
* After filling out the information, click the **APPLY** button. You will then be redirected to the plan selection screen.

<figure><img src="https://164766933-files.gitbook.io/~/files/v0/b/gitbook-x-prod.appspot.com/o/spaces%2FszVHHD4skw8SftKawRsw%2Fuploads%2Fimt42yTY2p2nRoux1qII%2FScreenshot%202025-04-08%20at%2012.24.29.png?alt=media&amp;token=a4681c47-1ffc-4ea4-ad65-e304c96ac334" alt=""><figcaption></figcaption></figure>
{% endstep %}

{% step %}

### Choose a Plan&#x20;

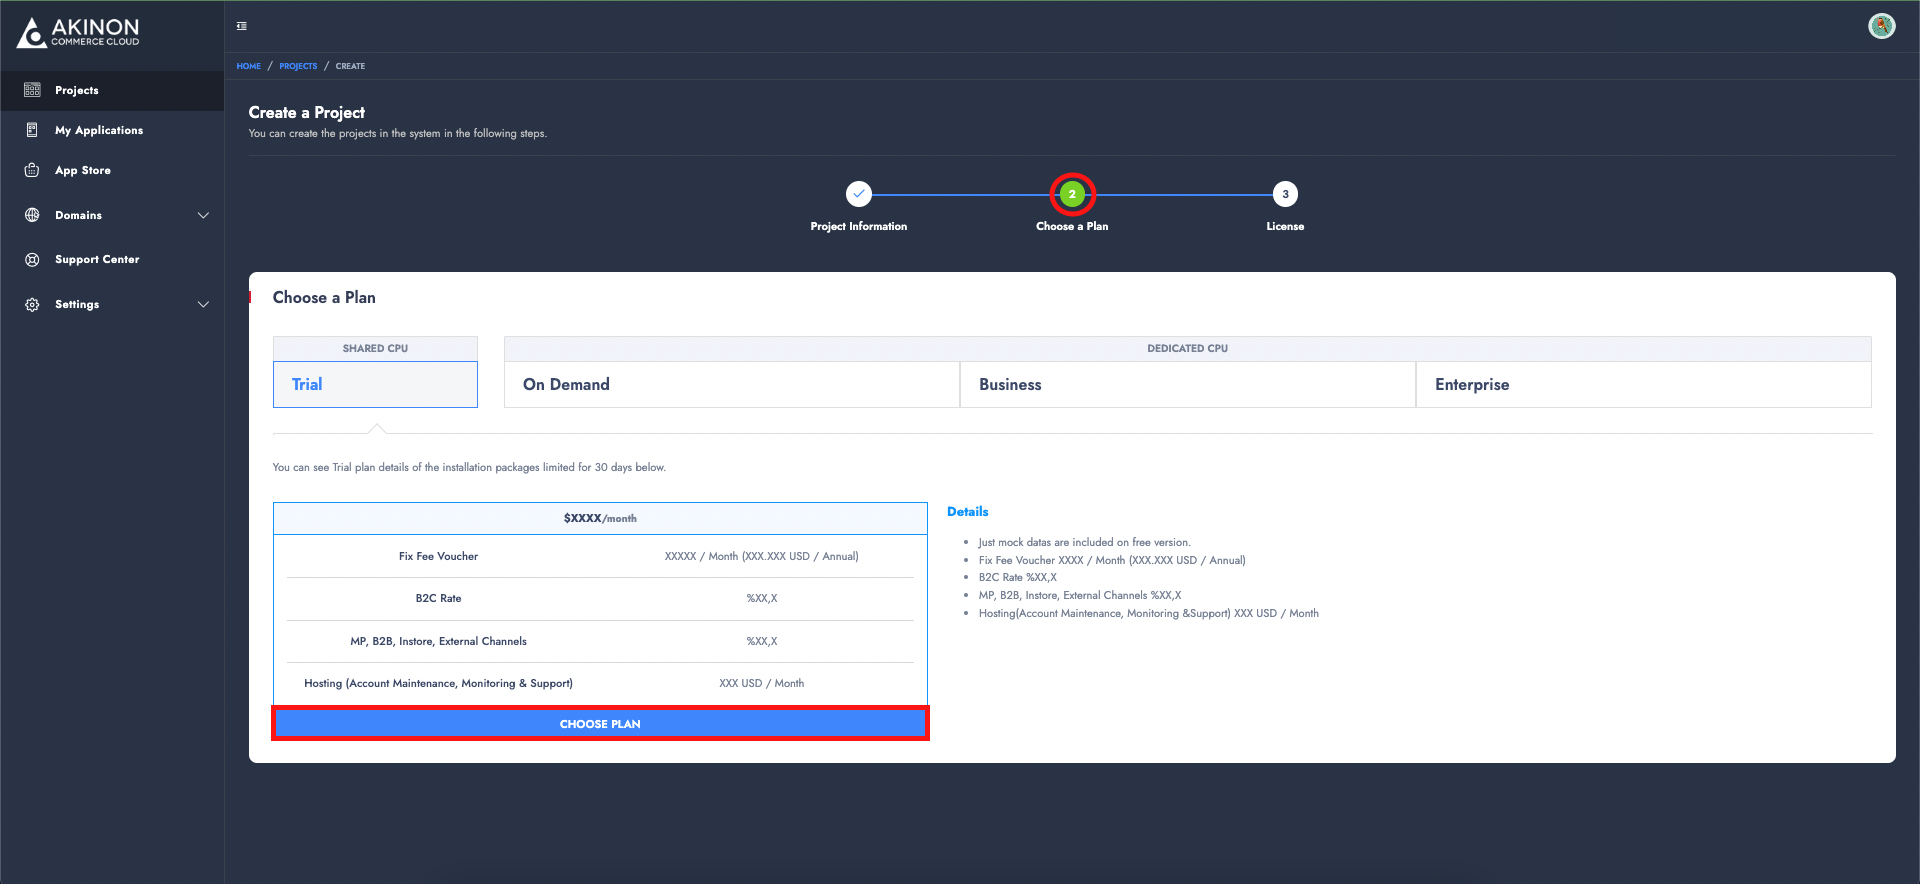
* The “Choose a Plan” screen is currently under development.
* Simply click **CHOOSE PLAN** to proceed.

<figure><img src="https://164766933-files.gitbook.io/~/files/v0/b/gitbook-x-prod.appspot.com/o/spaces%2FszVHHD4skw8SftKawRsw%2Fuploads%2Fk0EUTkMKqXOyUaVOeEKE%2FScreenshot%202025-04-08%20at%2012.40.39.png?alt=media&amp;token=db371659-33d4-4ce2-929a-1a2c1dbce518" alt=""><figcaption></figcaption></figure>
{% endstep %}

{% step %}

### Accept the Licence Agreement

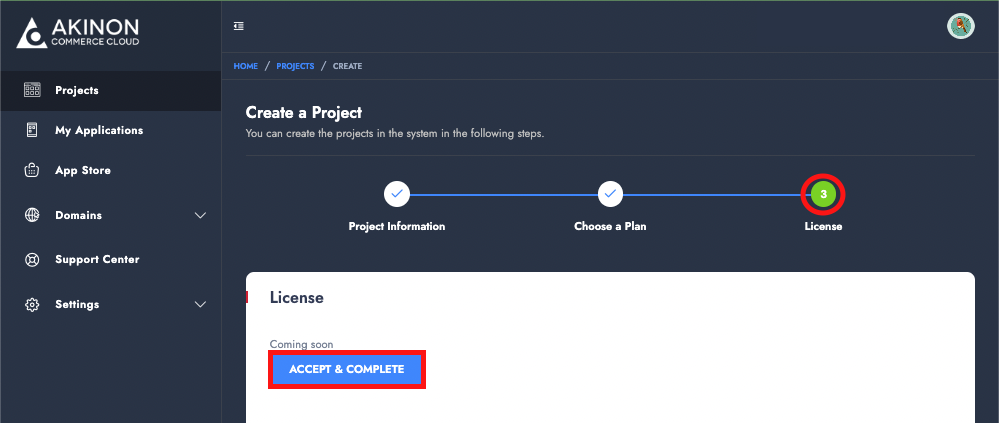
* The “License” step is also under development.
* Just click **ACCEPT & COMPLETE** to finalize the license agreement and complete your project setup.

<figure><img src="https://164766933-files.gitbook.io/~/files/v0/b/gitbook-x-prod.appspot.com/o/spaces%2FszVHHD4skw8SftKawRsw%2Fuploads%2F9jzCQxGLr50NRliVfcFl%2FScreenshot%202025-04-08%20at%2012.26.47.png?alt=media&amp;token=937714d4-192c-48f8-b318-7a4bc19185fd" alt=""><figcaption></figcaption></figure>
{% endstep %}

{% step %}

### Welcome Page

* Once the project is successfully created, you will be greeted with a **Welcome Page**.
* From here, you can follow provided links to visit the project overview or view its applications.

<figure><img src="https://164766933-files.gitbook.io/~/files/v0/b/gitbook-x-prod.appspot.com/o/spaces%2FszVHHD4skw8SftKawRsw%2Fuploads%2FbNrN9iAuvXNPa4wsIR9W%2FScreenshot%202025-04-08%20at%2012.45.43.png?alt=media&amp;token=c219d46b-4500-4475-9e93-bc3b311c5408" alt=""><figcaption></figcaption></figure>
{% endstep %}

{% step %}

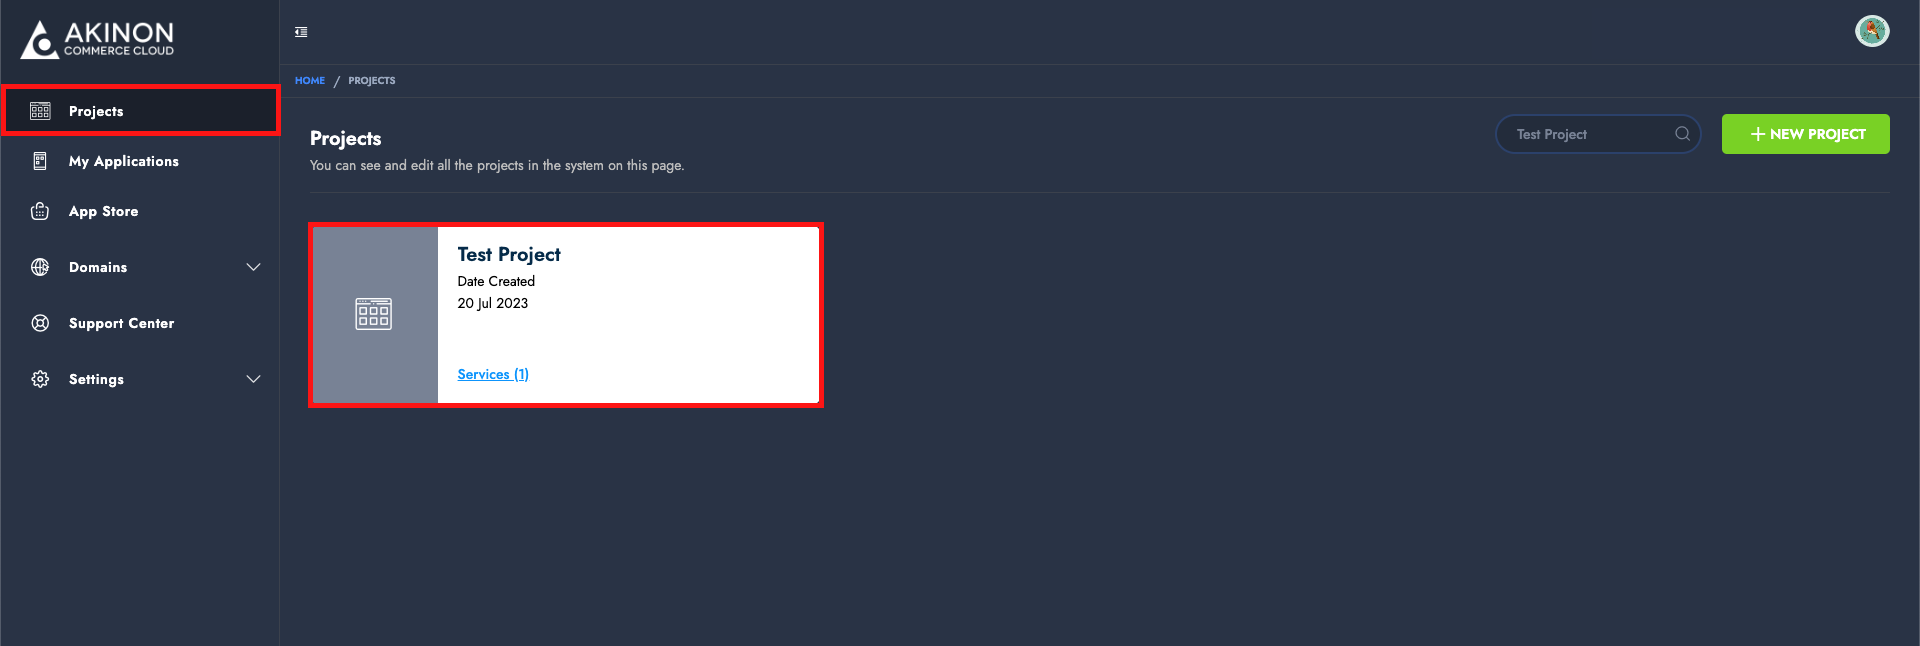
### Access Your Project Detail Page&#x20;

* You can either: use the shortcut on the welcome page, or find your project in the left-hand navigation menu and click on it to open its detail page.

<figure><img src="https://164766933-files.gitbook.io/~/files/v0/b/gitbook-x-prod.appspot.com/o/spaces%2FszVHHD4skw8SftKawRsw%2Fuploads%2FhL1itBeNOFgrNQeKhwXe%2FScreenshot%202025-04-08%20at%2012.55.32.png?alt=media&amp;token=c59e92cd-45ce-44e3-9f46-b8e33ebd933f" alt=""><figcaption></figcaption></figure>
{% endstep %}

{% step %}

### Omnitron Deployment Begin Automatically

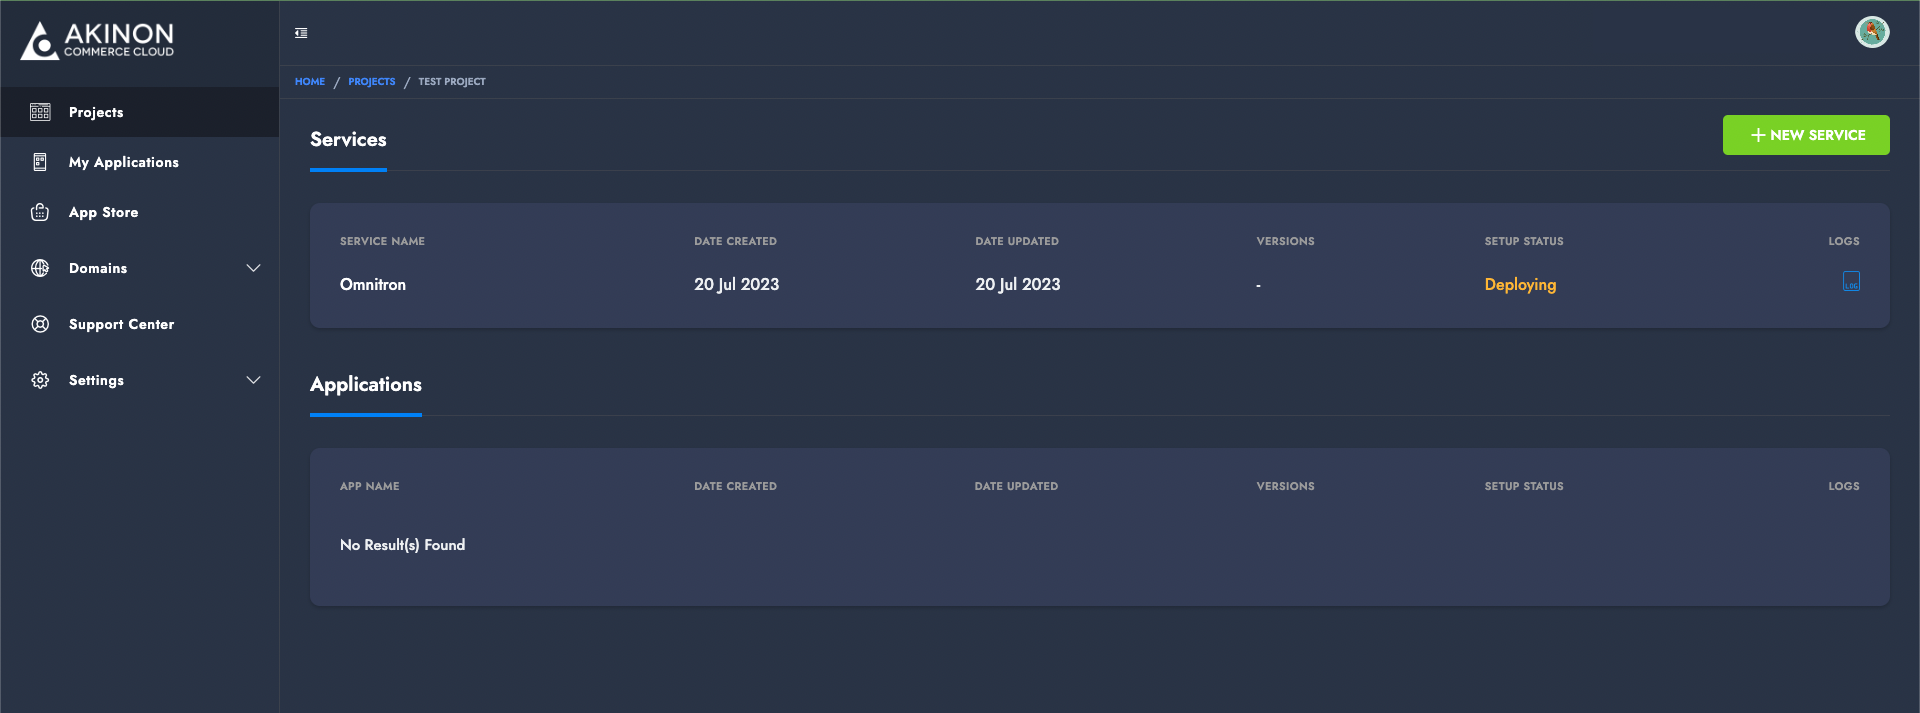
* As noted on the welcome page, the **Omnitron and Omnitron Frontend** services will automatically start deploying as soon as the project is created.

  > * &#x20;**Omnitron** is the core backend service used for managing product data, catalogs, and essential commerce configurations.
  > * **Omnitron Frontend (FE)** provides the admin interface where you can interact with this data through a user-friendly UI.

  There’s no manual action needed at this stage—just give it a moment to finish deploying in the background.

<figure><img src="https://164766933-files.gitbook.io/~/files/v0/b/gitbook-x-prod.appspot.com/o/spaces%2FszVHHD4skw8SftKawRsw%2Fuploads%2FXW2ZGHXFyL3omkHIa3da%2FScreenshot%202025-04-08%20at%2012.48.14.png?alt=media&amp;token=173ac353-697e-4087-8328-cc23b15574bd" alt=""><figcaption></figcaption></figure>
{% endstep %}

{% step %}

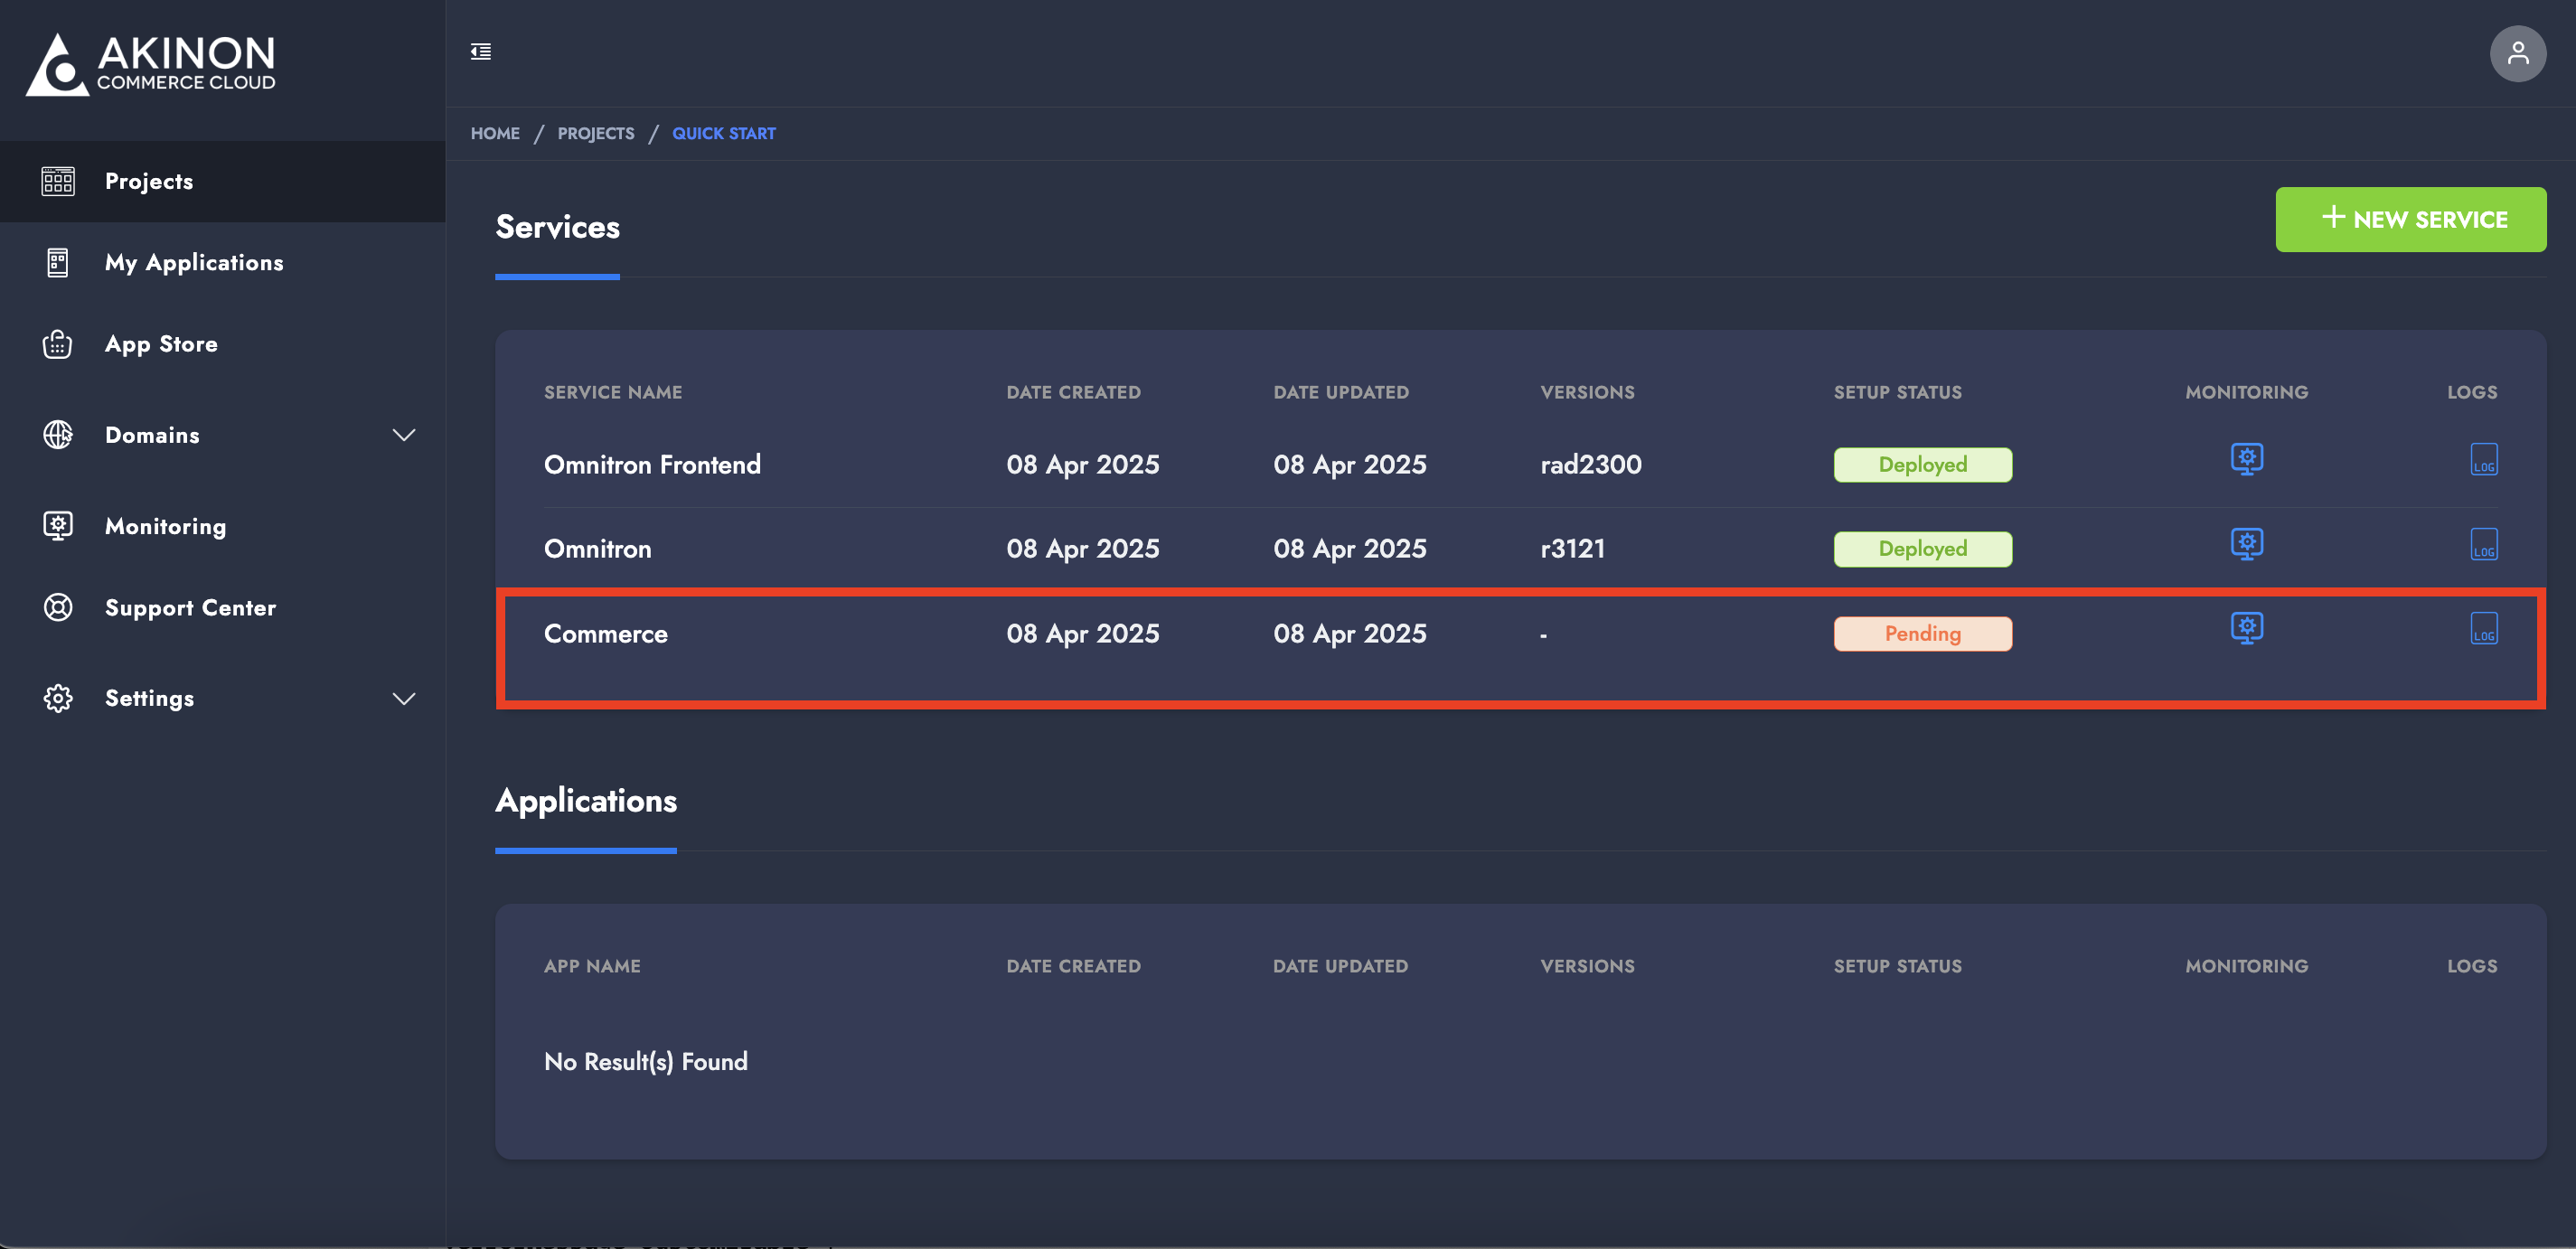
### Check Deployment Status

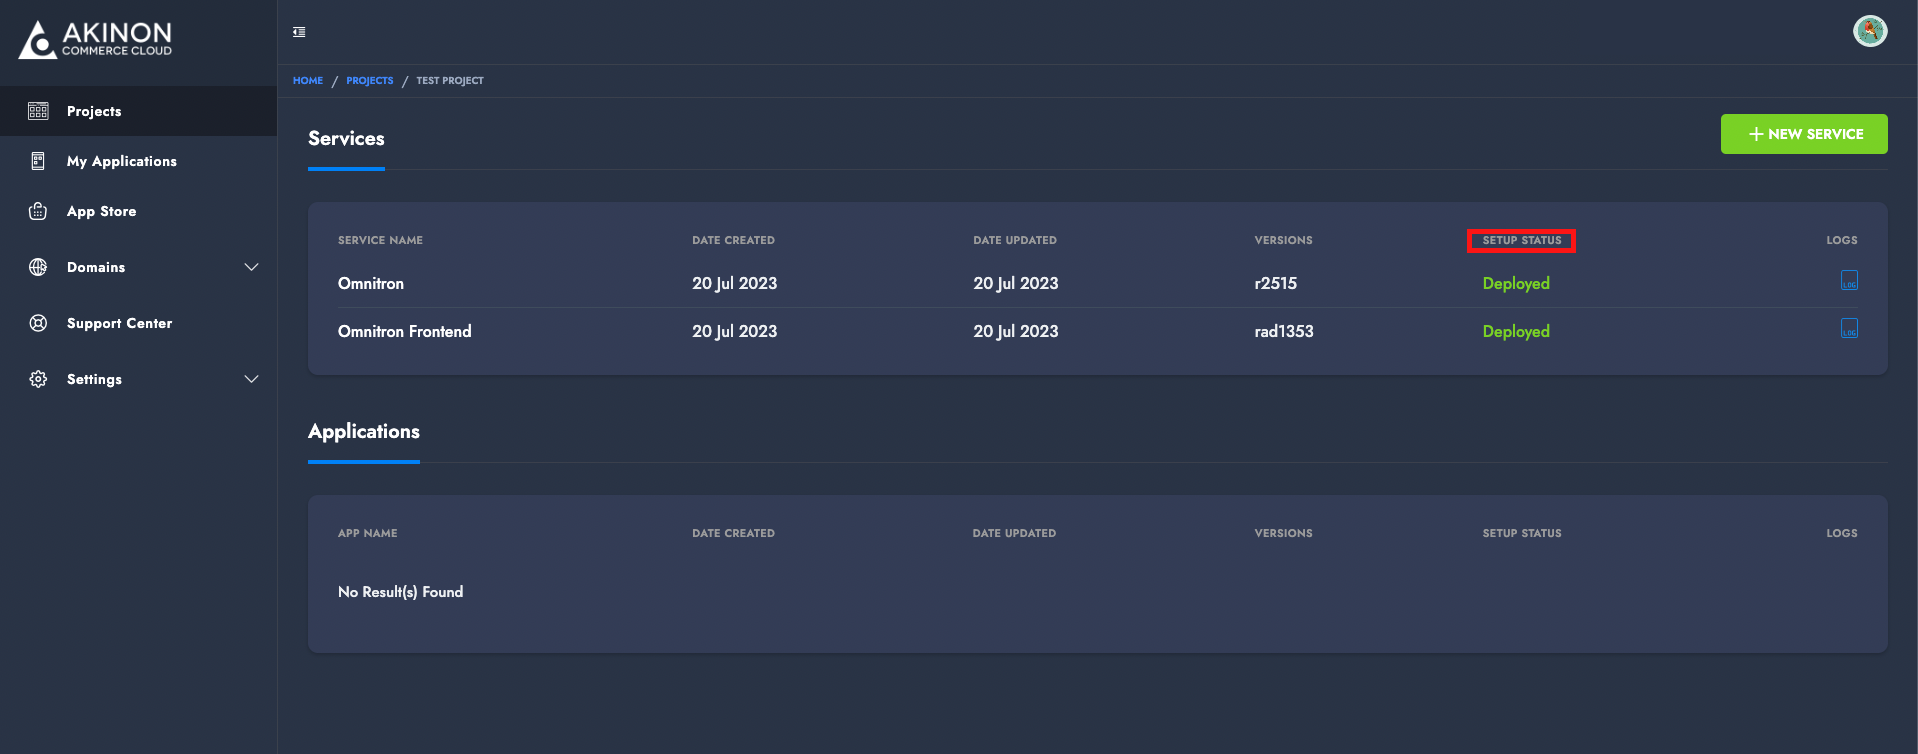
* When the installations are complete, both services will show their setup deployment status as **Deployed**.

<figure><img src="https://164766933-files.gitbook.io/~/files/v0/b/gitbook-x-prod.appspot.com/o/spaces%2FszVHHD4skw8SftKawRsw%2Fuploads%2FhuvrLnIVk6beyQIlZdlz%2FScreenshot%202025-04-08%20at%2015.23.23.png?alt=media&amp;token=c327f753-64aa-4245-9ca5-8d77311b2ba7" alt=""><figcaption></figcaption></figure>

Different deployment statuses may be displayed depending on the current state of the deployment process. Below is a list of possible statuses and the actions that need to be taken for each:

<table><thead><tr><th width="151.76171875">Status</th><th width="284.390625">Description</th><th>Action Required</th></tr></thead><tbody><tr><td><strong>Deploy Needed</strong></td><td>The service has been added, but a version has not been deployed yet.</td><td>A new deployment must be initiated.</td></tr><tr><td><strong>Pending</strong></td><td>The deployment is queued and waiting to be processed.</td><td>No action required. Wait for it to progress.</td></tr><tr><td><strong>Initializing Setup</strong></td><td>Add-ons are currently being installed.</td><td>No action required. Wait for initialization to complete.</td></tr><tr><td><strong>Addon Failed</strong></td><td>An error occurred during the installation of one or more add-ons.</td><td>Akinon support must investigate and resolve the issue.</td></tr><tr><td><strong>Deploying</strong></td><td>A version is currently being deployed.</td><td>No action required. Wait for the deployment to complete.</td></tr><tr><td><strong>Failed</strong></td><td>The deployment process failed.</td><td>Review the Deployment Logs to identify and fix the issue, then redeploy.</td></tr><tr><td><strong>Deployed</strong></td><td>The deployment was successful and the service is up and running.</td><td>No action needed.</td></tr></tbody></table>

> * If the status is **Addon Failed**, Akinon needs to take action to resolve the issue.
> * If the status is **Failed**, review the **Deployment Logs**, fix the root cause, and trigger a new deployment.
>   {% endstep %}

{% step %}

### Accessing Omnitron

* After the deployment is successful, you will receive an email with:
  * The **URL** to access Omnitron Frontend, and
  * A link to **set your password** via "Update Password".
* Use these credentials to log into Omnitron.

<figure><img src="https://164766933-files.gitbook.io/~/files/v0/b/gitbook-x-prod.appspot.com/o/spaces%2FszVHHD4skw8SftKawRsw%2Fuploads%2FD3bCzNhRJBQDaiTYi3zL%2FScreenshot%202025-04-08%20at%2015.31.59.png?alt=media&amp;token=3959e859-c7a6-41a8-b605-e4d8883436cd" alt=""><figcaption></figcaption></figure>
{% endstep %}

{% step %}

### Add Additional Services to Your Project

* Depending on your contract, you may need to add additional services.
* Common services within the Akinon ecosystem include:
  * Seller Center
  * Instore
  * OMS
  * Commerce
    {% endstep %}

{% step %}

### Adding the Commerce Service

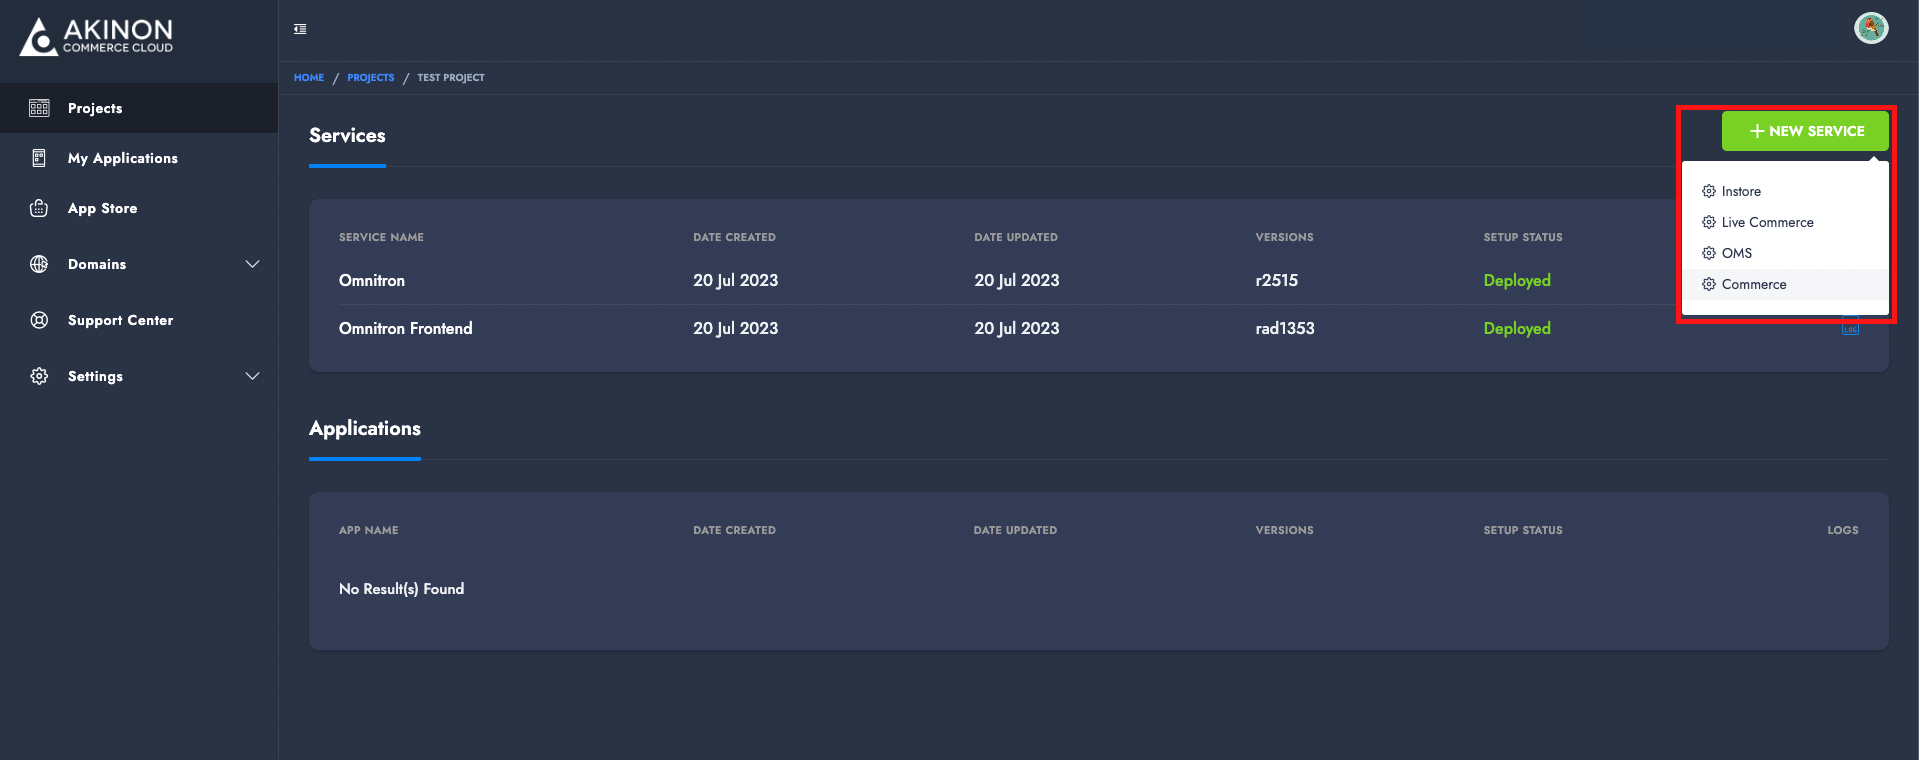
* One of the most commonly used services is **Commerce**.
* To add it:

  * Go to your project’s detail page.
  * Click the **+ NEW SERVICE** button in the upper-right corner.
  * Select **Commerce** from the list.

  <figure><img src="https://164766933-files.gitbook.io/~/files/v0/b/gitbook-x-prod.appspot.com/o/spaces%2FszVHHD4skw8SftKawRsw%2Fuploads%2FYakHmEvxAqdNqOjUAggd%2FScreenshot%202025-04-08%20at%2014.23.44.png?alt=media&amp;token=7c94c401-5ea9-4169-bc05-ac10578a78de" alt=""><figcaption></figcaption></figure>

{% endstep %}

{% step %}

### Confirm the Deployment&#x20;

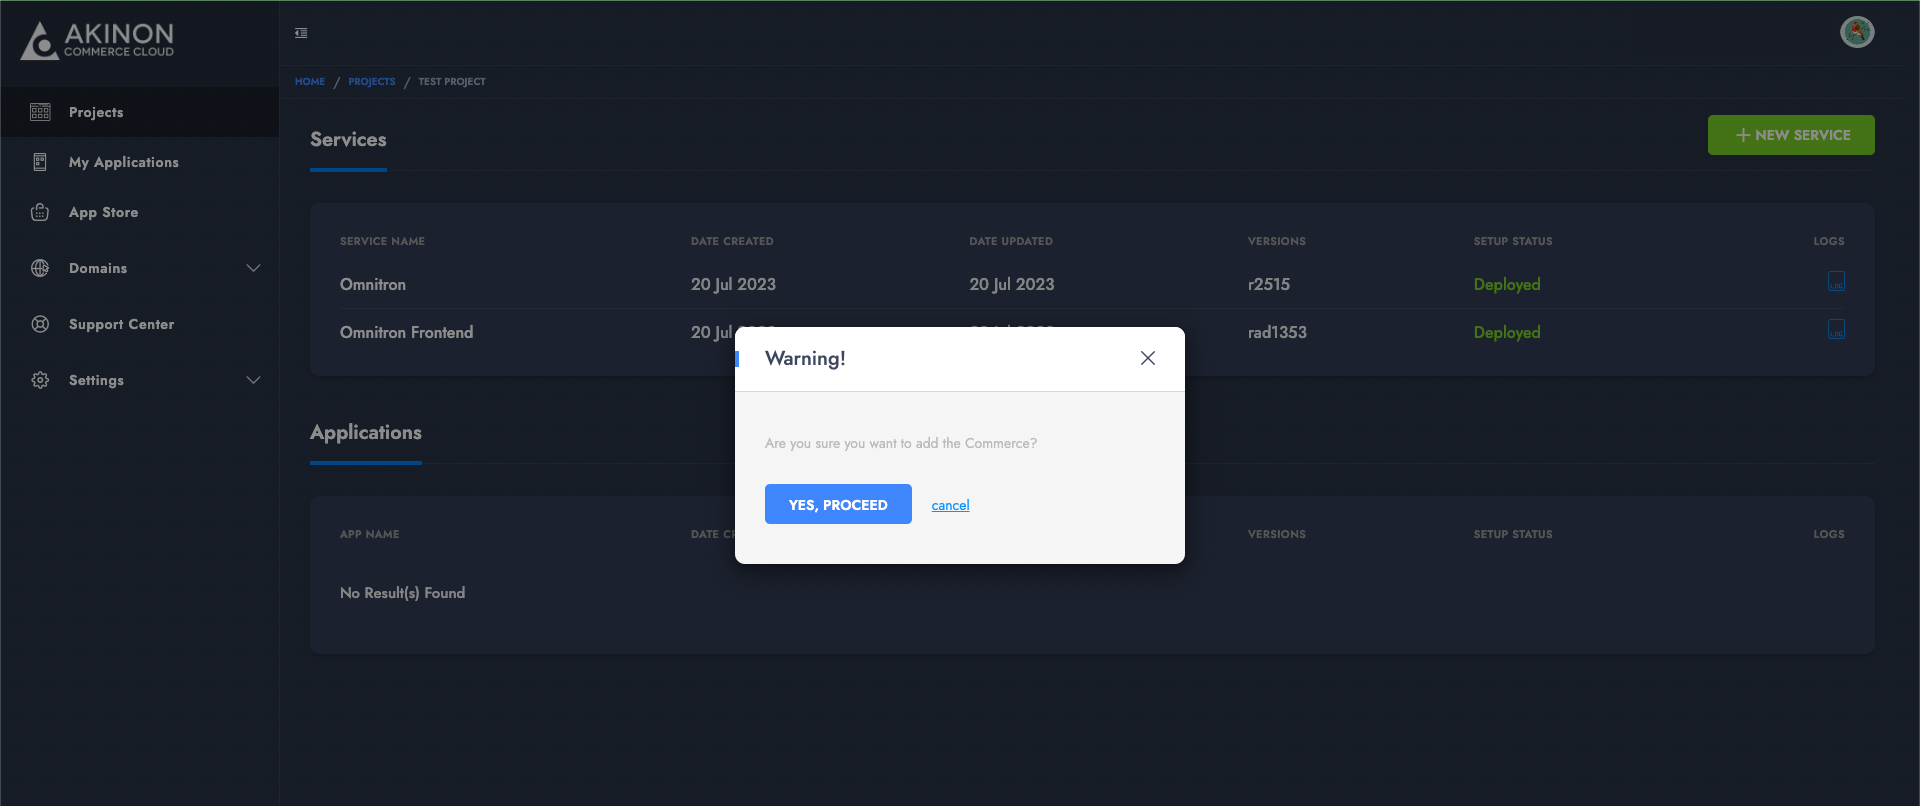
* A validation popup will appear.
* Click **YES, PROCEED** to begin the deployment.

<figure><img src="https://164766933-files.gitbook.io/~/files/v0/b/gitbook-x-prod.appspot.com/o/spaces%2FszVHHD4skw8SftKawRsw%2Fuploads%2FJK2Dczl6eeTqSq0Br1M2%2FScreenshot%202025-04-08%20at%2014.28.17.png?alt=media&amp;token=8060cac3-cf52-42d4-a5fa-78625bdd8dff" alt=""><figcaption></figcaption></figure>

{% hint style="danger" %}
If the Omnitron deployment is not yet complete, you will see a warning message.\
You must wait for Omnitron to be deployed before you can add any new services.
{% endhint %}

<figure><img src="https://164766933-files.gitbook.io/~/files/v0/b/gitbook-x-prod.appspot.com/o/spaces%2FszVHHD4skw8SftKawRsw%2Fuploads%2FsiKYeKcUjhPvH5OLT2mT%2FScreenshot%202025-04-08%20at%2014.32.32.png?alt=media&amp;token=b0aa1007-1d6a-48cd-890f-b95e2902ba47" alt=""><figcaption></figcaption></figure>
{% endstep %}

{% step %}

### Deployment of Commerce Service

* The Commerce service will begin deploying immediately after confirmation.

<figure><img src="https://164766933-files.gitbook.io/~/files/v0/b/gitbook-x-prod.appspot.com/o/spaces%2FszVHHD4skw8SftKawRsw%2Fuploads%2FYS9Qx4GCW4o9Tif5B1ot%2FScreenshot%202025-04-08%20at%2015.27.35.png?alt=media&amp;token=fcd0a23a-48e9-4da2-a1be-c7e786bcffeb" alt=""><figcaption></figcaption></figure>
{% endstep %}

{% step %}

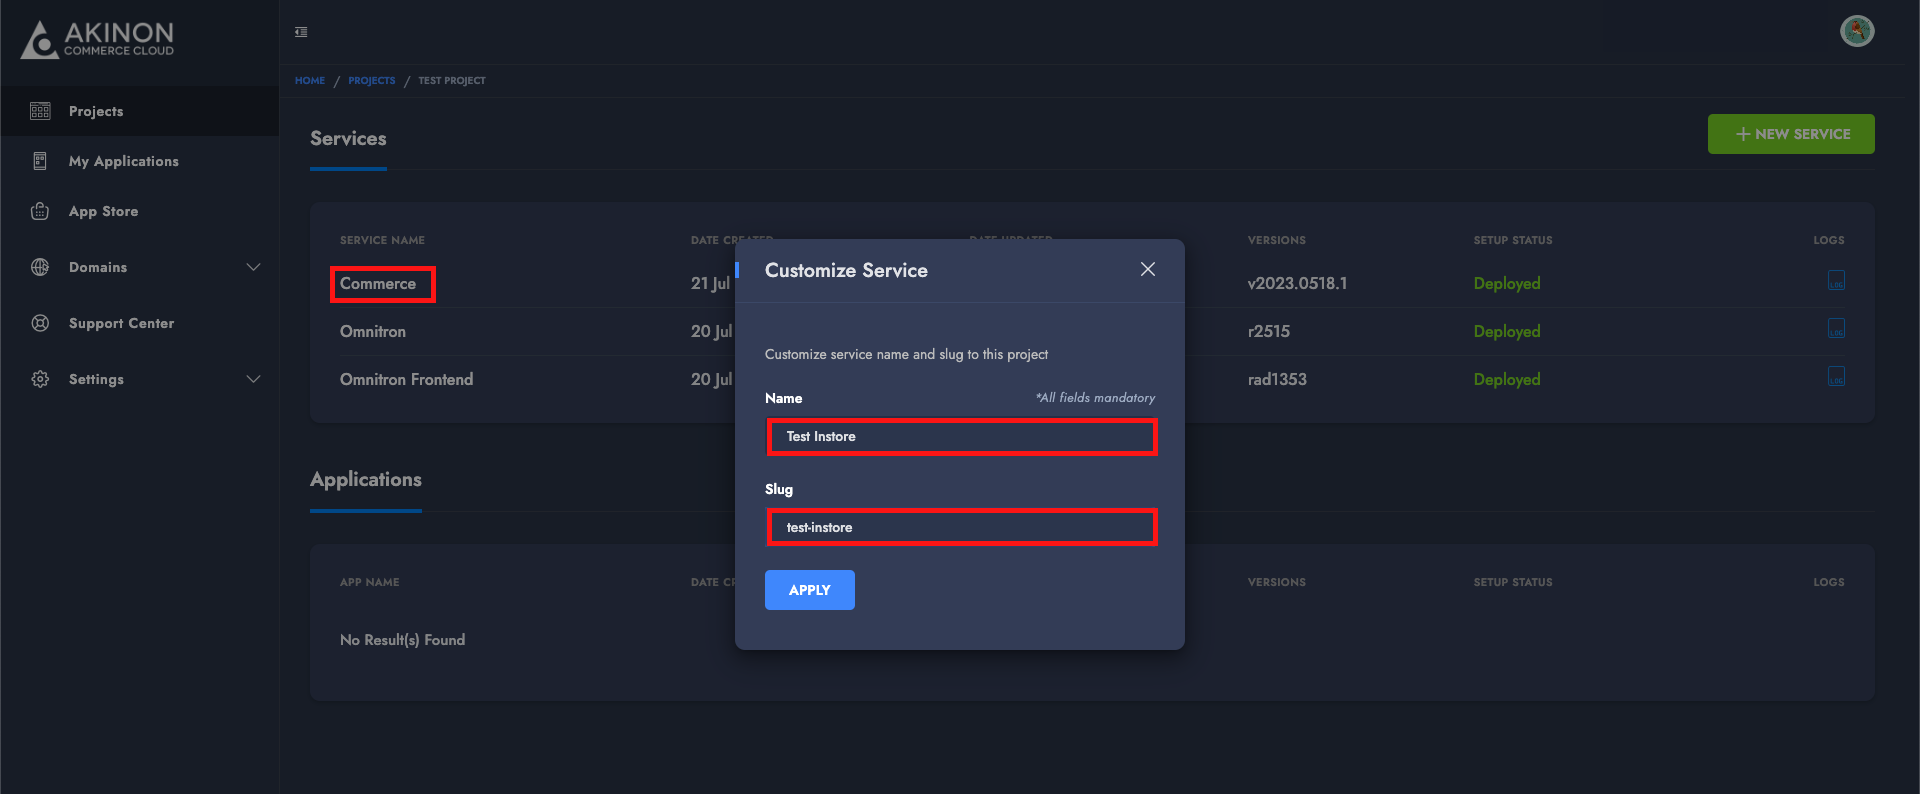
### Deployment Status Update

* Once completed, the status will be updated to **Deployed**, indicating it is ready for use.

<figure><img src="https://164766933-files.gitbook.io/~/files/v0/b/gitbook-x-prod.appspot.com/o/spaces%2FszVHHD4skw8SftKawRsw%2Fuploads%2FdNblCP8lW8WOkqxsyoZS%2FScreenshot%202025-04-09%20at%2015.26.30.png?alt=media&amp;token=495ec1ab-a623-42af-b457-459bafaac7d5" alt=""><figcaption></figcaption></figure>

Different deployment statuses may be displayed depending on the current state of the deployment process. Below is a list of possible statuses and the actions that need to be taken for each:

<table><thead><tr><th width="151.76171875">Status</th><th width="284.390625">Description</th><th>Action Required</th></tr></thead><tbody><tr><td><strong>Deploy Needed</strong></td><td>The service has been added, but a version has not been deployed yet.</td><td>A new deployment must be initiated.</td></tr><tr><td><strong>Pending</strong></td><td>The deployment is queued and waiting to be processed.</td><td>No action required. Wait for it to progress.</td></tr><tr><td><strong>Initializing Setup</strong></td><td>Add-ons are currently being installed.</td><td>No action required. Wait for initialization to complete.</td></tr><tr><td><strong>Addon Failed</strong></td><td>An error occurred during the installation of one or more add-ons.</td><td>Akinon support must investigate and resolve the issue.</td></tr><tr><td><strong>Deploying</strong></td><td>A version is currently being deployed.</td><td>No action required. Wait for the deployment to complete.</td></tr><tr><td><strong>Failed</strong></td><td>The deployment process failed.</td><td>Review the Deployment Logs to identify and fix the issue, then redeploy.</td></tr><tr><td><strong>Deployed</strong></td><td>The deployment was successful and the service is up and running.</td><td>No action needed.</td></tr></tbody></table>

> * If the status is **Addon Failed**, Akinon needs to take action to resolve the issue.
> * If the status is **Failed**, review the **Deployment Logs**, fix the root cause, and trigger a new deployment.
>   {% endstep %}
>   {% endstepper %}


# 2. Set Up Language & Locale

Once the initial ACC deployments are completed, the next essential step before proceeding with other configurations is setting the **project locales** and defining the **default language**.&#x20;

### <mark style="color:red;">What Are Locales?</mark>

**Locales** determine how language-specific content is managed and presented throughout the project. They control:

* How product attribute values and other localizable data are stored and displayed,
* Which languages are available for input and output in Omnitron and Commerce,
* The localization of content across multiple channels and regions.

The locales you define will appear at the top of the Omnitron interface and serve as the basis for content management. For example, you can set `tr-tr` for Turkish and `en-us` for English, enabling you to manage product names, descriptions, or other translatable fields in both languages.

{% hint style="warning" %}
Locales must be defined *before* entering any data into Omnitron. If content is entered before locales are properly configured, re-entry may be required.
{% endhint %}

### <mark style="color:red;">What Is the Default Language?</mark>

The **default language** determines which locale is used in requests and API responses when no specific language is provided by the client. For example, if no `Accept-Language` header is specified in a request, the system will respond using the default language.

This ensures consistency in responses and provides a fallback option for multilingual setups. It also affects system messages, validation errors, and user interface language when a specific language is not explicitly selected.

By default, English is set as the default locale.

<figure><img src="https://164766933-files.gitbook.io/~/files/v0/b/gitbook-x-prod.appspot.com/o/spaces%2FszVHHD4skw8SftKawRsw%2Fuploads%2FlLZJLORDAMvnsAkdddgL%2FScreenshot%202025-04-08%20at%2015.51.17.png?alt=media&amp;token=9adb2fe4-3db4-4059-956d-d3c4d2029f6f" alt=""><figcaption></figcaption></figure>

If you plan to use a locale other than English or change the default language, this must be configured through **environment variables** in both the **Commerce** and **Omnitron** services.

{% hint style="danger" %}
The language settings defined via environment variables **must be identical** in both Commerce and Omnitron services. These settings must be applied **immediately after the services are deployed and before any other configuration begins**. Otherwise, language-related issues may arise later during your project setup or runtime.
{% endhint %}

### <mark style="color:red;">Supported Languages in the System</mark>

Below is the list of ISO language codes currently supported by the system:

```ini
ar    ➡ Arabic 🇸🇦
el    ➡ Greek 🇬🇷
kk    ➡ Kazakh 🇰🇿
nl    ➡ Dutch 🇳🇱
pl    ➡ Polish 🇵🇱
ro    ➡ Romanian 🇷🇴
ru    ➡ Russian 🇷🇺
sr    ➡ Serbian 🇷🇸
tr-tr ➡ Turkish 🇹🇷
uk    ➡ Ukrainian 🇺🇦
```

{% hint style="warning" %}
If you require support for a language not listed above, please contact the Akinon team to discuss availability and integration options.
{% endhint %}

### <mark style="color:red;">Setting Language Environment Variables</mark>

To set a default language and supported locales (e.g., Turkish as default along with English), follow the steps below:

{% stepper %}
{% step %}

### Configure Language for Omnitron Service

* Navigate to the **Project Details** page.
* Click on the **Omnitron** service.

<figure><img src="https://164766933-files.gitbook.io/~/files/v0/b/gitbook-x-prod.appspot.com/o/spaces%2FszVHHD4skw8SftKawRsw%2Fuploads%2FTNz1P5GjVGKowyXKUrgc%2FScreenshot%202025-04-09%20at%2014.16.05.png?alt=media&amp;token=b33a6688-9bef-4022-b787-219ad9c3d1d3" alt=""><figcaption></figcaption></figure>

* Click the **VIEW ENVIRONMENT VARIABLES** button.

<figure><img src="https://164766933-files.gitbook.io/~/files/v0/b/gitbook-x-prod.appspot.com/o/spaces%2FszVHHD4skw8SftKawRsw%2Fuploads%2FqOQhxsZV81WCUM9PizE8%2FScreenshot%202025-04-09%20at%2014.20.43.png?alt=media&amp;token=7f7a57d6-c0e7-40dc-86a4-90cac3ed6d2c" alt=""><figcaption></figcaption></figure>

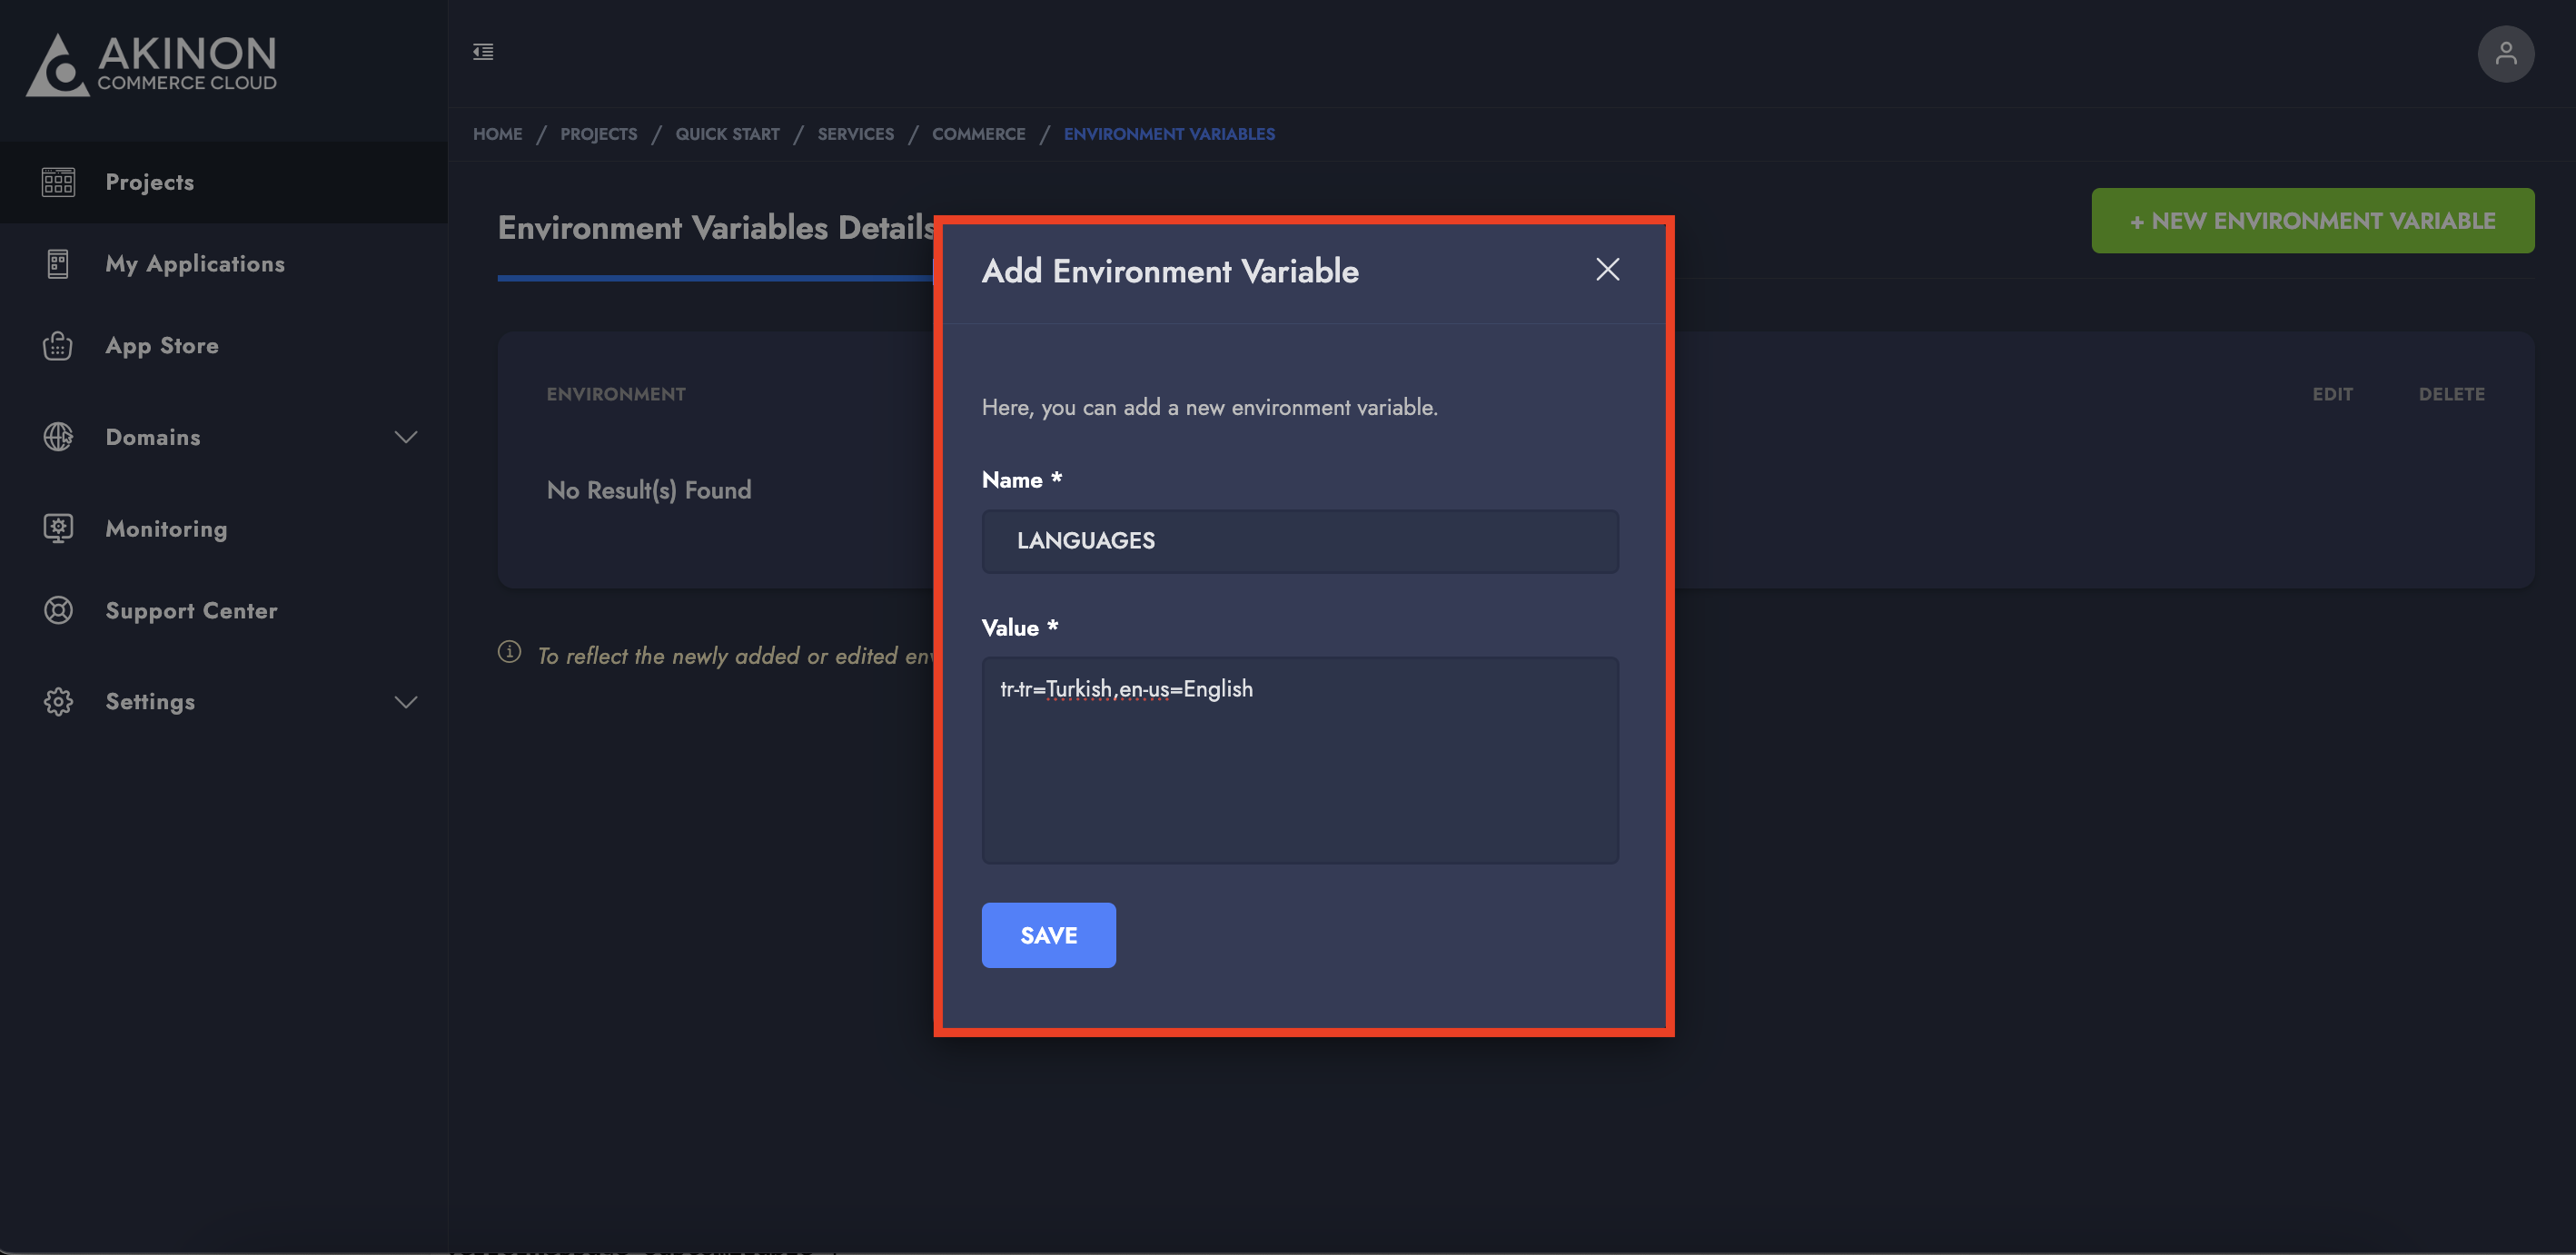
* Add the following two variables using the **+ NEW ENVIRONMENT VARIABLE** button:\
  \
  ***For locales:***

  * `Name`: `LANGUAGES`
  * `Value`: `tr-tr=Turkish,en-us=English`&#x20;

  <figure><img src="https://164766933-files.gitbook.io/~/files/v0/b/gitbook-x-prod.appspot.com/o/spaces%2FszVHHD4skw8SftKawRsw%2Fuploads%2Fkc7uGqDEb3s4mRAHvVvP%2FScreenshot%202025-04-09%20at%2014.33.58.png?alt=media&amp;token=9d68dc24-2d2a-42a7-8dba-3b35699dcf5a" alt=""><figcaption></figcaption></figure>

  ***For default language:***

  * `Name`: `LANGUAGE_CODE`
  * `Value`: `tr-tr`

  <figure><img src="https://164766933-files.gitbook.io/~/files/v0/b/gitbook-x-prod.appspot.com/o/spaces%2FszVHHD4skw8SftKawRsw%2Fuploads%2FsXDBqwfdFf2TKlhVcNVd%2FScreenshot%202025-04-09%20at%2014.34.42.png?alt=media&amp;token=36b47376-f2d4-4604-a5ac-ae7cccde2849" alt=""><figcaption></figcaption></figure>

{% endstep %}

{% step %}

### Configure Language for Commerce Service

* Return to the **Project Details** page.
* Click on the **Commerce** service.

<figure><img src="https://164766933-files.gitbook.io/~/files/v0/b/gitbook-x-prod.appspot.com/o/spaces%2FszVHHD4skw8SftKawRsw%2Fuploads%2FKZ9GNuSY7dW960X8SDVi%2FScreenshot%202025-04-09%20at%2014.37.10.png?alt=media&amp;token=1888621c-7b84-48da-9aa3-1c327bdeea12" alt=""><figcaption></figcaption></figure>

* Click the **VIEW ENVIRONMENT VARIABLES** button.

<figure><img src="https://164766933-files.gitbook.io/~/files/v0/b/gitbook-x-prod.appspot.com/o/spaces%2FszVHHD4skw8SftKawRsw%2Fuploads%2Fj5qa4jvxRraQ4BmdSdql%2FScreenshot%202025-04-09%20at%2014.10.27.png?alt=media&amp;token=83c5b112-bb10-4184-896f-d247604c9b4b" alt=""><figcaption></figcaption></figure>

* Again, add the **same two variables** as configured for Omnitron:\
  \
  ***For locales:***

  * `Name`: `LANGUAGES`
  * `Value`: `tr-tr=Turkish,en-us=English`&#x20;

  <figure><img src="https://164766933-files.gitbook.io/~/files/v0/b/gitbook-x-prod.appspot.com/o/spaces%2FszVHHD4skw8SftKawRsw%2Fuploads%2FyysGGcF0O1Sl1o40Fjjl%2Fimage.png?alt=media&amp;token=aba6755d-bc35-4010-b605-7cb4791ebcb0" alt=""><figcaption></figcaption></figure>

  ***For default language:***

  * `Name`: `LANGUAGE_CODE`
  * `Value`: `tr-tr`&#x20;

  <figure><img src="https://164766933-files.gitbook.io/~/files/v0/b/gitbook-x-prod.appspot.com/o/spaces%2FszVHHD4skw8SftKawRsw%2Fuploads%2FZsM4A6qbqqLFnT56CAvT%2Fimage.png?alt=media&amp;token=a6f64e71-0429-483d-80af-f4cc40f7ac83" alt=""><figcaption></figcaption></figure>

{% endstep %}

{% step %}

### Final Step: Redeploy to Apply Language Settings

After adding the language environment variables, the new language settings will only take effect **after a new version is deployed** for both Commerce and Omnitron services.

> 📩 **Please contact the Akinon team** to request a new deployment version for each service.

Once deployment is complete, the newly added locales will become available and selectable within the **Locales** section in **Omnitron Frontend**.

<figure><img src="https://164766933-files.gitbook.io/~/files/v0/b/gitbook-x-prod.appspot.com/o/spaces%2FszVHHD4skw8SftKawRsw%2Fuploads%2FeG2uI2WYw8VFGbpcMwp0%2FScreenshot%202025-04-09%20at%2015.21.05.png?alt=media&amp;token=bf67121b-90ce-431f-91cf-2519246face2" alt=""><figcaption></figcaption></figure>
{% endstep %}
{% endstepper %}


# 3. Define Store Currencies

In addition to language settings, it is essential to configure the **currencies** your project will support. By default, the system is configured to use the Turkish Lira (`try`). If you wish to use a different currency, follow the steps below to ensure proper setup.

{% stepper %}
{% step %}

### Define Supported Currencies \[`AVAILABLE_CURRENCIES`]

To use a currency other than the default, it must first be added to the system via the `AVAILABLE_CURRENCIES` dynamic setting.

* Navigate to **Omnitron > Sales Channels > Sales Channel Settings > Dynamic Settings**.
* Locate the `AVAILABLE_CURRENCIES` setting.
* Click on the **+ Add Field** button.
* From the dropdown menu, select the currency (e.g., `usd`, `eur`, etc.) you want to enable.
* Click **Save** to apply the change.

<figure><img src="https://164766933-files.gitbook.io/~/files/v0/b/gitbook-x-prod.appspot.com/o/spaces%2FszVHHD4skw8SftKawRsw%2Fuploads%2Fi09gbZzacBmxHEqVYvtD%2FScreenshot%202025-04-10%20at%2016.37.43.png?alt=media&amp;token=9366de73-6d47-4fdc-94c2-626ff69c26a8" alt=""><figcaption></figcaption></figure>

⚠️ If a currency is not defined in `AVAILABLE_CURRENCIES`, attempting to use it in the next step as the default currency will result in an error.
{% endstep %}

{% step %}

### Set the Default Currency \[`DEFAULT_CURRENCY`]

After defining the available currencies, you must designate one of them as the default currency.

* In the same location (**Omnitron > Sales Channels > Sales Channel Settings > Dynamic Settings**), locate the `DEFAULT_CURRENCY` setting.
* In the **Value** field, enter the code of the currency you previously added via `AVAILABLE_CURRENCIES`.
* Click **Save**.

<figure><img src="https://164766933-files.gitbook.io/~/files/v0/b/gitbook-x-prod.appspot.com/o/spaces%2FszVHHD4skw8SftKawRsw%2Fuploads%2FHwqI9obma2wdlBi2S3Cs%2FScreenshot%202025-04-10%20at%2016.42.13.png?alt=media&amp;token=39daf9b5-f535-4a4b-aca3-8373c3a98c3a" alt=""><figcaption></figcaption></figure>
{% endstep %}

{% step %}

### Supported Currency Codes

The system currently supports the following currency codes:

```
try ➡ Turkish Lira 🇹🇷
eur ➡ Euro 🏦
usd ➡ US Dollar 🇺🇸
egp ➡ Egyptian Pound 🇪🇬
gbp ➡ British Pound 🇬🇧
mad ➡ Moroccan Dirham 🇲🇦
pln ➡ Polish Zloty 🇵🇱
sar ➡ Saudi Riyal 🇸🇦
ron ➡ Romanian Leu 🇷🇴
uah ➡ Ukrainian Hryvnia 🇺🇦
czk ➡ Czech Koruna 🇨🇿
huf ➡ Hungarian Forint 🇭🇺
rub ➡ Russian Ruble 🇷🇺
bgn ➡ Bulgarian Lev 🇧🇬
iqd ➡ Iraqi Dinar 🇮🇶
kwd ➡ Kuwaiti Dinar 🇰🇼
bhd ➡ Bahraini Dinar 🇧🇭
omr ➡ Omani Rial 🇴🇲
qar ➡ Qatari Rial 🇶🇦
aed ➡ UAE Dirham 🇦🇪
ngn ➡ Nigerian Naira 🇳🇬
inr ➡ Indian Rupee 🇮🇳
lei ➡ Romanian Leu 🇷🇴
kzt ➡ Kazakhstani Tenge 🇰🇿
jod ➡ Jordanian Dinar 🇯🇴
rsd ➡ Serbian Dinar 🇷🇸
```

{% endstep %}
{% endstepper %}


# 4. Format Phone Numbers

If your customers are located outside of Turkey, it's essential to configure phone number validation and formatting rules appropriately. By default, Akinon systems are configured to validate Turkish mobile numbers. To ensure accurate data collection for international numbers, you must adjust two dynamic settings.<br>

{% stepper %}
{% step %}

### Define the Validation Rule with Regex \[`USER_PHONE_REGEX`]

The `USER_PHONE_REGEX` dynamic setting defines the validation rule for user phone numbers using a regular expression (regex).

**To configure this setting:**

* Go to **Omnitron > Sales Channels > Sales Channel Settings > Dynamic Settings**.
* Locate the `USER_PHONE_REGEX` setting.

By default, this setting is configured for Turkish phone numbers:

```regex
^(05)\d{9}$
```

**Breakdown of the default pattern:**

* `^` — Anchors the match to the beginning of the string
* `(05)` — The number must start with “05”
* `\d{9}` — Followed by exactly 9 digits
* `$` — Anchors the match to the end of the string

This pattern matches exactly 11-digit Turkish mobile numbers (e.g., 05xxxxxxxxx).

If your store serves users in other countries, you should **replace this pattern with a valid regex** for your desired format.

Need help with regex? [Here's a great resource](https://regex101.com/) for building patterns.

Once entered, **click Save** to apply the setting.

<figure><img src="https://164766933-files.gitbook.io/~/files/v0/b/gitbook-x-prod.appspot.com/o/spaces%2FszVHHD4skw8SftKawRsw%2Fuploads%2F9jgDF9GUzT72MDyk8bZz%2FScreenshot%202025-04-10%20at%2017.13.21.png?alt=media&amp;token=f006efa3-6e98-4de4-b26d-3daeb2b0adbc" alt=""><figcaption></figcaption></figure>
{% endstep %}

{% step %}

### Define the Display Format \[`USER_PHONE_FORMAT`]

The `USER_PHONE_FORMAT` dynamic setting controls the **human-readable** format for displaying user phone numbers.

**To configure this setting:**

* Stay in the **Dynamic Settings** section of the same Sales Channel.
* Locate the `USER_PHONE_FORMAT` setting.
* Enter the display format for phone numbers based on your country’s format (e.g., `+44XXXXXXXXXX` or `XXXXXXXXXX`).
* Click **Save** to apply the setting.

<figure><img src="https://164766933-files.gitbook.io/~/files/v0/b/gitbook-x-prod.appspot.com/o/spaces%2FszVHHD4skw8SftKawRsw%2Fuploads%2FtYBPyzHlt0puFhOHfm9Q%2FScreenshot%202025-04-10%20at%2017.11.15.png?alt=media&amp;token=47c139b8-d009-482d-98ca-0539e4d0b15e" alt=""><figcaption></figcaption></figure>

> ⚠️ The format you define in `USER_PHONE_FORMAT` **must be consistent** with the validation rule defined in `USER_PHONE_REGEX`.
>
> If they conflict, warning messages will be shown to users when inputting their phone numbers.
> {% endstep %}
> {% endstepper %}


# 5. Integrate Omnitron & Integrator

Before products can appear on your live site, you must first configure the catalog, product details, prices, stock information, payment, and shipping options in **Omnitron**. These configurations also enable data exchange between your ERP and Omnitron via **Integrator Flows**, ensuring real-time updates.

This section outlines the complete setup process—starting from catalog creation to address mapping—to ensure your products are ready for storefront.

### 1. Creating a Catalog

A **Catalog** is the foundational structure for managing products in Omnitron. It acts as a container that groups together product data, stock and price lists, and channel assignments. Every product you create, as well as its related configurations, must be assigned to a catalog to be published to the storefront.

<figure><img src="https://164766933-files.gitbook.io/~/files/v0/b/gitbook-x-prod.appspot.com/o/spaces%2FszVHHD4skw8SftKawRsw%2Fuploads%2FNSzGhHIpSqBATtLZCY6B%2Fimage.png?alt=media&amp;token=36867d12-4e95-4c2c-b5c0-5e60da978e39" alt=""><figcaption></figcaption></figure>

Once the catalog is created:

* Products should be linked to this catalog.
* Price and stock lists should be associated.
* Sales channels should be assigned to this catalog to ensure proper product visibility.

{% hint style="success" %}
For step-by-step instructions on creating and configuring a catalog, refer to the [Catalogs](/tutorials/omnitron/products-and-catalogs/how-to-manage-catalogs-in-omnitron) tutorial.
{% endhint %}

Once the catalog is created, you can proceed with defining **Attributes** and **Attribute Sets** to describe your products in detail.

***

### 2. Creating Attributes and Attribute Sets

Before creating products, you need to define their characteristics. This is done through **Attributes**, which are specific properties like color, size, or material.

<figure><img src="https://164766933-files.gitbook.io/~/files/v0/b/gitbook-x-prod.appspot.com/o/spaces%2FszVHHD4skw8SftKawRsw%2Fuploads%2F5unSAzwVP48BawtoB1CD%2Fimage.png?alt=media&amp;token=4f69ed07-59de-4407-beec-d8d815e3f513" alt=""><figcaption></figcaption></figure>

Once you have several attributes that logically belong together (e.g., size and color for clothing), you can bundle them into an **Attribute Set**. Attribute Sets make it easier to manage product structures and apply them consistently across similar product types or categories.

<figure><img src="https://164766933-files.gitbook.io/~/files/v0/b/gitbook-x-prod.appspot.com/o/spaces%2FszVHHD4skw8SftKawRsw%2Fuploads%2F16OQX7uC2ddpi9BvHg6H%2Fimage.png?alt=media&amp;token=133b6e10-177a-4af4-9204-855f6efe9ea5" alt=""><figcaption></figcaption></figure>

These elements not only help define your products clearly but also enable filtering and categorization in your storefront.

{% hint style="success" %}
For step-by-step instructions on creating and configuring attributes and attribute sets, refer to the [Attributes and Attribute Sets](/tutorials/omnitron/products-and-catalogs/how-to-create-product-attributes-and-attribute-sets-in-omnitron) tutorial.
{% endhint %}

***

### 3. Creating Products

With your catalog and attributes and attribute sets in place, you can now begin creating products. Each product must be associated with a catalog and assigned an attribute set that reflects its characteristics.

To get started quickly, creating a **Simple** product type is enough for now. For detailed, step-by-step instructions on how to create and configure all product types, refer to the [**Product Types**](/technical-guides/omnitron/product-types) tutorial.

When creating a product, you will:

* Enter basic product information (name, SKU, base code, etc.).
* Select the appropriate attribute set.

<figure><img src="https://164766933-files.gitbook.io/~/files/v0/b/gitbook-x-prod.appspot.com/o/spaces%2FszVHHD4skw8SftKawRsw%2Fuploads%2FKr3k1sSRosuXzxjIVskd%2Fimage.png?alt=media&amp;token=8186b517-47d6-4816-aaa2-decb1167889c" alt=""><figcaption></figcaption></figure>

* After entering basic product details and saving, a **Product Pictures** section will appear—upload at least one image. Images are mandatory for product visibility in storefront.

<figure><img src="https://164766933-files.gitbook.io/~/files/v0/b/gitbook-x-prod.appspot.com/o/spaces%2FszVHHD4skw8SftKawRsw%2Fuploads%2FkNmkFkol01kawXX9g85C%2FScreenshot%202025-04-16%20at%2013.19.14.png?alt=media&amp;token=70358a5b-efab-497d-829f-f391bf266148" alt=""><figcaption></figcaption></figure>

* **Image Requirements & Limitations**

  To ensure proper display and performance across all devices and channels, product images must meet the following requirements:

  * **Accepted file formats:** `jpeg`, `jpg`, `png`, `gif`, `webp`
  * **Minimum requirement:** At least one image must be uploaded per product.
  * **Maximum dimensions:**\
    Image size is controlled by a dynamic configuration setting called `MAX_IMAGE_DIMENSIONS`, which ensures uploaded images do not exceed certain dimensions for performance and quality purposes.

    **Default limits:**

    ```json
    MAX_IMAGE_DIMENSIONS = {
      "WIDTH": 2000,
      "HEIGHT": 2000
    }
    ```

  If an uploaded image exceeds these dimensions, it may be automatically rejected or resized depending on system behavior and configuration.\\

  <figure><img src="https://164766933-files.gitbook.io/~/files/v0/b/gitbook-x-prod.appspot.com/o/spaces%2FszVHHD4skw8SftKawRsw%2Fuploads%2FnX2yQ29d3g4owQPv3ur1%2Fimage.png?alt=media&amp;token=e7f61bf3-a437-41ba-badc-456986f6d9c3" alt=""><figcaption></figcaption></figure>
* This way, the product you created will be listed in the Product Pool.

  <figure><img src="https://164766933-files.gitbook.io/~/files/v0/b/gitbook-x-prod.appspot.com/o/spaces%2FszVHHD4skw8SftKawRsw%2Fuploads%2FXLzABdswWnDzoBseM4IV%2Fimage.png?alt=media&amp;token=2e3ba9f6-2467-4d24-a2c2-cc903f65ab4e" alt=""><figcaption></figcaption></figure>

{% hint style="info" %}
**Alternative: Using Integrator Product Flow**

While it’s possible to create and manage products manually, it’s strongly recommended to automate the process using the **Integrator** [**Product Flow**](/tutorials/integrator/flows/product-flow). This ensures real-time synchronization between your ERP system and Omnitron.
{% endhint %}

***

### 4. Creating a Price List

Every product must be assigned a price. To manage this, you first need to create a **Price List** in Omnitron. A price list can include multiple products, and each can have its own price within that list.

Key steps:

* Create a price list.

<figure><img src="https://164766933-files.gitbook.io/~/files/v0/b/gitbook-x-prod.appspot.com/o/spaces%2FszVHHD4skw8SftKawRsw%2Fuploads%2Fgb4fTihFKwD4Ni8Oyaag%2FScreenshot%202025-04-16%20at%2013.25.38.png?alt=media&amp;token=db5c0f66-e3ea-44cb-a316-134380840bb8" alt=""><figcaption></figcaption></figure>

* Add product entries and define the selling price for each product.

<figure><img src="https://164766933-files.gitbook.io/~/files/v0/b/gitbook-x-prod.appspot.com/o/spaces%2FszVHHD4skw8SftKawRsw%2Fuploads%2FFiD6EeLaxXLMSpSg7Xkt%2Fimage.png?alt=media&amp;token=6f520422-ea5e-4982-8024-d2726475f278" alt=""><figcaption></figcaption></figure>

{% hint style="success" %}
For step-by-step instructions on creating and configuring price lists, refer to the [**Price Lists**](/tutorials/omnitron/products-and-catalogs/how-to-create-and-update-price-lists-in-omnitron) tutorial.
{% endhint %}

{% hint style="info" %}
**Alternative: Using Integrator Price Flow**

While this can be done manually, it's more efficient to use the **Integrator** [**Price Flow**](/tutorials/integrator/flows/price-flow), which pulls pricing information directly from your ERP.
{% endhint %}

***

### 5. Creating a Stock List

Just like pricing, stock availability is essential for product visibility and order processing. A **Stock List** defines the stock quantity of products and links them to a specific catalog and sales channel.

Key steps:

* Create a stock list.

<figure><img src="https://164766933-files.gitbook.io/~/files/v0/b/gitbook-x-prod.appspot.com/o/spaces%2FszVHHD4skw8SftKawRsw%2Fuploads%2FTdNh9pjWirtouEIBuMVS%2Fimage.png?alt=media&amp;token=6276600e-1e93-464b-b27f-a5a683e99c6f" alt=""><figcaption></figcaption></figure>

* Add product entries and their available stock quantities.

<figure><img src="https://164766933-files.gitbook.io/~/files/v0/b/gitbook-x-prod.appspot.com/o/spaces%2FszVHHD4skw8SftKawRsw%2Fuploads%2FystTYR5up3lg3IaPi6ZU%2Fimage.png?alt=media&amp;token=32939362-f51b-4cba-9e31-e831cca395a2" alt=""><figcaption></figcaption></figure>

{% hint style="success" %}
For step-by-step instructions on creating and configuring stock lists, refer to the [**Stock Lists**](/tutorials/omnitron/products-and-catalogs/how-to-create-and-update-stock-lists-in-omnitron) tutorial.
{% endhint %}

{% hint style="info" %}
**Alternative: Using Integrator Stock Flow**

Use the **Integrator** [**Stock Flow**](/tutorials/integrator/flows/stock-flow) to automate stock updates based on your ERP system. This avoids inconsistencies and ensures up-to-date inventory data.
{% endhint %}

***

### 6. Catalog Control and Assignments

The catalog configuration process includes multiple detailed steps—**each of which must be followed carefully to ensure your products are correctly displayed in the storefront**. From assigning products to catalogs, linking price and stock lists, setting categories, to final catalog validation and sorting—each task plays a critical role and must be completed carefully and thoroughly. Otherwise, even if your product configurations are technically correct, they may not be visible in the storefront.

{% stepper %}
{% step %}

#### **Add Products to Catalog**

On the **Product List** step, products are added to the catalog from the product pool.

* Products can be added individually or in bulk.
* If the **Showing Added Products** checkbox is selected, only unassigned products will be displayed.
* This step links products with the catalog.

<figure><img src="https://164766933-files.gitbook.io/~/files/v0/b/gitbook-x-prod.appspot.com/o/spaces%2FszVHHD4skw8SftKawRsw%2Fuploads%2FCUCWjXHidNtJ6DR5nJMS%2Fimage.png?alt=media&amp;token=b4bbe5b3-ec79-411f-87e7-29205a5961ab" alt=""><figcaption></figcaption></figure>
{% endstep %}

{% step %}

#### Assign a Price List

From the **Price List** step, a relevant price list must be assigned.

* Without a price list, products won’t have pricing information and cannot be sold.

<figure><img src="https://164766933-files.gitbook.io/~/files/v0/b/gitbook-x-prod.appspot.com/o/spaces%2FszVHHD4skw8SftKawRsw%2Fuploads%2FuIAQqpjfVOL9IxN2cC5L%2Fimage.png?alt=media&amp;token=10d2d53c-3898-40ca-8c4d-f36873d4b7f4" alt=""><figcaption></figcaption></figure>
{% endstep %}

{% step %}

#### Assign a Stock List

Navigate to the **Stock List** step to assign a stock list to the catalog.

* Without stock data, products are considered unavailable.

<figure><img src="https://164766933-files.gitbook.io/~/files/v0/b/gitbook-x-prod.appspot.com/o/spaces%2FszVHHD4skw8SftKawRsw%2Fuploads%2FpMkKiGaYAioxfM96Zgif%2Fimage.png?alt=media&amp;token=bcde782a-2775-4cab-bdf5-5c38e53f9b4b" alt=""><figcaption></figcaption></figure>
{% endstep %}

{% step %}

#### Categorize Products

On the **Categories** step, the category tree is created, and products are assigned to categories.

* Category structure improves product discoverability and enhances product organization.
* For additional flexibility, product categorization can be done automatically using **Auto Assign Rules**, which allow bulk category assignments based on defined conditions. Explore more in the [**Product Categorization**](/technical-guides/omnitron/product-categorization) documentation.

<figure><img src="https://164766933-files.gitbook.io/~/files/v0/b/gitbook-x-prod.appspot.com/o/spaces%2FszVHHD4skw8SftKawRsw%2Fuploads%2FJ1fzBd5hgtcpDrnUCdNc%2Fimage.png?alt=media&amp;token=bb474d71-ea27-4867-a805-0c3d358a05db" alt=""><figcaption></figcaption></figure>
{% endstep %}

{% step %}

#### Catalog Control (💡 The Most Critical Step)

The **Catalog Control** page is your final checkpoint to verify that all assignments are correctly made.

* After all assignments are made, apply the following filters on the product list section.

  * ***Catalog View: Only products with Catalog***\
    Filters and displays only the products that are linked to a catalog. This ensures that the product is part of a defined catalog structure and can be routed through sales channels.
  * ***Category View: Only products with Category***\
    Filters products that are assigned to a category. Products must belong to at least one category to be properly browsed and displayed on the storefront.
  * ***Price List View: Only products with Price List***\
    Displays products with a price defined via a price list. Without pricing, products cannot be purchased or shown with their price details.
  * ***Stock List View: Only products with Stock List***\
    Filters for products that have stock entries in the stock list. Products with no stock won’t be purchasable, even if visible.
  * ***Image: Exist***\
    Filters for products that have at least one image uploaded. As product images are mandatory for storefront visibility, this filter helps confirm visual completeness.

  <figure><img src="https://164766933-files.gitbook.io/~/files/v0/b/gitbook-x-prod.appspot.com/o/spaces%2FszVHHD4skw8SftKawRsw%2Fuploads%2F8sazm4u08n9fS2CU1QpC%2Fimage.png?alt=media&amp;token=1c17d3f8-7074-4165-accb-33206df57327" alt=""><figcaption></figcaption></figure>
* After applying filters, if products do not appear in the product list, they will not show up in the storefront, even if all configurations are technically correct. It's essential to verify that everything is properly assigned to the correct catalog for products to be visible in the storefront.
  {% endstep %}

{% step %}

#### Sorting

From the **Sorting** step, define how products should appear in each category or collection.

<figure><img src="https://164766933-files.gitbook.io/~/files/v0/b/gitbook-x-prod.appspot.com/o/spaces%2FszVHHD4skw8SftKawRsw%2Fuploads%2FvVeSOlELJZwHSsSz70tb%2Fimage.png?alt=media&amp;token=45333173-d2bc-4e94-a91d-eb7aba4d3330" alt=""><figcaption></figcaption></figure>
{% endstep %}

{% step %}

#### Assign Sales Channels

On the **Sales Channels** step, connect your catalog to the appropriate sales channels.

* Without a sales channel assignment, your catalog cannot go live in any store.

<figure><img src="https://164766933-files.gitbook.io/~/files/v0/b/gitbook-x-prod.appspot.com/o/spaces%2FszVHHD4skw8SftKawRsw%2Fuploads%2FpjzPklaKGL514zIJv6oK%2Fimage.png?alt=media&amp;token=02203d71-0c59-4b97-be67-deaaaecd0dc0" alt=""><figcaption></figcaption></figure>
{% endstep %}

{% step %}

#### Configure Settings

In the **Settings** step, you can rename your catalog.

<figure><img src="https://164766933-files.gitbook.io/~/files/v0/b/gitbook-x-prod.appspot.com/o/spaces%2FszVHHD4skw8SftKawRsw%2Fuploads%2FiV24MJDkhTC3P92KOwd1%2Fimage.png?alt=media&amp;token=f4b6a1a4-9db0-4c79-85cd-6c38a96f1320" alt=""><figcaption></figcaption></figure>
{% endstep %}
{% endstepper %}

**In summary**, your catalog setup is only complete once all steps have been carefully followed and verified—especially via the **Catalog Control** page. Each configuration depends on the others, and skipping even one can result in products not appearing on the live site.

***

### **7. Creating a Payment Option**

To enable order placement, at least one **Payment Option** must be configured in Omnitron. For a quick setup, we can define a **Funds Transfer** payment type.

{% hint style="success" %}
For step-by-step instructions on creating and configuring a payment option, refer to the [**Payment Options** ](/tutorials/omnitron/sales-channels/payment-management/how-to-manage-payment-options-in-omnitron)tutorial.
{% endhint %}

As part of the configuration, a JSON config must be provided:

```json
{"initial_order_status": "300"}
```

**What does `"initial_order_status": "300"` mean?**

This parameter defines the initial status the order will have **immediately after it is created** via this payment option.

* **300 → `payment_waiting`**:\
  The order has been received, but payment is still pending. The order remains on hold until the customer completes the payment process.

{% hint style="success" %}
For a complete list of available order status codes and their meanings, please refer to the [**Order Status Codes documentation**](https://apidocs.akinon.com/omnitron/integration/order/order-status-codes-and-cancellation-statuses)**.**
{% endhint %}

<figure><img src="https://164766933-files.gitbook.io/~/files/v0/b/gitbook-x-prod.appspot.com/o/spaces%2FszVHHD4skw8SftKawRsw%2Fuploads%2FW4OkRzM7RnGPxZMNihj0%2FScreenshot%202025-04-15%20at%2011.00.34.png?alt=media&amp;token=61249d40-ae48-4475-a35d-eeb36cb4e467" alt=""><figcaption></figcaption></figure>

Then, define a bank account to be associated with Funds Transfer payment option:

* Create a bank
* Add an IBAN

<figure><img src="https://164766933-files.gitbook.io/~/files/v0/b/gitbook-x-prod.appspot.com/o/spaces%2FszVHHD4skw8SftKawRsw%2Fuploads%2FsVso154h5hoPTro92lmz%2Fimage.png?alt=media&amp;token=d216165f-aac0-4bce-ac36-9bdce98a18fa" alt=""><figcaption></figcaption></figure>

This setup ensures that the payment method appears as an option during checkout.

{% hint style="success" %}
Detailed instructions are available in the [**Banks**](/tutorials/omnitron/sales-channels/payment-management/how-to-manage-banks-in-omnitron) documentation.
{% endhint %}

***

### **8. Creating a Shipping Option**

Shipping management requires defining both a **Shipping Company** and corresponding **Shipping Options**.

Steps include:

* Creating a shipping company with the correct ERP code (used as the slug in defining shipping option step).

<figure><img src="https://164766933-files.gitbook.io/~/files/v0/b/gitbook-x-prod.appspot.com/o/spaces%2FszVHHD4skw8SftKawRsw%2Fuploads%2Fdzc0cD9JkJxfB2pOKeXp%2Fimage.png?alt=media&amp;token=3a279409-f6c8-4a23-8d97-0b014b5cec79" alt=""><figcaption></figcaption></figure>

* Defining a shipping option that references the company and includes calculator and rule, delivery time, etc.

<figure><img src="https://164766933-files.gitbook.io/~/files/v0/b/gitbook-x-prod.appspot.com/o/spaces%2FszVHHD4skw8SftKawRsw%2Fuploads%2FmFz8hSkHc8xr6jQG8sx6%2Fimage.png?alt=media&amp;token=a5fa5b84-b6b1-49b3-8e3d-2749e52217c0" alt=""><figcaption></figcaption></figure>

These options determine how deliveries are calculated and presented to customers.

{% hint style="success" %}
See the [**Shipping Company**](/tutorials/omnitron/settings/how-to-add-and-configure-a-shipping-company-in-omnitron) and [**Shipping Options**](/tutorials/omnitron/sales-channels/sales-channel-settings/how-to-manage-shipping-options-in-omnitron) documentation for full setup guidance.
{% endhint %}

***

### **9. Creating a Delivery Option**

**Delivery Options** define where products will be delivered, based on the customer's address, a retail store, or a pickup location. These options are crucial for managing the logistics flow, ensuring products are delivered to the correct destination.

You can configure delivery rules for:

* Customer's address
* Retail store delivery
* Pickup locations

<figure><img src="https://164766933-files.gitbook.io/~/files/v0/b/gitbook-x-prod.appspot.com/o/spaces%2FszVHHD4skw8SftKawRsw%2Fuploads%2F808wUxC1fh2fylKQ26Y3%2Fimage.png?alt=media&amp;token=f7ea2786-ba1b-4ccf-a1c3-f4feab272001" alt=""><figcaption></figcaption></figure>

{% hint style="success" %}
Follow the steps in the [**Delivery Options**](/tutorials/omnitron/sales-channels/sales-channel-settings/how-to-manage-delivery-options-in-omnitron) documentation to set up these delivery options based on the type of destination chosen.
{% endhint %}

***

### **10. Address Mapping**

The final step before your products go live is configuring **Address Mapping**. This ensures that the geographical data from your ERP matches the address structure required by Omnitron.

By default, mappings for **Turkey** are preloaded. If you're operating in another country, you’ll need to manually map those addresses.

{% hint style="success" %}
Use the [**Address Mapping**](/tutorials/omnitron/sales-channels/sales-channel-settings/how-to-manage-address-mapping-in-omnitron) documentation to perform this task correctly.
{% endhint %}

With these essential setups in place, you can now proceed with launching Project Zero to bring your products live and start selling.


# 6. Set Up Project Zero

Project Zero is Akinon's customizable frontend framework built on Next.js, designed to provide brands with a fast, modern, and flexible storefront experience. Once your products, prices, inventory, and channel settings are successfully configured in Omnitron, setting up Project Zero is the final step to bring your storefront to life.

This setup process connects your backend data to a fully functional frontend, enabling users to browse products, add them to cart, and complete orders using defined payment and shipping methods. Below is a step-by-step guide to setting up, configuring, and deploying your Project Zero application within the ACC platform.

Follow these instructions to:

* Create a new Project Zero app in ACC
* Configure environment variables and Git access
* Deploy your app and connect it to your project
* Go live with a fully integrated storefront experience

Let’s begin.

***

### 1. Creating a New Project Zero Application

To begin, you need to create a new Project Zero application in ACC:

{% stepper %}
{% step %}
Navigate to the **ACC Dashboard** and open the **My Applications** page.
{% endstep %}

{% step %}
Click on the **+ NEW APPLICATION** button.

<figure><img src="https://164766933-files.gitbook.io/~/files/v0/b/gitbook-x-prod.appspot.com/o/spaces%2FszVHHD4skw8SftKawRsw%2Fuploads%2Fjuw2IXWzh6hBfce83VXG%2FScreenshot%202025-04-15%20at%2013.47.38.png?alt=media&amp;token=150a7a82-59b4-47e0-8df9-06fb6767b4d1" alt=""><figcaption></figcaption></figure>
{% endstep %}

{% step %}
Fill in the form for Project Zero:

* **Application Type**: Select `Zero NextJS`
* **Product Images**: Upload at least 4 images.

<figure><img src="https://164766933-files.gitbook.io/~/files/v0/b/gitbook-x-prod.appspot.com/o/spaces%2FszVHHD4skw8SftKawRsw%2Fuploads%2F6mq4WX4gEfSxcGDqzhfF%2FScreenshot%202025-04-15%20at%2013.47.22.png?alt=media&amp;token=f1f31720-776a-4dc7-90bd-44b92bf51089" alt=""><figcaption></figcaption></figure>
{% endstep %}

{% step %}
After completing the form, click **APPLY** to create your application. Your application will now appear on the **My Applications** page.

<figure><img src="https://164766933-files.gitbook.io/~/files/v0/b/gitbook-x-prod.appspot.com/o/spaces%2FszVHHD4skw8SftKawRsw%2Fuploads%2FstpDykjnQMrsYCji06sL%2Fimage.png?alt=media&amp;token=b3806912-3237-488b-9071-e0f42127519a" alt=""><figcaption></figcaption></figure>
{% endstep %}
{% endstepper %}

***

### 2. CLI Setup and Project Initialization&#x20;

To set up your Project Zero storefront, begin by installing the required package manager and initializing the project using the Project Zero CLI tool.

{% stepper %}
{% step %}

### Install Yarn

It is recommended to use **Yarn** as the package manager. Depending on your operating system, follow the appropriate installation method:

**For macOS users:**

```bash
brew install yarn
```

**For non-macOS users:**

```bash
npm i -g yarn
```

{% endstep %}

{% step %}

### Initialize the Project with CLI

Use the CLI to generate your storefront project:

```bash
npx @akinon/projectzero@latest --create
```

When prompted, provide the following information:

* **Brand name (required):** Enter the name of your storefront (e.g., `Project Zero`).
* **Project description (optional):** Add an optional description for your project.
* **Commerce URL (optional):** Provide the URL to connect to Omnitron. This value can also be edited later in the environment configuration file.
  {% endstep %}

{% step %}

### Navigate the Project Directory

Once the setup is complete, move into the generated project directory:

```bash
cd project-path/project-name
```

{% endstep %}
{% endstepper %}

***

### 3. Adding Your SSH Key

To enable build and deploy operations via Git:

{% stepper %}
{% step %}
Generate your SSH public key and copy it to the clipboard:

```bash
cat ~/.ssh/id_rsa.pub | pbcopy
```

{% endstep %}

{% step %}
In ACC, navigate to **Settings > Public Keys**.

<figure><img src="https://164766933-files.gitbook.io/~/files/v0/b/gitbook-x-prod.appspot.com/o/spaces%2FszVHHD4skw8SftKawRsw%2Fuploads%2FdgB0ttfQrRuTqQoxmSHe%2FScreenshot%202025-04-15%20at%2017.09.59.png?alt=media&amp;token=11757f02-609c-45cf-90dd-f63556a8b201" alt=""><figcaption></figcaption></figure>
{% endstep %}

{% step %}
Click **+ NEW PUBLIC KEY**, enter a label and paste your copied key. Click **SAVE**.

<figure><img src="https://164766933-files.gitbook.io/~/files/v0/b/gitbook-x-prod.appspot.com/o/spaces%2FszVHHD4skw8SftKawRsw%2Fuploads%2FjawgM8shny5oxawJwtHG%2FScreenshot%202025-04-15%20at%2017.12.54.png?alt=media&amp;token=4abaac11-4a4d-4fef-a2b2-dd34aa22bf57" alt=""><figcaption></figcaption></figure>
{% endstep %}
{% endstepper %}

***

### **4. Add the Remote Repository**

Connect your local directory to the repository ACC generated for your app:

{% stepper %}
{% step %}
In **My Applications**, locate your app and copy the **Repository URL**.

<figure><img src="https://164766933-files.gitbook.io/~/files/v0/b/gitbook-x-prod.appspot.com/o/spaces%2FszVHHD4skw8SftKawRsw%2Fuploads%2FLbz6K0zvpclUsw7eNKXh%2FScreenshot%202025-04-15%20at%2017.14.12.png?alt=media&amp;token=8e89bd60-9126-435a-affc-86823b61a76b" alt=""><figcaption></figcaption></figure>
{% endstep %}

{% step %}
In your local project directory:

```bash
git init

git remote add acc <acc-repository-url>

git remote -v
```

{% endstep %}
{% endstepper %}

***

### **5. Commit and Tag the Application**

{% stepper %}
{% step %}
Ensure all changes are committed and tag your version for deployment:

```bash
git add .

git commit -m "Initial Project Zero commit"

git tag <tag-name>

git push acc <tag-name>
```

Use a meaningful tag name that reflects your build version.
{% endstep %}
{% endstepper %}

***

### **6. Build from ACC**

To build your application:

{% stepper %}
{% step %}
Go to **My Applications**, and click on your Project Zero app.
{% endstep %}

{% step %}
In the **Versions** section, click the **BUILD** button.
{% endstep %}

{% step %}
Enter:

* The **tag name** you pushed
* An optional **description**
  {% endstep %}

{% step %}
Click **BUILD**.

<figure><img src="https://164766933-files.gitbook.io/~/files/v0/b/gitbook-x-prod.appspot.com/o/spaces%2FszVHHD4skw8SftKawRsw%2Fuploads%2FAqlnQQdkeC7ynvvWKnvb%2FScreenshot%202025-04-15%20at%2017.24.05.png?alt=media&amp;token=15da0134-557f-4f42-9263-6cd83d7ea741" alt=""><figcaption></figcaption></figure>
{% endstep %}

{% step %}
Once the build status changes to **Completed**, mark it as the **Stable Version**.

<figure><img src="https://164766933-files.gitbook.io/~/files/v0/b/gitbook-x-prod.appspot.com/o/spaces%2FszVHHD4skw8SftKawRsw%2Fuploads%2FRTNhLpumbuhpE2mGjXvn%2FScreenshot%202025-04-15%20at%2017.26.16.png?alt=media&amp;token=70a56c5a-29b8-463f-a87a-fbacb98e1fbf" alt=""><figcaption></figcaption></figure>
{% endstep %}
{% endstepper %}

### **7. Add App to Project via App Store**

To link the application to your ACC project:

{% stepper %}
{% step %}
Open the **App Store** in ACC. Locate your Project Zero application and click on it.

<figure><img src="https://164766933-files.gitbook.io/~/files/v0/b/gitbook-x-prod.appspot.com/o/spaces%2FszVHHD4skw8SftKawRsw%2Fuploads%2FentTAvBrg49HK2YDigMK%2FScreenshot%202025-04-15%20at%2017.30.53.png?alt=media&amp;token=9d71eea3-338a-45ab-891e-5098addeb7f0" alt=""><figcaption></figcaption></figure>
{% endstep %}

{% step %}
Choose the project to install the app into. Select `Commerce` as the **Connected Service.** Click **NEXT.**

<figure><img src="https://164766933-files.gitbook.io/~/files/v0/b/gitbook-x-prod.appspot.com/o/spaces%2FszVHHD4skw8SftKawRsw%2Fuploads%2FXiSgSAAcLUXDkjw30HCf%2FScreenshot%202025-04-15%20at%2018.11.46.png?alt=media&amp;token=f5a852d4-508a-415e-97e7-4622225671da" alt=""><figcaption></figcaption></figure>
{% endstep %}

{% step %}
Then **INSTALL** on the approval page.

<figure><img src="https://164766933-files.gitbook.io/~/files/v0/b/gitbook-x-prod.appspot.com/o/spaces%2FszVHHD4skw8SftKawRsw%2Fuploads%2FCVpkj5ddtgv2WKao5aWv%2FScreenshot%202025-04-15%20at%2015.33.25.png?alt=media&amp;token=a55e72a4-62c5-4a68-9051-2e49499765fb" alt=""><figcaption></figcaption></figure>
{% endstep %}

{% step %}
Once the installation is complete, you’ll see a success message.

<figure><img src="https://164766933-files.gitbook.io/~/files/v0/b/gitbook-x-prod.appspot.com/o/spaces%2FszVHHD4skw8SftKawRsw%2Fuploads%2Fo2TiO5LZm2d9it4WAtvh%2FScreenshot%202025-04-15%20at%2015.33.33.png?alt=media&amp;token=43baffb6-b6d3-4ce7-89fa-85de52d84323" alt=""><figcaption></figcaption></figure>
{% endstep %}

{% step %}
Your app is now listed under the **Applications** tab in your **Project Detail Page**.

<figure><img src="https://164766933-files.gitbook.io/~/files/v0/b/gitbook-x-prod.appspot.com/o/spaces%2FszVHHD4skw8SftKawRsw%2Fuploads%2F5z48Cifo6LUUdf3gKTbT%2FScreenshot%202025-04-15%20at%2017.41.49.png?alt=media&amp;token=78aeba7c-eac3-4192-ba4a-b85556c2e5cf" alt=""><figcaption></figcaption></figure>
{% endstep %}
{% endstepper %}

***

### 8. Add Environment Variables

In your application settings on ACC, add the following environment variables:

| Variable Name         | Description                                                                  | Example URL / Value                                |
| --------------------- | ---------------------------------------------------------------------------- | -------------------------------------------------- |
| `NEXTAUTH_URL`        | Project Zero URL                                                             | `https://your-zero-app.lb.akinoncloud.com`         |
| `NEXTAUTH_SECRET`     | <p>Auth secret, run in terminal:<br><code>openssl rand -base64 32</code></p> | `iHBeNJAOVWvFZL4PmyHVA7b6y28Tvc47NJi4zdX2sPI=`     |
| `NEXT_PUBLIC_URL`     | Same as `NEXTAUTH_URL`                                                       | `https://your-zero-app.lb.akinoncloud.com`         |
| `SERVICE_BACKEND_URL` | Commerce service URL                                                         | `https://your-commerce-service.lb.akinoncloud.com` |

To add them:

{% stepper %}
{% step %}
Go to **Project Detail > Project Zero Application Detail** page.
{% endstep %}

{% step %}
Open the **Environment Variables** tab.

<figure><img src="https://164766933-files.gitbook.io/~/files/v0/b/gitbook-x-prod.appspot.com/o/spaces%2FszVHHD4skw8SftKawRsw%2Fuploads%2FZVxnGzMuegRaht83I8Ny%2Fimage.png?alt=media&amp;token=08f67b99-058a-4616-aeb8-933eb4058f11" alt=""><figcaption></figcaption></figure>
{% endstep %}

{% step %}
Click **+ NEW ENVIRONMENT VARIABLE** for each entry.

<figure><img src="https://164766933-files.gitbook.io/~/files/v0/b/gitbook-x-prod.appspot.com/o/spaces%2FszVHHD4skw8SftKawRsw%2Fuploads%2FteM501g412Ivw3WJjKT3%2Fimage.png?alt=media&amp;token=ab7f649a-7897-4289-91e5-385f85ae4aea" alt=""><figcaption></figcaption></figure>
{% endstep %}
{% endstepper %}

### **9. Deploy to Project**

To apply your changes and reflect the Project Zero layout on the storefront:

{% stepper %}
{% step %}
In **My Applications**, open your Project Zero app.&#x20;
{% endstep %}

{% step %}
In the **Installed Projects** section, choose your project. Click **DEPLOY SELECTED PROJECTS.**

<figure><img src="https://164766933-files.gitbook.io/~/files/v0/b/gitbook-x-prod.appspot.com/o/spaces%2FszVHHD4skw8SftKawRsw%2Fuploads%2FvWUkpxh4UKkjcNrTxSWd%2FScreenshot%202025-04-15%20at%2017.45.15.png?alt=media&amp;token=5872ef93-d3de-4741-8981-0441a2477d54" alt=""><figcaption></figcaption></figure>
{% endstep %}

{% step %}
In the pop-up:

* Enter the **tag name** of your last successful build.
* Start the deployment.

<figure><img src="https://164766933-files.gitbook.io/~/files/v0/b/gitbook-x-prod.appspot.com/o/spaces%2FszVHHD4skw8SftKawRsw%2Fuploads%2FfOe0i5IKO5kSatdnSQFk%2FScreenshot%202025-04-15%20at%2017.46.50.png?alt=media&amp;token=d8724deb-7e49-43a8-bdc4-50165c92a856" alt=""><figcaption></figcaption></figure>
{% endstep %}

{% step %}
Once complete, the deployment status will update to `Deployed`.

<figure><img src="https://164766933-files.gitbook.io/~/files/v0/b/gitbook-x-prod.appspot.com/o/spaces%2FszVHHD4skw8SftKawRsw%2Fuploads%2F8ih86yxVzZY5D1TBaxNC%2FScreenshot%202025-04-15%20at%2017.55.31.png?alt=media&amp;token=2ee67a38-449f-4244-95cb-64164b65cebf" alt=""><figcaption></figcaption></figure>
{% endstep %}
{% endstepper %}

***

### **10. Access the Storefront**

You’re all set! To access your storefront:

{% stepper %}
{% step %}
Go to the **Project Detail** page. Click into the **Project Zero app details**.
{% endstep %}

{% step %}
Find the **Project Zero URL.**

<figure><img src="https://164766933-files.gitbook.io/~/files/v0/b/gitbook-x-prod.appspot.com/o/spaces%2FszVHHD4skw8SftKawRsw%2Fuploads%2FFQf25XGdnAHCHAS8fQsc%2FScreenshot%202025-04-15%20at%2018.08.30.png?alt=media&amp;token=5df301da-c4d7-404e-8db9-4b91428476dc" alt=""><figcaption></figcaption></figure>
{% endstep %}

{% step %}
Open the link in your browser with `/list` at the end, e.g.:

```
https://your-zero-app.lb.akinoncloud.com/list
```

{% endstep %}

{% step %}
You should see your listed products, which means your setup was successful.

<figure><img src="https://164766933-files.gitbook.io/~/files/v0/b/gitbook-x-prod.appspot.com/o/spaces%2FszVHHD4skw8SftKawRsw%2Fuploads%2Fl7pn4wibANR1fLaWqlNA%2FScreenshot%202025-04-15%20at%2018.10.10.png?alt=media&amp;token=6acf55ce-d74c-435c-9206-b2361eb6d0f4" alt=""><figcaption></figcaption></figure>

***

<figure><img src="https://164766933-files.gitbook.io/~/files/v0/b/gitbook-x-prod.appspot.com/o/spaces%2FszVHHD4skw8SftKawRsw%2Fuploads%2FujZlCsmPy6CG7cwXEKLT%2Fimage.png?alt=media&amp;token=e3a386a8-1815-4a0f-a35b-80bc5d10164b" alt=""><figcaption></figcaption></figure>

***

<figure><img src="https://164766933-files.gitbook.io/~/files/v0/b/gitbook-x-prod.appspot.com/o/spaces%2FszVHHD4skw8SftKawRsw%2Fuploads%2FLKmwRihYdklsyGPdDyYM%2Fimage.png?alt=media&amp;token=63cd6081-b94b-48b3-8d15-a74aa9943e64" alt=""><figcaption></figcaption></figure>
{% endstep %}
{% endstepper %}

With your Project Zero storefront live and fully integrated, your commerce environment is now ready for action.&#x20;

Customers can browse your catalog, add products to their cart, choose from your configured shipping options, and complete their orders using the defined payment methods.&#x20;

All backend configurations—from product data to pricing and logistics—are now perfectly aligned with the frontend experience.&#x20;

Congratulations! Your shop is officially open for business. Time to welcome your first customers and start selling! :rocket:


# Launch Your Marketplace with Seller Center

The **Seller Center** allows Akinon customers to build and manage marketplaces through a single platform. Designed as an add-on, it works in conjunction with **Omnitron** to provide seamless integration and functionality.

This guide walks you through the steps to connect your Omnitron with the Seller Center, enabling you to set up and configure your marketplace within the **ACC**.

This guide will help you:

* Create a Seller Center in ACC
* Complete essential configurations
* Create and manage Sellers
* Manage offers and products as both Seller and Marketplace Owner
* Manage orders and packages as a Seller

**Below are the steps to get started and successfully complete the setup process.**

## <mark style="color:red;">1. Create a Seller Center in ACC</mark> <a href="#id-31mg8tcio8pa" id="id-31mg8tcio8pa"></a>

To get started:

* Log in to your **ACC Dashboard** and navigate to the **Projects** page.
* Select the project where you want to create the Seller Center.
* Click **+ NEW SERVICE** and select **Seller Center** from the list.

![](https://164766933-files.gitbook.io/~/files/v0/b/gitbook-x-prod.appspot.com/o/spaces%2FszVHHD4skw8SftKawRsw%2Fuploads%2FiiLU01Ld7rBeXAVH3u3K%2F0.png?alt=media\&token=0377d020-2d04-4bc2-8d58-c0264d1660bd)

After selection, you’ll see a list of environment settings required to configure the application under the **"Configure Seller Center Application Values"** section. Here’s what each setting means:

<table><thead><tr><th width="247.9609375">Settings</th><th>Description</th></tr></thead><tbody><tr><td>OMNITRON_CATALOG_ID</td><td>This dynamic setting represents the Omnitron Catalog ID used in the Seller Center. It is required when sellers create collections or retrieve category nodes during the offer creation process. The Catalog ID can be obtained from the relevant Omnitron.</td></tr><tr><td>OMNITRON_CHANNEL_ID</td><td>This setting defines the Omnitron Channel ID used in the Seller Center to access Commerce-related services. The value corresponds to the Sales Channel ID in Omnitron and can be retrieved from the appropriate Omnitron.</td></tr><tr><td>OMNITRON_FAILED_CANCELLATION_REASON_ID</td><td>This setting refers to the Cancellation Reason ID from Omnitron, used when a package delivery fails and the seller initiates a cancellation request for a refund. These IDs can be created and retrieved via <strong>Omnitron > Settings > Reasons for Cancellation / Return.</strong></td></tr><tr><td>OMNITRON_ALLOWED_CANCELLATION_REASON_IDS</td><td>This setting includes the list of Cancellation Reason IDs from Omnitron that sellers are permitted to use when rejecting an order item in the Seller Center. These IDs can be created and managed through <strong>Omnitron > Settings > Reasons for Cancellation / Return.</strong></td></tr><tr><td>OMNITRON_REJECTED_CANCELLATION_REASON_ID</td><td>This setting defines the default rejection reason used when a seller rejects an order item without providing any of the IDs listed in OMNITRON_ALLOWED_CANCELLATION_REASON_IDS. Cancellation reasons can be configured via <strong>Omnitron > Settings > Reasons for Cancellation / Return.</strong></td></tr><tr><td>COMMERCE_STORE_PAGE_DATA_WIDGET_ID</td><td><p>This setting represents the Widget Type ID used on the Store Management page in the Seller Center. Sellers use this widget to design their storefront homepages on the marketplace. Widget Types can be created in Omnitron. For more details, see:</p><p><a href="https://docs.akinon.com/tutorials/omnitron/sales-channels/content-management/how-to-manage-widget-schema-in-omnitron">How to manage widget schema in Omnitron</a></p></td></tr><tr><td>COMMERCE_PRODUCT_RECOMMENDATION_WIDGET_ID</td><td><p>This setting indicates the Widget Type ID for the Product Collection widget, used on the Store Management page in the Seller Center. Widget Types can be created in Omnitron. For more details, refer to:</p><p><a href="https://docs.akinon.com/tutorials/omnitron/sales-channels/content-management/how-to-manage-widget-schema-in-omnitron">How to manage widget schema in Omnitron</a></p></td></tr></tbody></table>

Click **SAVE AND CONTINUE** to install the Seller Center BE and FE applications into your selected project.

<img src="https://164766933-files.gitbook.io/~/files/v0/b/gitbook-x-prod.appspot.com/o/spaces%2FszVHHD4skw8SftKawRsw%2Fuploads%2F4w08yWuElHaSoZiZsTGs%2F1.png?alt=media&amp;token=104b2794-af67-49a3-bd6a-ce2424e2adba" alt="" width="362">

## <mark style="color:red;">2. Complete Seller Center Configurations</mark> <a href="#x3mjfi1fpq8z" id="x3mjfi1fpq8z"></a>

After the installation is complete and the necessary configurations are made in ACC, all relevant data—such as the Catalog, Category Tree, Sales Channel, Attributes, Attribute Values, Attribute Sets, Order Cancellation Reasons, Cities, Townships, Districts, and more—will be automatically transferred from Omnitron to the Seller Center.

The Seller Center has two main user roles: **Marketplace Owners (MPOs)** and **Sellers**. By default, Omnitron Super Users are assigned the role of MPO in the Seller Center. Therefore, once the installation is complete, you can log in to the Seller Center **using the Omnitron Super User credentials for the installed project as an MPO**.

To ensure the Seller Center functions correctly, there are both **mandatory** and **optional** configurations that need to be completed. These configurations must be created and managed by MPOs, and will be explained in detail in the following sections.

### <mark style="color:red;">Mandatory Configurations</mark> <a href="#id-5ngxkz70as7" id="id-5ngxkz70as7"></a>

#### **Attribute Set & Category Mapping**

To allow Sellers to create offers for specific categories, **Attribute Sets** must be mapped to **Categories**. This mapping ensures that Sellers are aware of the required attribute configurations for each category. As mentioned earlier, Attribute Set and Category Tree data are retrieved from Omnitron.

To perform the mapping:

{% stepper %}
{% step %}
Go to **Settings** in the Seller Center.
{% endstep %}

{% step %}
Open the **Attribute Set & Category Mapping** page.
{% endstep %}

{% step %}
You will see the category tree displayed in a hierarchical format. Each leaf category will have a dropdown menu.
{% endstep %}

{% step %}
These dropdowns contain the Attribute Sets created in Omnitron.
{% endstep %}

{% step %}
Select the most appropriate Attribute Set for each category and click **SAVE**.
{% endstep %}
{% endstepper %}

<figure><img src="https://164766933-files.gitbook.io/~/files/v0/b/gitbook-x-prod.appspot.com/o/spaces%2FszVHHD4skw8SftKawRsw%2Fuploads%2FmQEHgOIzFgNXnxhKKLVv%2F2.png?alt=media&amp;token=5b5f3086-4482-44b9-8e99-75c2c54d35fa" alt=""><figcaption></figcaption></figure>

{% hint style="warning" %}
Once the Attribute Set & Category Mapping is complete, the attributes defined within the mapped Attribute Sets will be activated and appear as filters in the application.
{% endhint %}

{% hint style="success" %}
For a step-by-step tutorial, please visit: [How to manage attribute set and category mapping](https://docs.akinon.com/tutorials/seller-center/marketplace-owner/settings/how-to-manage-attribute-set-and-category-mapping)
{% endhint %}

#### **Delivery Settings**

This configuration allows Sellers to choose from different shipping options as defined by the MPOs depending on various scenarios.

To configure delivery settings:

{% stepper %}
{% step %}
Select the most appropriate Attribute Set for each category and click **SAVE**.
{% endstep %}

{% step %}
Navigate to **Settings** in the Seller Center.
{% endstep %}

{% step %}
Open the **Delivery Settings** page.
{% endstep %}

{% step %}
Click on the **+ Add New Delivery Setting** button.
{% endstep %}

{% step %}
Fill in the required fields and save.
{% endstep %}
{% endstepper %}

![](https://164766933-files.gitbook.io/~/files/v0/b/gitbook-x-prod.appspot.com/o/spaces%2FszVHHD4skw8SftKawRsw%2Fuploads%2FhXwVzQDLyMpb2oLmZ1Td%2F3.png?alt=media\&token=f56c1061-ff5e-43e2-9428-92ade7131a64)

<figure><img src="https://164766933-files.gitbook.io/~/files/v0/b/gitbook-x-prod.appspot.com/o/spaces%2FszVHHD4skw8SftKawRsw%2Fuploads%2FQFnUxur5vdlokR29b4IY%2F4.png?alt=media&amp;token=e8d3d316-f741-4b0d-a733-2eef1fbc8440" alt="" width="563"><figcaption></figcaption></figure>

{% hint style="warning" %}
All created delivery settings will be visible to every Seller.
{% endhint %}

{% hint style="warning" %}
If you intend to include a contracted shipping company as a Delivery Setting, the relevant Cargo Extension Application must be linked to the project in ACC.
{% endhint %}

{% hint style="warning" %}
A default callback delivery setting—displayed as "Other - Other"—is automatically created when the Seller Center is set up.
{% endhint %}

{% hint style="success" %}
For detailed guidance, refer to: [How to manage delivery settings in Seller Center](https://docs.akinon.com/tutorials/seller-center/marketplace-owner/settings/how-to-manage-delivery-settings-in-seller-center)
{% endhint %}

{% hint style="success" %}
Additional information about shipping rules and calculations is available at: [Shipping Rules Calculator](https://docs.akinon.com/technical-guides/commerce/shipping-rules-calculator)
{% endhint %}

#### **Offer Reject Reasons**

This configuration allows MPOs to select reasons for rejecting Seller-created offers. These reasons will be visible on the corresponding marketplace product pages.

To create Offer Reject Reasons:

{% stepper %}
{% step %}
Go to **Settings** in the Seller Center.
{% endstep %}

{% step %}
Open the **Offer Reject Reasons** page.
{% endstep %}

{% step %}
Click on the **+ Add New Offer Rejection Reason** button.
{% endstep %}

{% step %}
Complete the necessary fields and save.
{% endstep %}
{% endstepper %}

<figure><img src="https://164766933-files.gitbook.io/~/files/v0/b/gitbook-x-prod.appspot.com/o/spaces%2FszVHHD4skw8SftKawRsw%2Fuploads%2Fu9uF4R41PlLHylfilIxo%2F5.png?alt=media&amp;token=270e3eee-8071-43d4-bbdd-5e5817bfad05" alt=""><figcaption></figcaption></figure>

{% hint style="success" %}
For more details, visit: [How to manage offer reject reasons in Seller Center](https://docs.akinon.com/tutorials/seller-center/marketplace-owner/settings/how-to-manage-offer-reject-reasons-in-seller-center)
{% endhint %}

### <mark style="color:red;">Optional Configurations</mark> <a href="#m6dyu6vjq2n6" id="m6dyu6vjq2n6"></a>

#### **Mail Configurations**

The Seller Center sends email notifications to users (both Sellers and MPOs) on specific occasions—such as when a new order is received, a password reset is requested, or Seller documents are updated. MPOs can customize the **brand name**, **sender email address**, and **Contact Us** URL for these emails.

To configure email settings:

{% stepper %}
{% step %}
Navigate to **Settings** in the Seller Center.
{% endstep %}

{% step %}
Open the **Dynamic Settings** page.
{% endstep %}

{% step %}
Configure the following dynamic settings based on your brand’s needs:

<table><thead><tr><th width="228.3828125">Parameter</th><th width="299.0625">Description</th><th>Default Value</th></tr></thead><tbody><tr><td><strong>EMAIL_BRAND_TEXT</strong></td><td>Sender name to appear in outgoing emails.</td><td>Akinon</td></tr><tr><td><strong>DEFAULT_FROM_EMAIL</strong></td><td>Email address from which emails will be sent.</td><td>noreply@akinon.com</td></tr><tr><td><strong>EMAIL_CONTACT_URL</strong></td><td>URL that opens when the “Contact Us” link in the email is clicked.</td><td>akinon.com</td></tr></tbody></table>

<figure><img src="https://164766933-files.gitbook.io/~/files/v0/b/gitbook-x-prod.appspot.com/o/spaces%2FszVHHD4skw8SftKawRsw%2Fuploads%2F2dTlNCbzhdPskNc2gM33%2F6.png?alt=media&amp;token=0dbff6de-ba32-49eb-bdb3-87ea5ee50d15" alt=""><figcaption></figcaption></figure>
{% endstep %}
{% endstepper %}

#### **Seller Performance Metrics**

Seller performance in the application can be evaluated based on specific metrics, helping to maintain high marketplace standards. The following metrics are available:

<table><thead><tr><th width="282.03125">Metric</th><th>Description</th></tr></thead><tbody><tr><td><strong>Seller Cancel Rate</strong></td><td>Percentage of orders canceled by the seller. Lower rates indicate higher reliability.</td></tr><tr><td><strong>Customer Cancel Rate</strong></td><td>Percentage of orders canceled by customers. High rates may point to product/service issues.</td></tr><tr><td><strong>Shipment in Target Duration</strong></td><td>Percentage of orders delivered within the expected delivery window. Timely deliveries enhance customer satisfaction.</td></tr><tr><td><strong>Seller-Related Delivery Problems</strong></td><td>Percentage of delivery issues caused by the seller. Lower rates indicate fewer problems.</td></tr></tbody></table>

To configure performance metrics and assign weights:

{% stepper %}
{% step %}
Go to **Finance** in the Seller Center.
{% endstep %}

{% step %}
Open the **Seller Performance Metrics** page.
{% endstep %}

{% step %}
Adjust the weight and related values for each metric as needed.

<figure><img src="https://164766933-files.gitbook.io/~/files/v0/b/gitbook-x-prod.appspot.com/o/spaces%2FszVHHD4skw8SftKawRsw%2Fuploads%2FGzacD8Kuere5HEhQ71fS%2F7.png?alt=media&amp;token=9cff6135-e7bd-455c-81dc-e05568ecfbaf" alt=""><figcaption></figcaption></figure>

<figure><img src="https://164766933-files.gitbook.io/~/files/v0/b/gitbook-x-prod.appspot.com/o/spaces%2FszVHHD4skw8SftKawRsw%2Fuploads%2FLEIwDLlY7c031yjli7KB%2Fimage.png?alt=media&amp;token=36d49131-d189-44a0-98e8-eca59771efda" alt=""><figcaption></figcaption></figure>
{% endstep %}
{% endstepper %}

#### **BuyBox Weight Configurations**

**BuyBox** is a feature commonly found on eCommerce platforms that allows customers to add a product directly to their cart and make a purchase. It typically highlights the offer from the seller providing the best combination of price, shipping options, and customer service.

In the Seller Center, the BuyBox calculation is influenced by several factors, including the **Seller Rating**, **Offer Pricing**, and whether the seller is marked as **Premium or not**. MPOs can configure the weight of each factor accordingly.

To configure BuyBox weight settings:

{% stepper %}
{% step %}
Navigate to **Settings**.
{% endstep %}

{% step %}
Open the **Dynamic Settings** page.
{% endstep %}

{% step %}
Set the following parameters according to their descriptions:

<table><thead><tr><th width="231.69140625">Parameter</th><th width="258.76953125">Description</th><th>Notes</th></tr></thead><tbody><tr><td><strong>PP_GRADE_WEIGHT</strong></td><td>Weight of the Seller Rating in the BuyBox calculation.</td><td>Accepts a decimal value between 0 and 1</td></tr><tr><td><strong>PP_PRICE_WEIGHT</strong></td><td>Weight of the Seller’s Offer Price in the BuyBox calculation.</td><td>Accepts a decimal value between 0 and 1</td></tr><tr><td><strong>PP_DATASOURCE_PREMIUM_POINT</strong></td><td>The point value awarded to a seller marked as Premium in the BuyBox calculation.</td><td></td></tr><tr><td><strong>PP_GRADE_VERSION</strong></td><td>The version identifier for the BuyBox calculation logic.</td><td>Must be incremented by 1 whenever any related setting changes</td></tr><tr><td><strong>PP_UPPER_LIMIT_RATIO</strong></td><td>Maximum percentage limit for the price range of an upcoming offer compared to other marketplace offers for the same product.</td><td></td></tr><tr><td><strong>PP_LOWER_LIMIT_RATIO</strong></td><td>Minimum percentage limit for the price range of an upcoming offer compared to other marketplace offers for the same product.</td><td></td></tr></tbody></table>

![](https://164766933-files.gitbook.io/~/files/v0/b/gitbook-x-prod.appspot.com/o/spaces%2FszVHHD4skw8SftKawRsw%2Fuploads%2FtgmTMpyAFBN80OwUzZK1%2F9.png?alt=media\&token=690ebf8a-5aba-492d-9162-863226c68294)
{% endstep %}
{% endstepper %}

#### **Order Rejection Deductions**

This configuration allows MPOs to define deduction rules for sellers when an order item is rejected. Deductions are applied to the seller’s commission earnings based on the selected rejection reason during the cancellation or return process.

To configure:

{% stepper %}
{% step %}
Navigate to **Settings**.
{% endstep %}

{% step %}
Open the **Order Rejection Deductions** page.
{% endstep %}

{% step %}
For each listed **Cancellation / Return Reason**, enter the deduction details that will be applied during seller reconciliation if that reason is selected.

![](https://164766933-files.gitbook.io/~/files/v0/b/gitbook-x-prod.appspot.com/o/spaces%2FszVHHD4skw8SftKawRsw%2Fuploads%2FWYN9U8xCi2bx7rXWX2vq%2F10.png?alt=media\&token=b90b6e63-20b2-4ceb-8177-eb95cd10cbb5)

![](https://164766933-files.gitbook.io/~/files/v0/b/gitbook-x-prod.appspot.com/o/spaces%2FszVHHD4skw8SftKawRsw%2Fuploads%2F1tFpmxIYeJxVFsQjXiyR%2F11.png?alt=media\&token=d4c79c16-d15c-4bc0-b2f1-c9fdb710d20d)
{% endstep %}
{% endstepper %}

#### **Image Dimension Ranges**

This configuration ensures that sellers upload product images within acceptable resolution limits, helping maintain visual consistency and quality across the platform.

To configure:

{% stepper %}
{% step %}
Navigate to **Settings**.
{% endstep %}

{% step %}
Open the **Dynamic Settings** page.
{% endstep %}

{% step %}
Set the following parameters based on the desired resolution guidelines (in pixels, defined by width x height):

<table><thead><tr><th width="246.60546875">Parameter</th><th>Description</th></tr></thead><tbody><tr><td><strong>MAX_IMAGE_DIMENSIONS</strong></td><td>The maximum image resolution allowed for uploads to the Seller Center.</td></tr><tr><td><strong>MIN_IMAGE_DIMENSIONS</strong></td><td>The minimum image resolution allowed for uploads to the Seller Center.</td></tr></tbody></table>

![](https://164766933-files.gitbook.io/~/files/v0/b/gitbook-x-prod.appspot.com/o/spaces%2FszVHHD4skw8SftKawRsw%2Fuploads%2FItJxy0pqwpwQ69CAIfrV%2F12.png?alt=media\&token=62f47c92-b489-4032-9052-f9cb7f0e94a0)
{% endstep %}
{% endstepper %}

## <mark style="color:red;">3. Create Sellers in Seller Center</mark> <a href="#id-3hlph9zbt1nz" id="id-3hlph9zbt1nz"></a>

After completing the mandatory and optional configurations, you can proceed to add Sellers to the platform.

To create a new Seller:

{% stepper %}
{% step %}
Navigate to **Finance**.
{% endstep %}

{% step %}
Open the **Seller Management** page.
{% endstep %}

{% step %}
Click the **+ Add New Seller** button.
{% endstep %}

{% step %}
Fill in the required information.
{% endstep %}
{% endstepper %}

A password creation email will be sent to the address provided in the **Seller Email Address** field to allow the Seller to complete their account setup.

{% hint style="success" %}
For detailed information on Seller Management, refer to: [Seller Management Tutorial](https://docs.akinon.com/tutorials/seller-center/marketplace-owner/finance/seller-management)
{% endhint %}

## <mark style="color:red;">4. Manage Offers & Products in Seller Center</mark> <a href="#v0fhhnhzd86q" id="v0fhhnhzd86q"></a>

In the Seller Center, Sellers can create offers—containing price, stock, and attribute information according to the related category—using three different methods:

* One by one
* In bulk
* From the Marketplace Catalog menu

In addition, MPOs have the ability to manage Seller-created offers. They can:

* Approve offers
* Reject offers
* Resolve offers

{% hint style="success" %}
You can find more information about offer and product management at the following links:

* For Sellers: [How to Add Product Offers Using Bulk Actions](https://docs.akinon.com/tutorials/seller-center/seller/products/how-to-add-product-offers-using-bulk-actions-in-seller-center)
* For MPOs:[ How to Use Offer Actions](https://docs.akinon.com/tutorials/seller-center/marketplace-owner/products/how-to-use-offer-actions-in-seller-center)
  {% endhint %}

{% hint style="success" %}
Additionally, offer and product management can be handled via integration: [Seller Center Products API](https://apidocs.akinon.com/seller-center/products)
{% endhint %}

## <mark style="color:red;">5. Manage Orders & Packages in Seller Center</mark> <a href="#elgc6bsndjtj" id="elgc6bsndjtj"></a>

In the Seller Center, if a Seller’s **Auto Pack** setting is enabled (True), the system automatically creates a package when an order is picked up.

{% hint style="success" %}
For detailed information on managing orders and packages, refer to the following resources:

* [How to Manage Orders in Seller Center](https://docs.akinon.com/tutorials/seller-center/seller/orders/how-to-manage-orders-in-seller-center)
* [How to Manage Packages in Seller Center](https://docs.akinon.com/tutorials/seller-center/seller/orders/how-to-manage-packages-in-seller-center)
  {% endhint %}

{% hint style="success" %}
Integration APIs are also available for order and package operations:

* [Orders API](https://apidocs.akinon.com/seller-center/orders)
* [Packages API](https://apidocs.akinon.com/seller-center/packages)
  {% endhint %}

{% hint style="danger" %}

### Zero App Compatibility Note <a href="#id-5cey2hxsjw8b" id="id-5cey2hxsjw8b"></a>

If a project in ACC is linked to the Seller Center, the **Product List** and **Product Detail** pages in the associated Zero application must correctly display products and offers. It is essential to ensure that the item being added to the cart is a valid **offer**, not just a product.
{% endhint %}


# Welcome to Akinon Tutorials

To view additional Tutorials please Log in below;

{% hint style="warning" icon="lock" %}
**This section is for signed-in partners.**

<a href="https://docs.akinon.com/~gitbook/auth/login" class="button secondary" data-icon="rocket-launch">Sign in</a>
{% endhint %}

Akinon Tutorials is the ultimate resource for comprehensive tutorials covering a wide range of topics related to Akinon's technologies. Our tutorials are designed to provide **in-depth learning materials**, **practical examples**, and **step-by-step guides** to help users master various aspects of Akinon's offerings and products.

Each tutorial is thoughtfully crafted to ensure **clarity and ease of understanding**. We provide detailed explanations of concepts, accompanied by practical examples and code snippets to illustrate their application in real-world scenarios. By following along with the tutorials, users can gain hands-on experience and build a strong foundation in using Akinon's technologies.

Whether users are a beginner or an experienced professional, our tutorials cater to learners of all levels, providing them with the knowledge and skills necessary to leverage Akinon's technologies effectively.

We continuously update our tutorials to keep them **current and relevant**. As technologies evolve and new features are introduced, we ensure that our tutorials reflect the latest advancements, providing up-to-date information and guidance.

Embark on your learning journey by exploring the Akinon Tutorials. Discover products and their functionalities, master key concepts with Akinon's step-by-step tutorials.


# ACC


# How to Manage Projects and Services

On the **Projects** page of ACC, users have the flexibility to create projects for multiple brands. Each project is designed to focus on services and applications, and the test environment of a brand is handled as a distinct and separate project. This approach allows for efficient organization and management of various brand-related tasks and applications within their dedicated environments.

## <mark style="color:red;">Creating Project</mark>

{% stepper %}
{% step %}
Log in to the platform and navigate to the **Projects**. A comprehensive list of all projects created in the partner's account is displayed on this screen. From this list, users can easily search for specific projects.

<figure><img src="https://3333414532-files.gitbook.io/~/files/v0/b/gitbook-x-prod.appspot.com/o/spaces%2FIbwGN7KwvYi0iLbjtnXz%2Fuploads%2F3qsnKiBpADtVmhZoMH05%2Fimage1-1b7d5aed493a1b9a3ebbb323cf4b718a.png?alt=media&amp;token=25760b77-62e1-458e-ac00-bdd31eeb0eb5" alt=""><figcaption></figcaption></figure>
{% endstep %}

{% step %}
To create a new project, click on the **+New Project** button in the upper right corner of the screen.

<figure><img src="https://3333414532-files.gitbook.io/~/files/v0/b/gitbook-x-prod.appspot.com/o/spaces%2FIbwGN7KwvYi0iLbjtnXz%2Fuploads%2FJqfqrJg7h21wWngs8qGB%2Fimage2-d6605914b173306050f8de42a036e52b.png?alt=media&amp;token=4250b98e-2f0c-4fb3-a19f-9aadd5f5cc58" alt=""><figcaption></figcaption></figure>
{% endstep %}

{% step %}
To set up a new project for a brand, an authorized user should follow the steps for adding projects.

Initially, fill in the related fields on the project details page:

* **Project Name:** Provide a descriptive name, such as the brand name.
* **Slug:** This unique value defines the project and should be specific to each project. It is used for communication between services, for example, a project-specific slug information is used to create a Sentry account.

After completing the required information, click on the **Apply** button. This action will redirect users to the plan selection screen for the specified project, where they can proceed with further customization and setup.

<figure><img src="https://3333414532-files.gitbook.io/~/files/v0/b/gitbook-x-prod.appspot.com/o/spaces%2FIbwGN7KwvYi0iLbjtnXz%2Fuploads%2FFBANcqoODoyubBrne5J6%2Fimage3-750b767def6dde449e06563b1f1e5d94.png?alt=media&amp;token=1a267b7c-1685-47e2-bdc5-63af6f66d6bb" alt=""><figcaption></figcaption></figure>
{% endstep %}

{% step %}
The partner can easily select the plan that aligns with their business contract. Dynamically generated invoice amounts for each plan are presented to the partner, facilitating transparent pricing. Additionally, the products included in each plan are clearly displayed, empowering the partner to make informed decisions about their preferred plan.

<figure><img src="https://3333414532-files.gitbook.io/~/files/v0/b/gitbook-x-prod.appspot.com/o/spaces%2FIbwGN7KwvYi0iLbjtnXz%2Fuploads%2FopBdYx6hU4t0kBTIIaQ8%2Fimage4-989f2d5c212eab329efbbe52e4415adb.png?alt=media&amp;token=43fb5a1b-5458-480d-9965-f1015faffb7f" alt=""><figcaption></figcaption></figure>
{% endstep %}

{% step %}
The partner can easily select the plan that aligns with their business contract. Dynamically generated invoice amounts for each plan are presented to the partner, facilitating transparent pricing. Additionally, the products included in each plan are clearly displayed, empowering the partner to make informed decisions about their preferred plan.

Upon the completion of the setup, the license agreement is signed, concluding the project setup process.

<figure><img src="https://3333414532-files.gitbook.io/~/files/v0/b/gitbook-x-prod.appspot.com/o/spaces%2FIbwGN7KwvYi0iLbjtnXz%2Fuploads%2FSXZf4KJUtwNQ9LkIeCZb%2Fimage5-0f22771dceb048dc9c616dcf11f8fdc1.png?alt=media&amp;token=6d33b04f-a991-40fc-9a15-a01052649e77" alt=""><figcaption></figcaption></figure>
{% endstep %}

{% step %}
To access the detail page of the created project, users can do so conveniently either from the welcome page or by locating the project in the left-side menu's project list and clicking on it. As mentioned on the welcome page, Omnitron installations will automatically commence immediately after the project is created.

<figure><img src="https://3333414532-files.gitbook.io/~/files/v0/b/gitbook-x-prod.appspot.com/o/spaces%2FIbwGN7KwvYi0iLbjtnXz%2Fuploads%2FT6z3Kbq00JLGhrVzUVES%2Fimage7-ad98400a8934b5cf97b119eef0e96e8d.png?alt=media&amp;token=cf54188a-cb82-4e37-9efd-45f8d625a46d" alt=""><figcaption></figcaption></figure>
{% endstep %}

{% step %}
To access the detail page of the created project, users can do so conveniently either from the welcome page or by locating the project in the left-side menu's project list and clicking on it. As mentioned on the welcome page, Omnitron installations will automatically commence immediately after the project is created.

<figure><img src="https://3333414532-files.gitbook.io/~/files/v0/b/gitbook-x-prod.appspot.com/o/spaces%2FIbwGN7KwvYi0iLbjtnXz%2Fuploads%2F0QXZSSwkZGqrTbA36nY9%2Fimage8-2a8889ea145516d782f159ee662e05e8.png?alt=media&amp;token=84ffc2a8-0ed5-4998-8448-a3e292e44600" alt=""><figcaption></figcaption></figure>
{% endstep %}

{% step %}
After the Omnitron installations are complete, the setup status of the deployments will be seen as **Deployed**. At this point, new services and applications can be added to the project.

<figure><img src="https://3333414532-files.gitbook.io/~/files/v0/b/gitbook-x-prod.appspot.com/o/spaces%2FIbwGN7KwvYi0iLbjtnXz%2Fuploads%2Ff6YLHDmgxNtTHBmibLX0%2Fimage9-42e3f5393fe64ab71d11417ad47d85b5.png?alt=media&amp;token=c14c0154-1ed4-4311-b51e-2a9d8f956817" alt=""><figcaption></figcaption></figure>

{% hint style="info" %}
Omnitron credentials will be sent to the email address of the user who created the project.​
{% endhint %}
{% endstep %}
{% endstepper %}

## <mark style="color:red;">Adding Service</mark>

{% stepper %}
{% step %}
To add new services available in the Akinon ecosystem to their project, click on the **+ New Service** button on the project detail page.

<figure><img src="https://3333414532-files.gitbook.io/~/files/v0/b/gitbook-x-prod.appspot.com/o/spaces%2FIbwGN7KwvYi0iLbjtnXz%2Fuploads%2FSOvOZz2OPnqjTsMKGHz3%2Fimage10-eeb0c2e105d5c4160beb21d0599816c2.png?alt=media&amp;token=89ba82d8-8d66-457c-aa0b-1c49b723100e" alt=""><figcaption></figcaption></figure>
{% endstep %}

{% step %}
Instore, Live Commerce, OMS, and Commerce services can be automatically added to the project according to the application dependencies. For example, after the Omnitron installations, users can directly add Commerce, OMS, or Live Commerce to their project, but they will be prompted to choose a connected service to add Instore.

<figure><img src="https://3333414532-files.gitbook.io/~/files/v0/b/gitbook-x-prod.appspot.com/o/spaces%2FIbwGN7KwvYi0iLbjtnXz%2Fuploads%2FcGRBgLXauDvEaCRsRsuI%2Fimage11-cc6a5ccd49cfcb64ce39c25cab05bfdf.png?alt=media&amp;token=c98deb04-7c5f-4d76-b22f-005db6f01469" alt=""><figcaption></figcaption></figure>
{% endstep %}

{% step %}
Initiate the deployment of Commerce by clicking the **Yes, Proceed** button. Next, add Instore to the project by entering a name and slug for the backend service, then select the previously added Commerce as the connected service.

<figure><img src="https://3333414532-files.gitbook.io/~/files/v0/b/gitbook-x-prod.appspot.com/o/spaces%2FIbwGN7KwvYi0iLbjtnXz%2Fuploads%2FJJhL8VwJbfCZEZ1KNPRW%2Fimage12-2ee261c8f9e1e1edf75197e81fc94de0.png?alt=media&amp;token=b674ff77-2692-45a5-964a-f0b60084e7ba" alt=""><figcaption></figcaption></figure>

<figure><img src="https://3333414532-files.gitbook.io/~/files/v0/b/gitbook-x-prod.appspot.com/o/spaces%2FIbwGN7KwvYi0iLbjtnXz%2Fuploads%2FCWd0rhJBLDawY3zAkAOJ%2Fimage13-c5a210c79f176ae921869d3b6239f54b.png?alt=media&amp;token=1f925319-630d-45a1-b0b8-db6581eff4ae" alt=""><figcaption></figcaption></figure>
{% endstep %}

{% step %}
To begin the deployment of the Instore backend, click on the **Apply** button. Once the backend deployment is initiated, the Instore frontend will automatically start deploying.

<figure><img src="https://3333414532-files.gitbook.io/~/files/v0/b/gitbook-x-prod.appspot.com/o/spaces%2FIbwGN7KwvYi0iLbjtnXz%2Fuploads%2F160O02ySpL96FMAayPGC%2Fimage14-1d12983773e026f8ceb2a4cd226a0287.png?alt=media&amp;token=9c02b30f-c55a-45a4-805a-5cabf8fb8520" alt=""><figcaption></figcaption></figure>
{% endstep %}

{% step %}
Clicking on a service name allows users to access detailed information such as URL, version, connected service, and more. Additionally, users have the option to customize the service name by clicking on the edit icon.

<figure><img src="https://3333414532-files.gitbook.io/~/files/v0/b/gitbook-x-prod.appspot.com/o/spaces%2FIbwGN7KwvYi0iLbjtnXz%2Fuploads%2Fd63nZCwOA1bQwSuaNfnU%2Fimage15-e9b1d63bae9f5124a8cc3df2b0fbf769.png?alt=media&amp;token=0bb921a8-498f-4dd4-844d-1be8cc8eb8fa" alt=""><figcaption></figcaption></figure>
{% endstep %}

{% step %}
Users can conveniently access the logs of the services in their project by clicking on the icon located in the **Logs** column.

<figure><img src="https://3333414532-files.gitbook.io/~/files/v0/b/gitbook-x-prod.appspot.com/o/spaces%2FIbwGN7KwvYi0iLbjtnXz%2Fuploads%2FlcGZ3YFYqJYt554DJNAr%2Fimage16-e03cd4ab59c3e2140f7b2f82c1db6065.png?alt=media&amp;token=d3cb0941-95b2-4ebb-918e-bb6bf396b49a" alt=""><figcaption></figcaption></figure>
{% endstep %}

{% step %}
By clicking on the **View Real Time Logs** button, users can access real-time logs, providing up-to-date information on the ongoing processes. Moreover, users have the option to copy and download selected log types.

<figure><img src="https://3333414532-files.gitbook.io/~/files/v0/b/gitbook-x-prod.appspot.com/o/spaces%2FIbwGN7KwvYi0iLbjtnXz%2Fuploads%2FcTAs81cDgpMKQqW0xEff%2Fimage17-5bf00f3ba51e4472d4bd8be95a564ea5.png?alt=media&amp;token=6148bec8-1144-433c-8c58-88fb7c6410f9" alt=""><figcaption></figcaption></figure>

<figure><img src="https://3333414532-files.gitbook.io/~/files/v0/b/gitbook-x-prod.appspot.com/o/spaces%2FIbwGN7KwvYi0iLbjtnXz%2Fuploads%2FOZD5Flaojsw2kxvGCoDa%2Fimage18-239cf0997bedd7be56ff98fe5a170332.png?alt=media&amp;token=81954794-8f29-4223-aa68-237260504450" alt=""><figcaption></figcaption></figure>
{% endstep %}

{% step %}
Users can easily obtain logs based on log types and for a specified date range from the **Application Log** field. The platform provides the convenience of sending the email download link of the logs directly to the user's email address.

<figure><img src="https://3333414532-files.gitbook.io/~/files/v0/b/gitbook-x-prod.appspot.com/o/spaces%2FIbwGN7KwvYi0iLbjtnXz%2Fuploads%2FT5jSfjXD0UgEQPQXqM64%2Fimage19-2ffb663fea3e192768638852d49e848e.png?alt=media&amp;token=03375cd5-3bfe-4640-b99a-c6a4b14e77c6" alt=""><figcaption></figcaption></figure>

{% hint style="info" %}
The **Applications** table in the project detail offers an overview of various applications, including Project Zero, extensions, and more. Users can view deployment statuses, application details, and logs, similar to the information provided for services. To add an application created in ACC to projects, follow the tutorial titled Tutorials>Add Application via App Store.
{% endhint %}

<figure><img src="https://3333414532-files.gitbook.io/~/files/v0/b/gitbook-x-prod.appspot.com/o/spaces%2FIbwGN7KwvYi0iLbjtnXz%2Fuploads%2FfPyr3KJAJNMUSVcTzONb%2Fimage20-93cb0bc72eb21877ffe66271cd19c01f.png?alt=media&amp;token=2067c88d-6ba2-40ef-9561-79fe6cec58f0" alt=""><figcaption></figcaption></figure>
{% endstep %}
{% endstepper %}


# How to Use Demo Projects with ARC

ACC and ARC (Akinon Rapid Commerce) offers various ready-to-use application package options to provide an easy and fast Akinon experience with just one click. This allows Akinon users to create demo projects with the provided application packages and experience Akinon digital commerce solutions end-to-end through ready-to-use applications with sample data.

To create a demo project, users assigned the role must have **App Bundle** authorization. When a new account is created in ACC, the account owner is automatically assigned the Manager role, which includes App Bundle authorization. Users with this authorization can see the action to create a demo project on the **Projects** page.

<figure><img src="https://3333414532-files.gitbook.io/~/files/v0/b/gitbook-x-prod.appspot.com/o/spaces%2FIbwGN7KwvYi0iLbjtnXz%2Fuploads%2FRXYDBO3NhBhkF0RSTRNM%2Fimage.png?alt=media&amp;token=859d83d3-84e7-4286-bef7-8224d8121582" alt=""><figcaption></figcaption></figure>

{% stepper %}
{% step %}
Clicking the **+ Create Demo** button redirects users to the demo project setup detail page. On this page, users need to specify the demo project name and slug, select one of the available application packages. After filling in the necessary fields, clicking the **Start Demo** button initiates automatic project and application deployments with the specified details on the page.

<figure><img src="https://3333414532-files.gitbook.io/~/files/v0/b/gitbook-x-prod.appspot.com/o/spaces%2FIbwGN7KwvYi0iLbjtnXz%2Fuploads%2FilQhwDpvX3ZixAHqET8M%2Fimage.png?alt=media&amp;token=37d11c97-db1c-4c32-a93a-e61e9e0a22e5" alt=""><figcaption></figcaption></figure>
{% endstep %}

{% step %}
The created demo project is listed on the **Projects** page and is distinguished from other projects by a different cardbox color.

<figure><img src="https://3333414532-files.gitbook.io/~/files/v0/b/gitbook-x-prod.appspot.com/o/spaces%2FIbwGN7KwvYi0iLbjtnXz%2Fuploads%2FxgRT68Dr6V9ynzQlSz7i%2Fimage.png?alt=media&amp;token=98775c38-6b74-416d-a6b6-46c088adc2e2" alt=""><figcaption></figcaption></figure>
{% endstep %}

{% step %}
After creating the demo project, the deployment of ready-to-use applications is automatically performed in sequence based on application dependencies. By clicking on the relevant demo project cardbox in the project page, users are directed to the project detail page where they can track the application setup status in the demo project.

<figure><img src="https://3333414532-files.gitbook.io/~/files/v0/b/gitbook-x-prod.appspot.com/o/spaces%2FIbwGN7KwvYi0iLbjtnXz%2Fuploads%2FT6l3LIvh6lNOzvKPOisZ%2Fimage.png?alt=media&amp;token=a5e0e469-d36a-4395-9f68-afb02a5ea883" alt=""><figcaption></figcaption></figure>

{% hint style="info" %}
Application deployments are carried out with stable versions if the stable version is marked and with the latest versions successfully built if not marked. After the Omnitron deployment is completed, user login information is sent to the ACC user who created the demo project via email.
{% endhint %}
{% endstep %}

{% step %}
It is not possible to add a new service/application to the project until the deployment of all applications in the selected application package is successfully completed. After successful deployments, a new service can be added to the project by clicking the **+ New Service** button. Services added later to the project are also deployed and ready for use with sample data.

<figure><img src="https://3333414532-files.gitbook.io/~/files/v0/b/gitbook-x-prod.appspot.com/o/spaces%2FIbwGN7KwvYi0iLbjtnXz%2Fuploads%2FXjCOs4xDQ2TmxTEILqsk%2Fimage.png?alt=media&amp;token=a1b38d59-5344-4d52-beb7-8d0eaa2b76f3" alt=""><figcaption></figcaption></figure>

{% hint style="info" %}
The limit set for the number of applications in demo projects will be automatically assigned as the number of applications in the application package by default. An increase in the limit should be requested for services and applications to be added later to demo projects.
{% endhint %}
{% endstep %}

{% step %}
In the project detail page, similar to other projects, by clicking on the log icon, logs for demo projects can be viewed from the log detail page, and by clicking on the application names, the application detail page can be accessed.
{% endstep %}
{% endstepper %}


# How to Move Apps into ACC

If you've been developing a web application locally using the **Django** framework and are now ready to take it live, deploying it to **ACC** is a powerful next step. ACC provides a scalable, cloud-native environment designed for modern commerce applications, allowing you to host, build, and manage your apps with ease.

{% stepper %}
{% step %}
If your application is written in **Python** using the **Django** framework, your local project directory may look like this:

```
├── manage.py
├── quickstart
│   ├── __init__.py
│   ├── __pycache__
│   ├── asgi.py
│   ├── settings.py
│   ├── urls.py
│   └── wsgi.py
├── requirements.txt
```

{% endstep %}

{% step %}
After setting up and running the application locally, you should see the expected output in the browser.

<figure><img src="https://3333414532-files.gitbook.io/~/files/v0/b/gitbook-x-prod.appspot.com/o/spaces%2FIbwGN7KwvYi0iLbjtnXz%2Fuploads%2FbvAuCXM0faVaI5CQx0Y7%2Fimage.png?alt=media&amp;token=12d971f5-95a4-4c6f-aca3-d426a7b0a52a" alt=""><figcaption></figcaption></figure>
{% endstep %}

{% step %}
To run your application on **ACC**, you’ll need to add **three essential files** to your project directory:

* `akinon.json` – This JSON file contains the manifest-level information of your application.
* `Procfile` – Includes the necessary commands to run the application within ACC.
* `build.sh` – ACC stores image files for each new version of the application. This shell script file should contain the package contents of these image files and instructions on how they should be executed.

**Sample akinon.json:**

```

{
 "name": "Quickstart Project",
 "description": "Quickstart Project",
 "scripts": {
   "release": "",
   "build": "sh build.sh"
 },
 "env": {},
 "formation": {
   "web": {
     "min": 1,
     "max": "auto"
   }
 },
 "runtime": "python:3.8-alpine",
 "addons": []
}
```

{% endstep %}

{% step %}
By including this file, specific requirements for ACC are defined regarding the Docker image of the application. This configuration guides versioning and the necessary commands during the build and release stages. It is important to note that the **akinon.json** file offers additional opportunities beyond these essentials. For more detailed information, refer to the [ACC App Manifest (akinon.json) and Procfile](/tutorials/acc/how-to-configure-your-acc-application-with-akinon.json-and-procfile).
{% endstep %}

{% step %}
Next, the contents of the **build. sh** file will be explored:

```
set -euo pipefail

apk add python3-dev g++ jpeg-dev zlib-dev libffi-dev --no-cache
pip install -U --force-reinstall pip
pip install -r requirements.txt

apk del g++ python3-dev
```

{% hint style="info" %}
Including this file allows specification of the actions ACC must take with the version image whenever a new version is built.
{% endhint %}
{% endstep %}

{% step %}
Finally, the **Procfile** must be added.

```
web: gunicorn quickstart.wsgi -w 4 -b 0.0.0.0:8008 --access-logfile -
```

Given that the **Gunicorn** library is being used to handle the **web** part of our application, it is crucial to specify the appropriate command in the Procfile using the standard format mentioned earlier.

The provided command is responsible for running our application and setting the format for access logs. If you wish to run your own application, ensure that you input the required command in the 'web: command' format.

{% hint style="info" %}
The `web:` prefix is required, and the app **must run on port 8008**, which is the only supported port in ACC.
{% endhint %}
{% endstep %}

{% step %}
Three essential files have been added to the application directory. As a result, the application directory should now resemble the following:

```
├── Procfile
├── akinon.json
├── build.sh
├── manage.py
├── quickstart
│   ├── __init__.py
│   ├── __pycache__
│   ├── asgi.py
│   ├── settings.py
│   ├── urls.py
│   └── wsgi.py
├── requirements.txt
```

{% endstep %}

{% step %}
Your app is now ready to be deployed to ACC.
{% endstep %}
{% endstepper %}

## <mark style="color:red;">Creating a Public Key​</mark> <a href="#creating-a-public-key" id="creating-a-public-key"></a>

To enable ACC to create a repository for the application and allow for development submissions, users must register an SSH Public Key within the ACC. If a Public Key has been previously provided, this step can be skipped.

{% stepper %}
{% step %}
To create an SSH Public Key, users can use the following command:

<pre><code><strong>ssh-keygen -t rsa -b 4096
</strong></code></pre>

{% endstep %}

{% step %}
This command has created a Private and a Public Key. The Public Key will be generated under the **.pub** extension. Next, copy this Public Key:

```
pbcopy < ~/.ssh/acc_rsa.pub
```

{% endstep %}

{% step %}
If `pbcopy` doesn’t work, open the file manually and copy its contents. Then paste it into ACC.

{% hint style="info" %}
For more info, see the [**Public Keys**](/tutorials/acc/how-to-generate-and-add-public-keys-in-acc) documentation.
{% endhint %}
{% endstep %}
{% endstepper %}

## <mark style="color:red;">Creating an Application</mark>​ <a href="#creating-an-application" id="creating-an-application"></a>

Applications within the ACC are stored in **git** repositories. To publish each version, users must push the corresponding **tag** to the git repository in ACC.

If the application is not currently versioned with git, a git repository can be created within the application directory by running the following command through the terminal:

{% stepper %}
{% step %}
If you're not currently versioning the application with git, create a git repository within the application by running the following command in the application directory through the terminal:

```
git init
```

{% endstep %}

{% step %}
To link your git repository in the local environment to the one within ACC, first add a new ***remote*** registry to your local git repository.

* **remote\_name**: For clarity, consider using a name that includes "acc" to distinguish it from your development repo.
* **remote\_address**: Copy and paste the URL that starts with "ssh://" of your application from the application list on the “My Applications” page in ACC into this field.

```
git remote add [remote_name] [remote_address]
```

{% endstep %}

{% step %}
Lastly, execute the following command:

```
git remote add acc ssh://abcdefgh@git-codecommit.eu-central-1.amazonaws.com/v1/repos/abcdefghe-abcdefhgh
```

{% endstep %}

{% step %}
To verify whether you have successfully added it, run this command:

```
git remote -v
```

{% endstep %}

{% step %}
The application can now be sent from the local environment to ACC. Create a new tag and push the first version.

```
git add .
git commit -m "Quickstart v1.0.0"
git tag v1.0.0
git push acc v1.0.0
```

{% endstep %}

{% step %}
After running the commands above, the v1.0.0 tag will be sent to the ACC repository.
{% endstep %}
{% endstepper %}

The next step is to initiate the version build corresponding to this tag.

## <mark style="color:red;">Building Versions</mark>​ <a href="#building-versions" id="building-versions"></a>

{% stepper %}
{% step %}
Go to the **“My Applications”** page in the ACC dashboard. Click on the name of your application. You’ll be directed to the application’s detail page, which includes a section for builds.

<figure><img src="https://3333414532-files.gitbook.io/~/files/v0/b/gitbook-x-prod.appspot.com/o/spaces%2FIbwGN7KwvYi0iLbjtnXz%2Fuploads%2FemiqJU0swcEZBisHuxiw%2Fimage2-43db9d30cd7a405880de0892703c972b.png?alt=media&amp;token=7c599161-9df3-4ddf-bb2d-a74ec7b9f224" alt=""><figcaption></figcaption></figure>
{% endstep %}

{% step %}
Follow the instructions under the **“Building Application”** section of the [My Application](/tutorials/acc/how-to-create-manage-build-and-deploy-applications-in-acc) documentation to trigger the build process.
{% endstep %}

{% step %}
As your version is being built, you'll see one of the following statuses:

* **Initializing**: The build has started and is being prepared.
* **Completed**: The build finished successfully and is ready to deploy.
* **Failed**: The build encountered an error.

If the status shows **Failed**, click on the build to view the error logs and troubleshoot the issue.

Once the build is marked **Completed**, you're ready to move on to deployment.
{% endstep %}
{% endstepper %}

## <mark style="color:red;">Creating a Project</mark>​ <a href="#creating-a-project" id="creating-a-project"></a>

In ACC, applications are installed into **projects**, which allow you to run different versions of your app in different environments (e.g., staging, production).

* If you **already have a project**, you can skip this step.
* If not, follow the steps outlined in the **“Creating Project”** section of the [Project and Services](#creating-a-project) documentation.

## <mark style="color:red;">Installing the Application​</mark> <a href="#installing-the-application" id="installing-the-application"></a>

As there is currently no project linked to Omnitron, the next step is to install the application into a project. To do this, follow the steps outlined in the [App Store](/tutorials/acc/how-to-install-applications-from-the-app-store-in-acc) documentation under “Adding an Application to a Project.”

## <mark style="color:red;">Deploying the Application to the Project​</mark> <a href="#deploying-the-application-to-the-project" id="deploying-the-application-to-the-project"></a>

{% stepper %}
{% step %}
Go back to **“My Applications”** and click on your application’s name. Scroll to the **Installed Projects** section to see which project the app is installed in.

<figure><img src="https://3333414532-files.gitbook.io/~/files/v0/b/gitbook-x-prod.appspot.com/o/spaces%2FIbwGN7KwvYi0iLbjtnXz%2Fuploads%2F5Yh4QlAj6M4ayTfIOO0h%2Fimage3-d73d43ff789d2d42a10de5fb35895457.png?alt=media&amp;token=c1e4ac7c-c28b-492a-90ce-6ddb079c1a2a" alt=""><figcaption></figcaption></figure>
{% endstep %}

{% step %}
Follow the steps under the **“Deploying Application”** section in the [My Application](/tutorials/acc/how-to-create-manage-build-and-deploy-applications-in-acc) documentation. Once deployed successfully, the status will be updated to **Deployed**.
{% endstep %}

{% step %}
Navigate to the **Projects** page. Select your project and locate your application under the **Applications** section. Click on the application name to view its details. The application details page includes the **URL** where the app is running.

<figure><img src="https://3333414532-files.gitbook.io/~/files/v0/b/gitbook-x-prod.appspot.com/o/spaces%2FIbwGN7KwvYi0iLbjtnXz%2Fuploads%2Fhi73WF6GS872c5cQudKb%2Fimage4-707f6db39d77b2bdf61f7537168a43da.png?alt=media&amp;token=c0f77085-6f19-4b64-a1a0-bb76d0904870" alt=""><figcaption></figcaption></figure>
{% endstep %}

{% step %}
Click the URL to launch your app—now fully deployed and running in ACC!

<figure><img src="https://3333414532-files.gitbook.io/~/files/v0/b/gitbook-x-prod.appspot.com/o/spaces%2FIbwGN7KwvYi0iLbjtnXz%2Fuploads%2F0saYGwRD8LbnJW6CvkJJ%2Fimage.png?alt=media&amp;token=2c706d8c-9584-4a4a-8bd5-a850407dd47f" alt=""><figcaption></figcaption></figure>
{% endstep %}
{% endstepper %}

Congratulations! Your application is now live on ACC. 🎉

The next step is to ensure your application has access to the necessary data. To configure database connectivity, continue with the [Configure Database Connections](/tutorials/acc/how-to-configure-database-connection-in-acc) guide.


# How To Configure Database Connection in ACC

This tutorial explains how to configure a **database connection** for your application in **ACC**.

## <mark style="color:red;">Recap: The</mark> <mark style="color:red;">`akinon.json`</mark> <mark style="color:red;">File</mark>

Earlier, we created a basic `akinon.json` configuration file:

```
{
  "name": "Quickstart Project",
  "description": "Quickstart Project",
  "scripts": {
    "release": "",
    "build": "sh build.sh"
  },
  "env": {},
  "formation": {
    "web": {
      "min": 1,
      "max": "auto"
    }
  },
  "runtime": "python:3.8-alpine", 
  "addons": []
}
```

## <mark style="color:red;">Configuring Addons</mark> <a href="#configuring-addons" id="configuring-addons"></a>

The needs of the application can be met by adding various components such as database, cache, CDN, and more into the addons field. For detailed information about addons, please refer to this [link](/tutorials/acc/how-to-configure-your-acc-application-with-akinon.json-and-procfile#healthcheck).

Below is the method to specify the addons required for the application within the akinon.json file:

```
{
    "...": "...",
    "addons": [
        {
            "plan": "postgresql",
            // "options": {
            //     "instance_type": "db.r5.large",
            //     "instance_count": 1
            // }
        }
    ]
}
```

{% hint style="info" %}
To specify addons, simply fill out the plan area in the akinon.json file. Optional configurations can be made using the options field, as demonstrated above. For instance, users can configure the type and amount of the database instance. The available instance types are aligned with the [database instance names on AWS](https://docs.aws.amazon.com/AmazonRDS/latest/UserGuide/Concepts.DBInstanceClass.html).
{% endhint %}

After completing the configuration, the akinon.json file will resemble the following:

```
{
  "name": "Quickstart Project",
  "description": "Quickstart Project",
  "scripts": {
    "release": "",
    "build": "sh build.sh"
  },
  "env": {},
  "formation": {
    "web": {
      "min": 1,
      "max": "auto"
    }
  },
  "runtime": "python:3.8-alpine", 
  "addons": [
        {
            "plan": "postgresql"
        }
    ]
}
```

## <mark style="color:red;">Using Environment Variables for Configuration</mark> <a href="#using-environment-variables-for-configuration" id="using-environment-variables-for-configuration"></a>

When a database addon is added, the following environment variables become available to your app:

* `DB_HOST`
* `DB_PORT`
* `DB_NAME`
* `DB_USER`
* `DB_PASSWORD`

Update your `settings.py` to use these variables:

```
DATABASES = {
    "default": {
        "ENGINE": "django.db.backends.postgresql",
        "HOST": env("DB_HOST"),
        "USER": env("DB_USER"),
        "PASSWORD": env("DB_PASSWORD"),
        "NAME": env("DB_NAME"),
        "PORT": env("DB_PORT", cast=int),
    }
}
```

To run the app locally, you’ll need to simulate these environment variables:

**.env**

```
# postgres
DB_NAME=quickstart
DB_USER=postgres_user
DB_PASSWORD='postgres_password'
DB_HOST=127.0.0.1
DB_PORT=5432
```

To enable the application to communicate with PostgreSQL, users must incorporate the **postgresql-dev** library into the build.sh file.

Below is the modified version of the build.sh file:

```
set -euo pipefail

apk add python3-dev postgresql-dev g++ jpeg-dev zlib-dev libffi-dev --no-cache
pip install -U --force-reinstall pip
pip install -r requirements.txt

apk del g++ python3-dev
```

## <mark style="color:red;">Automating of Database Migrations</mark> <a href="#automating-of-database-migrations" id="automating-of-database-migrations"></a>

To ensure database migrations run automatically during deployment, add the migration command to the `release` script in `akinon.json`:

Below is the addition to be made in the akinon.json file:

```
{
  //... ,
  "scripts": {
    "release": "python manage.py migrate --noinput",
    "build": "sh build.sh"
  },
  // ...
}
```

## <mark style="color:red;">Ensuring the Database Connection with Health-Check</mark> <a href="#ensuring-the-database-connection-with-health-check" id="ensuring-the-database-connection-with-health-check"></a>

To control the database connection and ensure that the application is running smoothly, users can create a **healthcheck** page. This page will serve as a status indicator, providing information about the application's proper configuration and functionality.

If everything is functioning well, the server will return an **HTTP 200 OK** status code. Otherwise, if there's an issue, it will handle the error and respond with an appropriate error status code (e.g., 500 Internal Server Error).

Let's add a new view to the application that will respond to the **/healthz** path and implement the health-check functionality:

**views.py**

```
import django
from django.http import HttpResponse
from django.views import View

class HomeView(View):
    def get(self, request):
        return HttpResponse(content='Quickstart App Home Page', status=200)

class HealthCheckView(View):
    def get(self, request):
        try:
            django.db.connection.ensure_connection()
        except Exception as exc:
            return HttpResponse(content='Database connection could not be established.', status=500)

        return HttpResponse(content='OK', status=200)
```

**urls.py**

```
from django.contrib import admin
from django.urls import path

from quickstart.views import HealthCheckView, HomeView

urlpatterns = [
    path('', HomeView.as_view(), name='home'),
    path('admin/', admin.site.urls),
    path('healthz/', HealthCheckView.as_view(), name='healthcheck')
]
```

Test the healthcheck page in the local environment:

<figure><img src="https://3333414532-files.gitbook.io/~/files/v0/b/gitbook-x-prod.appspot.com/o/spaces%2FIbwGN7KwvYi0iLbjtnXz%2Fuploads%2F60lT7oBKewBjgydyIu7Y%2Fimage.png?alt=media&amp;token=b84491cd-5909-4815-b4f4-2aa280649883" alt=""><figcaption></figcaption></figure>

Everything seems to be running smoothly! Let's try pausing the PostgreSQL service locally:

<figure><img src="https://3333414532-files.gitbook.io/~/files/v0/b/gitbook-x-prod.appspot.com/o/spaces%2FIbwGN7KwvYi0iLbjtnXz%2Fuploads%2F7PpQPliXOE2X1KKTMfuk%2Fimage.png?alt=media&amp;token=e61af3aa-b822-4d10-b470-b03818126957" alt=""><figcaption></figcaption></figure>

If the application is unable to connect to the database, the health check page will notify users of the issue.

By defining the health check path in the `akinon.json` file, ACC can automatically and periodically verify the application's health once it's deployed.

To enable this, simply add the `healthcheck` key under the `formation > web` section, specifying the path to the health check endpoint.

```
{
  //... 
  
  "env": {},
  "formation": {
    "web": {
      "min": 1,
      "max": "auto",
      "healthcheck": "/healthz/"
    }
  },
  
  // ...
}
```

{% hint style="info" %}
For more detailed information, refer to the tutorial [here](/tutorials/acc/how-to-configure-your-acc-application-with-akinon.json-and-procfile#healthcheck).
{% endhint %}

To test the changes in the ACC environment, push the updates to your application’s repository and trigger a new version build. Once the build is complete, proceed with the deployment.

After deployment, navigate to the health check endpoint. If everything is configured correctly, the page will confirm a successful database connection—indicating that your application is running smoothly.

<figure><img src="https://3333414532-files.gitbook.io/~/files/v0/b/gitbook-x-prod.appspot.com/o/spaces%2FIbwGN7KwvYi0iLbjtnXz%2Fuploads%2F93FDg7VcJVKRt95n5LAt%2Fimage.png?alt=media&amp;token=54d8a756-8896-42df-ba4a-d515d6993e56" alt=""><figcaption></figcaption></figure>


# How to Configure Your ACC Application with akinon.json and Procfile

To run your application on ACC, it must first be containerized. The approach for this will vary based on the programming language and framework you're using—searching for "dockerize $language $framework" is a good way to discover the recommended practices.

ACC packages your application into a Docker container and deploys it on a Kubernetes cluster. To do this, it needs specific instructions on how to build and run your app.

Instead of using a traditional Dockerfile, ACC relies on an app manifest composed of two files: `akinon.json` and a `Procfile`.

## <mark style="color:red;">akinon.json​</mark> <a href="#akinonjson" id="akinonjson"></a>

This file outlines the essential details about your application—what it is, how it should be built and executed, and any dependencies it requires to function correctly (such as a database or message broker). It must be placed at the root of your application's repository.

Here’s a minimal example of an `akinon.json` file:

```
{
    "name": "mcapp-9000",
    "description": "My cool app",
    "scripts": {
        "build": "build.sh"
    },
    "runtime": "python:3.10-slim",
    "formation": {
        "web": {
            "healthcheck": "/healthz"
        }
    },
    "...": "..."
}
```

Name and description are pretty self-explanatory, they're used to identify your app in the UI.

Scripts are used to build & run your app in different stages of its lifecycle. Since they're executed inside the container, they can use any shell available in the container (sh, bash, xonsh, etc.).

We'll explore other fields and their uses in the following sections.

#### Converting a Dockerfile into a build script​ <a href="#converting-a-dockerfile-into-a-build-script" id="converting-a-dockerfile-into-a-build-script"></a>

ACC abstracts `Dockerfile` into a script that is run while building the Docker container. It effectively combines all `RUN` statements into one. This is to prevent users from generating a massive Docker container, often due to creating too many layers by mistake.

It's best to start from a Dockerfile and later convert it to an app manifest that ACC can understand.

Take this minimal (though not optimized) Dockerfile as an example of a Python application served by Gunicorn server.

```
# Dockerfile
FROM python:3.10-slim

RUN apt-get update && apt-get install -y python-dev postgresql-dev jpeg-dev g++
COPY requirements.txt requirements.txt
RUN pip install -r requirements.txt
COPY . .
CMD ["gunicorn", "app:app", "-b", "0.0.0.0:8000"]
EXPOSE 8000
```

We have a number of `RUN` commands in the Dockerfile. And an `CMD` command that runs starts process.

To create a build script, we combine all `RUN` statements. Files inside the repo are copied to the Docker container, and the script is run at the root of the repo.

```
# build.sh
#!/bin/bash
set -euo pipefail

apt-get update && apt-get install -y python-dev postgresql-dev jpeg-dev g++
pip install -r requirements.txt

# remember to clean up unnecessary files to reduce container size
# for example, g++ or python-dev is not used by the app, it can be uninstalled
# this will reduce the container size significantly, 
# and speed up builds & deployments.

apt-get remove -y python-dev g++
```

{% hint style="info" %}
The `build.sh` file must be executable. On Unix-based systems, you can make this file executable by running the `chmod +x build.sh` command. For Windows users who cannot use chmod, you can achieve the same result by using the `git update-index --chmod=+x build.sh` Git command.
{% endhint %}

Then this is specified in `akinon.json` under `$.scripts.build`, and the base image under `$.runtime`:

```
{
    "...": "...",
    "scripts": {
        "build": "build.sh"  // runs `sh build.sh` at the repo root
    },
    "runtime": "python:3.10-slim" // used as the base image for the Docker container
}
```

This also means you can put your scripts under a subdirectory and point to it in `$.scripts.build`:

```
{
    "...": "...",
    "scripts": {
        "build": "./scripts/build.sh"
    }
}
```

#### Release Script​ <a href="#release-script" id="release-script"></a>

Release script is an **optional** script that is run just before deploying your app. This is usually used to run migrations.

Keep in mind that this script can and will likely be run multiple times, so it **must** be idempotent, meaning it should expect some changes to be already made by previous runs.

```
{
    "...": "...",
    "scripts": {
        "build": "build.sh",
        "release": "release.sh"
    }
}
```

It contents could potentially be:

```
# release.sh
#!/bin/bash
set -euo pipefail

# only run migrations if the database is not already migrated.
# this check is usually performed by the ORM you're using. 

is_migrated() {
  # ...
  if test $migrated -eq 0; then
    return 0 # yes
  else
    return 1 # no
  fi
}

is_migrated || migrate
```

{% hint style="info" %}
The `release.sh` file must be executable. You can make this file executable by running the `chmod +x release.sh` command.
{% endhint %}

## <mark style="color:red;">Formations and Procfile​</mark> <a href="#formations-and-procfile" id="formations-and-procfile"></a>

Formation defines how the app is deployed on a Kubernetes cluster and how many replicas it has or how many instances it can scale to.

```
{
    "...": "...",
    "formation": {
        "web": {
            "min": 2,  // app is deployed with 2 replicas
            "max": "auto", // and scale up as needed
            "healthcheck": "/healthz"
        },
        "beat": {
            "min": 1, // only a single instance is deployed
            "max": 1
        },
        "worker": {
            "min": 1, // only a single instance is deployed
            "max": "auto" // but can scale up as needed
        }
    }
}
```

Keys of the formation are the names of the processes that are defined in Procfile. We expect to find this file at repo root.

Procfile is a file that contains a list of processes that can be run inside the container.

```
# format: <process_name>: <command>
web: gunicorn app:app -b 0.0.0.0:8008
worker: worker.py
```

This command will be used as `CMD` statement in the Dockerfile.

For example, if you have a Django app, it is usually served by Gunicorn. But it also needs a worker process to run background tasks.

So we define two processes, both of which will be deployed as **separate** containers. This means they **cannot share state** among each other without using a shared database or a broker like Redis.

### <mark style="color:red;">Healthcheck​</mark> <a href="#healthcheck" id="healthcheck"></a>

If the app is expected to be accessed from the internet, it must have a `web` process which listens to all interfaces `0.0.0.0` at port `8008`. And it must have a healthcheck endpoint.

A healthcheck endpoint is a path used that responds to HTTP GET requests to confirm if the app is ready to receive traffic.

It is like the following command that is run inside the container:

```
curl -XGET http://localhost:$PORT/healthz
```

After deployment, once the app starts returning HTTP 200 responses from this endpoint, it is assumed to be healthy and ready to serve traffic.

This means, that if the app is **not ready** to serve traffic, such as, it cannot access the database or other upstream services & APIs it depends on, it **should not return HTTP 200 responses** from this endpoint. If it does, the traffic will be routed to the app, and it will most likely crash, and return HTTP 500 responses.

```
{
    "...": "...",
    "formation": {
        "web": {
            "...": "...",
            "healthcheck": "/healthz"
        },
        "...": "..."
    }
}
```

It is also possible to use health checks for processes other than `web`. In this case, the health check path will correspond to a file rather than an endpoint.

This indicates that if the health check file exists, the deployment is assumed to be healthy. Conversely, if the file is absent, the deployment is assumed to be unhealthy.

```
{
    "...": "...",
    "formation": {
        "worker": {
            "...": "...",
            "healthcheck": "/tmp/healthz"
        },
        "beat": {
            "...": "...",
            "healthcheck": "/tmp/healthz"
        }
        "...": "..."
    }
}
```

The following example demonstrates the process of creating a health check file with Celery:

```
from celery.signals import beat_init, worker_ready, worker_shutdown

READINESS_FILE = Path('/tmp/healthz')

@worker_ready.connect
def worker_ready(**_):
    READINESS_FILE.touch()


@worker_shutdown.connect
def worker_shutdown(**_):
    READINESS_FILE.unlink(missing_ok=True)


@beat_init.connect
def beat_ready(**_):
    READINESS_FILE.touch()
```

## <mark style="color:red;">Addons</mark>​ <a href="#addons" id="addons"></a>

With all this information, the app is now ready for deployment. However, most applications require a database to store state, which is provided through addons.

It's an array of objects, each of which defines an addon (with optional configuration).

```
{
    "...": "...",
    "addons": [
        {
            "plan": "postgresql",
            // "options": {
            //     "instance_type": "db.r5.large",
            //     "instance_count": 1
            // }
        }
    ]
}
```

Each addon causes a number of environment variables to be passed to the container. And the app needs to **read these environment variables** to configure itself.

You can define a type of addon multiple times, but they must have different roles defined in `as` field.

```
{
    "...": "...",
    "addons": [
        {
            "plan": "redis",
            "as": "cache"
        },
        {
            "plan": "redis",
            "as": "broker"
        }
    ]
}
```

This will cause environment variables to have different prefixes. In this case, the app will have two different Redis instances, and their details will be stored in `CACHE_*` and `BROKER_*` environment variables.

### <mark style="color:red;">Postgresql Addon​</mark> <a href="#postgresql-addon" id="postgresql-addon"></a>

This addon provides a Postgresql database. It can be defined as follows:

```
{
    "plan": "postgresql"
    // "as": "db", // optional, set to "db" by default 
    // "options": {
    //   "instance_type": "db.r5.large",
    //   "instance_count": 1
    // }
}
```

This will pass the following environment variables to the container:

* `DB_HOST`: the hostname of the database
* `DB_PORT`: the port to connect to the host
* `DB_NAME`: the name of the database
* `DB_USER`: the username to connect to the database
* `DB_PASSWORD`: the password of the user

### <mark style="color:red;">Redis Addon​</mark> <a href="#redis-addon" id="redis-addon"></a>

This addon provides a Redis instance to the app. It can be defined as follows:

```
{
    "plan": "redis" 
    // "as": "cache", // optional, set as cache by default
    // "options": {
    //    "instance_type": "cache.r4.large",
    //    "instance_count": 1
    // }
}
```

This will pass the following environment variables to the container:

* `CACHE_HOST`: the hostname of the Redis instance
* `CACHE_PORT`: the port to connect to the host
* `CACHE_DATABASE_INDEX`: the index of the database to use

Combining these, you'll need to prepare a Redis DSN as follows:

```
redis://$CACHE_HOST:$CACHE_PORT/$CACHE_DATABASE_INDEX
```

### <mark style="color:red;">Sentry Addon​</mark> <a href="#sentry-addon" id="sentry-addon"></a>

This addon provides a Sentry DSN to send error logs to. It can be defined as follows:

```
{
    "plan": "sentry"
}
```

This will pass the following environment variables to the container:

* `SENTRY_DSN`: the DSN of the Sentry instance

### <mark style="color:red;">Mail Addon​</mark> <a href="#mail-addon" id="mail-addon"></a>

This addon provides SMTP details to allow the app to send emails. It's included with every app by default, so it doesn't need to be defined in akinon.json.

This will pass the following environment variables to the container:

* `EMAIL_HOST`: the hostname of the SMTP server
* `EMAIL_PORT`: the port to connect to the host
* `EMAIL_HOST_USER`: the username to connect to the SMTP server
* `EMAIL_HOST_PASSWORD`: the password of the user
* `EMAIL_USE_TLS`: whether to use TLS or not

### <mark style="color:red;">CDN Addon​</mark> <a href="#cdn-addon" id="cdn-addon"></a>

This addon provides a CDN instance to the app. It can be defined as follows:

```
{
    "plan": "cdn",
    // "scope": "project" // optional set as cache by default
}
```

This will pass the following environment variables to the container:

* `CDN_DOMAIN`: the domain of the CDN server
* `S3_BUCKET_NAME`: the name of the AWS S3 bucket
* `S3_REGION_NAME`: the name of the AWS S3 region name
* `AWS_ACCESS_KEY_ID`: the access key id of the AWS account
* `S3_SIGNATURE_VERSION`: the signature version of the AWS S3
* `AWS_SECRET_ACCESS_KEY`: the secret access key of the AWS account

#### <mark style="color:red;">Static CDN Addon​</mark> <a href="#static-cdn-addon" id="static-cdn-addon"></a>

This addon provides a Static CDN instance to the app. It can be defined as follows:

```
{
    "plan": "static_cdn"
}
```

This will pass the following environment variables to the container:

* `BASE_STATIC_URL`: the url of the Static CDN server

### <mark style="color:red;">Elasticsearch Addon​</mark> <a href="#elasticsearch-addon" id="elasticsearch-addon"></a>

This addon provides an Elasticsearch instance to the app. It can be defined as follows:

```
{
    "plan": "elasticsearch",
    // "options": {
    //    "version": "5.5",
    //    "instance_type": "t2.medium.elasticsearch",
    //    "instance_count": 1
    // }
}
```

This will pass the following environment variables to the container:

* `ES_HOST`: the hostname of the Elasticsearch server
* `ES_PORT`: the port to connect to the host

## <mark style="color:red;">Adding Required Environment Variables in akinon.json​</mark> <a href="#adding-required-environment-variables-in-akinonjson" id="adding-required-environment-variables-in-akinonjson"></a>

When developing and deploying an extension in ACC, there might be cases where specific environment variables must be set before the extension can be added to a project. For example, sensitive configurations like `SECRET_KEY` or critical settings like `API_URL` can be defined as prerequisites for installation.

This requirement can be enforced by defining the `env` field in the `akinon.json` file. The example below includes two required environment variables:

* `SECRET_KEY`: A sensitive key with specific length constraints.
* `API_URL`: The base URL needed for API communication.

```
{
    "name": "example-extension",
    "description": "An example ACC extension",
    "runtime": "python:3.10-slim",
    "scripts": {
        "build": "build.sh"
    },
    "env": {
        "SECRET_KEY": {
            "type": "text",
            "required": true,
            "minlength": 12,
            "maxlength": 128,
            "description": "Secret Key"
        },
        "API_URL": {
            "type": "text",
            "required": true,
            "description": "Base URL for the API"
        }
    }
}
```

When a user attempts to deploy this extension, ACC validates the `env` section in the `akinon.json` file. If the required environment variables (SECRET\_KEY or API\_URL) are not provided or do not meet the specified criteria (e.g., type or length), the deployment process will be interrupted, prompting the user to input the required information.


# How to Create, Manage, Build, and Deploy Applications in ACC

## <mark style="color:red;">My Applications</mark>

Users can easily access application details or add a new application by clicking on **My Applications** in the left-side menu. This action directs users to a screen displaying all partner-viewed applications, providing quick access to relevant information and the ability to add new applications as needed.

<figure><img src="https://3333414532-files.gitbook.io/~/files/v0/b/gitbook-x-prod.appspot.com/o/spaces%2FIbwGN7KwvYi0iLbjtnXz%2Fuploads%2FEw77YITygOQIJUrBGuH9%2Fimage1-88d70b3a2ca4f41d522ddaed1122c92d.png?alt=media&amp;token=2cf58a63-201c-41a0-8abe-2ff463c9c3b1" alt=""><figcaption></figcaption></figure>

The list screen provides users with a view of application summary information. Additionally, users can use the search functionality to easily locate specific applications based on their preferences.

Furthermore, the **Edit** column grants users to make changes to specific fields such as description, logo, or images within the application.

<figure><img src="https://3333414532-files.gitbook.io/~/files/v0/b/gitbook-x-prod.appspot.com/o/spaces%2FIbwGN7KwvYi0iLbjtnXz%2Fuploads%2FYOPoKHxCJeC6EwnBvPgd%2Fimage2-867ac22751be96e7d623076046eb4516.png?alt=media&amp;token=2929aed0-cb69-487f-8262-3036636a3544" alt=""><figcaption></figcaption></figure>

## <mark style="color:red;">Creating Application​</mark> <a href="#creating-application" id="creating-application"></a>

To add an application to a project, the application must first be created. To initiate this process, click on the **+ New Application** button, which will then display the **Create New Application** page.

<figure><img src="https://3333414532-files.gitbook.io/~/files/v0/b/gitbook-x-prod.appspot.com/o/spaces%2FIbwGN7KwvYi0iLbjtnXz%2Fuploads%2FXCGTCBsKrnlv5tKhwHkw%2Fimage3-d4270405013076e490465c946ba17e57.png?alt=media&amp;token=80e6f10c-562b-494f-b750-60521f61c7e0" alt=""><figcaption></figcaption></figure>

<figure><img src="https://3333414532-files.gitbook.io/~/files/v0/b/gitbook-x-prod.appspot.com/o/spaces%2FIbwGN7KwvYi0iLbjtnXz%2Fuploads%2FJSdE8MHsH6PR1due3c1q%2Fimage4-9b610c9b86200050301dc98794c45be3.png?alt=media&amp;token=ecf5412c-f519-4299-b8eb-c5e609bef58a" alt=""><figcaption></figcaption></figure>

In order to create a new application, fill in essential fields such as the application's name, slug, type, description, logo, and images.

To proceed, provide both the name and the slug for the application. Then, select the suitable application type from the automatically displayed options. Do not forget to add a description, logo, and images to complete the application setup.

<figure><img src="https://3333414532-files.gitbook.io/~/files/v0/b/gitbook-x-prod.appspot.com/o/spaces%2FIbwGN7KwvYi0iLbjtnXz%2Fuploads%2FaPpmLI8ccsWabs5hmCBC%2Fimage5-eda42708692cf503f84703c6ebd01660.png?alt=media&amp;token=08d40124-9747-4e0b-b251-89489b450525" alt=""><figcaption></figcaption></figure>

The application logo will be visible across all instances where the application is used. To enhance the application's presentation, users are required to include a minimum of 4 product images. They also have the option to add up to 5 images, all of which will be showcased in the application's detail on the App Store.

Once all necessary details are provided, click the **Apply** button to create and add the application to the application list. With this step, the application setup is complete, and it will be ready for building and deploying.

<figure><img src="https://3333414532-files.gitbook.io/~/files/v0/b/gitbook-x-prod.appspot.com/o/spaces%2FIbwGN7KwvYi0iLbjtnXz%2Fuploads%2Fb4Rk7aa4yvFcruMKf8QL%2Fimage6-19d17bc6d7f8015f93c2ff5cb793f0d9.png?alt=media&amp;token=e696e99e-d8cb-4c65-a0f1-19131857ef73" alt=""><figcaption></figcaption></figure>

<figure><img src="https://3333414532-files.gitbook.io/~/files/v0/b/gitbook-x-prod.appspot.com/o/spaces%2FIbwGN7KwvYi0iLbjtnXz%2Fuploads%2Fmi6Z5AVQKRdfVcirBZrY%2Fimage7-73c52cc754c84fce44b2fb6a129fd29d.png?alt=media&amp;token=cfc9efa0-9400-4ee5-8745-28588dee55b4" alt=""><figcaption></figcaption></figure>

{% hint style="info" %}
In order to view and manage an application, users must own the application. **The My Applications** page will only display applications created within the user’s account in the ACC, where the user has been added as a member. However, access to applications from other accounts can be granted through authorization.
{% endhint %}

All users who have the rights to create projects and add applications within their own account can also add applications. When clicking on an application name from the application list, users will be directed to the application detail page. Here, they can access the application details, including the projects in which it has been added, the versions built, and the reports for each version.

The management of application builds and deployments to projects is handled within this screen.

<figure><img src="https://3333414532-files.gitbook.io/~/files/v0/b/gitbook-x-prod.appspot.com/o/spaces%2FIbwGN7KwvYi0iLbjtnXz%2Fuploads%2FLX2LfiivmGkbLx5N64Xj%2Fimage8-bb15ad44b0143022128bded691588af5.png?alt=media&amp;token=7efdbb80-35ee-47e2-88d2-e69449d756fb" alt=""><figcaption></figcaption></figure>

In the **Application Detail** section, users can access information about the application, which includes details such as the application access setting, application type, slug, and more.

{% hint style="info" %}
Regarding the **Application Access** option, it grants users the ability to determine whether the application should be set as private or public. Private applications are accessible for addition in projects within the ACC account where the application was created. In contrast, public applications can be accessed by users from any account, allowing them to add the application to their own projects. These public applications, created in other accounts, will be visible in the App Store, alongside applications owned by individual users.
{% endhint %}

Applications created as the **Project Zero** application type cannot be designated as public applications. They are used as private applications.

<figure><img src="https://3333414532-files.gitbook.io/~/files/v0/b/gitbook-x-prod.appspot.com/o/spaces%2FIbwGN7KwvYi0iLbjtnXz%2Fuploads%2FS4SoogtHsU3joDGNppLY%2Fimage9-1539a7f069c00d0049a3ba67e99fbebb.png?alt=media&amp;token=69d2e69f-9503-4ac4-8bdd-fa808f7d6f2f" alt=""><figcaption></figcaption></figure>

## <mark style="color:red;">Building Application​</mark> <a href="#building-application" id="building-application"></a>

In the **Versions** section of the application detail page, users can build different versions of their application. This section presents a list of the application's entire version history, allowing users to access error logs and quality reports.

Each version listed in this section is associated with a specific tag that the developer used during the application's build process. Furthermore, developers can use different tags for each project.

To initiate the application build process, click the **Build** button. A pop-up window will appear, provide a version tag and notes detailing the edits made in this particular version. Once all necessary information is entered, clicking the **Build** button will commence the application build process.

<figure><img src="https://3333414532-files.gitbook.io/~/files/v0/b/gitbook-x-prod.appspot.com/o/spaces%2FIbwGN7KwvYi0iLbjtnXz%2Fuploads%2FPDYsCkqjvhdQsBhPAHgW%2Fimage10-25e76802a50738f0a67251e3fb6ec761.png?alt=media&amp;token=205e8fbf-6c91-4812-8066-a088170c9983" alt=""><figcaption></figcaption></figure>

<figure><img src="https://3333414532-files.gitbook.io/~/files/v0/b/gitbook-x-prod.appspot.com/o/spaces%2FIbwGN7KwvYi0iLbjtnXz%2Fuploads%2FZd0S1DvNbY1CvPUAL0hU%2Fimage11-04ee79965f6d335d3d47f768388bbf0b.png?alt=media&amp;token=fed263df-ceb6-4320-8f67-5238f2023f14" alt=""><figcaption></figcaption></figure>

In the **Versions** section of the application detail page, users can keep track of the build status. If a build fails, they can view the error logs by clicking on the error icon, which provides detailed information about the encountered issues.

The **Status** column displays either **Completed** or **Failed** to indicate whether the application is ready for deployment with the specified tag.

After successful application builds, users have the option to install these versions into their projects before proceeding with deployment. For a step-by-step guide on the installation process, please refer to the **Tutorials > Add Application** via App Store.

<figure><img src="https://3333414532-files.gitbook.io/~/files/v0/b/gitbook-x-prod.appspot.com/o/spaces%2FIbwGN7KwvYi0iLbjtnXz%2Fuploads%2FYrJxg7xEAgg5PHcamlKW%2Fimage12-e065fc90db3dc00181a24985d3bd2fa5.png?alt=media&amp;token=5f2af4b5-8065-4079-ab7f-e46d9c20c374" alt=""><figcaption></figcaption></figure>

<figure><img src="https://3333414532-files.gitbook.io/~/files/v0/b/gitbook-x-prod.appspot.com/o/spaces%2FIbwGN7KwvYi0iLbjtnXz%2Fuploads%2Fe9mf76bTxDKN1BalL1nY%2Fimage13-080d1b6e6d514d818df4cd52e6a1aae2.png?alt=media&amp;token=c9f6309f-0f9b-468a-b7b2-901a4a273a12" alt=""><figcaption></figcaption></figure>

A perfectly working version can be set as a stable version under the **Stable** column. It is crucial to select a stable version as it will be the first version deployed when installed in projects.

<figure><img src="https://3333414532-files.gitbook.io/~/files/v0/b/gitbook-x-prod.appspot.com/o/spaces%2FIbwGN7KwvYi0iLbjtnXz%2Fuploads%2FCaQjfaaH79B5NtwhbK01%2Fimage14-60cd27a663632aaa847b245a5c182200.png?alt=media&amp;token=7ac83c2a-b1b1-44ea-ae4d-88bf3e8396aa" alt=""><figcaption></figcaption></figure>

Within the version list, users can access quality reports for successfully completed application versions through the **Reports** column. These reports are generated as part of CI/CD pipelines in ACC, providing essential metrics such as code coverage, complexity, duplication, and adherence to coding standards.

To initiate the report generation process for a specific version, click the **Create Report** button. Once the process is successfully completed, the generated report will be displayed in the **Reports** table. However, if any issues arise during the generation, users can retry generating the report for the same version.

The details of the report can be thoroughly examined within the **Reports** table. Under the **Quality Gate** column, the statuses “Passed” and “Failed” indicate whether the version meets the required quality standards or not. Additionally, users can download the report directly from the download icon.

<figure><img src="https://3333414532-files.gitbook.io/~/files/v0/b/gitbook-x-prod.appspot.com/o/spaces%2FIbwGN7KwvYi0iLbjtnXz%2Fuploads%2FMTFMDHaLQWSc1OeCPSVG%2Fimage15-aae91e019a1b1d0fc6002c61c4460709.png?alt=media&amp;token=c7d001a3-650c-4716-92ee-da6451ebc0b1" alt=""><figcaption></figcaption></figure>

## <mark style="color:red;">Deploying Application​</mark> <a href="#deploying-application" id="deploying-application"></a>

The **Installed Projects** section displays information about the projects in which the application is being used, along with the corresponding tags. Users can easily locate specific projects or application versions using the search bars.

Furthermore, applications can be deployed in multiple projects. To achieve this, users only need to select the desired projects, then click the **Deploy Selected Projects** button. In the pop-up window, provide the version tag information and then click the **Deploy** button to initiate the deployment process.

<figure><img src="https://3333414532-files.gitbook.io/~/files/v0/b/gitbook-x-prod.appspot.com/o/spaces%2FIbwGN7KwvYi0iLbjtnXz%2Fuploads%2FptdybyFPYilkbtSlohHd%2Fimage16-056e18b0f96ea1e296cabf58363fc5b4.png?alt=media&amp;token=bd5c87de-bb06-413e-91dd-05c424058684" alt=""><figcaption></figcaption></figure>

<figure><img src="https://3333414532-files.gitbook.io/~/files/v0/b/gitbook-x-prod.appspot.com/o/spaces%2FIbwGN7KwvYi0iLbjtnXz%2Fuploads%2FM6xxCA5vsZGmLbUWL2c8%2Fimage17-6052b2118075e7ed8a740b2c307bac82.png?alt=media&amp;token=78b3c4cd-6245-4e51-9839-90d2a28bc9cb" alt=""><figcaption></figcaption></figure>

The deployment status of the version for each associated project is visible in the table.

Users can access the deployment history page and view deployment details, including any error logs, if they exist, by clicking on the project's name.

<figure><img src="https://3333414532-files.gitbook.io/~/files/v0/b/gitbook-x-prod.appspot.com/o/spaces%2FIbwGN7KwvYi0iLbjtnXz%2Fuploads%2FO8aG8SpqY59oQeT4LpYc%2Fimage18-c7e91671c56fbd8af416a894ce98fe9e.png?alt=media&amp;token=f11c0055-7c30-4aa6-93ea-c0f274e4c213" alt=""><figcaption></figcaption></figure>

<figure><img src="https://3333414532-files.gitbook.io/~/files/v0/b/gitbook-x-prod.appspot.com/o/spaces%2FIbwGN7KwvYi0iLbjtnXz%2Fuploads%2FhVAmERauDLpntf1OBNzg%2Fimage19-79ee007b1e130afd66da7291af0909f3.png?alt=media&amp;token=839992e5-1319-4b8b-bb64-1d1ecbc267f9" alt=""><figcaption></figcaption></figure>

<figure><img src="https://3333414532-files.gitbook.io/~/files/v0/b/gitbook-x-prod.appspot.com/o/spaces%2FIbwGN7KwvYi0iLbjtnXz%2Fuploads%2FL3mcY1QlNuDestKKnmME%2Fimage20-1a492c0e714b6b7d13e20e3473f905ff.png?alt=media&amp;token=67fe441c-8f61-468e-a4c6-f7432d1993ab" alt=""><figcaption></figcaption></figure>

In addition, users can easily locate their application listed in the **Applications** table by navigating to the relevant project's detail page through the **Projects** menu. Here, they can check the deployment status of the application within that specific project. To access detailed information about the application, users can click on the application's name in the table.


# How to Install Applications from the App Store in ACC

## <mark style="color:red;">App Store</mark>

The App Store serves as a digital showcase, enriching the projects of ACC users with a diverse range of applications. It provides a secure and standardized experience, automating the installation of applications within projects.

Selecting the **App Store** from the left-side menu takes users to the **Application Catalog**, where the process of installing applications into a project starts. This procedure comprises four steps, with the initial step being the selection of an App, followed by choosing a project and service, configuring application settings, and proceeding with the installation.

<figure><img src="https://3333414532-files.gitbook.io/~/files/v0/b/gitbook-x-prod.appspot.com/o/spaces%2FIbwGN7KwvYi0iLbjtnXz%2Fuploads%2F6DvvomdMEjcRAnCymda1%2Fimage.png?alt=media&amp;token=0c582d82-6c5e-4db7-a678-b574381f7f18" alt=""><figcaption></figcaption></figure>

{% stepper %}
{% step %}
Application Catalog page displays both public and private applications. Users can conveniently search and filter applications based on criteria such as "Application Name," "Application Provider," and "Category." The Application provider refers to the account under which the application was created, while category refers to the type of application.

<figure><img src="https://3333414532-files.gitbook.io/~/files/v0/b/gitbook-x-prod.appspot.com/o/spaces%2FIbwGN7KwvYi0iLbjtnXz%2Fuploads%2Fc7rGE9wuvXDPK4ZCKsDE%2Fimage.png?alt=media&amp;token=cd12b74a-3593-471f-9f6f-09eef8453f61" alt=""><figcaption></figcaption></figure>
{% endstep %}

{% step %}
Users can filter the list to display only their own applications created in their account by selecting the **Show only my applications** checkbox. Otherwise, public applications from other accounts will also appear in the list.

<figure><img src="https://3333414532-files.gitbook.io/~/files/v0/b/gitbook-x-prod.appspot.com/o/spaces%2FIbwGN7KwvYi0iLbjtnXz%2Fuploads%2FX9j6yY942PZNawM37mMC%2Fimage.png?alt=media&amp;token=b6da4c34-cf47-4cab-8a9e-872b63060334" alt=""><figcaption></figcaption></figure>
{% endstep %}

{% step %}
Click on an application card from the list to move on to the next step.
{% endstep %}

{% step %}
After selecting an application, users will be directed to its launch page. Here, users can select the project in which they intend to use the application.
{% endstep %}

{% step %}
If the application is related to another app, users will dynamically find a dropdown menu for selecting the related app alongside the project selection.

<figure><img src="https://3333414532-files.gitbook.io/~/files/v0/b/gitbook-x-prod.appspot.com/o/spaces%2FIbwGN7KwvYi0iLbjtnXz%2Fuploads%2FBXjUNcHktRa67vgRf1hE%2Fimage.png?alt=media&amp;token=a51b98a7-e6d5-4810-9f70-75b1cd494875" alt=""><figcaption></figcaption></figure>
{% endstep %}

{% step %}
The application's launch page showcases images added during its creation process and provides information about the application, including an overview, technical specifications, release notes, and support details. The “Release Notes” section highlights recent changes made in the latest application version.

<figure><img src="https://3333414532-files.gitbook.io/~/files/v0/b/gitbook-x-prod.appspot.com/o/spaces%2FIbwGN7KwvYi0iLbjtnXz%2Fuploads%2FPE9DdqBW5zxGhhQ3qVYO%2Fimage.png?alt=media&amp;token=47f7cc90-06e2-4ba7-92dc-f0737be9f169" alt=""><figcaption></figcaption></figure>
{% endstep %}

{% step %}
Click the **Select Project** dropdown to choose a project for application installation. This dropdown displays all projects within the user's account.
{% endstep %}

{% step %}
After selecting a project, click the **Configure Application Values** button to proceed to the next step.

<figure><img src="https://3333414532-files.gitbook.io/~/files/v0/b/gitbook-x-prod.appspot.com/o/spaces%2FIbwGN7KwvYi0iLbjtnXz%2Fuploads%2Fva2Un5clFHlxU5E4J5hJ%2Fimage.png?alt=media&amp;token=3dda07eb-3e47-4f9b-8825-911bde0e4fbf" alt=""><figcaption></figcaption></figure>
{% endstep %}

{% step %}
Application Values page allows users to enter specific application values. These values are typically defined in the "akinon.json" file by the application owner when migrating the application to the platform. All these values will be dynamically displayed on the page based on their defined conditions. While there may not always be application values to enter, if any are applicable, all stakeholders looking to install the application within their projects must provide these values. These values can be either mandatory or optional, depending on the application's requirements.
{% endstep %}

{% step %}
Click the **Save and Continue** button to move on to the installation step.

<figure><img src="https://3333414532-files.gitbook.io/~/files/v0/b/gitbook-x-prod.appspot.com/o/spaces%2FIbwGN7KwvYi0iLbjtnXz%2Fuploads%2FKuuiycqBOM9rRd9yQtNv%2Fimage.png?alt=media&amp;token=5eb34bbc-943d-4d93-8bad-c0587aae6e4d" alt=""><figcaption></figcaption></figure>
{% endstep %}

{% step %}
This page provides a summary of the actions taken in the previous steps. If needed, users can revisit the relevant tabs for any adjustments.
{% endstep %}

{% step %}
After confirming the accuracy of the information, click the **Install** button to start the application deployment process.

<figure><img src="https://3333414532-files.gitbook.io/~/files/v0/b/gitbook-x-prod.appspot.com/o/spaces%2FIbwGN7KwvYi0iLbjtnXz%2Fuploads%2FlhMagyYo69HanvTiShpW%2Fimage.png?alt=media&amp;token=fe30d2dc-99dd-4329-aad1-98cb220167b0" alt=""><figcaption></figcaption></figure>
{% endstep %}

{% step %}
Once the installation is complete, users will receive a confirmation message. To access the details of the project where the application has been installed, click the **View Project** button.

<figure><img src="https://3333414532-files.gitbook.io/~/files/v0/b/gitbook-x-prod.appspot.com/o/spaces%2FIbwGN7KwvYi0iLbjtnXz%2Fuploads%2Fx3VQhYjK36EpNPu6tKdX%2Fimage.png?alt=media&amp;token=07b5ad7f-07be-459f-b7ce-c2c20ee74c8e" alt=""><figcaption></figcaption></figure>
{% endstep %}

{% step %}
Note that deployment methods may vary. Some applications auto-deploy, while others may require the application owner to initiate deployment.

<figure><img src="https://3333414532-files.gitbook.io/~/files/v0/b/gitbook-x-prod.appspot.com/o/spaces%2FIbwGN7KwvYi0iLbjtnXz%2Fuploads%2FHKwOSh9C8gnFMM6P4lkT%2Fimage.png?alt=media&amp;token=105e166d-cb5a-40c9-9235-117e873c6182" alt=""><figcaption></figcaption></figure>
{% endstep %}
{% endstepper %}


# How to Add and Manage Domains in ACC

Partners can add services and applications to projects created on the ACC platform, and the system generates a default URL for those services and applications. This URL information is available on the service and application detail pages.

When a B2C website, such as Project Zero, goes live, it is accessible using the domain name purchased from the Domains menu on the platform instead of the default URL created by the system.

## <mark style="color:red;">Access and Navigate Domain Menu​</mark> <a href="#access-and-navigate-domain-menu" id="access-and-navigate-domain-menu"></a>

On the ACC platform, navigate to the **Domain** tab on the platform's left side menu.

<figure><img src="https://3333414532-files.gitbook.io/~/files/v0/b/gitbook-x-prod.appspot.com/o/spaces%2FIbwGN7KwvYi0iLbjtnXz%2Fuploads%2FdigNnF1p4bu9dlLBGXjs%2Fimage.png?alt=media&amp;token=9b621af5-74fd-441c-871d-c227fccdb0cb" alt=""><figcaption></figcaption></figure>

The terms **Hosting** and **Domain** can often come across in this menu. To distinguish between **Hosting** and **Domain**, the domain name is a website's physical address, while web hosting is a service for hosting content.

Domain names are digital shortcuts that users may use to access the website and are stored in a central database.

Hosting is referred to as a server since it displays user's website to visitors. When user type a URL ([www.akinon.com](http://www.akinon.com/)) into the browser, a request is sent to the server where the website is hosted. The files are uploaded to the user's device through the internet by this server. Thus, the website is displayed on the user's device.

In a larger sense, the Domain Name represents website's physical address. Domains serve to direct visitors to the server.

## <mark style="color:red;">Add a New Domain​</mark> <a href="#add-a-new-domain" id="add-a-new-domain"></a>

To add a new domain to the ACC platform, three steps need to be followed.

### <mark style="color:red;">1. Domains​</mark> <a href="#id-1-domains" id="id-1-domains"></a>

The list of all previously added domains is displayed in the first step of the new domain adding flow. This page contains filtering options as well as a list of existing domains. User can select a domain from the list or add a new one by clicking the **+ New Domain** button.

<figure><img src="https://3333414532-files.gitbook.io/~/files/v0/b/gitbook-x-prod.appspot.com/o/spaces%2FIbwGN7KwvYi0iLbjtnXz%2Fuploads%2FJHdWISpEQk5viSdOJO5Z%2Fimage.png?alt=media&amp;token=64631746-4b4d-4106-bc2d-32345986fc58" alt=""><figcaption></figcaption></figure>

When the **+ New Domain** button is clicked, a pop-up window appears in which the domain's basic information such as the **Hostname** and **Managed by**.

**Client** should be selected for externally verified domain names on the client side, and **Akinon** should be selected for domain names to be managed by Akinon.

After setting these two parameters, click the **Apply** button to save the settings. The newly registered domain is saved in the domain list, and the system notifies the user that the domain has been successfully added. The domain then awaits a certificate to be added as the following step.

<figure><img src="https://3333414532-files.gitbook.io/~/files/v0/b/gitbook-x-prod.appspot.com/o/spaces%2FIbwGN7KwvYi0iLbjtnXz%2Fuploads%2F1ka37YCtnteDiNrLAAJo%2Fimage.png?alt=media&amp;token=e0cdc5ea-b71a-49b4-9c34-63485582baa0" alt=""><figcaption></figcaption></figure>

Find the newly added domain in the list and click on hostname for adding the certificates.

By clicking the delete icon next to the hostname, domains that do not have a certificate or those users want to remove from the domain list may also be removed.

**Note:** To move on to the next **Certificate** step, a domain needs to be selected from the domain list. If the certificate icon in the navigation menu is clicked to proceed to the next step, the warning *'Please select a domain name from the Domains list to add a certificate'* is received.

<figure><img src="https://3333414532-files.gitbook.io/~/files/v0/b/gitbook-x-prod.appspot.com/o/spaces%2FIbwGN7KwvYi0iLbjtnXz%2Fuploads%2FD6yIKc1YLJ7iQr4XMBw0%2Fimage.png?alt=media&amp;token=63c35118-d40a-4510-9148-90d4deb55d92" alt=""><figcaption></figcaption></figure>

### <mark style="color:red;">2. Certificate​</mark> <a href="#id-2-certificate" id="id-2-certificate"></a>

After selecting a domain from the list, proceed to the **Certificate** step. The hostname, certificate details, and who manages the domain are all provided on this page.

The **Client** and **Akinon** options of the **Managed by** parameter represent ownership of the domain. For certificates that are externally verified and managed by the partner, the **Client** option is selected. If **Akinon** option is selected, certificate ownership is managed through Akinon.

<figure><img src="https://3333414532-files.gitbook.io/~/files/v0/b/gitbook-x-prod.appspot.com/o/spaces%2FIbwGN7KwvYi0iLbjtnXz%2Fuploads%2FILviSuUwlxIXRwSOwG6X%2Fimage.png?alt=media&amp;token=04fd5c8b-a2e7-4351-805c-de4de77bdab4" alt=""><figcaption></figcaption></figure>

If user need to add a new certificate, click the **+New Certificate** button, type the FQDN in the pop-up window and then click the Apply button.

<figure><img src="https://3333414532-files.gitbook.io/~/files/v0/b/gitbook-x-prod.appspot.com/o/spaces%2FIbwGN7KwvYi0iLbjtnXz%2Fuploads%2F7AGjYK2cuuWtc0fRhc6b%2Fimage.png?alt=media&amp;token=0602b95b-0a2e-439a-ae73-ac61f774164c" alt=""><figcaption></figcaption></figure>

<figure><img src="https://3333414532-files.gitbook.io/~/files/v0/b/gitbook-x-prod.appspot.com/o/spaces%2FIbwGN7KwvYi0iLbjtnXz%2Fuploads%2F2y6KeFm9BPNpnIQZbaDG%2Fimage.png?alt=media&amp;token=3a99225b-55e8-4b65-a4d9-9044c8e97f6d" alt=""><figcaption></figcaption></figure>

When a FQDN is specified for the certificate, it is automatically displayed in the **Certificates** section, and newly added certificates can be clicked for more details.

The process is followed based on who holds the domain name management ownership.

**Domains managed by Akinon:**

* The partner adds the NS records displayed in the hostname field to the domain's environment so that the domain is managed by Akinon. This data is displayed in the hostname field. NS records are only displayed if Akinon is selected as the owner of the domain management.
* The A record of domains to be managed by Akinon is automatically assigned by Akinon during migration. A record is not available on the platform.
* The certificate's CNAME record for the domains is listed in the **Certificate Records** list, and the certificate is verified automatically. When the status of the certificate is **Success**, the certificate is eligible for the **Certificate Attachment** step.
* Once the certificate verification is complete, the status of the certificate changes to **Success**. For the verified certificates, the attachment button appears and the certificate is able to attach to a project and application by clicking the **Attach Certificate** button.

**Domains managed by Client:**

* The CNAME record of the certificate created for the domain is listed on the **Certificate Records** and the record for the certificate to be managed by client is sent to the partner.
* After the partner adds this record to the environment where the domain is hosted, the certificate verification process is complete.
* Once the certificate verification is complete, the status of the certificate changes to **Success**. For the verified certificates, the attachment button appears and the certificate is able to attach to a project and application by clicking the **Attach Certificate** button.

<figure><img src="https://3333414532-files.gitbook.io/~/files/v0/b/gitbook-x-prod.appspot.com/o/spaces%2FIbwGN7KwvYi0iLbjtnXz%2Fuploads%2Fr5I1OTcGfOHQKIK0aIOG%2Fimage.png?alt=media&amp;token=8cc7c140-bf7e-41ab-a92d-ad084ec0f846" alt=""><figcaption></figcaption></figure>

{% hint style="info" %}
To move on to the next **Certificate Attachment** step, the adding certificate step needs to be completed. If the certificate attachment icon in the navigation menu is clicked to proceed to the next step, the warning *'In order to attach the certificate to a project, after your certificate is approved, you can proceed to this step by clicking the Attach Certificate button for the relevant certificate.'* is received.

<img src="https://3333414532-files.gitbook.io/~/files/v0/b/gitbook-x-prod.appspot.com/o/spaces%2FIbwGN7KwvYi0iLbjtnXz%2Fuploads%2FlGbt0vG2MJQv3GTVeGIz%2Fimage.png?alt=media&amp;token=f6880fc7-2482-4bc1-abcf-665772fc72d5" alt="" data-size="original">
{% endhint %}

### <mark style="color:red;">3. Certificate Attachment​</mark> <a href="#id-3-certificate-attachment" id="id-3-certificate-attachment"></a>

By selecting a project and application in the **Certificate Attachment** step, the certificate is attached to this project and application. The **Select Application** parameter is a dependent combo box; in order for the available options, the project needs to be selected first. Click the **Save and Continue** button after selecting the project and application.

<figure><img src="https://3333414532-files.gitbook.io/~/files/v0/b/gitbook-x-prod.appspot.com/o/spaces%2FIbwGN7KwvYi0iLbjtnXz%2Fuploads%2Fppn7mo7zVyYZXWMEIXGR%2Fimage.png?alt=media&amp;token=48bc68f8-42e4-48eb-9be1-be97ed5e645f" alt=""><figcaption></figcaption></figure>

<figure><img src="https://3333414532-files.gitbook.io/~/files/v0/b/gitbook-x-prod.appspot.com/o/spaces%2FIbwGN7KwvYi0iLbjtnXz%2Fuploads%2Fekm04ck64dqq3IIv7i8f%2Fimage.png?alt=media&amp;token=ba648e7d-0d4e-45ec-b52c-94597f099c44" alt=""><figcaption></figcaption></figure>

{% hint style="info" %}
If a different certificate is added to the same project and application, the previous certificate remains valid.
{% endhint %}

After the certificate is attached to a project and application, the domain records can be viewed and the certificate attachment field is disabled.

<figure><img src="https://3333414532-files.gitbook.io/~/files/v0/b/gitbook-x-prod.appspot.com/o/spaces%2FIbwGN7KwvYi0iLbjtnXz%2Fuploads%2F3ELKr0CiRfFUeA2nScZH%2Fimage.png?alt=media&amp;token=6bdffb03-f12a-42ef-98ef-1d73008f8279" alt=""><figcaption></figcaption></figure>

Partner should add the record in the **Domain Records** list to the environment where the domain is hosted. This process is automatically done for the domains managed by Akinon.

Following the addition of domain records, application traffic is routed to ACC servers.

Users have the option to proceed to the **Certificate Attachment** step for certificates that are already attached to a project and its application. They can do this by clicking on the **Domain Records** button located in the certificate detail field on the **Certificate** page. By doing so, users will be able to view the related project and project application in the dropdown menus, along with the associated domain records.

<figure><img src="https://3333414532-files.gitbook.io/~/files/v0/b/gitbook-x-prod.appspot.com/o/spaces%2FIbwGN7KwvYi0iLbjtnXz%2Fuploads%2FdYJpUpzFupr4YeX058iJ%2Fimage.png?alt=media&amp;token=318bac87-0f57-4e59-9050-f2010b349834" alt=""><figcaption></figcaption></figure>

<figure><img src="https://3333414532-files.gitbook.io/~/files/v0/b/gitbook-x-prod.appspot.com/o/spaces%2FIbwGN7KwvYi0iLbjtnXz%2Fuploads%2FLIt8KcqHPe4E0kHcnvjp%2Fimage.png?alt=media&amp;token=fe407cc5-b16f-42cd-a13d-14b86626e479" alt=""><figcaption></figcaption></figure>

## <mark style="color:red;">Email Domain Verification​</mark> <a href="#email-domain-verification" id="email-domain-verification"></a>

Email domains serve as a means to confirm domain ownership for email dispatch. Failure to complete this verification can result in emails being flagged as spam. “Email Domain Verification" should be completed for emails intended for delivery to the brands' end users through Amazon Simple Email Service (SES).

To access the "Email Domain Verification" page, go to the "Domains" section in the left-side menu. From there, users can view, search, and delete added email domains, along with their statuses, using the delete icon.

<figure><img src="https://3333414532-files.gitbook.io/~/files/v0/b/gitbook-x-prod.appspot.com/o/spaces%2FIbwGN7KwvYi0iLbjtnXz%2Fuploads%2FITAciiCWIFfpgxoxc2Lj%2Fimage.png?alt=media&amp;token=feff4543-e7e9-4dbb-ae64-194f9f68dfd4" alt=""><figcaption></figcaption></figure>

To add a new email domain, click **+ New Email Verification** in the upper-right corner.

<figure><img src="https://3333414532-files.gitbook.io/~/files/v0/b/gitbook-x-prod.appspot.com/o/spaces%2FIbwGN7KwvYi0iLbjtnXz%2Fuploads%2Flm4wpeh0J0WGkY4eo7iM%2Fimage.png?alt=media&amp;token=153aee8c-6d16-456a-b770-218839b8a3bd" alt=""><figcaption></figcaption></figure>

Upon clicking, users will be directed to the “Create Email Domain Verification” form, where they will encounter fields for “Domain” and “MAIL FROM Subdomain”.

<figure><img src="https://3333414532-files.gitbook.io/~/files/v0/b/gitbook-x-prod.appspot.com/o/spaces%2FIbwGN7KwvYi0iLbjtnXz%2Fuploads%2FiC9P3xKl1carDN14AC6I%2Fimage.png?alt=media&amp;token=0ddd1d15-a992-4570-9c01-6d188a79f853" alt=""><figcaption></figcaption></figure>

“Domain“ field is mandatory and it is used for the domain where the emails will be sent from. If you define a custom “MAIL FROM Subdomain”, it will result in Amazon SES labeling messages as originating from your domain rather than a subdomain of amazon.com.

Click on **Apply**, and the email domain will be added to the list.

<figure><img src="https://3333414532-files.gitbook.io/~/files/v0/b/gitbook-x-prod.appspot.com/o/spaces%2FIbwGN7KwvYi0iLbjtnXz%2Fuploads%2FUwoVpwMSMjHvH2KhqSZc%2Fimage.png?alt=media&amp;token=610f16b6-a3e8-45a1-bb57-6977b5a546e4" alt=""><figcaption></figcaption></figure>

Email DNS records can now be accessed on the “Email Domain Verification Detail” page. To view them, simply click on the email domain name in the list.

<figure><img src="https://3333414532-files.gitbook.io/~/files/v0/b/gitbook-x-prod.appspot.com/o/spaces%2FIbwGN7KwvYi0iLbjtnXz%2Fuploads%2F3KRmWeY1d4feyqjfKzyd%2Fimage.png?alt=media&amp;token=582a581c-0be1-4a20-847c-686662c308ed" alt=""><figcaption></figcaption></figure>

In the “DNS Record” table, users will see the “DKIM” and “mail\_from\_domain” records. These records statuses can be viewed on the field under the domain name.

DKIM (DomainKeys Identified Mail) is a cryptographic protocol used for signing and verifying emails, ensuring their legitimacy. “MAIL FROM” is an integral part of the SMTP protocol, serving to manage bounce messages and other errors from recipient mail servers, while also facilitating DMARC authentication compliance. These verification processes collectively enhance the credibility of emails originating from a domain.

{% hint style="info" %}
If the domain is managed by the client, the partner or the client side must add these DNS records to the environment where the domain is managed. This process is automatically done for the domains managed by Akinon.
{% endhint %}

Users can conveniently acquire a **.zone** document containing DNS records, simplifying the process of entering these records where the domain is managed. This can be done by clicking the icon located in the top left corner of the “DNS Record” table.

<figure><img src="https://3333414532-files.gitbook.io/~/files/v0/b/gitbook-x-prod.appspot.com/o/spaces%2FIbwGN7KwvYi0iLbjtnXz%2Fuploads%2FkKg3QFp4SXatLovLtl8K%2Fimage.png?alt=media&amp;token=4cc847f7-e224-4674-a5f4-cde25e17c4e1" alt=""><figcaption></figcaption></figure>

Once the necessary DNS records are created and verified, the client will be able to send emails from any address under that domain. Statuses indicate whether a certain claim is verified by our systems through the DNS records. This procedure typically concludes within 20 minutes, although the system perseveres for 72 hours. Afterward, users may need to restart the process and generate a new record.


# How to Generate and Add Public Keys in ACC

SSH (Secure Shell) serves as a secure means for computers to communicate with each other. It establishes a protected connection over the internet, encrypting the data exchanged between your computer and another computer, ensuring its confidentiality.

In the realm of public-key cryptography, data encryption and decryption are facilitated using a key pair. One of the keys, known as the public key, is shared with others to encrypt data. The other key, the private key, is kept confidential and solely utilized by the owner to decrypt the data. This cryptographic approach ensures secure and private communication between parties involved.

## <mark style="color:red;">Generate Public Key​</mark> <a href="#generate-public-key" id="generate-public-key"></a>

To generate a new RSA key pair, follow these steps:

{% stepper %}
{% step %}
Open a terminal or command prompt and run the following command:

`ssh-keygen -o -t rsa -C "[your@email.com](mailto:your@email.com)"`

{% hint style="info" %}
In case the command gives errors, delete the‘**-o**’ option and try running it again.
{% endhint %}
{% endstep %}

{% step %}
During the installation process, the location where the key is to be inserted needs to be selected. The default value can be accepted by pressing the **Enter** key.

**Enter file in which to save the key (/Users/username/.ssh/id\_rsa):**
{% endstep %}

{% step %}
In the next step, users have the option to assign a password to their key. If they prefer not to set a password, they can press **Enter** key to skip this step.

**Enter passphrase (empty for no passphrase):**

**Enter same passphrase again:**
{% endstep %}

{% step %}
After configuring the key, the subsequent screen will appear:

* Identification has been saved in `/Users/username/.ssh/id_rsa.`
* Public key has been saved in `/Users/username/.ssh/id_rsa.pub.`

**The key fingerprint is:**

`01:0f:f4:3b:ca:85:d6:17:a1:7d:f0:68:9d:f0:a2:db your@email.com`

**The key's randomart image is:**

```
+--[ RSA 2048]----+
|                 |
|                 |
|        . E +    |
|       . o = .   |
|      . S =   o  |
|       o.O . o   |
|       o .+ .    |
|      . o+..     |
|       .+=o      |
+-----------------+
```

{% endstep %}

{% step %}
To view the public key, run the following command:

`$ cat ~/.ssh/id_rsa.pub`
{% endstep %}

{% step %}
Copy the output of the command. The output should look like this:

```
ssh-rsa
AAAAB3NzaC1yc2EAAAABIwAAAQEA879BJGYlPTLIuc9/R5MYiN4yc/YiCLcdBpSdzgK9Dt0Bkfe3rSz5cPm4wmehdE7GkVFXrBJ2YHqPLuM1yx1AUxIebpwlIl9f/aUHOts9eVnVh4NztPy0iSU/Sv0b2ODQQvcy2vYcasdasdxJjAgfWsO3W4iGEe6QwBpVomcME8IU35v5VbylM9ORQa6wvZMVrPECBvwItTY8cPWH3MGZiK/74eHbSLKA4PY3gM4GHI450Nie16yggEg2aTQfWA1rry9JYWEoHS9pJ1dnLqZU3k/8OWgqJrilwSoC5rGjgp93iu0H8T6+mEHGRQe84Nk1y5lESSWIbn6P636Bl3uQ== your@email.com
```

{% endstep %}
{% endstepper %}

## <mark style="color:red;">Add Public Key​</mark> <a href="#add-public-key" id="add-public-key"></a>

To modify the code commit repository associated with the application in the Akinon ecosystem, users need to add a public key. The responsibility of overseeing this process lies with the developer. It is important to note that up to five public keys can be added for enhanced security and access control.

To add a public key to the ACC account, log in to the account and navigate to the **Settings** section from the left-side menu. Then, click on **Public Keys** to manage and configure the public key settings.

<figure><img src="https://3333414532-files.gitbook.io/~/files/v0/b/gitbook-x-prod.appspot.com/o/spaces%2FIbwGN7KwvYi0iLbjtnXz%2Fuploads%2F3NqzFnYud0uafSoDwGuv%2Fimage.png?alt=media&amp;token=e547146b-e0b2-4f39-a81f-87ecd65cafa9" alt=""><figcaption></figcaption></figure>

To add a new public key, click on the **+New Public Key** button.

<figure><img src="https://3333414532-files.gitbook.io/~/files/v0/b/gitbook-x-prod.appspot.com/o/spaces%2FIbwGN7KwvYi0iLbjtnXz%2Fuploads%2FXa2RPehHnf59fHyPNABv%2Fimage.png?alt=media&amp;token=32f9a59a-5033-4b56-b4d6-51205944ffa9" alt=""><figcaption></figcaption></figure>

Enter a label for the public key in the **Label** field, and paste the generated SSH Key into the **Public Key** field. Afterward, click the **Apply** button to successfully add the public key to the account.

<figure><img src="https://3333414532-files.gitbook.io/~/files/v0/b/gitbook-x-prod.appspot.com/o/spaces%2FIbwGN7KwvYi0iLbjtnXz%2Fuploads%2FrYSwYi6qgUmN0enl4uQ9%2Fimage.png?alt=media&amp;token=136bb5e8-cd1d-4a22-b1cd-b2c9e37df389" alt=""><figcaption></figcaption></figure>

The **Public Keys** list will display the public key that users have added. If they wish to remove a public key, they can click on the delete icon next to the respective key.

<figure><img src="https://3333414532-files.gitbook.io/~/files/v0/b/gitbook-x-prod.appspot.com/o/spaces%2FIbwGN7KwvYi0iLbjtnXz%2Fuploads%2Fxm7W1S7TuHyaNswRZHoK%2Fimage.png?alt=media&amp;token=d83f5e75-e16d-4f19-b1f3-44eeaaf5e4ef" alt=""><figcaption></figcaption></figure>


# How to Monitor Application Resources in ACC

The ACC Monitoring enables the observation of resource consumption behaviors of applications tied to projects and allows monitoring of applications based on these behaviors for optimization. On this page, all applications related to projects on the respective account can be tracked according to specific metrics.

To access the Monitoring page, log in to the ACC application, follow the sidebar menu and click on the **Monitoring** tab. All users with **Monitoring** permissions in the associated role can access this page.

<figure><img src="https://3333414532-files.gitbook.io/~/files/v0/b/gitbook-x-prod.appspot.com/o/spaces%2FIbwGN7KwvYi0iLbjtnXz%2Fuploads%2FGc7lfMcU4sMgMZdnwNFY%2Fimage.png?alt=media&amp;token=37532f70-67af-4c26-a6b3-5f1fe51810a9" alt=""><figcaption></figcaption></figure>

Upon the initial login to the page, the latest project created on the account where the application login is made, along with the data of an application (project app) linked to this project from the past hour, is displayed. To access the data of another application, the project and the application itself must be selected through the filters provided above.

<figure><img src="https://3333414532-files.gitbook.io/~/files/v0/b/gitbook-x-prod.appspot.com/o/spaces%2FIbwGN7KwvYi0iLbjtnXz%2Fuploads%2FHZIo9V0Yl2erWCpfuhzp%2Fimage.png?alt=media&amp;token=1e3f09fd-3608-47f3-b2a1-f0b8253f4c40" alt=""><figcaption></figcaption></figure>

{% hint style="info" %}
ACC users can only view projects created within the account they have logged into.
{% endhint %}

On the right side of the project and application filters, users can select the time interval option to determine the time range for which the data will be displayed. Among the options are time intervals for the last 1, 3, 12 hours, and 1 day. Additionally, users have the flexibility to set a custom time interval according to their preferences.

<figure><img src="https://3333414532-files.gitbook.io/~/files/v0/b/gitbook-x-prod.appspot.com/o/spaces%2FIbwGN7KwvYi0iLbjtnXz%2Fuploads%2F7NAKYtAE8Sj9BpgRAUYO%2Fimage.png?alt=media&amp;token=79daeed5-3e12-4350-a8d2-9c4911504837" alt=""><figcaption></figcaption></figure>

{% hint style="info" %}
The data displayed on this page is presented with a maximum range of 7 days.
{% endhint %}

The viewing options can be customized using the **Settings** icon located to the left of the time interval options. The **Refresh** option determines how often the data in the graphics on the page will be automatically refreshed. When the page is initially opened, the refresh interval comes as default turned off; if no time interval is selected, the data will not be updated automatically.

When a custom time interval is selected, the automatic refresh is not performed. In the **Settings** section, in addition to the refresh option, there is another option that determines the time interval for retrieving data. With the **Change Period** option, the period of the data displayed at intervals of 1, 10, 30 minutes, or 1 hour can be adjusted.

<figure><img src="https://3333414532-files.gitbook.io/~/files/v0/b/gitbook-x-prod.appspot.com/o/spaces%2FIbwGN7KwvYi0iLbjtnXz%2Fuploads%2FHAf9LrXh6MUz6l1gjcGJ%2Fimage.png?alt=media&amp;token=35d92161-0d62-4c65-b43e-f35c73e91e43" alt=""><figcaption></figcaption></figure>

<figure><img src="https://3333414532-files.gitbook.io/~/files/v0/b/gitbook-x-prod.appspot.com/o/spaces%2FIbwGN7KwvYi0iLbjtnXz%2Fuploads%2Fz8dcI7g84K0yLwYemhpw%2Fimage.png?alt=media&amp;token=02e34721-0d96-4382-83bc-0e5fa7bc5d57" alt=""><figcaption></figcaption></figure>

In accordance with the selections made for viewing application data, access to relevant graphs will be provided on the page.

Initially, the **Application Pod Count** graph for the chosen application is displayed. This graph illustrates the variation in the number of pods in which the selected application runs during the specified time interval. This graph also specifies the types of pods the application runs, and the changes in the number of pods for each pod type are displayed individually. Hovering over the points on the line graphs reveals tooltips, providing time information for each data point and displaying the pod counts for each pod type at the respective time.

<figure><img src="https://3333414532-files.gitbook.io/~/files/v0/b/gitbook-x-prod.appspot.com/o/spaces%2FIbwGN7KwvYi0iLbjtnXz%2Fuploads%2FZdI51wdJx6ZRotzvVDkw%2Fimage.png?alt=media&amp;token=fb703773-db79-4d15-94f6-09253de1e863" alt=""><figcaption></figcaption></figure>

{% hint style="info" %}
Apart from automatic refreshing, manual refreshing for all the graphs on the page can be performed using the refresh icon located in the top right corner of each graph.
{% endhint %}

Below the Application Pod Count graph, there is a list of pods in which the application runs. This list includes pod information, pod status, and CPU & Memory usage data for the listed pods.

<figure><img src="https://3333414532-files.gitbook.io/~/files/v0/b/gitbook-x-prod.appspot.com/o/spaces%2FIbwGN7KwvYi0iLbjtnXz%2Fuploads%2FkoFgYwQW454KAKHRbkaw%2Fimage.png?alt=media&amp;token=e4020d87-d346-49a3-9d10-6417571580fd" alt=""><figcaption></figcaption></figure>

By clicking on any pod in the pod list, users can access container-based CPU & Memory usage information for that specific pod. Below this list, container-based usage graphs for the pod at the top of the list, which is listed for the selected application, are opened by default.

<figure><img src="https://3333414532-files.gitbook.io/~/files/v0/b/gitbook-x-prod.appspot.com/o/spaces%2FIbwGN7KwvYi0iLbjtnXz%2Fuploads%2FDWahTK1Y1JiatrwxAkwp%2Fimage.png?alt=media&amp;token=dd926f0a-45e6-41a5-989d-c5d522c25cfc" alt=""><figcaption></figcaption></figure>

For the CPU & Memory usage graphs of the selected pod, users can change the container information from the fields next to the graph's name. Tooltips on the graphs display date and time information and usage, request, and limit data for each data point at the respective time.

<figure><img src="https://3333414532-files.gitbook.io/~/files/v0/b/gitbook-x-prod.appspot.com/o/spaces%2FIbwGN7KwvYi0iLbjtnXz%2Fuploads%2FQsBnaJ5Y9kvzCyrJtbS0%2Fimage.png?alt=media&amp;token=188e98a7-cb31-459d-9412-11851a7f3ff1" alt=""><figcaption></figcaption></figure>


# How to Manage Users and Roles in ACC

In ACC, there is an account-based structure. For instance, partners request separate accounts to oversee their projects and applications independently. Projects and applications within each specific account are restricted to viewing and management solely within that account. Each account establishes its own user roles and defines its users accordingly.

## <mark style="color:red;">Users</mark>​ <a href="#users" id="users"></a>

When an account is created in ACC, a user is also created on the platform with the email address provided as the account owner and a password creation email is sent. This user is the initial user with all permissions, and new users can only be added through this user. Similarly, users created within an account are specific to that account, and they can only view the projects and applications within that account using the email address they were added with.

A user can be added to multiple accounts using the same email address. When a user with access to more than one account logs in to ACC, they can switch between their accounts using the account switcher in the top right corner of the page, without needing to log out and log back in.

When account owners log in to ACC, they can find their personal user on the "Users" page in the **Settings** section. The first user is automatically a "Manager" with full account permissions. Role details will be explained later in this document.

<figure><img src="https://3333414532-files.gitbook.io/~/files/v0/b/gitbook-x-prod.appspot.com/o/spaces%2FIbwGN7KwvYi0iLbjtnXz%2Fuploads%2F7Ni6WTSErIl4V0UrCDn6%2Fimage.png?alt=media&amp;token=da19242f-c060-4c5f-b815-d36fe3d85a90" alt=""><figcaption></figcaption></figure>

On the “Users” page, account users have the ability to view and search a comprehensive list of all users within their account. They can also edit existing user profiles or generate new user accounts. It's important to note that user permissions and visible pages are determined by their assigned roles.

To create a new user, simply click the **+New User** button.

<figure><img src="https://3333414532-files.gitbook.io/~/files/v0/b/gitbook-x-prod.appspot.com/o/spaces%2FIbwGN7KwvYi0iLbjtnXz%2Fuploads%2FBHVVY6iFz6KRTCTVTo3B%2Fimage.png?alt=media&amp;token=aacd5116-1693-4c96-9109-02fa874993c4" alt=""><figcaption></figcaption></figure>

This will direct users to the user creation page.

<figure><img src="https://3333414532-files.gitbook.io/~/files/v0/b/gitbook-x-prod.appspot.com/o/spaces%2FIbwGN7KwvYi0iLbjtnXz%2Fuploads%2FnnSpakXVZ7AOEUzWhQtA%2Fimage.png?alt=media&amp;token=9b4513ae-89e2-4718-8ad2-72f0f24df07d" alt=""><figcaption></figcaption></figure>

All fields on this page must be filled. If a user with the provided email address already exists in the system, the email, name, and surname fields will be populated automatically. For this example, we will choose the "Manager" role as it is the only role currently available within the account. Additionally, this role is automatically created with full permissions for the initial user.

Upon clicking the **Apply** button, a new user will be added to the user list. If no existing user is associated with the provided email address, a password creation email will be sent to the user. Otherwise, the user will receive a notification informing them that they have been added to the new account.

<figure><img src="https://3333414532-files.gitbook.io/~/files/v0/b/gitbook-x-prod.appspot.com/o/spaces%2FIbwGN7KwvYi0iLbjtnXz%2Fuploads%2F46BilkowZKBzpaRYbIMH%2Fimage.png?alt=media&amp;token=f8fcf987-8d3e-4068-85ba-09271bfd3619" alt=""><figcaption></figcaption></figure>

Clicking the edit icon in the user list allows users to access the “Edit User” page.

<figure><img src="https://3333414532-files.gitbook.io/~/files/v0/b/gitbook-x-prod.appspot.com/o/spaces%2FIbwGN7KwvYi0iLbjtnXz%2Fuploads%2F8atIZdlfwbIR05d7HxTt%2Fimage.png?alt=media&amp;token=f87a49b4-8cb0-4192-a4a6-3d2d8ad04140" alt=""><figcaption></figcaption></figure>

Here, users with appropriate permissions can edit all user information, with the exception of their email address.

To deactivate a user, use the toggle switch on the form, which will change the user's status to "passive." Please be aware that this action is irreversible and reactivation is not possible. However, the user can be re-added to the account by creating a new user with the same email address.

<figure><img src="https://3333414532-files.gitbook.io/~/files/v0/b/gitbook-x-prod.appspot.com/o/spaces%2FIbwGN7KwvYi0iLbjtnXz%2Fuploads%2FawglOSgcm2fJdDbowwc1%2Fimage.png?alt=media&amp;token=41eb925e-63cd-4cdd-8ece-b2beb17b3007" alt="" width="375"><figcaption></figcaption></figure>

<figure><img src="https://3333414532-files.gitbook.io/~/files/v0/b/gitbook-x-prod.appspot.com/o/spaces%2FIbwGN7KwvYi0iLbjtnXz%2Fuploads%2Fjynm3gWGCcVOnwDU9MfV%2Fimage.png?alt=media&amp;token=07226167-5436-4cf9-94a7-5ad3c918095e" alt=""><figcaption></figcaption></figure>

Additionally, by hovering over the profile icon in the top right corner of any page, users can access a dropdown menu that displays their associated accounts, with the active account indicated by a checkmark. From this menu, users can switch between accounts, navigate to their profile page using the **Edit Profile** button, adjust language settings, and log out.

<figure><img src="https://3333414532-files.gitbook.io/~/files/v0/b/gitbook-x-prod.appspot.com/o/spaces%2FIbwGN7KwvYi0iLbjtnXz%2Fuploads%2FEJ9xi700Z6nghCOsvIZr%2Fimage%20(3).png?alt=media&amp;token=c7fc37c3-a0c6-457f-9367-e1cd3df93f4e" alt=""><figcaption></figcaption></figure>

The "Profile" page allows for the modification of name information, addition of a profile avatar, and adjustments to the password.

<figure><img src="https://3333414532-files.gitbook.io/~/files/v0/b/gitbook-x-prod.appspot.com/o/spaces%2FIbwGN7KwvYi0iLbjtnXz%2Fuploads%2FwBG7zxBBsSbYdYrYttw8%2Fimage.png?alt=media&amp;token=1872637a-a9e4-4653-bc6b-9ba41b9cb2d9" alt=""><figcaption></figcaption></figure>

## <mark style="color:red;">Roles</mark>​ <a href="#roles" id="roles"></a>

As mentioned earlier, ACC associates users with their assigned roles, which determine their permissions within the account. The "Manager" role is automatically given to the first user, while users with appropriate permissions, including initial users, can view and edit roles or create new ones on the "Roles" page in the **Settings** section of the left-side menu.

<figure><img src="https://3333414532-files.gitbook.io/~/files/v0/b/gitbook-x-prod.appspot.com/o/spaces%2FIbwGN7KwvYi0iLbjtnXz%2Fuploads%2F87VncKindNBBGKuqgIem%2Fimage.png?alt=media&amp;token=b436f604-0090-42ac-a0fd-7e36f77055d8" alt=""><figcaption></figcaption></figure>

To add a new role, simply click on the **+ New Role** button and this will direct users to the “Create Role” page.

<figure><img src="https://3333414532-files.gitbook.io/~/files/v0/b/gitbook-x-prod.appspot.com/o/spaces%2FIbwGN7KwvYi0iLbjtnXz%2Fuploads%2FLl422FevNqyDvIgY2PEf%2Fimage.png?alt=media&amp;token=97945b67-991c-4600-acc9-5f3ef4e46355" alt=""><figcaption></figcaption></figure>

In the “Add Authority Group” field, it is required to specify a role name, and users may also provide a role description.

<figure><img src="https://3333414532-files.gitbook.io/~/files/v0/b/gitbook-x-prod.appspot.com/o/spaces%2FIbwGN7KwvYi0iLbjtnXz%2Fuploads%2FSixNgpl0SuWzlWRHu4qI%2Fimage.png?alt=media&amp;token=86ebc8a4-00e4-4d31-9bba-17b495e583a4" alt=""><figcaption></figcaption></figure>

In the “Select Authorizations to Add” field, users will find a list of permissions that can be included in the role. The “Added Authorizations” field lists the permissions already included in the role.

When users click the **+** icon next to a permission type title in the “Select Authorizations to Add” field to add a new permission, they will be presented with subcategories and the option to **Add All Permissions** under that permission. The **Add All** option on the right corner of the main field can be used to include all permission types, along with their respective subcategories, within the role.

<figure><img src="https://3333414532-files.gitbook.io/~/files/v0/b/gitbook-x-prod.appspot.com/o/spaces%2FIbwGN7KwvYi0iLbjtnXz%2Fuploads%2F0B4UQM9RDLQGcMGu70cc%2Fimage.png?alt=media&amp;token=486a34c4-7817-4364-acdd-d30535ea624c" alt=""><figcaption></figcaption></figure>

Selecting **Add All Permissions** will add all subcategories under that permission into the role. Alternatively, users can individually select the ones they desire by clicking the **+** icon next to the subcategories.

For instance, users can opt to include only **List** and **Create** permissions for the **Email** permission type, while selecting all permissions for the **Project App Email** permission type.

<figure><img src="https://3333414532-files.gitbook.io/~/files/v0/b/gitbook-x-prod.appspot.com/o/spaces%2FIbwGN7KwvYi0iLbjtnXz%2Fuploads%2F28dI0CcBD3FUfvbwEndz%2Fimage.png?alt=media&amp;token=1086ee59-c6bc-45eb-94d6-c1eacaa404b4" alt=""><figcaption></figcaption></figure>

<figure><img src="https://3333414532-files.gitbook.io/~/files/v0/b/gitbook-x-prod.appspot.com/o/spaces%2FIbwGN7KwvYi0iLbjtnXz%2Fuploads%2FWQ9OfEYXWywT0wvhsVub%2Fimage.png?alt=media&amp;token=6b317aaf-22d9-4f20-bf7b-331ed8b390ef" alt=""><figcaption></figcaption></figure>

This action will add the chosen permissions to the “Added Authorizations” field.

To remove individual permissions, users can simply click the **-** icon. Alternatively, all permissions in the role can be removed by selecting **Remove All**, or permissions specific to a permission type can be removed by clicking the **Remove All Permissions** button beneath that permission type. This will relocate the removed permissions back to the “Select Authorizations to Add” field.

<figure><img src="https://3333414532-files.gitbook.io/~/files/v0/b/gitbook-x-prod.appspot.com/o/spaces%2FIbwGN7KwvYi0iLbjtnXz%2Fuploads%2Fn1osyP0QoSfQJiZdzpMU%2Fimage.png?alt=media&amp;token=2e07267f-9aad-47dd-8afa-4337df201de9" alt=""><figcaption></figcaption></figure>

To complete the role creation process, just click the **Save Settings** button, and the role will be added to the list of roles. Users can further modify the role's name, description, and assigned permissions by clicking the edit icon within the list.

<figure><img src="https://3333414532-files.gitbook.io/~/files/v0/b/gitbook-x-prod.appspot.com/o/spaces%2FIbwGN7KwvYi0iLbjtnXz%2Fuploads%2FW8ckT4omuzvccocMRN4V%2Fimage.png?alt=media&amp;token=9ef66c32-0a66-4094-933e-61538836f593" alt=""><figcaption></figcaption></figure>

Edit the newly created user and update their role to the newly created one.

<figure><img src="https://3333414532-files.gitbook.io/~/files/v0/b/gitbook-x-prod.appspot.com/o/spaces%2FIbwGN7KwvYi0iLbjtnXz%2Fuploads%2FDQMzdu4YnxBrrlgHwjS5%2Fimage.png?alt=media&amp;token=3b762d84-ad80-4dd8-9aa9-8295721ca48f" alt=""><figcaption></figcaption></figure>

<figure><img src="https://3333414532-files.gitbook.io/~/files/v0/b/gitbook-x-prod.appspot.com/o/spaces%2FIbwGN7KwvYi0iLbjtnXz%2Fuploads%2F80XGzWVPUxC7UobdXaIw%2Fimage.png?alt=media&amp;token=89f5dce1-37ff-4ca1-aa50-b38f4b19fffb" alt=""><figcaption></figcaption></figure>

For instance, this user won't have the ability to modify user roles since we did not grant them “Users” permissions.

If users are unable to view any page or perform an action on the platform, they should first ensure that they have the necessary permissions.


# How to Integrate a BI Tool with Your Project in ACC

This tutorial will walk you through the process of integrating a BI (Business Intelligence) tool with your project. BI tools enable you to analyze and visualize your data effectively, providing valuable insights for informed decision-making.

## <mark style="color:red;">Creating Google BigQuery Account​</mark> <a href="#creating-google-bigquery-account" id="creating-google-bigquery-account"></a>

Once you have set up the BI Tool within your project, the next step is to create a Google BigQuery account. Follow these steps:

{% stepper %}
{% step %}
Click the **Go to console** button.

<figure><img src="https://3333414532-files.gitbook.io/~/files/v0/b/gitbook-x-prod.appspot.com/o/spaces%2FIbwGN7KwvYi0iLbjtnXz%2Fuploads%2FNiNcbqmm0tysMeNhxOgD%2Fimage.png?alt=media&amp;token=c1e4f215-8ee3-4a7e-8759-49ebd6bb94d7" alt=""><figcaption></figcaption></figure>
{% endstep %}

{% step %}
You'll be directed to the console setup. Follow the on-screen instructions.

<figure><img src="https://3333414532-files.gitbook.io/~/files/v0/b/gitbook-x-prod.appspot.com/o/spaces%2FIbwGN7KwvYi0iLbjtnXz%2Fuploads%2FabsBQnNTnhtJ4TkWyr9B%2Fimage.png?alt=media&amp;token=86fc8056-5b86-49a4-93c9-00cb627b66e9" alt=""><figcaption></figcaption></figure>
{% endstep %}

{% step %}
On the next page, click the **Create Project** button.

<figure><img src="https://3333414532-files.gitbook.io/~/files/v0/b/gitbook-x-prod.appspot.com/o/spaces%2FIbwGN7KwvYi0iLbjtnXz%2Fuploads%2Fp68ZBhgDdYcp8a0f5rLR%2Fimage.png?alt=media&amp;token=7efd7e0f-38de-4df2-a756-6879e884bfc6" alt=""><figcaption></figcaption></figure>
{% endstep %}

{% step %}
Enter a project name and select the location for storing data. Then, click the **Create** button.

<figure><img src="https://3333414532-files.gitbook.io/~/files/v0/b/gitbook-x-prod.appspot.com/o/spaces%2FIbwGN7KwvYi0iLbjtnXz%2Fuploads%2FC188OWc67aYdtZuzjk3x%2Fimage.png?alt=media&amp;token=416e2f13-b778-45b0-8c7c-ecb6ccf109a1" alt=""><figcaption></figcaption></figure>
{% endstep %}

{% step %}
After project creation, you'll need to generate a project ID for your Google project. The **business-intelligence** field should match the project name on ACC. The location from which this project receives data is displayed in the breakdown menu.

<figure><img src="https://3333414532-files.gitbook.io/~/files/v0/b/gitbook-x-prod.appspot.com/o/spaces%2FIbwGN7KwvYi0iLbjtnXz%2Fuploads%2FvuBXKP50gSH9PBBncWam%2Fimage.png?alt=media&amp;token=7b7064cc-2293-4a3c-9211-59c0c87b12d9" alt=""><figcaption></figcaption></figure>
{% endstep %}

{% step %}
Once the project is created, a `service-account.json` file is generated. This file is crucial for transferring data to Google BigQuery. Make sure to add the information from this file using the CLI.

Below are the environment variables that must be added to the CLI:

* `BI_TOOL_TOKEN`: Enter an alphanumeric value of 16 characters following the token in "Token x16."
* `BIGQUERY_PROJECT_ID`: BigQuery project ID.
* `BIGQUERY_DATASET`: The name of the dataset on BigQuery.
* `GOOGLE_APPLICATION_CREDENTIALS`: JSON.

<figure><img src="https://3333414532-files.gitbook.io/~/files/v0/b/gitbook-x-prod.appspot.com/o/spaces%2FIbwGN7KwvYi0iLbjtnXz%2Fuploads%2F5FxLHPFKNt9l0TMmPM8g%2Fimage.png?alt=media&amp;token=57d34c0c-1acc-4af9-984d-3d7ce139ceb3" alt="" width="375"><figcaption></figcaption></figure>

<figure><img src="https://3333414532-files.gitbook.io/~/files/v0/b/gitbook-x-prod.appspot.com/o/spaces%2FIbwGN7KwvYi0iLbjtnXz%2Fuploads%2F8uNMLaECKfLX2WKND1oI%2Fimage.png?alt=media&amp;token=bd6456a7-d98e-45c6-871b-3f16c9714e58" alt="" width="375"><figcaption></figcaption></figure>

<figure><img src="https://3333414532-files.gitbook.io/~/files/v0/b/gitbook-x-prod.appspot.com/o/spaces%2FIbwGN7KwvYi0iLbjtnXz%2Fuploads%2FLqaf8yPq8ea5iA1TfbSs%2Fimage.png?alt=media&amp;token=a8208b66-124f-4d0e-8947-fc46708c7056" alt="" width="375"><figcaption></figcaption></figure>

<figure><img src="https://3333414532-files.gitbook.io/~/files/v0/b/gitbook-x-prod.appspot.com/o/spaces%2FIbwGN7KwvYi0iLbjtnXz%2Fuploads%2Fg5lnmw9ulEtbYBafvgtc%2Fimage.png?alt=media&amp;token=e4710eca-abc8-4c0b-a2f1-7100c52fe902" alt=""><figcaption></figcaption></figure>

<figure><img src="https://3333414532-files.gitbook.io/~/files/v0/b/gitbook-x-prod.appspot.com/o/spaces%2FIbwGN7KwvYi0iLbjtnXz%2Fuploads%2FOzCyrALfuaSPdby0ufut%2Fimage.png?alt=media&amp;token=f559fdd6-bf5c-4d4e-801c-6c3e3f7af43d" alt="" width="375"><figcaption></figcaption></figure>

<figure><img src="https://3333414532-files.gitbook.io/~/files/v0/b/gitbook-x-prod.appspot.com/o/spaces%2FIbwGN7KwvYi0iLbjtnXz%2Fuploads%2FmpkgXS0xi14lpavZLdlg%2Fimage.png?alt=media&amp;token=6011e5a3-3947-4f69-9279-167788f06173" alt="" width="375"><figcaption></figcaption></figure>

<figure><img src="https://3333414532-files.gitbook.io/~/files/v0/b/gitbook-x-prod.appspot.com/o/spaces%2FIbwGN7KwvYi0iLbjtnXz%2Fuploads%2FXlgXctePMDHelcNsy9O2%2Fimage.png?alt=media&amp;token=1130dd86-0d50-4d81-8ef0-6b5e74237a27" alt="" width="375"><figcaption></figcaption></figure>

<figure><img src="https://3333414532-files.gitbook.io/~/files/v0/b/gitbook-x-prod.appspot.com/o/spaces%2FIbwGN7KwvYi0iLbjtnXz%2Fuploads%2FLZeFNTSS7aGt9AYhTepZ%2Fimage.png?alt=media&amp;token=92cb36d9-e8b9-4551-b9c6-c331932d6882" alt="" width="375"><figcaption></figcaption></figure>

<figure><img src="https://3333414532-files.gitbook.io/~/files/v0/b/gitbook-x-prod.appspot.com/o/spaces%2FIbwGN7KwvYi0iLbjtnXz%2Fuploads%2FVMuBIMDv69y14P6TDYjr%2Fimage.png?alt=media&amp;token=d192d499-10d0-4bec-a0a2-f86d51fa7c9d" alt="" width="272"><figcaption></figcaption></figure>
{% endstep %}

{% step %}
Click on the location where the data is received to display data on the page. This page dynamically shows data based on data transfer frequency.

To customize incoming data for reports, you can write queries in the relevant field.

<figure><img src="https://3333414532-files.gitbook.io/~/files/v0/b/gitbook-x-prod.appspot.com/o/spaces%2FIbwGN7KwvYi0iLbjtnXz%2Fuploads%2FPXKtMRIGhNuIjZnxTOv7%2Fimage.png?alt=media&amp;token=52a837c8-7e97-4c67-a474-03801b5d90ee" alt=""><figcaption></figcaption></figure>
{% endstep %}
{% endstepper %}

## <mark style="color:red;">ACC Setup Requirements​</mark> <a href="#acc-setup-requirements" id="acc-setup-requirements"></a>

{% stepper %}
{% step %}
Navigate to the App Store in the left-side menu and find the BI Tool application in the application catalog. Clicking on the application card will direct users to the project selection step.

<figure><img src="https://3333414532-files.gitbook.io/~/files/v0/b/gitbook-x-prod.appspot.com/o/spaces%2FIbwGN7KwvYi0iLbjtnXz%2Fuploads%2FxCCzIIetR82bTNS4TSSJ%2Fimage.png?alt=media&amp;token=64193869-ceca-4a06-a5e5-761b14d4d9d3" alt=""><figcaption></figcaption></figure>
{% endstep %}

{% step %}
Choose the project in which the BI Tool application will be installed, and then click on **Configure Application Values**. Clicking this button will direct users to the application value entry step.

<figure><img src="https://3333414532-files.gitbook.io/~/files/v0/b/gitbook-x-prod.appspot.com/o/spaces%2FIbwGN7KwvYi0iLbjtnXz%2Fuploads%2FJi2QwcEB1wj1x4Riqmcw%2Fimage.png?alt=media&amp;token=7d740b44-99b8-457a-97e6-f4fe4f37ff0b" alt=""><figcaption></figcaption></figure>
{% endstep %}

{% step %}
At this stage, users should input the application values required for configuring the application. Enter the necessary values and click **Save and Continue**.

<figure><img src="https://3333414532-files.gitbook.io/~/files/v0/b/gitbook-x-prod.appspot.com/o/spaces%2FIbwGN7KwvYi0iLbjtnXz%2Fuploads%2FkxzgvFyTGB2vx1P7XWaB%2Fimage.png?alt=media&amp;token=54d4ca49-9146-4ecc-856b-778d045a5416" alt=""><figcaption></figcaption></figure>
{% endstep %}

{% step %}
Once the application values have been entered, they will be reviewed in the final step, and users can initiate the application installation by clicking the **Install** button.

<figure><img src="https://3333414532-files.gitbook.io/~/files/v0/b/gitbook-x-prod.appspot.com/o/spaces%2FIbwGN7KwvYi0iLbjtnXz%2Fuploads%2FCLCOkHQr04bR42aFAzNd%2Fimage.png?alt=media&amp;token=af82d230-f4db-4b63-9394-41de55e37736" alt=""><figcaption></figcaption></figure>

<figure><img src="https://3333414532-files.gitbook.io/~/files/v0/b/gitbook-x-prod.appspot.com/o/spaces%2FIbwGN7KwvYi0iLbjtnXz%2Fuploads%2Fy1c1kuHULiRdbSJBPGCj%2Fimage.png?alt=media&amp;token=6d6fe8e2-f11d-4bf2-b211-c7875944e629" alt=""><figcaption></figcaption></figure>
{% endstep %}

{% step %}
The BI Tool frontend and backend applications will be installed in the selected project. Users can monitor the deployment status of these applications on the project's detail page.

<figure><img src="https://3333414532-files.gitbook.io/~/files/v0/b/gitbook-x-prod.appspot.com/o/spaces%2FIbwGN7KwvYi0iLbjtnXz%2Fuploads%2Fh3KZ7WlONw9ErTxK7Mvl%2Fimage.png?alt=media&amp;token=9fea887a-b62b-49bf-963a-e64e90c65f00" alt=""><figcaption></figcaption></figure>
{% endstep %}
{% endstepper %}


# How to Create App Preview

## <mark style="color:red;">Creating a Preview</mark>

App Preview lets you test a specific application version through a short-lived, isolated URL without deploying it to your live environment.

To create a preview, go to **My Applications**, select the application, and open the **Versions** tab. Find the version you'd like to preview — it must have a **Completed** status — and click the preview icon in the Actions column.

<figure><img src="https://3333414532-files.gitbook.io/~/files/v0/b/gitbook-x-prod.appspot.com/o/spaces%2FIbwGN7KwvYi0iLbjtnXz%2Fuploads%2FGFRTFNYbPrXPmPWgsbKg%2Fbuton_marked.png?alt=media&amp;token=94efd164-1a5a-4f69-b7f7-9eaa8bb74b49" alt=""><figcaption></figcaption></figure>

A modal will open where you can select the **Project** and the **Project Application** you want to preview the version in.

<figure><img src="https://3333414532-files.gitbook.io/~/files/v0/b/gitbook-x-prod.appspot.com/o/spaces%2FIbwGN7KwvYi0iLbjtnXz%2Fuploads%2FarTZwN7zeHPoyl9AWpI0%2Fmodal.png?alt=media&amp;token=82822a34-3540-4d93-927c-380f942c1bac" alt=""><figcaption></figcaption></figure>

Once you've made your selection, click **Create Preview**.

{% hint style="info" %}
After a preview is created, it may take 1–2 minutes for it to become viewable while the environment finishes deploying. Each preview stays live for **1 hour**.
{% endhint %}

{% hint style="info" %}
This feature is currently enabled for select applications only. It will be gradually rolled out to other applications in the coming days.
{% endhint %}

## <mark style="color:red;">Viewing the Preview</mark>

Once the preview is deployed, you can find it in the **Previews** tab along with its status and a link to the live preview URL.

<figure><img src="https://3333414532-files.gitbook.io/~/files/v0/b/gitbook-x-prod.appspot.com/o/spaces%2FIbwGN7KwvYi0iLbjtnXz%2Fuploads%2FOsbdfKsudoHamCKpBkrw%2Fpreview.png?alt=media&amp;token=a7e2ce24-d176-444b-b3de-413e72e427e6" alt=""><figcaption></figcaption></figure>

You can stop an active preview at any time from the same tab using the stop icon in the Actions column.

<figure><img src="https://3333414532-files.gitbook.io/~/files/v0/b/gitbook-x-prod.appspot.com/o/spaces%2FIbwGN7KwvYi0iLbjtnXz%2Fuploads%2FITS8CKOatNi06nsb5emS%2Fpreview_action.png?alt=media&amp;token=92db52ce-60d2-4ede-9d8e-0010bf2a737c" alt=""><figcaption></figcaption></figure>


# How to Manage Build Variables

Build variables let you pass environment-specific values into an application's build process — for example, a private key needed to authenticate with a private package repository. Once defined, these variables are injected as environment variables during each new build and can be accessed from within `build.sh`.

{% stepper %}
{% step %}
Go to **My Applications** and click the settings icon on the row of the application you want to configure.

<figure><img src="https://3333414532-files.gitbook.io/~/files/v0/b/gitbook-x-prod.appspot.com/o/spaces%2FIbwGN7KwvYi0iLbjtnXz%2Fuploads%2F0EmcfSDqAbuPF0M7COGt%2Fbuild_step1.png?alt=media&amp;token=07ef21fd-e5fe-44c9-bfde-475f9fbd3513" alt=""><figcaption></figcaption></figure>
{% endstep %}

{% step %}
On the application's **Settings** page, click **Build Variables** to switch to the build variables tab.

<figure><img src="https://3333414532-files.gitbook.io/~/files/v0/b/gitbook-x-prod.appspot.com/o/spaces%2FIbwGN7KwvYi0iLbjtnXz%2Fuploads%2FCSAkDnl3X42nSTr1VvhO%2Fbuild_step2.png?alt=media&amp;token=36ae478c-7544-4f2a-9c74-2dd6fd6487d9" alt=""><figcaption></figcaption></figure>
{% endstep %}

{% step %}
Click **+New Build Variable** to open the form for adding a new variable.

<figure><img src="https://3333414532-files.gitbook.io/~/files/v0/b/gitbook-x-prod.appspot.com/o/spaces%2FIbwGN7KwvYi0iLbjtnXz%2Fuploads%2F2RCZdQZWOaAq0uDeo67E%2Fbuild_step3.png?alt=media&amp;token=3e38a504-885b-4e38-bcd4-3d7dfcc5881b" alt=""><figcaption></figcaption></figure>
{% endstep %}

{% step %}
Enter a **Name** and **Value** for the variable. Optionally check **Mark as secret** to hide the value after creation, then click **Save**.

<figure><img src="https://3333414532-files.gitbook.io/~/files/v0/b/gitbook-x-prod.appspot.com/o/spaces%2FIbwGN7KwvYi0iLbjtnXz%2Fuploads%2F0qi8GQN5LkW76GWIeOFf%2Fbuild_step4.png?alt=media&amp;token=8114efcb-3834-4fee-9a3b-56ad662b961b" alt=""><figcaption></figcaption></figure>

{% hint style="info" %}
Once a variable is marked as secret, its value can no longer be read after creation.
{% endhint %}
{% endstep %}

{% step %}
From the list, use the actions column to edit or delete an existing build variable.

<figure><img src="https://3333414532-files.gitbook.io/~/files/v0/b/gitbook-x-prod.appspot.com/o/spaces%2FIbwGN7KwvYi0iLbjtnXz%2Fuploads%2FC4ZrzOTGzJea0m0xJeAf%2Fbuild_step5.png?alt=media&amp;token=6e799874-4207-448e-97f3-dc9b052341e7" alt=""><figcaption></figcaption></figure>
{% endstep %}
{% endstepper %}


# Omnitron


# Products & Catalogs


# Product Pool

In this page, the process of adding single or bulk products to product pool within Omnitron is explained.

## <mark style="color:red;">Step 1: Access to Omnitron​</mark> <a href="#step-1-access-to-omnitron" id="step-1-access-to-omnitron"></a>

* Get access to the Omnitron panel.
* Enter your Username and Password, and then click the **Sign In** button.\
  ![](https://3333414532-files.gitbook.io/~/files/v0/b/gitbook-x-prod.appspot.com/o/spaces%2FIbwGN7KwvYi0iLbjtnXz%2Fuploads%2FL1sAi0Wa7yceeQM3tJhA%2Fimage.png?alt=media\&token=f21533e2-c19c-4fa3-8506-b56dab42f399)

## <mark style="color:red;">Step 2: Product Pool​</mark> <a href="#step-2-product-pool" id="step-2-product-pool"></a>

* Follow the Product and Catalogs sidebar and click the **Product Pool** page.<br>

  <figure><img src="https://3333414532-files.gitbook.io/~/files/v0/b/gitbook-x-prod.appspot.com/o/spaces%2FIbwGN7KwvYi0iLbjtnXz%2Fuploads%2F1hZFpYq6h4uwy0lDwQh2%2Fimage.png?alt=media&amp;token=b3d317c6-719a-437b-b064-23fec92f2b82" alt=""><figcaption></figcaption></figure>
* On the Product Pool page, filters and products are listed. Within the filter panel, product types, include and exclude filters, or **.CSV** and **.XLS** files can be used to filter the product pool.
* Users can apply filters in the product pool by clicking the <img src="https://3333414532-files.gitbook.io/~/files/v0/b/gitbook-x-prod.appspot.com/o/spaces%2FIbwGN7KwvYi0iLbjtnXz%2Fuploads%2F5txaFTpNUTfn0VVGgGME%2Fimage.png?alt=media&amp;token=681701d8-2193-4e78-9e6c-6b3b701f2aaa" alt="" data-size="line"> icon using the added attributes on **Products and Catalogs > Product Attributes** pages.
* Below the filter panel, the products are listed, allowing for the selection of product display limits such as 20, 50, 100, and 250 per page.
* To download products with or without filters applied, users can use the **XLS** button situated on the far right of the product list. Additionally, the product pool template can be obtained by clicking the button located at the bottom left corner of the product list.
* In the product list, on the leftmost side, the **Select Action** dropdown contains options for "Export to Excel with Selected Items," "Export to CSV with Selected Items," and "Delete Selected Items". The desired action and products are selected, followed by clicking the **Apply** button.<br>

  <figure><img src="https://3333414532-files.gitbook.io/~/files/v0/b/gitbook-x-prod.appspot.com/o/spaces%2FIbwGN7KwvYi0iLbjtnXz%2Fuploads%2FiuwgKZ8lL5zV0wEX2W8Q%2Fimage.png?alt=media&amp;token=a1edcb62-d24b-49eb-97fa-e49baecd61b7" alt=""><figcaption></figcaption></figure>

## <mark style="color:red;">Step 3: Add Single Product to Product Pool​</mark> <a href="#step-3-add-single-product-to-product-pool" id="step-3-add-single-product-to-product-pool"></a>

* Click the **+New Product** button in the top right corner of the Product Pool page. Select the product type that you want to add to the product pool.<br>

  <figure><img src="https://3333414532-files.gitbook.io/~/files/v0/b/gitbook-x-prod.appspot.com/o/spaces%2FIbwGN7KwvYi0iLbjtnXz%2Fuploads%2FhcFRTBObo9yt05XcIE0I%2Fimage.png?alt=media&amp;token=5c03afcb-e8ac-49c2-a50b-ac1909a137e4" alt=""><figcaption></figcaption></figure>
* Start by inputting the **Product Name, SKU, Base Code** for the product.
* Choose the preferred attribute set for adding the product; this action will display all attributes linked with the chosen attribute set.
* Input the **Listing Code** and **Status** of the product, then proceed by clicking on the **Save** button to complete the process.<br>

  <figure><img src="https://3333414532-files.gitbook.io/~/files/v0/b/gitbook-x-prod.appspot.com/o/spaces%2FIbwGN7KwvYi0iLbjtnXz%2Fuploads%2FDA6b0WKbZr66S1uc7z91%2Fimage.png?alt=media&amp;token=65491349-80bf-4e6e-b774-866ec478cdfa" alt=""><figcaption></figcaption></figure>

## <mark style="color:red;">Step 4: Bulk Product Update in Product Pool​</mark> <a href="#step-4-bulk-product-update-in-product-pool" id="step-4-bulk-product-update-in-product-pool"></a>

* In the top-right corner of the screen, locate and click the **Bulk Product Update** button.<br>

  <figure><img src="https://3333414532-files.gitbook.io/~/files/v0/b/gitbook-x-prod.appspot.com/o/spaces%2FIbwGN7KwvYi0iLbjtnXz%2Fuploads%2FpXiB9j6G6p1uEYIjUzxf%2Fimage.png?alt=media&amp;token=ffe6e673-06f4-419a-99fa-cf2bc4c3d766" alt=""><figcaption></figcaption></figure>
* Before proceeding, ensure your data aligns with the required format by downloading the product pool template:
  * Find the **Download Product Pool Template** button at the bottom left corner of the screen.
  * Click the button to download the template file to your computer.<br>

    <figure><img src="https://3333414532-files.gitbook.io/~/files/v0/b/gitbook-x-prod.appspot.com/o/spaces%2FIbwGN7KwvYi0iLbjtnXz%2Fuploads%2FKVqT3T8Z9tZyNq2q9SX0%2Fimage.png?alt=media&amp;token=80ca55ec-4b70-4475-a6f6-9d59b1fd68b5" alt=""><figcaption></figcaption></figure>
  * Ensure all mandatory fields are filled in correctly. Save your completed file in either `.CSV` or `.XLS` format.
* Return to the platform and click on the **Bulk Product Update** button again.
* Choose one of the following methods to upload your file:
  * **Drag and Drop:** Drag your file into the designated upload area.
  * **Click and Select:** Click on the designated area to open a file selector, then locate and select your file.<br>

    <figure><img src="https://3333414532-files.gitbook.io/~/files/v0/b/gitbook-x-prod.appspot.com/o/spaces%2FIbwGN7KwvYi0iLbjtnXz%2Fuploads%2Fvt85Uuk5pWhr7JiZyKu1%2Fimage.png?alt=media&amp;token=f8a2b49e-737d-4c62-bc5a-4a6ad9d7030a" alt=""><figcaption></figcaption></figure>
* After the process completes, review the updated products in the product pool to confirm the changes.


# Attributes and Attribute Sets

This tutorial provides step-by-step instructions on how to add product attribute sets and product attributes in Omnitron.

## <mark style="color:red;">Step 1: Access Omnitron​</mark> <a href="#step-1-access-omnitron" id="step-1-access-omnitron"></a>

* Access the Omnitron panel.
* Enter your username and password, then click the **SIGN IN** button.\
  ![](https://3333414532-files.gitbook.io/~/files/v0/b/gitbook-x-prod.appspot.com/o/spaces%2FIbwGN7KwvYi0iLbjtnXz%2Fuploads%2FL1sAi0Wa7yceeQM3tJhA%2Fimage.png?alt=media\&token=f21533e2-c19c-4fa3-8506-b56dab42f399)

## <mark style="color:red;">Step 2: Navigate to the Product Attributes Page​</mark> <a href="#step-2-navigate-to-the-product-attributes-page" id="step-2-navigate-to-the-product-attributes-page"></a>

* Navigate to the **Product and Catalogs** section and click on the **Product Attributes** page.<br>

  <figure><img src="https://3333414532-files.gitbook.io/~/files/v0/b/gitbook-x-prod.appspot.com/o/spaces%2FIbwGN7KwvYi0iLbjtnXz%2Fuploads%2FWSXWdhhmGAyWqCD0MwC9%2Fimage.png?alt=media&amp;token=630b14fb-a15a-4aa4-bfe0-067196f0bd75" alt=""><figcaption></figcaption></figure>
* On the Product Attributes page, filters and attributes are listed. Static filters for filtering product attributes are displayed in the filter panel.
* Below the filter panel, users can view product attributes and choose to display them in sets of 20, 50, 100, or 250 per page.<br>

  <figure><img src="https://3333414532-files.gitbook.io/~/files/v0/b/gitbook-x-prod.appspot.com/o/spaces%2FIbwGN7KwvYi0iLbjtnXz%2Fuploads%2F09NNykr5M7LHW6S4OVtd%2Fimage.png?alt=media&amp;token=0d9ff9c5-28a3-454a-9d74-2d206b42d8de" alt=""><figcaption></figcaption></figure>

## <mark style="color:red;">Step 3: Add Product Attributes​</mark> <a href="#step-3-add-product-attributes" id="step-3-add-product-attributes"></a>

* Click the **+New Attribute** button in the top right corner of the Product Attributes page. Attributes are used to enrich product information for filtering and listing purposes. More details on creating attributes with the API can be found [here](https://apidocs.akinon.com/omnitron/integration/product/attribute#create-attribute).<br>

  <figure><img src="https://3333414532-files.gitbook.io/~/files/v0/b/gitbook-x-prod.appspot.com/o/spaces%2FIbwGN7KwvYi0iLbjtnXz%2Fuploads%2FQrHrif0k03voB6kRYOM8%2Fimage.png?alt=media&amp;token=3407867b-1b2b-4b0f-b52f-a9030e4403ee" alt=""><figcaption></figcaption></figure>

### <mark style="color:red;">Add / Edit Attributes Form Inputs​</mark> <a href="#add--edit-attributes-form-inputs" id="add--edit-attributes-form-inputs"></a>

* **Attribute Code:** Enter the Attribute Code.
* **Product Attribute Input Type:** Commonly used attribute types are **text**, **text\_area**, and **dropdown**.
  * **dropdown:** Select this type for creating filterable or listable products. Requires entering attribute values, e.g., color, size, season, brand, category, collar type.
  * **text:** Select this type for non-selectable attributes like product descriptions. The attribute value information is automatically linked to the product itself, manual input of the attribute value is not necessary.
  * **text\_area**: Select this type for editing product descriptions within the Omnitron interface. When **text\_area** is selected, the enriched text editor is displayed on the Omnitron product detail page.
* **Mandatory Attribute:** After the product attribute is linked to the attribute set, decide whether the product attribute is mandatory or optional on the product detail page.
* **Is Visible?:** Choose if this product attribute will appear on the site.
* **Searchable:** Specify if the product attribute is searchable on the site.
* **Is Filterable?:** Determine if the product attribute is filterable on the webshop.
* **Variant Attribute:** Define this attribute as a variant of the product.
* **Is Variant Listable?:** List this variant on the sales site by grouping it according to variant attribute values.
* **Attribute Name:** Enter an attribute name visible to customers.
* **ERP Code:** Enter the Attribute ERP Code.
* **Pre Attribute:** Decide if the product attribute is a pre-attribute.
* **Is Localizable?:** If Omnitron supports multiple languages, attributes are generated for the main language. To define attributes for other languages, select the relevant language from the Locales field in the upper right of the Omnitron interface.<br>

  <figure><img src="https://3333414532-files.gitbook.io/~/files/v0/b/gitbook-x-prod.appspot.com/o/spaces%2FIbwGN7KwvYi0iLbjtnXz%2Fuploads%2FOftHsyDKQoAdeBufMrU5%2Fimage.png?alt=media&amp;token=667bae7a-6059-4f5e-a524-5ff79b455522" alt=""><figcaption></figcaption></figure>

## <mark style="color:red;">Step 4: Add Attribute Value​</mark> <a href="#step-4-add-attribute-value" id="step-4-add-attribute-value"></a>

Attribute values define selectable fields (for **dropdown** type). To add values in Omnitron:

* Navigate to **Products and Catalogs** > **Product Attribute** in the left menu.
* Select the relevant **dropdown** attribute from the attribute list.
* Enter the values by clicking the **Add** button in the table at the bottom of the page.<br>

  <figure><img src="https://3333414532-files.gitbook.io/~/files/v0/b/gitbook-x-prod.appspot.com/o/spaces%2FIbwGN7KwvYi0iLbjtnXz%2Fuploads%2FqUfrVdv1UylCwDv2dLB7%2Fimage.png?alt=media&amp;token=49efd3e5-8272-4293-8655-915b8d62953d" alt=""><figcaption></figcaption></figure>

### <mark style="color:red;">For API-Related Actions​</mark> <a href="#for-api-related-actions" id="for-api-related-actions"></a>

* Once the attribute for which a value will be defined with the API has been queried from Omnitron, the attribute value is generated together with the attribute ID. Details are available [here](https://apidocs.akinon.com/omnitron/integration/product/attribute-value#create-attribute-value).

### <mark style="color:red;">**Get & Search Attribute Value​**</mark>

* To create or update attribute values using the API, the attribute ID to which the value will be added must first be obtained. Detailed information on this process can be found [here](https://apidocs.akinon.com/omnitron/integration/product/attribute-value#search-attribute-value).

### <mark style="color:red;">**Update Attribute Value​**</mark>

* To update attribute value information, navigate to the **Products and Catalogs > Product Attribute** in the left menu. Select the relevant attribute with the **dropdown** type from the attribute list. Changes can be made by clicking the value line that requires updating.
* To update the attribute value using the API, the attribute value ID to which the value will be added must first be obtained. After reaching the Attribute value ID, an update request should be sent to the `attribute_value` endpoint, specifying the desired changes in the respective fields. More details can be found [here](https://apidocs.akinon.com/omnitron/integration/product/attribute-value#update-attribute-value).

### <mark style="color:red;">Language Support​</mark> <a href="#language-support" id="language-support"></a>

Omnitron's default language is set during the installation process, typically to a language such as English when it's deployed on platforms like Commerce Cloud. However, if the website is intended to be launched in a language other than Omnitron's default, it's essential to input translations for the products in that specific language.

If translation is not provided for the products, the default language of the product is displayed on the website. For instance, if the default language of Omnitron is English and the website is planned to be in German, it is imperative to input German translations for all products intended for sale on the German version of the site. Otherwise, the products will be displayed in English even though the website is set to German.

{% hint style="info" %}
The principle of uniqueness applies to both the `value` and the `attribute` when considered as a single attribute model. Since the `value` itself is unique within an `attribute`, it is not possible to create multiple records with the same `value`.
{% endhint %}

## <mark style="color:red;">Step 5: Navigate to the Product Attribute Sets Page​</mark> <a href="#step-5-navigate-to-the-product-attribute-sets-page" id="step-5-navigate-to-the-product-attribute-sets-page"></a>

* In the **Products and Catalogs** section, click on the **Product Attribute Sets** page.<br>

  <figure><img src="https://3333414532-files.gitbook.io/~/files/v0/b/gitbook-x-prod.appspot.com/o/spaces%2FIbwGN7KwvYi0iLbjtnXz%2Fuploads%2Fh69yG5DgAiM4BHZldD3y%2Fimage.png?alt=media&amp;token=6f39ae46-676b-4268-b021-e8593945fd48" alt=""><figcaption></figcaption></figure>
* Below the filter panel, the product attributes are listed, and you have the option to select the attribute display limit, with choices of 20, 50, 100, and 250 per page.
* Furthermore, attribute sets are used for grouping attributes or products, determining how products are presented on the site, and configuring how grouped attributes are filtered on the site. This framework is used to define the attributes that a product will possess.<br>

  <figure><img src="https://3333414532-files.gitbook.io/~/files/v0/b/gitbook-x-prod.appspot.com/o/spaces%2FIbwGN7KwvYi0iLbjtnXz%2Fuploads%2Fcdd8G8dfJ9s8yjnkW8fq%2Fimage.png?alt=media&amp;token=710568e4-0883-4d03-a663-45fb32a7a3bf" alt=""><figcaption></figcaption></figure>

## <mark style="color:red;">Step 6: Create an Attribute Set​</mark> <a href="#step-6-create-an-attribute-set" id="step-6-create-an-attribute-set"></a>

* In Omnitron, navigate to **Products and Catalogs** > **Product Attribute Sets** from the left-hand menu.
* Click the **+New Attribute Set** button in the top right corner of the Product Attribute Sets page.
* Enter a name for **Attribute Set** and select the **Attribute Group Type**, then click **Save**.<br>

  <figure><img src="https://3333414532-files.gitbook.io/~/files/v0/b/gitbook-x-prod.appspot.com/o/spaces%2FIbwGN7KwvYi0iLbjtnXz%2Fuploads%2FHe8BYmWtJBH1OCKbXg9a%2Fimage.png?alt=media&amp;token=64a94be0-fef3-4503-b4d1-57d59b32396d" alt=""><figcaption></figcaption></figure>
* After creating an attribute set, a section will be displayed for showing all attributes. Add specific attributes to the set by clicking the **"+"** button.
* In the "Selected Attributes" section, remove a selected attribute using the **"-"** button.
* In the "Selected Attributes" section, edit product attributes by clicking the pencil icon.<br>

  <figure><img src="https://3333414532-files.gitbook.io/~/files/v0/b/gitbook-x-prod.appspot.com/o/spaces%2FIbwGN7KwvYi0iLbjtnXz%2Fuploads%2FmhrYFwqkRKmvAXVUagft%2Fimage.png?alt=media&amp;token=a1b827bd-b45c-4168-ba26-a4514a18cee5" alt=""><figcaption></figcaption></figure>

### <mark style="color:red;">Assign Attributes to Attribute Set​</mark> <a href="#assign-attributes-to-attribute-set" id="assign-attributes-to-attribute-set"></a>

The usage of an attribute within the attribute set is defined in this process. For instance, if you need to apply the "color" attribute differently for carpets, clothing, and jewelry, you would use the attribute set. The specific usage of this attribute within the attribute set is defined through the following specifications.

* **Required**: This attribute must be filled in the product within the Attribute set.
* **Searchable**: Mark this attribute as searchable in products within the Attribute set.
* **Filterable**: Mark this attribute as available for filters within the Attribute set.
* **Variant**: Define this attribute as a variant of the product within the Attribute set.
* **Variant Listing**: List this variant on the sales site by grouping it according to variant attribute values within the Attribute set. For example, the color variant can be listed for the clothing attribute set, while the size variant can be listed for the carpet attribute set.
* **Visible**: Use for attributes used for back-office operations in Omnitron but not on the website. Examples; erp\_color\_code, erp\_sku, etc.
* **Form Required**: Use for texts like name and notes on the product, e.g., jewelry, watches, wallets, flowers.
* **Form Field Required**: Eliminate the obligation to enter texts like name and notes, allowing anonymous product orders.\
  ![](https://3333414532-files.gitbook.io/~/files/v0/b/gitbook-x-prod.appspot.com/o/spaces%2FIbwGN7KwvYi0iLbjtnXz%2Fuploads%2FMg6Iw4PYTa6iJ25QEoSe%2Fimage.png?alt=media\&token=8960aaae-7e62-467c-87cb-43bbb9b9b775)


# Attribute Values

In Omnitron, attributes play a crucial role in defining product characteristics, enabling filtering in the storefront, and integrating with external systems like ERPs. However, there is a key limitation: a single attribute on a product cannot hold multiple values. This tutorial walks you through the recommended approach for handling such cases by using separate boolean attributes for each value. You'll learn how to create boolean attributes via the Omnitron interface or API, configure attribute mappings for ERP integrations, and ensure that these attributes are correctly reflected in product data and storefront filtering. Whether you're managing attributes manually or through an integrator, this guide provides the complete workflow to ensure accurate attribute configuration.

## <mark style="color:red;">Understand Attribute Value Limitation</mark>

* In the current Omnitron structure, attributes on a product cannot have multiple values.
* If it is desired for an attribute to have more than one value on a product, a separate boolean attribute must be created for each value.

## <mark style="color:red;">Create Boolean Attributes via Omnitron</mark>

* Go to **Products and Catalogs > Product Attributes** page in Omnitron.
* Click the **+ New Attribute** button to create a new attribute.
* In the form that opens:
  * Set the **Product Attribute Input Type** field to `Boolean`.
  * If the attribute will be used for filtering in the shop, set the **Is Filterable?** field to `Yes`.
  * Set the **Pre Attribute** field to `No`.

**Example:**

<figure><img src="https://3333414532-files.gitbook.io/~/files/v0/b/gitbook-x-prod.appspot.com/o/spaces%2FIbwGN7KwvYi0iLbjtnXz%2Fuploads%2FzalAEcLsXd868tnJn6hF%2FScreenshot%202025-05-28%20at%2012.52.29.png?alt=media&amp;token=32c757b5-6c2f-4e73-86a0-7cb1d236cff8" alt=""><figcaption></figcaption></figure>

Instead of using the interface, a `POST` request can be sent to the following endpoint:

```bash
{{omnitron_url}}/api/v1/attributes/
```

**Example Body:**

```json
{
  "key": "concern_oily",
  "data_type": "bool",
  "default_value": null,
  "is_required": false,
  "is_visible": false,
  "is_searchable": false,
  "is_filterable": true,
  "is_variant": false,
  "is_variant_listable": false,
  "name": "Oily",
  "is_form_required": false,
  "is_form_field_required": false,
  "erp_code": "concern_oily",
  "pre_attribute": false,
  "is_offer": false,
  "is_localizable": false
}
```

## <mark style="color:red;">If Attribute Value Will Be Sent from ERP</mark>

#### **If the brand is using pending product:**

**i. Create Pre Attributes**

* Go to **Products and Catalogs > Product Attributes** in Omnitron.
* Click **+ New Attribute** to create a new attribute.
* In the opened form:
  * Match information with the original attribute.
  * Set **Pre Attribute** field to `Yes`.

**Example:**

<figure><img src="https://3333414532-files.gitbook.io/~/files/v0/b/gitbook-x-prod.appspot.com/o/spaces%2FIbwGN7KwvYi0iLbjtnXz%2Fuploads%2FYzi5cWWAfF7kCFvsOsCZ%2FScreenshot%202025-05-28%20at%2012.54.28.png?alt=media&amp;token=79bb6274-87e5-4813-862c-ebbcd2f8eac5" alt=""><figcaption></figcaption></figure>

**ii. Map Pre Attributes**

* Go to **Integration > Mapping** and click **+ New Rule Set**.
* In the empty mapping row at the end of the page:
  * Select **Pre Attribute** in the **ERP Features** field.
  * Select the **Attribute** to be mapped in the **Attributes** field.
  * Select the **Pre Attribute** in the **Default Attribute** field.

Instead of using the interface, a `POST` request can be sent to the following endpoint:

<pre><code><strong>{{omnitron_url}}/api/v1/mappings/
</strong></code></pre>

**Example Body:**

```json
{
  "mapping_type": "attribute_value",
  "value_dict": {
    "attributes__erp_concern_oily__isnull": false
  },
  "default_value": {},
  "default_attribute": "erp_concern_oily",
  "priority": 1,
  "mapping_key": "Oily",
  "create_all_kind": false
}
```

#### **If the brand is using an Integrator:**

**i. Update Product Flow in Integrator**

* Add newly created attributes to the **Product Flow** under **Integration Flows** in Integrator.
* If needed, update the script in the flow to modify data coming from ERP.

**ii. Map ERP Values to Omnitron Attributes**

* On the **Mapping** page of the flow:
  * Create mapping between ERP values and Omnitron attributes. *(If using pending product, use pre attributes.)*

## <mark style="color:red;">Add Attributes to Attribute Sets</mark>

To reflect the newly added attribute on products, it must be added to the relevant attribute sets.

* Go to **Products and Catalogs > Product Attribute Sets** in Omnitron.
* Edit the attribute sets where the attribute will be used.
* If attribute should not be used for filtering on certain products, set **Is Filterable?** to `No` in those attribute sets.

## <mark style="color:red;">Reflect Attribute Values on Products</mark>

* **If the brand is using ERP:**
  * Add new attributes to the product in the ERP system.
* **If ERP is not used:**
  * Enter attribute values via Omnitron.

## <mark style="color:red;">Enable Filtering by Attribute in the Shop</mark>

In order for products to be filterable by the newly added attributes in the shop, the attribute name and value must be added to the URL using the following format:`attributes_<attribute_key>=<value>`

**Example:**

```
/?attributes_concern_oily=True&attributes_concern_sensitive=True
```

{% hint style="warning" %}
For this filter to work, the attribute's **Is Filterable?** field must be set to `Yes` (see the "Create Boolean Attributes via Omnitron" section above). If the attribute is not defined as filterable, adding the parameter to the URL will not produce any filtering result.
{% endhint %}


# Catalogs

This tutorial provides step-by-step instructions on how to manage catalogs in Omnitron.

## <mark style="color:red;">Step 1: Access Omnitron​</mark> <a href="#step-1-access-omnitron" id="step-1-access-omnitron"></a>

* Access to the Omnitron panel.
* Enter your username and password, then click the **SIGN IN** button.\
  ![](https://3333414532-files.gitbook.io/~/files/v0/b/gitbook-x-prod.appspot.com/o/spaces%2FIbwGN7KwvYi0iLbjtnXz%2Fuploads%2FL1sAi0Wa7yceeQM3tJhA%2Fimage.png?alt=media\&token=f21533e2-c19c-4fa3-8506-b56dab42f399)

## <mark style="color:red;">Step 2: Navigate to the Catalogs Page​</mark> <a href="#step-2-navigate-to-the-catalogs-page" id="step-2-navigate-to-the-catalogs-page"></a>

* Follow the Product and Catalogs sidebar and click the **Catalogs** page.<br>

  <figure><img src="https://3333414532-files.gitbook.io/~/files/v0/b/gitbook-x-prod.appspot.com/o/spaces%2FIbwGN7KwvYi0iLbjtnXz%2Fuploads%2FZSb0KO1ym28rCCo0x6q5%2Fimage.png?alt=media&amp;token=78c21ddc-ff87-48f3-8818-15e5f9c778b7" alt=""><figcaption></figcaption></figure>
* On the **Catalogs** page, users will find information about the prices, stock, and sales channels linked to the existing catalogs.
* To access the price and stock lists associated with a catalog, click on the **Edit Price List** and **Update Stock List** buttons.<br>

  <figure><img src="https://3333414532-files.gitbook.io/~/files/v0/b/gitbook-x-prod.appspot.com/o/spaces%2FIbwGN7KwvYi0iLbjtnXz%2Fuploads%2FmhvrlVBpFPJL2Ig6uWBu%2Fimage.png?alt=media&amp;token=e0212ed1-0b42-4b87-aa3f-c78bd7f75732" alt=""><figcaption></figcaption></figure>

## <mark style="color:red;">Step 3: Add a Catalog​</mark> <a href="#step-3-add-a-catalog" id="step-3-add-a-catalog"></a>

* To create a new catalog, click the **+New Catalog** button located in the top right corner of the Catalogs page.
* Provide a Catalog Name and then click the **Save** button.<br>

  <figure><img src="https://3333414532-files.gitbook.io/~/files/v0/b/gitbook-x-prod.appspot.com/o/spaces%2FIbwGN7KwvYi0iLbjtnXz%2Fuploads%2F5ds3ec0KqltP6aAbvUvv%2Fimage.png?alt=media&amp;token=0d4cbe00-cd96-4fa7-871c-2d75dd5a1883" alt=""><figcaption></figcaption></figure>

## <mark style="color:red;">Step 4: Navigate to the Product List on Catalogs​</mark> <a href="#step-4-navigate-to-the-product-list-on-catalogs" id="step-4-navigate-to-the-product-list-on-catalogs"></a>

* On the **Products and Catalogs > Catalogs** page, the filter panel, product pool, and the list of products added to the catalog are displayed.
* Below the filter panel, users will find a list of products, and options are provided to display 20, 50, 100, or 250 products per page.
* The **.xls** button, located on the far right of the product list, can be used to download products, either with or without applying filters.
* If the **Showing Added Products** checkbox have been checked, only products that have not been added to the catalog will be listed in the product pool.
* Within the product pool, the **Select Action** dropdown allows users to select either the **Add Selected Products** or **Add All Products** actions for the listed items.
* In the product list, the **Select Action** dropdown provides the option to select either the **Remove All Selected Products** or **Remove All Products** actions for the listed items.<br>

  <figure><img src="https://3333414532-files.gitbook.io/~/files/v0/b/gitbook-x-prod.appspot.com/o/spaces%2FIbwGN7KwvYi0iLbjtnXz%2Fuploads%2Fd9RQBMw5MDUMsReGd8AY%2Fimage.png?alt=media&amp;token=7597747d-c3b0-4045-b62a-1bf5e07472d1" alt=""><figcaption></figcaption></figure>

## <mark style="color:red;">Step 5: Navigate to the Price List on Catalogs​</mark> <a href="#step-5-navigate-to-the-price-list-on-catalogs" id="step-5-navigate-to-the-price-list-on-catalogs"></a>

* A price list for the related catalog can be selected by users, followed by clicking the **Save** button.
* When users click the **Edit Price List** button, they will be directed to the **Products and Catalog > Price List > Add/Edit Price List** page.
* On the Price List page, filters and products are listed. The filter panel provides options for filtering by product types, include and exclude filters, or filtering the product pool using **.CSV** and **.XLS** files.
* Filters can be applied in the product pool by clicking the "filter" icon, using the added attributes found on the **Products and Catalogs > Product Attributes** pages.
* Below the filter panel, a list of products is available, and users have the option to select from different product display limits, including 20, 50, 100, and 250 products per page.
* In the product pool, the **Select Action** dropdown allows users to select either the **Add Selected Products** or **Exclude Selected Products** actions for the listed items.<br>

  <figure><img src="https://3333414532-files.gitbook.io/~/files/v0/b/gitbook-x-prod.appspot.com/o/spaces%2FIbwGN7KwvYi0iLbjtnXz%2Fuploads%2FphxGvvS75lwh1fr8sBVc%2Fimage.png?alt=media&amp;token=655a235c-2686-48c6-b381-2042caae7bcd" alt=""><figcaption></figcaption></figure>

## <mark style="color:red;">Step 6: Navigate to the Stock List on Catalogs​</mark> <a href="#step-6-navigate-to-the-stock-list-on-catalogs" id="step-6-navigate-to-the-stock-list-on-catalogs"></a>

* A stock list for the related catalog can be selected by users, followed by clicking the **Save** button.
* When users click the **Edit Stock List** button, they will be directed to the **Products and Catalogs > Product Attributes** page.
* On the Stock List page, filters and products are listed. The filter panel provides options for filtering by product types, include and exclude filters, or filtering the product pool using **.CSV** and **.XLS** files.
* Filters can be applied in the product pool by clicking the "filter" icon, using the added attributes found on the **Products and Catalogs > Product Attributes** pages.
* Below the filter panel, a list of products is available, and users have the option to select from different product display limits, including 20, 50, 100, and 250 products per page.
* In the product pool, the **Select Action** dropdown allows users to select either the **Add Selected Products** or **Remove Selected Ones From Products** actions for the listed items.<br>

  <figure><img src="https://3333414532-files.gitbook.io/~/files/v0/b/gitbook-x-prod.appspot.com/o/spaces%2FIbwGN7KwvYi0iLbjtnXz%2Fuploads%2F1akPXrZtReyvn56CL8NH%2Fimage.png?alt=media&amp;token=bd62211c-afe7-4ac7-b0b6-7fadf2e7bf0c" alt=""><figcaption></figcaption></figure>

## <mark style="color:red;">Step 7: Categories​</mark> <a href="#step-7-categories" id="step-7-categories"></a>

* On the Category Tree page, warnings, filters and products are listed. The filter panel provides options for filtering by product types, include and exclude filters, or using **.CSV** and **.XLS** files.
* Users can expand the entire category tree and view all categories and their subcategories by clicking the **Expand All** button. Conversely, they can collapse the expanded category tree using the **Collapse All** button.<br>

  <figure><img src="https://3333414532-files.gitbook.io/~/files/v0/b/gitbook-x-prod.appspot.com/o/spaces%2FIbwGN7KwvYi0iLbjtnXz%2Fuploads%2F0Ser1eM6dLbpGIsMqLkx%2Fimage.png?alt=media&amp;token=0f3701cd-da3b-4be5-92c5-dc23353313e2" alt=""><figcaption></figcaption></figure>
* Below the filter panel, a list of products is available, and users have the option to select from different product display limits, including 20, 50, 100, and 250 products per page.
* Within the product list, there are two actions available: **Add Selected Product to Selected Categories** and **Add All Products**. Users first select the category or categories where they want to add the product(s). After selecting the action, users click the **Apply** button.<br>

  <figure><img src="https://3333414532-files.gitbook.io/~/files/v0/b/gitbook-x-prod.appspot.com/o/spaces%2FIbwGN7KwvYi0iLbjtnXz%2Fuploads%2FP3wmtCJLJ21zfzrUTi89%2Fimage.png?alt=media&amp;token=ed99196c-02c6-41c2-bd66-cb74adbce83b" alt=""><figcaption></figcaption></figure>
* Users can review the products added to a category by clicking on the icon within the category. In the opened panel, users can take actions such as **Remove Selected Product From Selected Categories** and **Remove All Products** on the Category Product List Page.
* Users have the capability to adjust the order of categories using the up and down arrow icons.
* If a category has no children or products, users have the option to delete the category.<br>

  <figure><img src="https://3333414532-files.gitbook.io/~/files/v0/b/gitbook-x-prod.appspot.com/o/spaces%2FIbwGN7KwvYi0iLbjtnXz%2Fuploads%2FeAThq8fOgB3mFwjsq1l2%2Fimage.png?alt=media&amp;token=1e395d63-04d3-41f8-90db-962bd38cd761" alt=""><figcaption></figcaption></figure>
* By using the editing icon, category-specific content can be saved and edited for the schema added to the category node on the **Sales Channels > Content Management > Model Schema Management** page.

## <mark style="color:red;">Step 8: Catalog Control​</mark> <a href="#step-8-catalog-control" id="step-8-catalog-control"></a>

* On the Catalog Control page, filters and products are listed. The filter panel provides options for filtering by product types, include and exclude filters, or using **.CSV** and **.XLS** files.
* On this page, categories, product images, prices, and stock lists of the products in the catalog can be reviewed and managed by users.
* Within the product list, actions such as **Adding Selected Products to the Catalog** and **Removing Selected Ones From the Catalog** can be taken by users.<br>

  <figure><img src="https://3333414532-files.gitbook.io/~/files/v0/b/gitbook-x-prod.appspot.com/o/spaces%2FIbwGN7KwvYi0iLbjtnXz%2Fuploads%2FJwtYmRhp6wTVY87QgXgQ%2Fimage.png?alt=media&amp;token=42900f30-3e02-455a-85ef-72384ebb2e91" alt=""><figcaption></figcaption></figure>

## <mark style="color:red;">Step 9: Sorting​</mark> <a href="#step-9-sorting" id="step-9-sorting"></a>

* In the sorting page, users will find the category tree and collections panel on the left side.<br>

  <figure><img src="https://3333414532-files.gitbook.io/~/files/v0/b/gitbook-x-prod.appspot.com/o/spaces%2FIbwGN7KwvYi0iLbjtnXz%2Fuploads%2FEpmKFps5tae2eTbqzGiA%2Fimage.png?alt=media&amp;token=d9d6c98c-fd1f-4ac9-a742-a954849e133a" alt=""><figcaption></figcaption></figure>
* When a category or collection is selected, the **Settings > Sorting Algorithm** page will display the sorting algorithms that have been added, with the "Is Visible" option set to Yes.
* From the list of available sorting algorithms, users can select one or more, click the **Add** button, and then save the operation using the **Save** button.<br>

  <figure><img src="https://3333414532-files.gitbook.io/~/files/v0/b/gitbook-x-prod.appspot.com/o/spaces%2FIbwGN7KwvYi0iLbjtnXz%2Fuploads%2FKViHXAQWZOqRbH5TsHSP%2Fimage.png?alt=media&amp;token=9738631b-1157-42e6-a679-c797cce4fde3" alt=""><figcaption></figcaption></figure>
* On the flat sorting page, users can use the **Add Products to Sorting** action to add the products that require manual sorting.<br>

  <figure><img src="https://3333414532-files.gitbook.io/~/files/v0/b/gitbook-x-prod.appspot.com/o/spaces%2FIbwGN7KwvYi0iLbjtnXz%2Fuploads%2F7g0Rcgu6XV9Godk35Z27%2Fimage.png?alt=media&amp;token=59407c1c-a09a-4856-bb06-db7b72c94be4" alt=""><figcaption></figcaption></figure>
* On the Preview and Edit page, products can be manually reordered by dragging and dropping. After arranging them, changes can be saved with the **Save Placement** button. If needed, users can use the **Remove All Products** button to delete all the products they want to manually sort.
* The product view per row can be changed, ranging from 2 to 12 items.
* If users want to sort out-of-stock products, the **Show Out of Stock** checkbox should be checked.<br>

  <figure><img src="https://3333414532-files.gitbook.io/~/files/v0/b/gitbook-x-prod.appspot.com/o/spaces%2FIbwGN7KwvYi0iLbjtnXz%2Fuploads%2FBrcLMBM0nzy6GP5gqHJE%2Fimage.png?alt=media&amp;token=9ca271f9-be62-4539-b305-3b00ec90f8bc" alt=""><figcaption></figcaption></figure>

## <mark style="color:red;">Step 10: Sales Channels​</mark> <a href="#step-10-sales-channels" id="step-10-sales-channels"></a>

* The Sales Channels page lists the sales channels associated with the catalog.<br>

  <figure><img src="https://3333414532-files.gitbook.io/~/files/v0/b/gitbook-x-prod.appspot.com/o/spaces%2FIbwGN7KwvYi0iLbjtnXz%2Fuploads%2FXs2hKccigay6swf5Zcfa%2Fimage.png?alt=media&amp;token=c0ca29ae-5303-4b18-842d-5b6437349b94" alt=""><figcaption></figcaption></figure>

## <mark style="color:red;">Step 11: Settings​</mark> <a href="#step-11-settings" id="step-11-settings"></a>

* On Settings page users can rename their catalog by clicking on the **Save** button.<br>

  <figure><img src="https://3333414532-files.gitbook.io/~/files/v0/b/gitbook-x-prod.appspot.com/o/spaces%2FIbwGN7KwvYi0iLbjtnXz%2Fuploads%2F0x6RSeAmfEn41C7OJBx0%2Fimage.png?alt=media&amp;token=4ad01f9c-fd60-4b4a-9460-8eb6524d9348" alt=""><figcaption></figcaption></figure>


# Price Lists

In this page, the process of adding or editing price list within Omnitron is explained.

## <mark style="color:red;">Step 1: Access to Omnitron​</mark> <a href="#step-1-access-to-omnitron" id="step-1-access-to-omnitron"></a>

* Access the Omnitron panel.
* Enter your username and password, then click the **SIGN IN** button.\
  ![](https://3333414532-files.gitbook.io/~/files/v0/b/gitbook-x-prod.appspot.com/o/spaces%2FIbwGN7KwvYi0iLbjtnXz%2Fuploads%2FL1sAi0Wa7yceeQM3tJhA%2Fimage.png?alt=media\&token=f21533e2-c19c-4fa3-8506-b56dab42f399)

## <mark style="color:red;">Step 2: Navigate to Price List Page​</mark> <a href="#step-2-navigate-to-price-list-page" id="step-2-navigate-to-price-list-page"></a>

* Follow the Product and Catalogs sidebar and click the **Price List** page.<br>

  <figure><img src="https://3333414532-files.gitbook.io/~/files/v0/b/gitbook-x-prod.appspot.com/o/spaces%2FIbwGN7KwvYi0iLbjtnXz%2Fuploads%2FhtVsVjVbKMwAKU31f56v%2Fimage.png?alt=media&amp;token=f0a91d1a-4c3b-4dfb-8842-1e0ddfdbcb76" alt=""><figcaption></figcaption></figure>
* On the **Price List** page, filter panel and the list of price lists are displayed.<br>

  <figure><img src="https://3333414532-files.gitbook.io/~/files/v0/b/gitbook-x-prod.appspot.com/o/spaces%2FIbwGN7KwvYi0iLbjtnXz%2Fuploads%2Fzop2F56Z1kg7NHenwwaj%2Fimage.png?alt=media&amp;token=ebd24327-f6f6-43c0-81f9-4e54507884e0" alt=""><figcaption></figcaption></figure>

## <mark style="color:red;">Step 3: Add a New Price List​</mark> <a href="#step-3-add-a-new-price-list" id="step-3-add-a-new-price-list"></a>

* To create a new price list, click the **+New Price List** button located in the top right corner of the Price List page.<br>

  <figure><img src="https://3333414532-files.gitbook.io/~/files/v0/b/gitbook-x-prod.appspot.com/o/spaces%2FIbwGN7KwvYi0iLbjtnXz%2Fuploads%2F2E6csrqeE8UTh2oo80IQ%2Fimage.png?alt=media&amp;token=84e1d792-b7bf-4677-abf2-56eb810ad2f0" alt=""><figcaption></figcaption></figure>
* **Enter Price List Name:** Different price lists can assign various values to a product. For example, a product can be priced at X amount in Price List A, which is designated for Marketplace A, while it can be sold for Y amount in Price List B, designated for Marketplace B. Therefore, when creating or updating a product's price, it's essential to specify the relevant price list.
* **Select ERP Connection:** Select between 'Yes' or 'No'. If 'Yes' is selected, price creation and updates can be performed through integration. If 'No' is selected, the price creation and update processes are managed using Excel through the Omnitron back-office.
* When accessing the form initially in **Sales Channel Settings > Dynamic Settings**, the default currency set in the dynamic settings will be preselected.
* Currencies listed in the currency drop-down menu will be those added to the Available Currencies key of **Sales Channel Settings > Dynamic Settings**.
* After entering this information, click the **Save** button to create the new price list. For detailed information on creating a price list using an API, refer to [this page](https://apidocs.akinon.com/omnitron/integration/price/price-list).

## <mark style="color:red;">Step 4: Update Price Lists​</mark> <a href="#step-4-update-price-lists" id="step-4-update-price-lists"></a>

* To access the details of the listed price lists, click on it.<br>

  <figure><img src="https://3333414532-files.gitbook.io/~/files/v0/b/gitbook-x-prod.appspot.com/o/spaces%2FIbwGN7KwvYi0iLbjtnXz%2Fuploads%2F7BO2zluep44mwTYM5nEX%2Fimage.png?alt=media&amp;token=634244bc-4995-40a2-bdb3-12b1d9bb6281" alt=""><figcaption></figcaption></figure>
* On the Price List page, filters and products are listed. The filter panel provides options for filtering by product types, include and exclude filters, or filtering the product pool using **.CSV** and **.XLS** files.<br>

  <figure><img src="https://3333414532-files.gitbook.io/~/files/v0/b/gitbook-x-prod.appspot.com/o/spaces%2FIbwGN7KwvYi0iLbjtnXz%2Fuploads%2FNKGby6zyzDUH59iV2yb6%2Fimage.png?alt=media&amp;token=2dcf7046-d357-48ca-b011-2d7f5a9eb075" alt=""><figcaption></figcaption></figure>
* To ensure the accuracy of the parameters within the uploaded file, it is recommended to download the price list template from the bottom of the page first. Once product information is added to the template, bulk product updates can be performed by either dragging and dropping the file or clicking on the designated area and selecting the .xls or .csv file format.
* By clicking the **+Update Price List** button, a file in the designated area can be uploaded by users.
* After the file is uploaded, the update process will be completed with a progress bar for users to monitor.<br>

  <figure><img src="https://3333414532-files.gitbook.io/~/files/v0/b/gitbook-x-prod.appspot.com/o/spaces%2FIbwGN7KwvYi0iLbjtnXz%2Fuploads%2FOz4cU2gSUob6rCmJyNAG%2Fimage.png?alt=media&amp;token=e820f291-5795-4011-8d05-7cb47b5aec25" alt=""><figcaption></figcaption></figure>
* Once the process is complete, the page will be refreshed, and the updated values will be displayed.


# Stock Lists

In this page, adding or editing stock list processes within Omnitron is explained.

## <mark style="color:red;">Step 1: Access to Omnitron​</mark> <a href="#step-1-access-to-omnitron" id="step-1-access-to-omnitron"></a>

* Access the Omnitron panel.
* Enter your username and password, then click the **SIGN IN** button.\
  ![](https://3333414532-files.gitbook.io/~/files/v0/b/gitbook-x-prod.appspot.com/o/spaces%2FIbwGN7KwvYi0iLbjtnXz%2Fuploads%2FL1sAi0Wa7yceeQM3tJhA%2Fimage.png?alt=media\&token=f21533e2-c19c-4fa3-8506-b56dab42f399)

## <mark style="color:red;">Step 2: Navigate to Stock List Page​</mark> <a href="#step-2-navigate-to-stock-list-page" id="step-2-navigate-to-stock-list-page"></a>

* Follow the Product and Catalogs sidebar and click the **Stock List** page.<br>

  <figure><img src="https://3333414532-files.gitbook.io/~/files/v0/b/gitbook-x-prod.appspot.com/o/spaces%2FIbwGN7KwvYi0iLbjtnXz%2Fuploads%2FgDvdw40hHJ9LsKLKE83r%2Fimage.png?alt=media&amp;token=fc8676e0-db0d-4250-9a24-be2430d7315c" alt=""><figcaption></figcaption></figure>
* On the **Stock List** page, filter panel and the list of stock lists are displayed.<br>

  <figure><img src="https://3333414532-files.gitbook.io/~/files/v0/b/gitbook-x-prod.appspot.com/o/spaces%2FIbwGN7KwvYi0iLbjtnXz%2Fuploads%2F058nOKdn1JCwFFE4gOEU%2Fimage.png?alt=media&amp;token=3344170f-03d2-477f-8af1-a2d6fff93d2d" alt=""><figcaption></figcaption></figure>

## <mark style="color:red;">Step 3: Add a New Stock List​</mark> <a href="#step-3-add-a-new-stock-list" id="step-3-add-a-new-stock-list"></a>

* To create a new stock list, click the **+New Stock List** button located in the top right corner of the Stock List page.<br>

  <figure><img src="https://3333414532-files.gitbook.io/~/files/v0/b/gitbook-x-prod.appspot.com/o/spaces%2FIbwGN7KwvYi0iLbjtnXz%2Fuploads%2FjPSIXzBYLI9tyFylBFVq%2Fimage.png?alt=media&amp;token=e24a2d9e-c71c-4078-92bb-eea2b0d58a71" alt=""><figcaption></figcaption></figure>
* **Enter Stock List Name:** Different stock lists can assign various values to a product. For example, a product can be priced at X amount in Stock List A, which is designated for Marketplace A, while it can be sold for Y amount in Stock List B, designated for Marketplace B. Therefore, when creating or updating a product's stock, it's essential to specify the relevant stock list.
* **Select ERP Connection:** Select between 'Yes' or 'No'. If 'Yes' is selected, stock creation and updates can be performed through integration. If 'No' is selected, the stock creation and update processes are managed using Excel through the Omnitron back-office.
* After entering this information, click the **Save** button to create the new stock list. For detailed information on creating a stock list using an API, refer to [this page](https://apidocs.akinon.com/omnitron/integration/stock/stock-list).

## <mark style="color:red;">Step 4: Update Stock Lists​</mark> <a href="#step-4-update-stock-lists" id="step-4-update-stock-lists"></a>

* To access the details of the listed stock lists, click on it.<br>

  <figure><img src="https://3333414532-files.gitbook.io/~/files/v0/b/gitbook-x-prod.appspot.com/o/spaces%2FIbwGN7KwvYi0iLbjtnXz%2Fuploads%2FEpUeKz3D9d882bezdsZI%2Fimage.png?alt=media&amp;token=ce255c9b-4ffe-4c2d-a491-7850dd05b78a" alt=""><figcaption></figcaption></figure>
* On the Stock List page, filters and products are listed. The filter panel provides options for filtering by product types, include and exclude filters, or filtering the product pool using **.CSV** and **.XLS** files.<br>

  <figure><img src="https://3333414532-files.gitbook.io/~/files/v0/b/gitbook-x-prod.appspot.com/o/spaces%2FIbwGN7KwvYi0iLbjtnXz%2Fuploads%2FFIFQe9l8XyMZjMWVc4hJ%2Fimage.png?alt=media&amp;token=ee2b52a9-f255-4395-9f1a-2fcfe65cd9f3" alt=""><figcaption></figcaption></figure>
* To ensure the accuracy of the parameters within the uploaded file, it is recommended to download the stock list template from the bottom of the page first. Once product information is added to the template, bulk product updates can be performed by either dragging and dropping the file or clicking on the designated area and selecting the **.CSV** or **.XLS** file format.
* By clicking the **+Update Stock List** button, a file in the designated area can be uploaded by users.
* After the file is uploaded, the update process will be completed with a progress bar for users to monitor.<br>

  <figure><img src="https://3333414532-files.gitbook.io/~/files/v0/b/gitbook-x-prod.appspot.com/o/spaces%2FIbwGN7KwvYi0iLbjtnXz%2Fuploads%2F6ZPMQq8N2IZ4IJGmrd6x%2Fimage.png?alt=media&amp;token=45bccdf3-631c-4914-9a85-1263db8c9e09" alt=""><figcaption></figcaption></figure>
* Once the process is complete, the page will be refreshed, and the updated values will be displayed.


# Collections

This tutorial provides step-by-step instructions for managing collections in Omnitron.

## <mark style="color:red;">Step 1: Access to Omnitron​</mark> <a href="#step-1-access-to-omnitron" id="step-1-access-to-omnitron"></a>

* Get access to the Omnitron panel.
* Enter your Username and Password, and then click the **Sign In** button.\
  ![](https://3333414532-files.gitbook.io/~/files/v0/b/gitbook-x-prod.appspot.com/o/spaces%2FIbwGN7KwvYi0iLbjtnXz%2Fuploads%2FL1sAi0Wa7yceeQM3tJhA%2Fimage.png?alt=media\&token=f21533e2-c19c-4fa3-8506-b56dab42f399)

## <mark style="color:red;">Step 2: Navigate to Collections Page​</mark> <a href="#step-2-navigate-to-collections-page" id="step-2-navigate-to-collections-page"></a>

* Follow the Product and Catalogs sidebar and click the **Collections** page.<br>

  <figure><img src="https://3333414532-files.gitbook.io/~/files/v0/b/gitbook-x-prod.appspot.com/o/spaces%2FIbwGN7KwvYi0iLbjtnXz%2Fuploads%2F1MpF0eyqbhGwTHojno97%2Fimage.png?alt=media&amp;token=e2a25495-d998-47e7-a634-fce24c42503a" alt=""><figcaption></figcaption></figure>
* On the **Collection** page, the filter panel and the list of existing collections are displayed.
* New collection can be created by using the **+ New Collection.**<br>

  <figure><img src="https://3333414532-files.gitbook.io/~/files/v0/b/gitbook-x-prod.appspot.com/o/spaces%2FIbwGN7KwvYi0iLbjtnXz%2Fuploads%2FIWSzXIlPL3SwdQ41NLng%2Fimage.png?alt=media&amp;token=c613731e-9392-421c-b09a-93bb54f527d1" alt=""><figcaption></figcaption></figure>
* In the collection list, operations such as **Make Selected Passive** and **Make Selected Active** can be performed by selecting the collections.<br>

  <figure><img src="https://3333414532-files.gitbook.io/~/files/v0/b/gitbook-x-prod.appspot.com/o/spaces%2FIbwGN7KwvYi0iLbjtnXz%2Fuploads%2F8m5BC2TLfYYKee2sftx9%2Fimage.png?alt=media&amp;token=aa49f3cd-b9da-4219-9745-0d8aa42c6dad" alt=""><figcaption></figcaption></figure>

## <mark style="color:red;">Step 3: Add New Collection​</mark> <a href="#step-3-add-new-collection" id="step-3-add-new-collection"></a>

* Click the **+ New Collection** button in the top right corner of the Collection page.<br>

  <figure><img src="https://3333414532-files.gitbook.io/~/files/v0/b/gitbook-x-prod.appspot.com/o/spaces%2FIbwGN7KwvYi0iLbjtnXz%2Fuploads%2FJd76Rc7Zj6KzULIY1rQO%2Fimage.png?alt=media&amp;token=68c44b04-ffa4-4628-851a-a15fe0dff497" alt=""><figcaption></figcaption></figure>
* Fill in the required information:
  * **Collection Name**: Enter a name for the collection.
  * **Catalog**: Select the catalog where the collection should be placed.
  * **Collection Type**: Choose between a static or dynamic collection type.
  * **Status**: Select whether the collection will be active or passive.
* Click the **Save** button to finalize the creation.

## <mark style="color:red;">Step 4: Manage Static Collection​</mark> <a href="#step-4-manage-static-collection" id="step-4-manage-static-collection"></a>

If a static collection has been created, the following steps are followed to add or remove products from this static collection.

* Navigate to the **Product and Catalogs > Collections > Add/Edit Collection** page by clicking on the collection name.<br>

  <figure><img src="https://3333414532-files.gitbook.io/~/files/v0/b/gitbook-x-prod.appspot.com/o/spaces%2FIbwGN7KwvYi0iLbjtnXz%2Fuploads%2FBPXwf98xsUwlNcuCN1Wk%2Fimage.png?alt=media&amp;token=9af800e8-10ad-4e35-b438-4a1983a18c39" alt=""><figcaption></figcaption></figure>
* On this page, you will find filtering options, and just below them, the products are listed. On the left side of the products section, you will see the products that have not yet been assigned to the collection from the catalog's sellable products, while on the right side, you will find the products that have been assigned to the collection.
* Advanced filtering options such as product type, inclusion/exclusion, or filtering with CSV/XLS files can be used to determine which products to perform actions on.<br>

  <figure><img src="https://3333414532-files.gitbook.io/~/files/v0/b/gitbook-x-prod.appspot.com/o/spaces%2FIbwGN7KwvYi0iLbjtnXz%2Fuploads%2FUvXdBIxrGt0MjXL9lqy5%2Fimage.png?alt=media&amp;token=9f186de1-f720-47b9-bf65-ac7b9f268106" alt=""><figcaption></figcaption></figure>
* To add the filtered products from the Product Pool to the collection, you can perform bulk additions by selecting the products and using the **Add Selected Products** or **Add All Products** actions. Alternatively, you can also use the green **"+"** button next to each product to add them individually to the collection.<br>

  <figure><img src="https://3333414532-files.gitbook.io/~/files/v0/b/gitbook-x-prod.appspot.com/o/spaces%2FIbwGN7KwvYi0iLbjtnXz%2Fuploads%2FFVTlXJYwIZdzVeQSHkRW%2Fimage.png?alt=media&amp;token=a15db28d-f689-4d26-883c-98ff23a03402" alt=""><figcaption></figcaption></figure>
* To remove the filtered products from the collection, you can perform bulk removal by selecting the products and using the **Delete Selected Items** or **Remove All Products** actions. Alternatively, you can also use the red **"−"** button next to each product to remove them individually from the collection.<br>

  <figure><img src="https://3333414532-files.gitbook.io/~/files/v0/b/gitbook-x-prod.appspot.com/o/spaces%2FIbwGN7KwvYi0iLbjtnXz%2Fuploads%2FoKpUXq3vVd77R1mrEbTO%2Fimage.png?alt=media&amp;token=183a6f74-670f-4eb3-a448-7673edbb1801" alt=""><figcaption></figcaption></figure>

## <mark style="color:red;">Step 5: Manage Dynamic Collection​</mark> <a href="#step-5-manage-dynamic-collection" id="step-5-manage-dynamic-collection"></a>

If a dynamic collection has been created, the following steps are followed to add or remove products dynamically from this static collection.

* Navigate to the **Product and Catalogs > Collections > Add/Edit Collection** page by clicking on the collection name.
* Specify the collection's end date as needed.<br>

  <figure><img src="https://3333414532-files.gitbook.io/~/files/v0/b/gitbook-x-prod.appspot.com/o/spaces%2FIbwGN7KwvYi0iLbjtnXz%2Fuploads%2FigExJtOCvXiu4wkjxxVp%2Fimage.png?alt=media&amp;token=7c695563-246f-4840-afc7-28b64582341c" alt=""><figcaption></figcaption></figure>
* Advanced filtering options such as product type or inclusion/exclusion can be used to determine which products to add or remove from the collection.
* After determining the products that will be included in, click the **Save Collection Settings** button to apply your dynamic collection settings.<br>

  <figure><img src="https://3333414532-files.gitbook.io/~/files/v0/b/gitbook-x-prod.appspot.com/o/spaces%2FIbwGN7KwvYi0iLbjtnXz%2Fuploads%2FrIyzU27g2xbFgzgL8EKU%2Fimage.png?alt=media&amp;token=6a830340-1acd-4b99-91e3-40b84d091fe9" alt=""><figcaption></figcaption></figure>


# Sorting

How to sort your products, tab by tab

The **Products and Catalogs > Catalogs > \[Category or Collection] > Sorting** screen lets you control the display order of products in a category or collection. It has three tabs, and this guide walks through each one separately:

* **Sorting Algorithms** — apply an automatic sorting rule (e.g. price, newest arrivals).
* **Products to Sort** — find products in the catalog pool and add them to your sorting list.
* **Edit Sorting** — select and manually reorder the products you've added, using drag-and-drop, filters, or bulk actions.

<figure><img src="https://3333414532-files.gitbook.io/~/files/v0/b/gitbook-x-prod.appspot.com/o/spaces%2FIbwGN7KwvYi0iLbjtnXz%2Fuploads%2FwlIiICB50viV7KEF80LW%2Fimage.png?alt=media&amp;token=39834035-310a-4454-af23-5417cd3f3bde" alt=""><figcaption></figcaption></figure>

You can use one tab or combine all three, depending on how much manual control you want over the order.

In this guide:

1. **Tab 1 — Sorting Algorithms:** choosing an automatic sort rule
2. **Tab 2 — Products to Sort:** finding products and adding them to your sorting list
3. **Tab 3 — Edit Sorting:** selecting and manually arranging your sorted products

## <mark style="color:$primary;">Tab 1</mark> <mark style="color:$primary;">**—**</mark> <mark style="color:$primary;">Sorting Algorithms</mark>

This is the first tab you land on. Use it when you want the system to order products automatically — for example, always showing the cheapest items first, or newest arrivals first — instead of arranging every product by hand.

### <mark style="color:$primary;">Open the Sorting Algorithms tab</mark>

1. From the left panel, select the **Category** or **Collection** you want to sort.
2. On the right, make sure the **Sorting Algorithms** tab is selected (it's the leftmost of the three tabs, and the one shown by default).

   <figure><img src="https://3333414532-files.gitbook.io/~/files/v0/b/gitbook-x-prod.appspot.com/o/spaces%2FIbwGN7KwvYi0iLbjtnXz%2Fuploads%2FPVxyQueUIvXC1PVIiebr%2Fimage.png?alt=media&amp;token=9151a99d-2e0a-4a41-9a8c-c37899ac67c2" alt=""><figcaption></figcaption></figure>

### <mark style="color:$primary;">Choose an algorithm</mark>

1. Click the **Select Algorithm** dropdown.

You'll see a searchable list of available algorithms, for example:

* **Default —** the platform's standard order.
* **Ascending Price —** lowest price first.
* **Descending Price —** highest price first.
* **Newcomers —** most recently added products first.

  <figure><img src="https://3333414532-files.gitbook.io/~/files/v0/b/gitbook-x-prod.appspot.com/o/spaces%2FIbwGN7KwvYi0iLbjtnXz%2Fuploads%2F9Vj9pSlFDXTLWObgM2R0%2Fimage.png?alt=media&amp;token=7f6759cc-ae81-4daa-85ae-c5a212260259" alt=""><figcaption></figcaption></figure>

2. Click **+ Add** to add it to the Selected Algorithms list below. Repeat to add more than one — when several are added, the first one is the primary sort and the rest break ties, in the order they're listed.

   <figure><img src="https://3333414532-files.gitbook.io/~/files/v0/b/gitbook-x-prod.appspot.com/o/spaces%2FIbwGN7KwvYi0iLbjtnXz%2Fuploads%2Fj8KNQS8btVCnig5XKkyL%2FScreenshot%202026-09-02%20at%2011.40.45.png?alt=media&amp;token=7c508eb5-5c77-43d4-9a7a-787f5d7f56a4" alt=""><figcaption></figcaption></figure>
3. Drag an item in the Selected Algorithms list to reorder it, or click − to remove it.
4. Click **SAVE SETTINGS** to confirm.

### <mark style="color:$primary;">Define a new algorithm (optional)</mark>

Not finding what you need in the dropdown?

1. Click the All Sorting Algorithms link in the top right to go to **Settings > Sorting Algorithms**.
2. Define a new algorithm there (Dynamic, or External) — see [How to Create and Manage Sorting Algorithms in Omnitron](/tutorials/omnitron/settings/how-to-create-and-manage-sorting-algorithms-in-omnitron) for the full walkthrough.
3. Come back to this tab and add it.

   <figure><img src="https://3333414532-files.gitbook.io/~/files/v0/b/gitbook-x-prod.appspot.com/o/spaces%2FIbwGN7KwvYi0iLbjtnXz%2Fuploads%2FBoz5n47iUgrmi9ZAOSzZ%2Fimage.png?alt=media&amp;token=94aaf238-f949-4e19-95b8-d81493cd9a60" alt=""><figcaption></figcaption></figure>

{% hint style="warning" %}
An automatic algorithm is a good starting point, but you can still fine-tune individual product positions afterwards in the Edit Sorting tab (Tab 3) — manual positions there take priority over the algorithm.
{% endhint %}

## <mark style="color:$primary;">Tab 2</mark> <mark style="color:$primary;">**—**</mark> <mark style="color:$primary;">Products to Sort</mark>

This tab is where you build up the list of products you actually want to manually order. It shows every product available in the selected category/collection — not just the ones already being sorted. Filter this pool down to the products you care about, select them, and send them to the **Edit Sorting** tab (Tab 3), where you'll arrange their exact order.

{% hint style="success" %}
Only products you add here will show up in Edit Sorting. If a product is missing from your sort list, come back to this tab and add it.
{% endhint %}

### <mark style="color:$primary;">Open the tab and view the pool</mark>

Click the **Products to Sort** tab (middle tab).

The list shows every product in the selected category/collection as a table, with columns for

* **Image,**
* **Base Code,**
* **Listing Code,**
* **Product Name,**
* **Stock, Sales Price,**
* **Retail Price,** and
* **Variant Count**.

<figure><img src="https://3333414532-files.gitbook.io/~/files/v0/b/gitbook-x-prod.appspot.com/o/spaces%2FIbwGN7KwvYi0iLbjtnXz%2Fuploads%2FFFTi9crN1gZIOohhEjpO%2Fimage.png?alt=media&amp;token=638e9442-70d0-4c51-9725-f06d82b0d6da" alt=""><figcaption></figcaption></figure>

### <mark style="color:$primary;">Filter to find the products you want</mark>

Use the filter fields above the table to narrow down the pool:

* **Product Name, Base Code, Listing Code, SKU** for text search.
* **Min./Max. Sales Price, Min./Max. Number of Stock, Min./Max. Variant Stock** for numeric ranges.
* **Out of Stock** to filter by stock status.

<figure><img src="https://3333414532-files.gitbook.io/~/files/v0/b/gitbook-x-prod.appspot.com/o/spaces%2FIbwGN7KwvYi0iLbjtnXz%2Fuploads%2FFFTi9crN1gZIOohhEjpO%2Fimage.png?alt=media&amp;token=638e9442-70d0-4c51-9725-f06d82b0d6da" alt=""><figcaption></figcaption></figure>

* Click the **funnel** icon next to the CSV/XLS icons to open the **Filters** picker. Here you can search for and enable additional filter fields based on your product attributes — for example Color, Gender, Beden (Size), Material, or any other custom attribute defined. Once you tick an attribute, it's added as a new field in the filter panel, ready for you to enter a value and search by it, just like the default fields.

<figure><img src="https://3333414532-files.gitbook.io/~/files/v0/b/gitbook-x-prod.appspot.com/o/spaces%2FIbwGN7KwvYi0iLbjtnXz%2Fuploads%2FZkqZs1TgcYIRy7SI35CX%2Fimage.png?alt=media&amp;token=60507817-4d86-4ddb-9463-c94d84b59f64" alt=""><figcaption></figcaption></figure>

Applied filters appear as tags in the "Active Filters" row. Remove one with `✕`, or clear all of them at once with the trash icon at the end of the row.

<figure><img src="https://3333414532-files.gitbook.io/~/files/v0/b/gitbook-x-prod.appspot.com/o/spaces%2FIbwGN7KwvYi0iLbjtnXz%2Fuploads%2FYqzYxqfopA12nAcVEoMD%2Fimage.png?alt=media&amp;token=bcab671b-ddb0-4f7b-98f4-fee5d50a7652" alt=""><figcaption></figcaption></figure>

You can also filter in bulk by uploading a **CSV** or **XLS** file instead of entering values one by one. Each row in the file represents one product group. The file accepts two columns:

<table><thead><tr><th width="209.4765625">Column</th><th width="326.19140625">Meaning</th></tr></thead><tbody><tr><td><code>base_code</code></td><td>The product group's main code</td></tr><tr><td><code>listing_code</code></td><td>The group's listing code</td></tr></tbody></table>

### <mark style="color:$primary;">Select products and send them to Edit Sorting</mark>

1. Tick the checkbox next to each product you want to sort. Selected rows are highlighted.
2. Open the **Select Action** dropdown and choose **Add Products To Sorting**.
3. Click **APPLY**. The selected products are added to the sorting list and become available in the **Edit Sorting** tab.

   <figure><img src="https://3333414532-files.gitbook.io/~/files/v0/b/gitbook-x-prod.appspot.com/o/spaces%2FIbwGN7KwvYi0iLbjtnXz%2Fuploads%2FgLI4zxo2stulUzwmulQj%2Fimage.png?alt=media&amp;token=39588446-b21e-4780-9075-9e88cdbbb032" alt=""><figcaption></figcaption></figure>
4. Optional: use the **XLS** icons in the top right to download the current list.

Once you've added the products you care about, switch to **Edit Sorting** to arrange their exact display order.

## <mark style="color:$primary;">Tab 3</mark> <mark style="color:$primary;">**—**</mark> <mark style="color:$primary;">Edit Sorting</mark>

This is where you fine-tune the exact display order — product by product, or in bulk — using drag-and-drop, card selection, and bulk actions. It only shows products you've added via Products to Sort (Tab 2).

### <mark style="color:$primary;">Switch to Edit Sorting</mark>

Click **Edit Sorting** (rightmost tab). Products are now shown as visual cards instead of a table.

When you switch to this tab, the working area expands automatically:

* The main left menu collapses to an icon strip (only icons remain).
* The category/collection panel narrows and becomes scrollable within its own area.
* This leaves a much wider area for the product cards.

<figure><img src="https://3333414532-files.gitbook.io/~/files/v0/b/gitbook-x-prod.appspot.com/o/spaces%2FIbwGN7KwvYi0iLbjtnXz%2Fuploads%2Frh6ntbQDphPFUSrmjInm%2Fimage.png?alt=media&amp;token=d74fbdec-fd00-4d63-9075-26964e4e9505" alt=""><figcaption></figcaption></figure>

### <mark style="color:$primary;">Choose a view mode</mark>

Two icons in the toolbar let you switch the grid view:

* **Detailed card view:** Product Name, Base Code, Listing Code, Stock, and Price appear below each card. This is the default view.

  <figure><img src="https://3333414532-files.gitbook.io/~/files/v0/b/gitbook-x-prod.appspot.com/o/spaces%2FIbwGN7KwvYi0iLbjtnXz%2Fuploads%2FKCQ8qQSTBNKU1L0MtbNY%2Fimage.png?alt=media&amp;token=7132f48e-854c-4fee-990d-3a66d4e976ca" alt=""><figcaption></figcaption></figure>
* **Image-only view:** only the product image is shown, so many more products fit in the same space.

  <figure><img src="https://3333414532-files.gitbook.io/~/files/v0/b/gitbook-x-prod.appspot.com/o/spaces%2FIbwGN7KwvYi0iLbjtnXz%2Fuploads%2FFJ5Fx5MJeQczkdUaZy1A%2Fimage.png?alt=media&amp;token=828416c2-c860-44ba-a647-c9eae03083a2" alt=""><figcaption></figcaption></figure>
* Use the **VIEW** slider to set how many cards appear side by side.

  <figure><img src="https://3333414532-files.gitbook.io/~/files/v0/b/gitbook-x-prod.appspot.com/o/spaces%2FIbwGN7KwvYi0iLbjtnXz%2Fuploads%2Fxg8PV9JsTEWvqfYuzZDA%2Fimage.png?alt=media&amp;token=e3f56999-cfcb-42e6-9d90-bfd21409e623" alt=""><figcaption></figcaption></figure>

### <mark style="color:$primary;">Filter to select products, ready for sorting</mark>

The filter fields here work differently from Tab 2: applying a filter **doesn't hide the rest of the grid**. Instead, it automatically **selects every matching product** — as if you'd clicked each one by hand — so they're instantly ready for a bulk action (move to top/bottom, remove, etc.). All other products stay visible on the grid; they're just left unselected.

1. Enter a value in one or more filter fields (**Product Name, Base Code, Listing Code, Min./Max. Stock, Min./Max. Price**).
2. The products **matching your filter become selected** (highlighted with a blue border) across the grid.

   <figure><img src="https://3333414532-files.gitbook.io/~/files/v0/b/gitbook-x-prod.appspot.com/o/spaces%2FIbwGN7KwvYi0iLbjtnXz%2Fuploads%2FHCPVhI81oJRMmhZhjQ1X%2Fimage.png?alt=media&amp;token=ce8bdb6e-7504-4555-a2a2-bf34aa6d5da7" alt=""><figcaption></figcaption></figure>
3. Apply a bulk action to act on exactly those selected products, or click cards individually to adjust the selection further.

### <mark style="color:$primary;">Reorder with drag-and-drop</mark>

1. Hold a card and drag it to the position you want.
2. The position number in the bottom-left corner of each card shows its current display order (1, 2, 3 …).
3. You can also select **multiple products first via their checkboxes**, then drag any one of the selected cards — the whole group moves together to the new position.

   <figure><img src="https://3333414532-files.gitbook.io/~/files/v0/b/gitbook-x-prod.appspot.com/o/spaces%2FIbwGN7KwvYi0iLbjtnXz%2Fuploads%2FuC3QVKlQLsEf6w58L1yM%2FScreenshot%202026-09-02%20at%2011.55.05.png?alt=media&amp;token=a4f68e9f-0063-4fdf-8cc4-2f39284a500e" alt=""><figcaption></figcaption></figure>

Drag-and-drop is ideal for positioning products one at a time; for moving many products at once — especially a group you've just selected via filter — use the bulk actions below instead.

### <mark style="color:$primary;">Jump to a position by typing it in</mark>

1. Click directly into the position number box on a card.
2. Type the new position and enter. The product jumps straight to that spot and the rest of the list shifts accordingly.

   <figure><img src="https://3333414532-files.gitbook.io/~/files/v0/b/gitbook-x-prod.appspot.com/o/spaces%2FIbwGN7KwvYi0iLbjtnXz%2Fuploads%2FZnTZwqTGBywEXUjSUGIX%2Fimage.png?alt=media&amp;token=7e6967b8-b3d4-4ad6-92f4-bc245cc3072e" alt=""><figcaption></figcaption></figure>

### <mark style="color:$primary;">Apply a bulk action</mark>

1. Select the products you want to act on — either by clicking cards individually, or by using a filter to select a whole group at once.
2. Open the "Select Action" dropdown and choose:

   * **Move to Beginning of List**
   * **Move to End of List**
   * **Remove All Products from List** — after you confirm.
   * **Remove Selected Products from List**

   <figure><img src="https://3333414532-files.gitbook.io/~/files/v0/b/gitbook-x-prod.appspot.com/o/spaces%2FIbwGN7KwvYi0iLbjtnXz%2Fuploads%2FMRJdmg57lZOcKldCh5fj%2Fimage.png?alt=media&amp;token=34306579-1540-4690-97d3-e52659033b28" alt=""><figcaption></figcaption></figure>
3. Click **APPLY**. (Disabled while no product is selected.)

   <figure><img src="https://3333414532-files.gitbook.io/~/files/v0/b/gitbook-x-prod.appspot.com/o/spaces%2FIbwGN7KwvYi0iLbjtnXz%2Fuploads%2FskwCIgB84v0rwBZD0xcP%2Fimage.png?alt=media&amp;token=ef2908c3-4dd7-4e28-8cf2-1757bbd4b66d" alt=""><figcaption></figcaption></figure>

{% hint style="info" %}
*Bulk operations are held temporarily; don't forget to save your changes to make them permanent.*
{% endhint %}

### <mark style="color:$primary;">Check product detail and sales performance</mark>

1. Click the zoom icon in the bottom-right corner of a card.

   <figure><img src="https://3333414532-files.gitbook.io/~/files/v0/b/gitbook-x-prod.appspot.com/o/spaces%2FIbwGN7KwvYi0iLbjtnXz%2Fuploads%2FHKGvvpP3Ey19NMTYtMXA%2Fimage.png?alt=media&amp;token=49cfed21-0194-4e12-8668-e0d4aa5389f5" alt=""><figcaption></figcaption></figure>
2. The "Select Product" window opens. The window shows a large product image and product info on the right, plus a Sales Performance section.

   <figure><img src="https://3333414532-files.gitbook.io/~/files/v0/b/gitbook-x-prod.appspot.com/o/spaces%2FIbwGN7KwvYi0iLbjtnXz%2Fuploads%2FVBUv7j9uNnJeqxu8ThLm%2Fimage.png?alt=media&amp;token=3ec48085-7f5d-4d32-8776-53a4161ebfca" alt=""><figcaption></figcaption></figure>
3. Pick a range from the period selector: Last 1 Day / 7 Days / 30 Days / 3 Months / 6 Months / 1 Year.
   * **Metrics shown:** Total Orders, Cancellations, Refunds, Net Orders, and Total Sales (GMV) — so you can spot high- and low-performing products and sort accordingly.
   * Use the `‹ ›` arrows to move to the next/previous product without closing the window.
   * The **MOVE TO TOP OF LIST / MOVE TO BOTTOM OF LIST** buttons let you reposition the product from here too.

     <figure><img src="https://3333414532-files.gitbook.io/~/files/v0/b/gitbook-x-prod.appspot.com/o/spaces%2FIbwGN7KwvYi0iLbjtnXz%2Fuploads%2FuQHgSm40wFMbrtM3OZKv%2Fimage.png?alt=media&amp;token=b3f36211-f313-4bd7-90c3-0851f98334d6" alt=""><figcaption></figcaption></figure>
   * Ticking the **Select Product** checkbox at the top of the window also selects that product on the main grid — so once you close the window, it's ready for a bulk action just like any other selected card.

     <figure><img src="https://3333414532-files.gitbook.io/~/files/v0/b/gitbook-x-prod.appspot.com/o/spaces%2FIbwGN7KwvYi0iLbjtnXz%2Fuploads%2FDzIRcjrWJ33CoY3U88u2%2Fimage.png?alt=media&amp;token=4fe81098-f957-40e9-ad15-eb013cde1133" alt=""><figcaption></figcaption></figure>

### <mark style="color:$primary;">Sort in bulk via CSV (optional)</mark>

1. Use the CSV export icon to download the current list.

   <figure><img src="https://3333414532-files.gitbook.io/~/files/v0/b/gitbook-x-prod.appspot.com/o/spaces%2FIbwGN7KwvYi0iLbjtnXz%2Fuploads%2FGafTIK5vfN0eVXKHO6RM%2Fimage.png?alt=media&amp;token=c6f779d0-f14c-47f4-abdb-c5e89366ab8e" alt=""><figcaption></figcaption></figure>
2. Edit the product order in the file and save it — to change the order, **move entire rows** to their new position; don't edit the index/order numbers within a row and leave the row in place. The system reads the file top-to-bottom, so a row's position in the file is what determines its position in the sort order.

   <figure><img src="https://3333414532-files.gitbook.io/~/files/v0/b/gitbook-x-prod.appspot.com/o/spaces%2FIbwGN7KwvYi0iLbjtnXz%2Fuploads%2Fdgv7zEIEvzUv2tZDbK7T%2FScreenshot%202026-09-02%20at%2012.13.25.png?alt=media&amp;token=3ee00874-8a99-41eb-b5fb-fc771c21e512" alt=""><figcaption></figcaption></figure>
3. Use CSV import to upload the file back.

   <figure><img src="https://3333414532-files.gitbook.io/~/files/v0/b/gitbook-x-prod.appspot.com/o/spaces%2FIbwGN7KwvYi0iLbjtnXz%2Fuploads%2Fzsg0jjZeqAvESAP0L0Tj%2FScreenshot%202026-09-02%20at%2012.15.17.png?alt=media&amp;token=f46d1656-445b-4511-8cf4-fd739f632cff" alt=""><figcaption></figcaption></figure>
4. Before anything is applied, a preview screen shows you the new order based on the file — review it here, then click **Confirm & Save** to apply it. If something looks off, you can cancel and fix the file.

   <figure><img src="https://3333414532-files.gitbook.io/~/files/v0/b/gitbook-x-prod.appspot.com/o/spaces%2FIbwGN7KwvYi0iLbjtnXz%2Fuploads%2FWUqGlZjHexFaA19ZULBr%2FScreenshot%202026-09-02%20at%2012.15.43.png?alt=media&amp;token=f66277ef-549c-45e5-b50e-4d0de03f7c45" alt=""><figcaption></figcaption></figure>

{% hint style="danger" %}
Before importing your new sorting as a CSV file, make sure to export the latest CSV file and apply your changes to it.
{% endhint %}

### <mark style="color:$primary;">Save your changes</mark>

Click **SAVE CHANGES** at the bottom of the screen. Until you do, all moves and removals are only held temporarily.

Clear product selection (bottom right) clears your current selection without touching the sort order.

<figure><img src="https://3333414532-files.gitbook.io/~/files/v0/b/gitbook-x-prod.appspot.com/o/spaces%2FIbwGN7KwvYi0iLbjtnXz%2Fuploads%2Fk4lnnC0gMVOnXzuxA8WZ%2Fimage.png?alt=media&amp;token=6b5ece63-f879-4ca6-84ac-0ab310c84cd9" alt=""><figcaption></figcaption></figure>

If you try to leave without saving, the system will warn you.

{% hint style="danger" %}
Products you don't add here will appear after the sorted products, within that category/collection. To hide a product from the storefront entirely, remove it from the category/collection instead.
{% endhint %}


# Orders


# How to Manage Orders in Omnitron?

This tutorial provides step-by-step instructions for managing orders in Omnitron.

## <mark style="color:red;">Step 1: Access to Omnitron​</mark> <a href="#step-1-access-to-omnitron" id="step-1-access-to-omnitron"></a>

* Get access to the Omnitron panel.
* Enter your Username and Password, and then click the **Sign In** button.\
  ![](https://3333414532-files.gitbook.io/~/files/v0/b/gitbook-x-prod.appspot.com/o/spaces%2FIbwGN7KwvYi0iLbjtnXz%2Fuploads%2FL1sAi0Wa7yceeQM3tJhA%2Fimage.png?alt=media\&token=f21533e2-c19c-4fa3-8506-b56dab42f399)

## <mark style="color:red;">Step 2: Navigate to Orders Page​</mark> <a href="#step-2-navigate-to-orders-page" id="step-2-navigate-to-orders-page"></a>

* Follow the Orders sidebar and click the **Orders** page.<br>

  <figure><img src="https://3333414532-files.gitbook.io/~/files/v0/b/gitbook-x-prod.appspot.com/o/spaces%2FIbwGN7KwvYi0iLbjtnXz%2Fuploads%2FgeWsZCMZYnrdM2n0a8Rx%2Fimage.png?alt=media&amp;token=efab3163-c41a-4b45-abf7-b0bbd3eb71f0" alt=""><figcaption></figcaption></figure>
* On the **Orders** page, the filter panel and the list of existing orders lists are displayed.

## <mark style="color:red;">Step 3: Update Order Info with CSV File​</mark> <a href="#step-3-update-order-info-with-csv-file" id="step-3-update-order-info-with-csv-file"></a>

* By using the **Update Order Info with CSV** button, users can bulk update the order lists.<br>

  <figure><img src="https://3333414532-files.gitbook.io/~/files/v0/b/gitbook-x-prod.appspot.com/o/spaces%2FIbwGN7KwvYi0iLbjtnXz%2Fuploads%2FyeVOLwL6epjz0a3A03Qw%2Fimage.png?alt=media&amp;token=492c945a-c954-41fa-9e49-0c77e2a0fdbd" alt=""><figcaption></figcaption></figure>
* Before starting the order update, a template can be downloaded by clicking on the **Download Order Update Template File** button at the bottom of the order list page.<br>

  <figure><img src="https://3333414532-files.gitbook.io/~/files/v0/b/gitbook-x-prod.appspot.com/o/spaces%2FIbwGN7KwvYi0iLbjtnXz%2Fuploads%2FrBR7SwnWP6V9xydRLkHZ%2Fimage.png?alt=media&amp;token=20d6bdae-d8b9-4dc8-8904-3aa078c8863f" alt=""><figcaption></figcaption></figure>
* After downloading the template, you can enter the updated order information into the CSV file.
* The fields to update include:
  * **status** : The status of the order line.
  * **shipping\_company** : Information about which shipping company the order line is shipped with (must be from the enum in Omnitron)
  * **e\_archive\_url** : The URL to access the invoice pdf in the Omnitron panel and sales channels.
  * **invoice\_number** : Invoice number for the order line.
  * **invoice\_date** : Billing date for the order line.
  * **tracking\_number** : Shipping tracking number for the order line (this will be sent filled when the cargo tracking integration is done by the company).
* On the Orders page, users have the option to select the specific orders and perform the **Export to Excel with Selected Items** and **Export to CSV with Selected Items** actions.<br>

  <figure><img src="https://3333414532-files.gitbook.io/~/files/v0/b/gitbook-x-prod.appspot.com/o/spaces%2FIbwGN7KwvYi0iLbjtnXz%2Fuploads%2F5KVO8WRI3g7H08iDHCil%2Fimage.png?alt=media&amp;token=cf5a2c2a-f3f5-4aaa-a108-09315ebee7fc" alt=""><figcaption></figcaption></figure>

## <mark style="color:red;">Step 4: Navigate to Order Detail Page​</mark> <a href="#step-4-navigate-to-order-detail-page" id="step-4-navigate-to-order-detail-page"></a>

* Click on one of the selected orders to navigate to the Order Detail page.
* The Order Detail page includes information such as the customer's name, last name, shipping address, and the platform used.
* To view all the details related to the order, including order information, customer information, shipping details, and payment information, click the **Expand All** button.
* You can also view order logs by clicking the **Order Log** button.<br>

  <figure><img src="https://3333414532-files.gitbook.io/~/files/v0/b/gitbook-x-prod.appspot.com/o/spaces%2FIbwGN7KwvYi0iLbjtnXz%2Fuploads%2Fxm5mhP6uMr9r9MtftP7u%2Fimage.png?alt=media&amp;token=95cbd78e-49d0-44ba-a5c7-06055f670cd5" alt=""><figcaption></figcaption></figure>

## <mark style="color:red;">Step 5: Update Customer Information​</mark> <a href="#step-5-update-customer-information" id="step-5-update-customer-information"></a>

* To formally update customer information, click the **Edit** button under the **Customer Information** section.
* This will open a form where you can make necessary changes to the customer's information<br>

  <figure><img src="https://3333414532-files.gitbook.io/~/files/v0/b/gitbook-x-prod.appspot.com/o/spaces%2FIbwGN7KwvYi0iLbjtnXz%2Fuploads%2FEF88KvgStPtPiev2AWCs%2Fimage.png?alt=media&amp;token=c14d0655-b3fc-4c1f-872f-876deebd6302" alt=""><figcaption></figcaption></figure>

## <mark style="color:red;">Step 6: Create a Cancellation Plan​</mark> <a href="#step-6-create-a-cancellation-plan" id="step-6-create-a-cancellation-plan"></a>

* In the Product panel below the Order Details page, the products that create the order and the product features that can be added to the products are listed.
* If you need to cancel or return specific products, select the products you want to work with.
* Create a cancellation plan by specifying the transaction type and providing cancellation/return reasons.
* After selecting the "Cancel/Return Selected Items" action, a cancellation plan will be created at the bottom of the order detail page.<br>

  <figure><img src="https://3333414532-files.gitbook.io/~/files/v0/b/gitbook-x-prod.appspot.com/o/spaces%2FIbwGN7KwvYi0iLbjtnXz%2Fuploads%2FdEGHmS06jqnVn7iSbel7%2Fimage.png?alt=media&amp;token=0152f627-b9aa-4961-a1a7-97ccd3846550" alt=""><figcaption></figcaption></figure>
* The cancellation process will refund the amount according to the payment method, up to the desired cancellation amount.<br>

  <figure><img src="https://3333414532-files.gitbook.io/~/files/v0/b/gitbook-x-prod.appspot.com/o/spaces%2FIbwGN7KwvYi0iLbjtnXz%2Fuploads%2FmvfsJEcFPtKLFAe0W2bU%2Fimage.png?alt=media&amp;token=cab8a620-767c-4b82-8c00-57f618493078" alt=""><figcaption></figcaption></figure>

## <mark style="color:red;">Step 7: Manual Refund (If Required)​</mark> <a href="#step-7-manual-refund-if-required" id="step-7-manual-refund-if-required"></a>

* If the cancellation tasks cannot successfully refund the payment, the cancellation plan's status will progress to "Manual Refund Needed."<br>

  <figure><img src="https://3333414532-files.gitbook.io/~/files/v0/b/gitbook-x-prod.appspot.com/o/spaces%2FIbwGN7KwvYi0iLbjtnXz%2Fuploads%2FqFMd5ChcRRMQdAVGdRrU%2Fimage.png?alt=media&amp;token=39fd76d8-071b-4748-bc5f-46ec365cf097" alt=""><figcaption></figcaption></figure>
* After the manual refund is completed, the "Manual Refund Required" checkbox is marked for the order item that needs a manual refund, and the select the “Refund has been made” action.<br>

  <figure><img src="https://3333414532-files.gitbook.io/~/files/v0/b/gitbook-x-prod.appspot.com/o/spaces%2FIbwGN7KwvYi0iLbjtnXz%2Fuploads%2FwXNAkj6aFNcL0uDVbDAL%2Fimage.png?alt=media&amp;token=fb92116c-88dc-4126-b261-08369220937d" alt=""><figcaption></figcaption></figure>

## <mark style="color:red;">Step 8: Cancel Entire Order​</mark> <a href="#step-8-cancel-entire-order" id="step-8-cancel-entire-order"></a>

* If needed, you can cancel the entire order by using the **Cancel Entire Order** button at the bottom of the product panel.
* Alternatively, based on the cancellation plan strategy, you can process a refund for only the shipping fee by using the **Only Refund Shipping Fee** button.<br>

  <figure><img src="https://3333414532-files.gitbook.io/~/files/v0/b/gitbook-x-prod.appspot.com/o/spaces%2FIbwGN7KwvYi0iLbjtnXz%2Fuploads%2FoXApKC2UWmzcGgTkoBcg%2Fimage.png?alt=media&amp;token=f02d99ae-612a-4603-8abc-9adcb42eeaf4" alt=""><figcaption></figcaption></figure>

## <mark style="color:red;">Step 9: View Payment and Order Details​</mark> <a href="#step-9-view-payment-and-order-details" id="step-9-view-payment-and-order-details"></a>

* At the bottom of the order detail page, you can view sections that display payment transactions, Order Amount Before Return/Cancellation, Current Order Amount, and any contracts related to the order.<br>

  <figure><img src="https://3333414532-files.gitbook.io/~/files/v0/b/gitbook-x-prod.appspot.com/o/spaces%2FIbwGN7KwvYi0iLbjtnXz%2Fuploads%2FdP4lkhtmN13ku8CyGt2X%2Fimage.png?alt=media&amp;token=0babad65-faa0-4ec3-ae07-95105250c0dc" alt=""><figcaption></figcaption></figure>


# How to Manage Cancellation and Return Requests in Omnitron?

This tutorial provides step-by-step instructions for managing Cancellation/Return Requests in Omnitron.

## <mark style="color:red;">Step 1: Access to Omnitron​</mark> <a href="#step-1-access-to-omnitron" id="step-1-access-to-omnitron"></a>

* Get access to the Omnitron panel.
* Enter your Username and Password, and then click the **Sign In** button.\
  ![](https://3333414532-files.gitbook.io/~/files/v0/b/gitbook-x-prod.appspot.com/o/spaces%2FIbwGN7KwvYi0iLbjtnXz%2Fuploads%2FL1sAi0Wa7yceeQM3tJhA%2Fimage.png?alt=media\&token=f21533e2-c19c-4fa3-8506-b56dab42f399)

## <mark style="color:red;">Step 2: Navigate to Cancellation/Return Requests Page​</mark> <a href="#step-2-navigate-to-cancellationreturn-requests-page" id="step-2-navigate-to-cancellationreturn-requests-page"></a>

* Follow the **Orders** sidebar and click the **Cancellation/Return Requests** page.<br>

  <figure><img src="https://3333414532-files.gitbook.io/~/files/v0/b/gitbook-x-prod.appspot.com/o/spaces%2FIbwGN7KwvYi0iLbjtnXz%2Fuploads%2FnN0QLUIxsL8kyI1J1Ord%2Fimage.png?alt=media&amp;token=2cb642a9-9ff6-4330-9074-009ce1ef5489" alt=""><figcaption></figcaption></figure>
* On the Cancellation/Return Requests page, the filter panel and the list of existing cancellation or return request lists are displayed.
* Users have the option to select the specific orders and perform the **Export to Excel with Selected Items** and **Export to CSV with Selected Items** actions.
* Cancellation/refund request list can be downloaded in XLS format through the **Download** button.<br>

  <figure><img src="https://3333414532-files.gitbook.io/~/files/v0/b/gitbook-x-prod.appspot.com/o/spaces%2FIbwGN7KwvYi0iLbjtnXz%2Fuploads%2F4gH12306UqlNtePEwi12%2Fimage.png?alt=media&amp;token=6c589406-51e0-4a75-a873-209868895958" alt=""><figcaption></figcaption></figure>
* To navigate to the Order Detail page, click on one of the selected Cancellation/Return Requests.<br>

  <figure><img src="https://3333414532-files.gitbook.io/~/files/v0/b/gitbook-x-prod.appspot.com/o/spaces%2FIbwGN7KwvYi0iLbjtnXz%2Fuploads%2FUyKgjnNkYKqAxPKFhz4N%2Fimage.png?alt=media&amp;token=b447dca1-cdd1-41bd-a09e-bf2247b2c7cd" alt=""><figcaption></figcaption></figure>


# Sales Channels


# How to Manage Products in Omnitron?

This tutorial provides step-by-step instructions for managing Products in Omnitron.

## <mark style="color:red;">Step 1: Access to Omnitron​</mark> <a href="#step-1-access-to-omnitron" id="step-1-access-to-omnitron"></a>

* Get access to the Omnitron panel.
* Enter your Username and Password, and then click the **Sign In** button.\
  ![](https://3333414532-files.gitbook.io/~/files/v0/b/gitbook-x-prod.appspot.com/o/spaces%2FIbwGN7KwvYi0iLbjtnXz%2Fuploads%2FL1sAi0Wa7yceeQM3tJhA%2Fimage.png?alt=media\&token=f21533e2-c19c-4fa3-8506-b56dab42f399)

## <mark style="color:red;">Step 2: Navigate to Products Page​</mark> <a href="#step-2-navigate-to-products-page" id="step-2-navigate-to-products-page"></a>

* Follow the **Sales Channels** sidebar and click the **Products** page.<br>

  <figure><img src="https://3333414532-files.gitbook.io/~/files/v0/b/gitbook-x-prod.appspot.com/o/spaces%2FIbwGN7KwvYi0iLbjtnXz%2Fuploads%2FMIuxbIvjqNh6Tgk5n2af%2Fimage.png?alt=media&amp;token=aa8faff2-8ee7-4a41-a031-7d8d0c551850" alt=""><figcaption></figcaption></figure>
* If the sales channel type is web or distributed, the above module is displayed.
* On the **Products** page, the include and exclude filter panel and the list of existing products are listed.<br>

  <figure><img src="https://3333414532-files.gitbook.io/~/files/v0/b/gitbook-x-prod.appspot.com/o/spaces%2FIbwGN7KwvYi0iLbjtnXz%2Fuploads%2FZTJu2mcynZhcZ0h8k7QK%2Fimage.png?alt=media&amp;token=6ff1900b-3ef8-4333-b480-1d366affb25a" alt=""><figcaption></figcaption></figure>

## <mark style="color:red;">Step 3: Add/Remove Products to Catalog​</mark> <a href="#step-3-addremove-products-to-catalog" id="step-3-addremove-products-to-catalog"></a>

* In the product list, users can use the **Select Action** dropdown to either perform the **Add Selected Products to Catalogs** or **Remove Selected Ones From Catalog** actions for the listed items. The same actions can also be executed on the **Products & Catalogs > Catalogs > Product List** page.<br>

  <figure><img src="https://3333414532-files.gitbook.io/~/files/v0/b/gitbook-x-prod.appspot.com/o/spaces%2FIbwGN7KwvYi0iLbjtnXz%2Fuploads%2FIttF5RjXyFmw3JKTZf2W%2Fimage.png?alt=media&amp;token=388c374a-43c7-4eb8-b535-407f1c33bad2" alt=""><figcaption></figcaption></figure>

## <mark style="color:red;">Step 4: Navigate to Edit Product Page​</mark> <a href="#step-4-navigate-to-edit-product-page" id="step-4-navigate-to-edit-product-page"></a>

* Upon clicking the product, the product details page will open on the right side of the screen. If a user wants to edit the product, they can initiate the process by clicking the **Edit Product** button, which will subsequently redirect them to the Add/Edit Product page.<br>

  <figure><img src="https://3333414532-files.gitbook.io/~/files/v0/b/gitbook-x-prod.appspot.com/o/spaces%2FIbwGN7KwvYi0iLbjtnXz%2Fuploads%2FAcTUoUnHAjvm0Y40XuWj%2Fimage.png?alt=media&amp;token=98b200e5-b53e-419b-927c-84c97085f627" alt=""><figcaption></figcaption></figure>


# How to Manage Registered Users Based on Sales Channel?

This tutorial explains how to track registered user information by sales channel from the Users page and how to update them. Additionally, it details how to access detailed user information and perform various actions.

## <mark style="color:red;">Step 1: Navigate to the Users Page​</mark> <a href="#step-1-navigate-to-the-users-page" id="step-1-navigate-to-the-users-page"></a>

* Follow the **Sales Channels** sidebar and click the **Users** page.<br>

  <figure><img src="https://3333414532-files.gitbook.io/~/files/v0/b/gitbook-x-prod.appspot.com/o/spaces%2FIbwGN7KwvYi0iLbjtnXz%2Fuploads%2FrNEOlAM6DReknTtxdj9C%2Fimage.png?alt=media&amp;token=e264ea1a-15cb-4d94-8ec1-10dfa61985cf" alt=""><figcaption></figcaption></figure>
* On the Users page, users can use the filters at the top, labeled user properties, to narrow down the results as needed.
* The selected filters is displayed in the **Active Filters** row.<br>

  <figure><img src="https://3333414532-files.gitbook.io/~/files/v0/b/gitbook-x-prod.appspot.com/o/spaces%2FIbwGN7KwvYi0iLbjtnXz%2Fuploads%2FOUC2j2MFMnWcNlt9q2qg%2Fimage.png?alt=media&amp;token=3748ef13-662d-4647-b721-4b05b0f0a63b" alt=""><figcaption></figcaption></figure>

## <mark style="color:red;">Step 2: Updating Users​</mark> <a href="#step-2-updating-users" id="step-2-updating-users"></a>

To bulk update users, follow these steps:

* Click the **Bulk Update User** button located in the upper-right corner.<br>

  <figure><img src="https://3333414532-files.gitbook.io/~/files/v0/b/gitbook-x-prod.appspot.com/o/spaces%2FIbwGN7KwvYi0iLbjtnXz%2Fuploads%2F8bA2VsZSwwJ4Nfsxbp5Z%2Fimage.png?alt=media&amp;token=cbae19d6-b063-4f65-9a43-2fc840a18ae7" alt=""><figcaption></figcaption></figure>
* Clicking this button opens a pop-up displaying local files. Select an Excel file from your local and upload it.

{% hint style="info" %}
You can download an example Excel template by clicking the **Download Bulk User Update Template** button at the bottom of the screen.

<img src="https://3333414532-files.gitbook.io/~/files/v0/b/gitbook-x-prod.appspot.com/o/spaces%2FIbwGN7KwvYi0iLbjtnXz%2Fuploads%2FAYOQiOqY9QE2zXweu5wN%2Fimage.png?alt=media&amp;token=1c17a192-ba5c-456c-a128-94f56be16e94" alt="" data-size="original">
{% endhint %}

## <mark style="color:red;">Step 3: Accessing User Details​</mark> <a href="#step-3-accessing-user-details" id="step-3-accessing-user-details"></a>

To access detailed user information;

* Click on the user's name in the list of users.
* A new screen opens displaying the user's information and a list of their previous orders.
* Clicking on one of the listed orders opens a detailed order view.<br>

  <figure><img src="https://3333414532-files.gitbook.io/~/files/v0/b/gitbook-x-prod.appspot.com/o/spaces%2FIbwGN7KwvYi0iLbjtnXz%2Fuploads%2F49qyy5tdK7czDb0FWNN1%2Fimage.png?alt=media&amp;token=677bd607-0b30-48ca-9f8e-41f034c72647" alt=""><figcaption></figcaption></figure>

## <mark style="color:red;">Step 4: Updating User Permissions​</mark> <a href="#step-4-updating-user-permissions" id="step-4-updating-user-permissions"></a>

To update user permissions or membership information;

* Navigate to the user's detail page.
* Go to the section related to permissions.
* Make the necessary updates by clicking **Enable** or **Remove permission** button as needed.<br>

  <figure><img src="https://3333414532-files.gitbook.io/~/files/v0/b/gitbook-x-prod.appspot.com/o/spaces%2FIbwGN7KwvYi0iLbjtnXz%2Fuploads%2FgIL7Xdh1FUcrtLuxvX2b%2Fimage.png?alt=media&amp;token=9883977a-5416-4ba3-8124-9ddbc673abf6" alt=""><figcaption></figcaption></figure>

## <mark style="color:red;">Step 5: Other Settings​</mark> <a href="#step-5-other-settings" id="step-5-other-settings"></a>

To access additional user information or perform certain actions;

* Click the **Expand All** button on the detail page to view more user information.
* To send a password reset email to the user, click the **Send Forgot My Password Email** button.
* To anonymize the user, click the **Anonymize The User** button.<br>

  <figure><img src="https://3333414532-files.gitbook.io/~/files/v0/b/gitbook-x-prod.appspot.com/o/spaces%2FIbwGN7KwvYi0iLbjtnXz%2Fuploads%2FaYLoMouDIC105BjTq4xH%2Fimage.png?alt=media&amp;token=fb57b11b-3f10-4ce8-9213-950e26b6df8b" alt=""><figcaption></figcaption></figure>


# How to Create and Update Customer Groups in Omnitron?

This tutorial explains how to create and update customer groups to effectively organize and target specific sets of customers and how to configure customer group settings to create dynamic customer groups with specific rules.

## <mark style="color:red;">Customer Groups</mark>

### <mark style="color:red;">Step 1: Navigate to the Customer Groups Page​</mark> <a href="#step-1-navigate-to-the-customer-groups-page" id="step-1-navigate-to-the-customer-groups-page"></a>

* Follow the **Sales Channels** sidebar and click the **Customer Groups** page.<br>

  <figure><img src="https://3333414532-files.gitbook.io/~/files/v0/b/gitbook-x-prod.appspot.com/o/spaces%2FIbwGN7KwvYi0iLbjtnXz%2Fuploads%2F2lk52IN0Ov7OHNNX0lnY%2Fimage.png?alt=media&amp;token=94fa2461-ada9-472d-ab24-1b7144434db2" alt=""><figcaption></figcaption></figure>

### <mark style="color:red;">Step 2: Filtering Customer Groups​</mark> <a href="#step-2-filtering-customer-groups" id="step-2-filtering-customer-groups"></a>

* At the top of the Customer Groups page, you can filter customer groups based on customer attributes.
* The selected filters is displayed in the **Active Filters** row.

### <mark style="color:red;">Step 3: Creating a New Customer Group​</mark> <a href="#step-3-creating-a-new-customer-group" id="step-3-creating-a-new-customer-group"></a>

* To create a new customer group, click the **+New Customer Group** button located in the upper right corner.<br>

  <figure><img src="https://3333414532-files.gitbook.io/~/files/v0/b/gitbook-x-prod.appspot.com/o/spaces%2FIbwGN7KwvYi0iLbjtnXz%2Fuploads%2FsHHSaYUmd9sanzwk1jJX%2Fimage.png?alt=media&amp;token=b7d7e87b-7c5a-4f8f-a632-961a16925c40" alt=""><figcaption></figcaption></figure>
* A new window will appear, prompting you to enter a name for the customer group. This field is mandatory. (If you enter a customer group name that has been used before, you will receive a warning message.)
* After entering the customer group name, click the **Save** button.<br>

  <figure><img src="https://3333414532-files.gitbook.io/~/files/v0/b/gitbook-x-prod.appspot.com/o/spaces%2FIbwGN7KwvYi0iLbjtnXz%2Fuploads%2FVm24hYKes6qYAow07fsI%2Fimage.png?alt=media&amp;token=d8ff38d9-ba6d-4529-b25e-68bec326a159" alt=""><figcaption></figcaption></figure>

### <mark style="color:red;">Step 4: Assigning Customers to the Group​</mark> <a href="#step-4-assigning-customers-to-the-group" id="step-4-assigning-customers-to-the-group"></a>

* On the left side of the screen, you will find a list of all customers registered in the system.
* To assign the customers to the group, select the customers you want to include from this list.
* If you need to find a specific customer, you can use the filter area to search for them.
* After making your selections, add customers to the group collectively using bulk addition actions or individually by clicking the green **+** button next to the customer.<br>

  <figure><img src="https://3333414532-files.gitbook.io/~/files/v0/b/gitbook-x-prod.appspot.com/o/spaces%2FIbwGN7KwvYi0iLbjtnXz%2Fuploads%2FII5YMw6A81PFLZcmlJNQ%2Fimage.png?alt=media&amp;token=a43db38b-3d23-49a0-af53-24fe4bae5fa1" alt=""><figcaption></figcaption></figure>

### <mark style="color:red;">Step 5: Updating an Existing Customer Group​</mark> <a href="#step-5-updating-an-existing-customer-group" id="step-5-updating-an-existing-customer-group"></a>

* To update an existing customer group, click on the row corresponding to the group you want to update.
* On the left side of the screen, you will see a list of all customers registered in the system.
* On the right side, you will see the details of the selected customer group.
* To add more customer to the existing customer group, clicking the green **+** button next to the customer row.
* Once the process is complete, the right-hand list will be updated with the new additions.

## <mark style="color:red;">Customer Groups Settings​</mark> <a href="#customer-groups-settings" id="customer-groups-settings"></a>

### <mark style="color:red;">Step 1: Navigate to the Customer Group Settings​</mark> <a href="#step-1-navigate-to-the-customer-group-settings" id="step-1-navigate-to-the-customer-group-settings"></a>

* Follow the **Sales Channels** sidebar and click the **Customer Groups**, then **Customer Group Settings**.<br>

  <figure><img src="https://3333414532-files.gitbook.io/~/files/v0/b/gitbook-x-prod.appspot.com/o/spaces%2FIbwGN7KwvYi0iLbjtnXz%2Fuploads%2FJIulCrGXrLT4qtqLvitH%2Fimage.png?alt=media&amp;token=2581850f-8969-46cd-8faf-89ef60cb9aa3" alt=""><figcaption></figcaption></figure>
* From the Customer Group Settings page, you can set up the rules for creating a dynamic customer group.
* These rules will determine how customer groups are created and how they affect the display of stock and pricing information.

### <mark style="color:red;">Step 2: Filtering Customer Group Settings​</mark> <a href="#step-2-filtering-customer-group-settings" id="step-2-filtering-customer-group-settings"></a>

* To manage and view your customer group settings, you can filter them based on customer attributes.
* The selected filters is displayed in the **Active Filters** row.

### <mark style="color:red;">Step 3: Creating a New Customer Group Setting​</mark> <a href="#step-3-creating-a-new-customer-group-setting" id="step-3-creating-a-new-customer-group-setting"></a>

* To create a new customer group setting, click the **+New Customer Groups Setting** button located in the upper right corner.<br>

  <figure><img src="https://3333414532-files.gitbook.io/~/files/v0/b/gitbook-x-prod.appspot.com/o/spaces%2FIbwGN7KwvYi0iLbjtnXz%2Fuploads%2Fv40T0jgJh2uh9knfffTb%2Fimage.png?alt=media&amp;token=04177419-eef5-4020-aa0f-2ee5f65d81fa" alt=""><figcaption></figcaption></figure>
* When adding a new customer group setting, you will need to provide a "name" and a "slug" for the setting. These fields are mandatory. The "name" is for identifying the setting, and the "slug" is a unique identifier for the setting.
* The specific configuration you set for this customer group will determine how stock and pricing information is displayed to customers.<br>

  <figure><img src="https://3333414532-files.gitbook.io/~/files/v0/b/gitbook-x-prod.appspot.com/o/spaces%2FIbwGN7KwvYi0iLbjtnXz%2Fuploads%2FDOF87yF5xza6GVfCH5KE%2Fimage.png?alt=media&amp;token=316f89f1-8cd4-42ed-92bc-266e53de8136" alt=""><figcaption></figcaption></figure>

### <mark style="color:red;">Step 4: Example Use Case​</mark> <a href="#step-4-example-use-case" id="step-4-example-use-case"></a>

* For instance, let's say you want to create a special customer group setting for students.
* Students can access custom stock and pricing information when they log in with their school email addresses.
* To achieve this, you create a new customer group setting, name it "Student Discount," and set up the configuration to apply special pricing and stock display rules for customers with school email addresses.


# Marketing


# How to Create and Manage Campaigns in Omnitron?

In this tutorial, we will guide you through the process of creating campaigns in your Sales Channels' Marketing tab. Campaigns are essential for promoting your products and attracting customers by offering various discounts or incentives. We will break down the process into four main sections: Campaign Information, Campaign Conditions, Campaign Actions, and Summary.

## <mark style="color:red;">Step 1: Navigate to the Campaigns Page​</mark> <a href="#step-1-navigate-to-the-campaigns-page" id="step-1-navigate-to-the-campaigns-page"></a>

* Follow the **Marketing** sidebar and click the **Campaigns** page.<br>

  <figure><img src="https://3333414532-files.gitbook.io/~/files/v0/b/gitbook-x-prod.appspot.com/o/spaces%2FIbwGN7KwvYi0iLbjtnXz%2Fuploads%2FKZPWTVsUlmp5kwR8YLBG%2Fimage.png?alt=media&amp;token=baf5b27d-7184-458f-89d9-5998f4b247c8" alt=""><figcaption></figcaption></figure>
* On this page, you can see a list of previously created campaigns.

## <mark style="color:red;">Step 2: Filtering Campaigns​</mark> <a href="#step-2-filtering-campaigns" id="step-2-filtering-campaigns"></a>

* At the top of the Campaigns page, you can filter campaigns based on campaign characteristics.
* The selected filters are displayed in the **Active Filters** row.

## <mark style="color:red;">Step 3: Creating a New Campaign​</mark> <a href="#step-3-creating-a-new-campaign" id="step-3-creating-a-new-campaign"></a>

* Choose a campaign language from the available options listed in the Locales menu.
  * You may need to create independent campaigns for each language.
  * Ensure that the campaign message and customer warning messages are adapted to the selected language.<br>

    <figure><img src="https://3333414532-files.gitbook.io/~/files/v0/b/gitbook-x-prod.appspot.com/o/spaces%2FIbwGN7KwvYi0iLbjtnXz%2Fuploads%2F8JHYs9WOGGoCX8HDZ2JD%2Fimage.png?alt=media&amp;token=f80fd498-a540-495b-bad0-d567d8546f32" alt=""><figcaption></figcaption></figure>
* To create a new campaign, click the **+ New Campaign** button in the upper-right corner.<br>

  <figure><img src="https://3333414532-files.gitbook.io/~/files/v0/b/gitbook-x-prod.appspot.com/o/spaces%2FIbwGN7KwvYi0iLbjtnXz%2Fuploads%2FKi65TvXQqw77J24SmERJ%2Fimage.png?alt=media&amp;token=75870ac0-06f1-4a9c-91e8-a84876a76f29" alt=""><figcaption></figcaption></figure>

### <mark style="color:red;">Campaign Information​</mark> <a href="#campaign-information" id="campaign-information"></a>

* This section is used to define the general information of the campaign.<br>

  <figure><img src="https://3333414532-files.gitbook.io/~/files/v0/b/gitbook-x-prod.appspot.com/o/spaces%2FIbwGN7KwvYi0iLbjtnXz%2Fuploads%2FWXmh6pOjcN5QiKBz1mla%2Fimage.png?alt=media&amp;token=d72ee025-333d-44f2-8936-8de4d8c41b86" alt=""><figcaption></figcaption></figure>
* Fill in the required fields, including:
  * **Campaign Name:** The name of the campaign.
  * **Campaign Slug:** The unique name given to a campaign in the company's ERP system.
  * **Campaign Message:** The message shown to users in the basket summary and search filters. It must match the language chosen in the 'Locales' setting.
  * **Maximum Number of Applications (Per Cart):** Indicates how many times the campaign can be used within the same basket. A value of '0' is not allowed.
  * **Maximum Number of Applications (Per Customer):** Indicates how many times a single customer can apply the campaign. Use '0' for unlimited use.
  * **Start/End Date and Time:** Sets the date and time range when the campaign is valid. It automatically activates at the start time and deactivates at the end time you choose.
  * **Status:** Switches the campaign between active and passive states.
  * **Priority:** Determines whether the campaign takes precedence over other active campaigns.
  * **Currency:** Defines the currency for the campaign. To display this field on the Campaign Information page, you need to have more than one currency defined in Dynamic Settings under Sales Channel Settings.
  * **Combine with Other Campaigns:** When selected, this campaign can be combined with other active campaigns.
  * **Show on Product Detail:** If selected, the campaign's name is displayed on the product detail page.
  * **Show on Product List:** If selected, the campaign's name is displayed on the product list page.
  * **Show Gift Product**: If the product has an associated gift, it will be displayed as part of the campaign.
* Click **Save and Continue** after filling all necessary fields.

#### <mark style="color:red;">Understanding Priority and Combining Campaigns</mark> <a href="#understanding-priority-and-combining-campaigns" id="understanding-priority-and-combining-campaigns"></a>

When more than one campaign is eligible for the same basket, two settings on this tab decide what happens:

* **Priority (Importance)** sets the **order** in which eligible campaigns are evaluated. Non-combinable campaigns are evaluated first, and within each group the campaign with the **higher value is evaluated first**. Because campaigns are applied one after another, an earlier campaign can consume basket items and change what later campaigns see. Priority only orders the campaigns — on its own it does **not** stop a lower-priority campaign from also applying.
* **Combine with Other Campaigns** decides whether this campaign is allowed to be applied **together with** other campaigns at all. If it is **not** selected, once this campaign applies, no other campaign is applied to the basket — only this single campaign takes effect.

Combining is controlled by **three independent settings**, which are easy to confuse:

1. **Combine with Other Campaigns** (this tab) — the master on/off switch for stacking.
2. **Application Type** (Campaign Conditions and Campaign Actions tabs) — decides, per item, whether the products this campaign touches stay available to other campaigns (see below).
3. **Consume Group** — an optional advanced setting that lets campaigns in the same group apply one at a time by priority.

{% hint style="warning" %}
Selecting *"Products affected by the relevant campaign cannot be included in other campaigns"* only removes this campaign's items from the shared pool — it does **not** prevent a second campaign from applying on other items in the basket. To stop two campaigns from stacking entirely, unselect **Combine with Other Campaigns** on **all** of the overlapping campaigns. For the full behaviour and item-level examples, see [Promotions](https://github.com/akinon/docs/tree/main/technicalguides/commerce/promotions.md) and [Consume Group in Campaigns](https://github.com/akinon/docs/tree/main/technicalguides/commerce/consume-group-in-campaigns.md).
{% endhint %}

### <mark style="color:red;">Campaign Conditions​</mark> <a href="#campaign-conditions" id="campaign-conditions"></a>

This section is used to define the conditions for the application of the campaign.

<figure><img src="https://3333414532-files.gitbook.io/~/files/v0/b/gitbook-x-prod.appspot.com/o/spaces%2FIbwGN7KwvYi0iLbjtnXz%2Fuploads%2FmKXD55lqHDx7yL2pJR42%2Fimage.png?alt=media&amp;token=4fa0bd5b-1170-4a67-babf-81dfd42ae19e" alt=""><figcaption></figcaption></figure>

Fill in the required fields, including:

* **Select a Collection:** Select a collection previously created in the products and catalogs section where you want to add the campaign.
* **Primary Condition Type:**
  * **Total Amount:** Define specific amount or quantity thresholds for your campaign. If your campaign is based on a certain amount or quantity of products, select this option and enter the required number in the total amount/quantity field below.
    * **Minimum & Maximum Amount:** This field sets a range of amounts for your campaign.
  * **Total Number of Products**: Enables the campaign to be defined within a specific product quantity range.
    * **Minimum & Maximum Product Quantity:** This field sets the quantity range for products in the campaign.
    * **Distinct By:** If you want to limit products based on certain criteria, you can choose options such as None, SKU, Base Code, or Attributes.
  * **Payment Step Discount:** This covers discounts applied to the total basket during payment, typically during payment approval when a specific payment method is used.
* **Supplier:** Used to create vendor-based campaigns for Unified and Seller Center.
* **Secondary Condition Type:** This field allows you to add a secondary condition type to your campaign.
  * **Card Type:** Add custom campaign conditions based on card types defined within the system.
  * **Installments:** Add custom campaign conditions based on the number of installments.
  * **Bank:** Add custom campaign conditions based on the banks defined within the system.
  * **Payment Type:** Add custom campaign conditions based on payment options like credit card, wire, pay-on-delivery, Masterpass, and PayPal defined within the system.
  * **Minimum Cart Amount:** Set the minimum total amount for products in the cart to apply the campaign when the cart's total exceeds this limit.
  * **Email Extension:** Enter an email extension to make customers with that extension eligible for the campaign.
  * **Email:** Define a campaign for a specific email address.
  * **Card BIN:** These are the first 6 digits of a card and help the system identify the bank associated with the card.
  * **Minimum Number of Product(s) in Cart:** Specifies the minimum number of products required in the cart to apply the campaign.
  * **User Feature:** This field enables you to define additional conditions for your campaign to target specific scenarios or user groups, allows for advanced customization. For examples:
    * To offer free shipping for users with a "VIP" membership type, you can set the following condition:
      * `pre_order__user__attribute__member_type = vip`
    * Missing any necessary conditions may lead to issues (e.g., errors during checkout or incorrect campaign applications).
    * **Important Note:** This feature is highly customizable. So, If you require support or further assistance with configuring advanced conditions, please reach out to Akinon.
  * **Shopping Platform:** Options for web, Android, iOS, and Instore, allowing you to create unique campaigns for each platform.
  * **User Membership Date:** Users who registered after the selected date are eligible to use the relevant campaign.
  * **Number of Orders:** Customers who have placed orders in the specified amount are eligible for this campaign.
* **User Warning Message:** These are messages meant to encourage customers to earn discounts.
* **Price Type:** This field sets the campaign's application condition regarding price, with options like Unit Price, Discount Price, and Retail Price.
* **Application Type:** Determines whether the discount will be applied to all products, products not included in other campaigns, or independently of other campaigns.

Click **Save and Continue** after filling all necessary fields.

{% hint style="info" %}
​If you intend to create a campaign that adjusts its scale independently, make sure to select "The campaign is applied independently of other campaigns" in the Application Type field.
{% endhint %}

### <mark style="color:red;">Campaign Actions​</mark> <a href="#campaign-actions" id="campaign-actions"></a>

This section is used to define the action of the campaign when customers meet the conditions.

<figure><img src="https://3333414532-files.gitbook.io/~/files/v0/b/gitbook-x-prod.appspot.com/o/spaces%2FIbwGN7KwvYi0iLbjtnXz%2Fuploads%2FeXzDqVY56nKjggDUjjgn%2Fimage.png?alt=media&amp;token=07820edd-b005-450f-b0fe-8d9243ceb125" alt=""><figcaption></figcaption></figure>

Fill in the required fields, including:

* **Select a Collection:** Select a collection previously created in the Products and Catalogs module where the campaign should apply.
* **Price Type**:
  * **Discount Price**: the system calculates the discount price of products that are on sale due to other campaigns.
  * **Unit Price**: it is based on the product’s selling price.
  * **Retail Price:** It is used to calculate the crossed-out price in the Retail Price shop.
* **Application Type:** This field determines whether the discount will be applied to all products or to products with no campaigns applied.
  * Products affected by the relevant campaign can be included in other campaigns.
  * Products affected by the relevant campaign cannot be included in other campaigns.
  * The campaign is applied independently of other campaigns.

### <mark style="color:red;">Action Types​</mark> <a href="#action-types" id="action-types"></a>

Different action types have distinct fields associated with them. Each action type fields are explained below:

**1. Price Discount**

* **Price Discount:** Specify the desired discounted price.
* **Discount Amount**: Determine the discount amount to be applied to the basket.

**2. Cheapest Item Free (Buy 3, Pay 2)**

* **Distributing to Products that Meet the Terms of Discount:** Controls how the discount is shared across the items that took part in the campaign (the `share_benefit_on_conditions` setting). It is **enabled by default**.
  * **Enabled (default):** the discount is distributed across **all** items that satisfied the condition, so each participating item is recorded as benefiting from the campaign and can be refunded proportionally.
  * **Disabled:** the discount is attributed **only to the free items**, so on return those items refund as **0 TRY**.
* **Order Type:** This indicates whether the discount applies to the cheapest product, the most expensive product, or follows a gradual discount scheme.
  * **Gradual Discount:** This is a 2-4-6 discount. The discount is gradually applied to the second, fourth, and sixth most expensive products in the cart.
  * **Discount for the Cheapest Product:** The discount is applied to the cheapest product in the cart.
  * **Discount for the Most Expensive Product:** The discount is applied to the most expensive product in the cart.
* **Number of Products to be Applied:** Specify the total number of products for which the campaign will be valid.

{% hint style="warning" %}
Keep **Distributing to Products that Meet the Terms of Discount** enabled unless you have a specific reason not to. Disabling it is the usual cause of "the item refunds as 0 TRY" reports, because the whole discount is attributed to a single line that then has nothing left to refund.
{% endhint %}

**3. Percent Discount**

Apply a discount at the specified percentage.

* **Percent Discount:** Enter the percentage discount to be applied.

**4. Free Shipping**

Ensures free shipping when the campaign conditions are met.

**5. Coupon**

Provide a coupon defined here to anyone who meets the campaign conditions.

<figure><img src="https://3333414532-files.gitbook.io/~/files/v0/b/gitbook-x-prod.appspot.com/o/spaces%2FIbwGN7KwvYi0iLbjtnXz%2Fuploads%2F7kFKFvUu6Uzhh5rnTr96%2Fimage.png?alt=media&amp;token=d702198e-da9b-40eb-930a-8f0e96843d56" alt=""><figcaption></figcaption></figure>

<figure><img src="https://3333414532-files.gitbook.io/~/files/v0/b/gitbook-x-prod.appspot.com/o/spaces%2FIbwGN7KwvYi0iLbjtnXz%2Fuploads%2FntytybOTE19pfqL0hHgJ%2Fimage.png?alt=media&amp;token=b8a00657-4e51-46a1-80bf-301c71a79483" alt=""><figcaption></figcaption></figure>

**6. Discount Code**

This option shares similarities with coupons. The key distinction is that a coupon is created within a user's account, while a discount code is provided to the user, and they are prompted to enter it during their purchase.

**7. Sample Product**

This action lets you include an additional product in the shopping basket. The products designated as "Sample Products" should already be listed in Omnitron as simple products.

After you are certain about what the campaign will offer and have filled in the necessary information, click **Save and Continue**.

## <mark style="color:red;">Step 4: Review and Approve​</mark> <a href="#step-4-review-and-approve" id="step-4-review-and-approve"></a>

* On the Summary page, review all the Campaign Information, Conditions, and Actions.
* If everything appears correct, click the **Approve** button to finalize the campaign creation process.

  <figure><img src="https://3333414532-files.gitbook.io/~/files/v0/b/gitbook-x-prod.appspot.com/o/spaces%2FIbwGN7KwvYi0iLbjtnXz%2Fuploads%2FAl18cV6dslh7du3nDZ93%2Fimage.png?alt=media&amp;token=14e79b4d-57ee-4e6b-ae85-d935d552b64d" alt=""><figcaption></figcaption></figure>

  <figure><img src="https://3333414532-files.gitbook.io/~/files/v0/b/gitbook-x-prod.appspot.com/o/spaces%2FIbwGN7KwvYi0iLbjtnXz%2Fuploads%2FOjUz6FOaU7IMiiBIupJ3%2Fimage.png?alt=media&amp;token=42323a57-bd8f-4e8a-bfff-621200f529c8" alt=""><figcaption></figcaption></figure>

## <mark style="color:red;">Step 5: Changing the Status of Campaigns​</mark> <a href="#step-5--changing-the-status-of-campaigns" id="step-5--changing-the-status-of-campaigns"></a>

* Select the campaigns you want to change the status of from the list.
* From the dropdown menu located at the top left of the list, click **Make Selected Active** if you want to activate the selected campaigns, or click **Make Selected Passive** if you want to deactivate them.
* Click the **Apply** button.<br>

  <figure><img src="https://3333414532-files.gitbook.io/~/files/v0/b/gitbook-x-prod.appspot.com/o/spaces%2FIbwGN7KwvYi0iLbjtnXz%2Fuploads%2Fphh1zwSSZPQgDWjh4zUZ%2Fimage.png?alt=media&amp;token=88286548-abc8-4daa-82d7-64b589948bcd" alt=""><figcaption></figcaption></figure>

## <mark style="color:red;">Step 6: Updating Campaigns​</mark> <a href="#step-6-updating-campaigns" id="step-6-updating-campaigns"></a>

* To make updates, click on the row of an existing campaign in the list.
* You will be directed to the detail screen where you can make the necessary changes.<br>

  <figure><img src="https://3333414532-files.gitbook.io/~/files/v0/b/gitbook-x-prod.appspot.com/o/spaces%2FIbwGN7KwvYi0iLbjtnXz%2Fuploads%2FFdFZ8bgGcFUU4hkbfofJ%2Fimage.png?alt=media&amp;token=03108e68-e48f-4ad5-bf63-b637a36784a4" alt=""><figcaption></figcaption></figure>

{% hint style="info" %}
Seeing a discount that is larger, smaller, or distributed differently than expected? The cause is almost always in the campaign configuration — priority order, combine settings, Application Type, or Share Benefit on Conditions. Follow the step-by-step [Troubleshooting: Unexpected Discount Amount](https://github.com/akinon/docs/tree/main/technicalguides/commerce/promotions.md#troubleshooting-unexpected-discount-amount) checklist.
{% endhint %}


# How to Create and Manage Coupons in Omnitron?

This tutorial provides step-by-step instructions for creating and managing coupons in Omnitron.

## <mark style="color:red;">Step 1: Navigate to Coupons Page​</mark> <a href="#step-1-navigate-to-coupons-page" id="step-1-navigate-to-coupons-page"></a>

* Navigate to the Omnitorn platform and log into your account.
* Follow the **Sales Channels** > **Marketing** sidebar and click the **Coupons** page.<br>

  <figure><img src="https://3333414532-files.gitbook.io/~/files/v0/b/gitbook-x-prod.appspot.com/o/spaces%2FIbwGN7KwvYi0iLbjtnXz%2Fuploads%2FBMenk8z4535fbWaP6ahA%2Fimage.png?alt=media&amp;token=d940242e-6826-4aa2-bc5e-d64f5ca00129" alt=""><figcaption></figcaption></figure>
* On the Coupons page, the filter panel and the list of existing coupons are displayed.
* You can filter the coupons based on their characteristics such as Coupon Name, Discount Type, and more. The selected filters are displayed in the active filters row.

## <mark style="color:red;">Step 2: Creating a New Coupon​</mark> <a href="#step-2-creating-a-new-coupon" id="step-2-creating-a-new-coupon"></a>

* To create a new coupon, start by selecting a language from the available options. This language preference will determine the language of the coupon message and user warning messages.
* Then, click the **+ New Coupon** button located in the upper-right corner.<br>

  <figure><img src="https://3333414532-files.gitbook.io/~/files/v0/b/gitbook-x-prod.appspot.com/o/spaces%2FIbwGN7KwvYi0iLbjtnXz%2Fuploads%2FF8WdiCrhsUoKvUyTLWjp%2Fimage.png?alt=media&amp;token=a21a6f90-29f2-408f-9440-3da03821934a" alt=""><figcaption></figcaption></figure>

### <mark style="color:red;">Coupon Information​</mark> <a href="#coupon-information" id="coupon-information"></a>

* This section is used to define the general information of the coupon.<br>

  <figure><img src="https://3333414532-files.gitbook.io/~/files/v0/b/gitbook-x-prod.appspot.com/o/spaces%2FIbwGN7KwvYi0iLbjtnXz%2Fuploads%2FpWOqV9JzVT3RO1Gp2SKk%2Fimage.png?alt=media&amp;token=bcc16847-f7b7-414a-89ec-f674cdb08f40" alt=""><figcaption></figcaption></figure>
* Fill in the required fields, including:
  * **Coupon Name:** The name of the coupon.
  * **Discount Slug:** Define a name for the coupon in your ERP system.
  * **User:** Choose which customers are eligible for the coupon.
  * **Coupon Message:** This message is shown to customers in the cart summary and search filters. Please make sure it is in the selected language.
  * **Maximum Number of Applications (Per Cart):** Specify the maximum number of times each customer can apply the coupon. Use "0" for unlimited uses.
  * **Priority:** Set the priority of the coupon in comparison to others. A lower value indicates higher priority, and negative values are allowed.
  * **Start/End Date and Time:** Define the valid date and time for the coupon.
  * **Status:** Toggle the status to activate or deactivate the coupon.
  * **Currency:** Select the currency for the coupon.
  * **Can be combined with other campaigns:** Choose whether the coupon can be combined with other active campaigns or discounts.
  * **Show on Product Detail:** Choose whether the coupon name should be displayed on the product detail page.
* Click **Save and Continue** after filling all necessary fields.

### <mark style="color:red;">Coupon Conditions​</mark> <a href="#coupon-conditions" id="coupon-conditions"></a>

* This section is used to define the conditions for the application of the coupon.<br>

  <figure><img src="https://3333414532-files.gitbook.io/~/files/v0/b/gitbook-x-prod.appspot.com/o/spaces%2FIbwGN7KwvYi0iLbjtnXz%2Fuploads%2Fp1NyDgBqfTt5dyi2u68Z%2Fimage.png?alt=media&amp;token=f96cae37-b76a-4378-957c-558ecde6b291" alt=""><figcaption></figcaption></figure>
* Fill in the required fields, including:
  * **Select a Collection:** Select the collection to which the coupon should apply.
  * **Primary Condition Type:** Select the primary condition type, such as Total Amount, Total Number of Products, or Payment Step Discount, and define specific conditions based on your selection.
    * (You can also define secondary conditions based on card types, installments, banks, payment types, minimum cart amount, email extensions, and more.)
  * **User Warning Message:** Customize the user warning message to encourage customers to meet the coupon conditions. Use placeholders like {remaining} to dynamically display information about what customers need to do to qualify for the coupon.
  * **Price Type:** Select the price type to determine the application condition related to pricing, such as Unit Price, Discount Price, or Retail Price.
  * **Application Type:** Select the application type to specify whether the coupon will be applied to all products or only to products without any pre-existing coupons.
* Click **Save and Continue** after filling all necessary fields.

### <mark style="color:red;">Coupon Action​</mark> <a href="#coupon-action" id="coupon-action"></a>

* This section is used to define the action of the coupon when customers meet the conditions.<br>

  <figure><img src="https://3333414532-files.gitbook.io/~/files/v0/b/gitbook-x-prod.appspot.com/o/spaces%2FIbwGN7KwvYi0iLbjtnXz%2Fuploads%2FTUDBrO7LLYGQol46MQ3Q%2Fimage.png?alt=media&amp;token=7dd4c8e3-1b0f-45a6-86ef-ac39b79cebde" alt=""><figcaption></figcaption></figure>
* Fill in the required fields, including:
  * **Select a Collection**: Select the collection to which the coupon should apply.
  * **Action Type:** Select the action type that aligns with the specific discount or offer you want to provide, such as **Price Discount, Cheapest Item Free, Percent Discount, Free Shipping,** and more.
  * **Price Type:** Specify the price type to decide whether the discount will be applied to the **Unit Price** or the **Discount Price**.
  * **Application Type:** Set the application type to determine whether the coupon can be used in conjunction with other coupons or campaigns.
* Depending on your selection, configure the specific details of the action.
* Click **Save and Continue** after filling all necessary fields.

## <mark style="color:red;">Step 3: Review and Approve​</mark> <a href="#step-3-review-and-approve" id="step-3-review-and-approve"></a>

* On the Summary page, review all the Coupon Information, Conditions, and Actions.
* If everything appears correct, click the Approve button to finalize the discount code creation process.<br>

  <figure><img src="https://3333414532-files.gitbook.io/~/files/v0/b/gitbook-x-prod.appspot.com/o/spaces%2FIbwGN7KwvYi0iLbjtnXz%2Fuploads%2F8OTY6Z30ESZuvwoQpEKW%2Fimage.png?alt=media&amp;token=70715750-d19a-4365-8bc1-a348e32bdaad" alt=""><figcaption></figcaption></figure>

## <mark style="color:red;">Step 4: Changing the Status of Coupons​</mark> <a href="#step-4-changing-the-status-of-coupons" id="step-4-changing-the-status-of-coupons"></a>

* Select the coupons you want to change the status of from the list.
* From the dropdown menu located at the top left of the list, click **Make Selected Active** if you want to activate the selected coupons, or click **Make Selected Passive** if you want to deactivate them.
* Click the **Apply** button.<br>

  <figure><img src="https://3333414532-files.gitbook.io/~/files/v0/b/gitbook-x-prod.appspot.com/o/spaces%2FIbwGN7KwvYi0iLbjtnXz%2Fuploads%2Fdg7twmntl7NA3A0qx78h%2Fimage.png?alt=media&amp;token=1bd60435-b262-4164-9d5a-a7669eb1f511" alt=""><figcaption></figcaption></figure>

## <mark style="color:red;">Step 5: Updating Coupons​</mark> <a href="#step-5-updating-coupons" id="step-5-updating-coupons"></a>

* To make updates, click on the row of an existing coupon in the list.
* You will be directed to the detail screen where you can make the necessary changes.<br>

  <figure><img src="https://3333414532-files.gitbook.io/~/files/v0/b/gitbook-x-prod.appspot.com/o/spaces%2FIbwGN7KwvYi0iLbjtnXz%2Fuploads%2FDujbR1URsaT5EKQbBr3K%2Fimage.png?alt=media&amp;token=563740a8-c5f5-4b4f-9083-d579c1ece364" alt=""><figcaption></figcaption></figure>


# How to Create and Manage Bulk Coupons in Omnitron?

This page will enable you to create bulk coupon codes according to the conditions you have set to achieve the campaign while managing them in several aspects.

## <mark style="color:red;">Step 1: Access to Omnitron​</mark> <a href="#step-1-access-to-omnitron" id="step-1-access-to-omnitron"></a>

* Access the Omnitron panel through your URL.
* Insert your granted *Username* and *Password*, and click the **Sign In** button.\
  ![](https://3333414532-files.gitbook.io/~/files/v0/b/gitbook-x-prod.appspot.com/o/spaces%2FIbwGN7KwvYi0iLbjtnXz%2Fuploads%2FQnfNjX72in5Qcy4LZzGH%2Fimage.png?alt=media\&token=7777dd02-19d8-44cd-af84-d258bc07ab2b)

## <mark style="color:red;">Step 2: Navigate to Bulk Coupons Page​</mark> <a href="#step-2-navigate-to-bulk-coupons-page" id="step-2-navigate-to-bulk-coupons-page"></a>

* From the sidebar, click through **Sales Channels > Marketing > Bulk Coupons.**<br>

  <figure><img src="https://3333414532-files.gitbook.io/~/files/v0/b/gitbook-x-prod.appspot.com/o/spaces%2FIbwGN7KwvYi0iLbjtnXz%2Fuploads%2FL4TOFkYF4zLLOORAW8CK%2Fimage.png?alt=media&amp;token=1f819331-1582-4f72-adef-2adcf0353739" alt=""><figcaption></figcaption></figure>

## <mark style="color:red;">Step 3: Creating a New Bulk Coupon​</mark> <a href="#step-3-creating-a-new-bulk-coupon" id="step-3-creating-a-new-bulk-coupon"></a>

* To create a new bulk coupon, click the **+ New Bulk Coupon** that is located in the upper-right corner.
* This feature will later break down to 4 + 1 main categories to fill out, respectively; Bulk Coupon Information, Bulk Coupon Condition, Bulk Coupon Action, Summary and Bulk Coupon section that will open after successfully reviewing and saving the summary.

  <figure><img src="https://3333414532-files.gitbook.io/~/files/v0/b/gitbook-x-prod.appspot.com/o/spaces%2FIbwGN7KwvYi0iLbjtnXz%2Fuploads%2F5CaxghAnERgXJ0lTjM9Y%2Fimage.png?alt=media&amp;token=e2b43117-f574-4043-931f-2136d2a8d385" alt=""><figcaption></figcaption></figure>

  <figure><img src="https://3333414532-files.gitbook.io/~/files/v0/b/gitbook-x-prod.appspot.com/o/spaces%2FIbwGN7KwvYi0iLbjtnXz%2Fuploads%2F0IviA5LGUrZV9o0pkoF3%2Fimage.png?alt=media&amp;token=6cd30996-72c5-4f69-9ff7-c9b19a833cc4" alt=""><figcaption></figcaption></figure>

### <mark style="color:red;">Bulk Coupon Information​</mark> <a href="#bulk-coupon-information" id="bulk-coupon-information"></a>

After selecting the local language, you will be taken to the "Bulk Coupon Information" section where you need to fill out the following fields:

* **Discount Name:** Enter a unique name for the coupon.
* **Discount Slug:** Define a name for the coupon in your ERP system.
* **Discount Message:** This is the message displayed to customers in the cart summary and search filters. Ensure that it's in the selected language.
* **Maximum Number of Applications (Per Customer):** Specify how many times this coupon can be applied for customers. Use "0" for unlimited use.
* **Maximum Number of Applications (Per Cart):** Specify how many times this coupon can be applied to the basket. Use "0" for unlimited use.
* **Priority:** Set the priority of this coupon compared to others. A lower numerical value gives higher priority. Negative values are allowed.
* **Start/End Date and Time:** Define the valid date and time for the coupon.
* **Status:** oggle the status to activate or deactivate the coupon.
* **Currency:** Choose the currency for the coupon.
* **Can be combined with other campaigns:** Decide if this coupon can be combined with other active campaigns or coupons.
* **Show on Product Detail:** Select whether the coupon name should be displayed on the product detail page.

After filling out the mandatory fields, click **Save and Continue**.

<figure><img src="https://3333414532-files.gitbook.io/~/files/v0/b/gitbook-x-prod.appspot.com/o/spaces%2FIbwGN7KwvYi0iLbjtnXz%2Fuploads%2FpbGLrIza1MpkmvULkSTY%2Fimage.png?alt=media&amp;token=694cc07b-9adf-451e-970e-15aaaed8ff23" alt=""><figcaption></figcaption></figure>

### <mark style="color:red;">Bulk Coupon Conditions​</mark> <a href="#bulk-coupon-condition" id="bulk-coupon-condition"></a>

In the "Bulk Coupon Conditions" section, define the conditions required for the coupon to be applied:

* **Select a Collection:** Select the collection to which the coupon should be applied.
* **Condition Type:** Select from options such as Total Amount, Total Number of Products, Payment Step Discount. Depending on your selection, set the specific conditions and criteria for the coupon.
* **Upper Limit:** After setting the condition along with criteria as **greater than**, set the upper limit to be applied to limit customer’s action.
* You can also define **Secondary conditions** to complex the target customer based on card types, installments, banks, payment types, minimum cart amount, email extensions, and more, with using the plus (+) button you will be able to add as many as secondary conditions.
* Configure the **User Warning Message** to encourage customers to meet the coupon conditions. Use placeholders like {remaining} to dynamically display information about what customers need to do to earn the coupon.
* Select the **Price Type** to determine the application condition regarding price, such as Unit Price, Discount Price, or Retail Price.
* Choose the **Application Type** to specify whether the coupon will be applied to all products or only to products without any applied coupons.

Once all conditions are set, click **Save and Continue**.

<figure><img src="https://3333414532-files.gitbook.io/~/files/v0/b/gitbook-x-prod.appspot.com/o/spaces%2FIbwGN7KwvYi0iLbjtnXz%2Fuploads%2FhU6EuvVqdn74MkiXhDu9%2Fimage.png?alt=media&amp;token=a33182b5-7539-4cfb-bbb8-427ab0426e86" alt=""><figcaption></figcaption></figure>

### <mark style="color:red;">Bulk Coupon Action​</mark> <a href="#bulk-coupon-action" id="bulk-coupon-action"></a>

In the "Bulk Coupon Action" section, define what action the customer will receive if they meet the coupon conditions:

* **Select a Collection:** Choose the collection for which the coupon is expected to be valid.
* Select the **Action Type** that corresponds to the type of discount or offer you want to provide, such as Price Discount, Cheapest Item Free, Percent Discount, Free Shipping, and more. Depending on your selection, configure the specific details of the action.
* Specify the **Price Type** to determine whether the discount will be applied to the Unit Price, Discount Price or Retail Price.
* Set the **Application Type** to determine whether the discount can be combined with other coupons or campaigns.

Once you've configured the bulk coupon action, click **Save and Continue**.

<figure><img src="https://3333414532-files.gitbook.io/~/files/v0/b/gitbook-x-prod.appspot.com/o/spaces%2FIbwGN7KwvYi0iLbjtnXz%2Fuploads%2FGbYxsCRAZ948ibVc6Ry5%2Fimage.png?alt=media&amp;token=631e748b-6a03-4047-bc83-0638285e2885" alt=""><figcaption></figcaption></figure>

#### Summary​ <a href="#summary" id="summary"></a>

The **Summary** section will allow you to review all the information you have entered for the coupon, including coupon details, conditions, and actions. At the bottom of the page, you can either click **Edit** to make changes or **Approve** to finalize the coupon creation process.

<figure><img src="https://3333414532-files.gitbook.io/~/files/v0/b/gitbook-x-prod.appspot.com/o/spaces%2FIbwGN7KwvYi0iLbjtnXz%2Fuploads%2Fb6biZxePGW21kViqibm9%2Fimage.png?alt=media&amp;token=225012ad-d797-48b1-89ad-4b7b14fa58b1" alt=""><figcaption></figcaption></figure>

### <mark style="color:red;">Bulk Coupon​</mark> <a href="#bulk-coupon" id="bulk-coupon"></a>

After successfully approving the summary section, once clicked to the **Bulk Coupon** step, 2 buttons will be available to create coupon codes, respectively; **+ Discount Code, + Bulk Discount Code** along with the page view for already created coupons codes for that specific campaign.

<figure><img src="https://3333414532-files.gitbook.io/~/files/v0/b/gitbook-x-prod.appspot.com/o/spaces%2FIbwGN7KwvYi0iLbjtnXz%2Fuploads%2FeTyogDCQZt5XRDYzfvhX%2Fimage.png?alt=media&amp;token=59da0721-2c49-40ff-aab4-d510331fff08" alt=""><figcaption></figcaption></figure>

### <mark style="color:red;">**Activate/Deactivate Discount Codes​**</mark>

From the **Discount Codes** section, you can select the check box as shown and apply **Active/Passive** in a bulk action.

<figure><img src="https://3333414532-files.gitbook.io/~/files/v0/b/gitbook-x-prod.appspot.com/o/spaces%2FIbwGN7KwvYi0iLbjtnXz%2Fuploads%2F3Dil8LGDoOSWHBtOIGmk%2Fimage.png?alt=media&amp;token=53b1b547-4c10-4159-ab15-507cbd48e63d" alt=""><figcaption></figcaption></figure>

### <mark style="color:red;">**Add Discount Code​**</mark>

From the **Add Discount Code** pop up, you can either type a manual code and click **Save** or you can click the green button to automatically generate one.

<figure><img src="https://3333414532-files.gitbook.io/~/files/v0/b/gitbook-x-prod.appspot.com/o/spaces%2FIbwGN7KwvYi0iLbjtnXz%2Fuploads%2FU8PrxySXmYwZBHVCwstJ%2Fimage.png?alt=media&amp;token=d5f2360f-5ad4-47f1-9b01-f74ba1defea0" alt=""><figcaption></figcaption></figure>

### <mark style="color:red;">**Add Bulk Discount Code​**</mark>

In the **Add Bulk Discount Code** pop u&#x70;**,** complete the following fields:

* **Number of Discount Codes:** Total number of codes that are expected to be generated.
* **Discount Code Prefix:** Common numbers or letters that are expected to be placed on the beginning of code, such as **Summer**12X162Y, **Summer**1948F6X.
* **Discount Code Length:** The expected character of the code excluding the **Prefix**, default value will be 8 when it is not filled out.
* **Discount Code Content:** Expected variation and combinations of the characters that are on the code; it can be selected as letters, numbers, the combination of both and/or created custom.

When the steps are looking right, click **Save** to generate.

<figure><img src="https://3333414532-files.gitbook.io/~/files/v0/b/gitbook-x-prod.appspot.com/o/spaces%2FIbwGN7KwvYi0iLbjtnXz%2Fuploads%2FcnPg3GvAaUDzjyJKWHoT%2Fimage.png?alt=media&amp;token=62232201-28cb-423c-b9f8-7446a97408b9" alt=""><figcaption></figcaption></figure>

## <mark style="color:red;">Step 4: Filtering Coupons​</mark> <a href="#step-4-filtering-coupons" id="step-4-filtering-coupons"></a>

Users can filter the coupons based on their characteristics such as coupon name, start date, and more. The selected filters will be displayed in the active filters row.

<figure><img src="https://3333414532-files.gitbook.io/~/files/v0/b/gitbook-x-prod.appspot.com/o/spaces%2FIbwGN7KwvYi0iLbjtnXz%2Fuploads%2F9PGzHICEuEbqMzUe8kp6%2Fimage.png?alt=media&amp;token=b1d219e7-655a-459e-a8f1-f89bd3961fac" alt=""><figcaption></figcaption></figure>


# How to Create and Manage Discount Codes in Omnitron?

This tutorial provides step-by-step instructions for creating and managing discount codes in Omnitron.

## <mark style="color:red;">Step 1: Navigate to Discount Codes Page​</mark> <a href="#step-1-navigate-to-discount-codes-page" id="step-1-navigate-to-discount-codes-page"></a>

* Navigate to the Omnitorn platform and log into your account.
* Follow the **Sales Channels** > **Marketing** sidebar and click the **Discount Codes** page.<br>

  <figure><img src="https://3333414532-files.gitbook.io/~/files/v0/b/gitbook-x-prod.appspot.com/o/spaces%2FIbwGN7KwvYi0iLbjtnXz%2Fuploads%2F7TYXBNZekjkgbt3PU7Ml%2Fimage.png?alt=media&amp;token=48ee223f-f027-49de-9400-e50af7de5e46" alt=""><figcaption></figcaption></figure>
* On the Discount Codes page, the filter panel and the list of existing discount codes are displayed.
* You can filter the discount codes based on their characteristics such as Discount Name, Discount Type, and more. The selected filters are displayed in the active filters row.

## <mark style="color:red;">Step 2: Creating a New Discount Code​</mark> <a href="#step-2-creating-a-new-discount-code" id="step-2-creating-a-new-discount-code"></a>

* To create a new discount code, start by selecting a language from the available options. This language preference will determine the language of the discount and user warning messages.
* Then, click the **+ New Discount Code** button located in the upper-right corner.<br>

  <figure><img src="https://3333414532-files.gitbook.io/~/files/v0/b/gitbook-x-prod.appspot.com/o/spaces%2FIbwGN7KwvYi0iLbjtnXz%2Fuploads%2FdbVo5YTxgUpPMADQ4Hv0%2Fimage.png?alt=media&amp;token=706918fa-463e-47f0-b7b5-49a410eaad3c" alt=""><figcaption></figcaption></figure>

### <mark style="color:red;">Discount Code Information​</mark> <a href="#discount-code-information" id="discount-code-information"></a>

* This section is used to define the general information of the discount code.<br>

  <figure><img src="https://3333414532-files.gitbook.io/~/files/v0/b/gitbook-x-prod.appspot.com/o/spaces%2FIbwGN7KwvYi0iLbjtnXz%2Fuploads%2FbUWjobB9BKsCvIGOFY1j%2Fimage.png?alt=media&amp;token=ef327bd4-f0b8-4ffd-afd4-8964529b7b31" alt=""><figcaption></figcaption></figure>
* Fill in the required fields, including:
  * **Discount Name:** The name of the discount code.
  * **Discount Slug:** The unique name given to a discount code in the company's ERP system.
  * **Discount Code:** Enter the code to offer customers. You have the option to generate a new discount code by clicking the **+ New Discount Code** button or enter a custom discount code.
  * **Discount Message:** This message is shown to customers in the cart summary and search filters.
  * **Maximum Number of Applications (Per Customer):** Specify the maximum number of times each customer can apply the discount code. Use "0" for unlimited uses.
  * **Maximum Number of Applications (Per Cart):** Set a limit on how many times the code can be applied to the same cart.
  * **User:** Choose which customers are eligible for the discount code.
  * **Start/End Date and Time:** Define the valid date and time for the discount code.
  * **Status:** Toggle the status to activate or deactivate the discount code.
  * **Priority:** Set the priority of the discount code in comparison to others. A lower value indicates higher priority, and negative values are allowed.
  * **Currency:** Select the currency for the discount.
  * **Can be combined with other discount-codes:** Decide whether the discount can be combined with other active discount-codes or discounts.
* Click **Save and Continue** after filling all necessary fields.

### <mark style="color:red;">Discount Conditions​</mark> <a href="#discount-conditions" id="discount-conditions"></a>

* This section is used to define the conditions for the application of the discount code.<br>

  <figure><img src="https://3333414532-files.gitbook.io/~/files/v0/b/gitbook-x-prod.appspot.com/o/spaces%2FIbwGN7KwvYi0iLbjtnXz%2Fuploads%2Flcw2u62nGAJZoYunQlyE%2Fimage.png?alt=media&amp;token=10a59f3b-5eb7-428c-9c6b-fbe172561272" alt=""><figcaption></figcaption></figure>
* Fill in the required fields, including:
  * **Select a Collection:** Select the collection to which the discount code should apply.
  * **Condition Type:** Choose the primary condition type, such as **Total Amount, Total Number of Products,** or **Payment Step Discount**, and define specific conditions based on your selection.
    * (You can also define secondary conditions based on card types, installments, banks, payment types, minimum cart amount, email extensions, and more.)
  * **User Warning Message:** Customize the user warning message to encourage customers to meet the discount code conditions. Use placeholders like {remaining} to dynamically display information about what customers need to do to qualify for the discount code.
  * **Price Type:** Select the Price Type to determine the application condition related to pricing, such as Unit Price, Discount Price, or Retail Price.
  * **Application Type:** Select the Application Type to specify whether the discount code will be applied to all products or only to products without any pre-existing discounts.
* Click **Save and Continue** after filling all necessary fields.

### <mark style="color:red;">Discount Action​</mark> <a href="#discount-action" id="discount-action"></a>

* This section is used to define the action of the discount code when customers meet the conditions.<br>

  <figure><img src="https://3333414532-files.gitbook.io/~/files/v0/b/gitbook-x-prod.appspot.com/o/spaces%2FIbwGN7KwvYi0iLbjtnXz%2Fuploads%2FKRXsAnFLb6p0RKIjL3o2%2Fimage.png?alt=media&amp;token=477bae88-c2af-4d24-9f30-84f26fd685b5" alt=""><figcaption></figcaption></figure>
* Fill in the required fields, including:
  * **Select a Collection**: Select the collection to which the discount code should apply.
  * **Action Type:** Select the action type that aligns with the specific discount or offer you want to provide, such as **Price Discount, Cheapest Item Free, Percent Discount, Free Shipping,** and more.
  * **Price Type:** Specify the price type to decide whether the discount will be applied to the **Unit Price** or the **Discount Price**.
  * **Application Type:** Set the application type to determine whether the discount can be used in conjunction with other coupons or discount-codes.
* Depending on your selection, configure the specific details of the action.
* Click **Save and Continue** after filling all necessary fields.

## <mark style="color:red;">Step 3: Review and Approve​</mark> <a href="#step-3-review-and-approve" id="step-3-review-and-approve"></a>

* On the Summary page, review all the Discount Code Information, Conditions, and Actions.
* If everything appears correct, click the Approve button to finalize the discount code creation process.<br>

  <figure><img src="https://3333414532-files.gitbook.io/~/files/v0/b/gitbook-x-prod.appspot.com/o/spaces%2FIbwGN7KwvYi0iLbjtnXz%2Fuploads%2FR78rCHGJU2g9OeXiZMv3%2Fimage.png?alt=media&amp;token=d40a5840-8fa0-4ef4-9482-8a88a6e7fb30" alt=""><figcaption></figcaption></figure>

## <mark style="color:red;">Step 4: Changing the Status of Discount Codes​</mark> <a href="#step-4-changing-the-status-of-discount-codes" id="step-4-changing-the-status-of-discount-codes"></a>

* Select the discount codes you want to change the status of from the list.
* From the dropdown menu located at the top left of the list, click **Make Selected Active** if you want to activate the selected discount codes, or click **Make Selected Passive** if you want to deactivate them.
* Click the **Apply** button.<br>

  <figure><img src="https://3333414532-files.gitbook.io/~/files/v0/b/gitbook-x-prod.appspot.com/o/spaces%2FIbwGN7KwvYi0iLbjtnXz%2Fuploads%2FNviDR281RiC1ZmYXLP02%2Fimage.png?alt=media&amp;token=f7771873-532b-4538-98f6-42f85dcdec29" alt=""><figcaption></figcaption></figure>

## <mark style="color:red;">Step 5: Updating Discount Codes​</mark> <a href="#step-5-updating-discount-codes" id="step-5-updating-discount-codes"></a>

* To make updates, click on the row of an existing discount code in the list.
* You will be directed to the detail screen where you can make the necessary changes.


# How to Configure SEO Settings in Omnitron?

Search Engine Optimization (SEO) is crucial for improving the website's visibility in search engines. This tutorial explains the process of configuring SEO settings for your website and provides step-by-step instructions on how to create new settings, filter settings and edit/delete existing settings.

## <mark style="color:red;">Step 1: Navigate to SEO Settings Page​</mark> <a href="#step-1-navigate-to-seo-settings-page" id="step-1-navigate-to-seo-settings-page"></a>

* Follow the **Sales Channels >** **Marketing** sidebar and click the **SEO Settings** page.<br>

  <figure><img src="https://3333414532-files.gitbook.io/~/files/v0/b/gitbook-x-prod.appspot.com/o/spaces%2FIbwGN7KwvYi0iLbjtnXz%2Fuploads%2FDfgtkZbtevEDiwbELru7%2Fimage.png?alt=media&amp;token=4408e409-4cb5-4970-90ae-0b6091cffdac" alt=""><figcaption></figcaption></figure>

## <mark style="color:red;">Step 2: Filtering and Editing SEO Settings for a Page​</mark> <a href="#step-2--filtering-and-editing-seo-settings-for-a-page" id="step-2--filtering-and-editing-seo-settings-for-a-page"></a>

* On the SEO Settings page, the filter panel and the list of existing SEO settings are displayed.
* You can filter pages based on several criteria, including Page URL, Meta Title, Meta Description, First and Last Creation Dates, and First and Last Updated Dates. Use these filters to quickly locate the page you want to work on.
* To edit the SEO settings for a specific page, click on the row containing the page. This will take you to the SEO Settings detail screen for that page.<br>

  <figure><img src="https://3333414532-files.gitbook.io/~/files/v0/b/gitbook-x-prod.appspot.com/o/spaces%2FIbwGN7KwvYi0iLbjtnXz%2Fuploads%2FFxeX3mxw7551zB8yGZwr%2Fimage.png?alt=media&amp;token=4379acaa-fdd0-4a5a-8361-74c236f9e0bc" alt=""><figcaption></figcaption></figure>

## <mark style="color:red;">Step 3: Creating a New SEO Setting​</mark> <a href="#step-3-creating-a-new-seo-setting" id="step-3-creating-a-new-seo-setting"></a>

* To create a SEO settings for a new page, click the **+ New SEO Setting** button in the upper-right corner of the SEO Settings page.<br>

  <figure><img src="https://3333414532-files.gitbook.io/~/files/v0/b/gitbook-x-prod.appspot.com/o/spaces%2FIbwGN7KwvYi0iLbjtnXz%2Fuploads%2FTEGxYHMD3ziC5udYmmGh%2Fimage.png?alt=media&amp;token=9b3a9314-fc2e-41a4-adf4-e5a407a90b75" alt=""><figcaption></figcaption></figure>
* On this page, fields are dynamically generated based on the selected shop and its defined schemas.
* The form will be pre-filled with information, including Title, Description, Keywords, and Social Media Tags, based on the configured page URL. You can configure these settings manually or programmatically, with the exception of Meta Title and Meta Description rules.

  <figure><img src="https://3333414532-files.gitbook.io/~/files/v0/b/gitbook-x-prod.appspot.com/o/spaces%2FIbwGN7KwvYi0iLbjtnXz%2Fuploads%2FfBbTc0WbImqTFPVeaXA7%2Fimage.png?alt=media&amp;token=00437b11-a68e-4eb5-bbff-871a17e15ea0" alt=""><figcaption></figcaption></figure>

  The fields on this form:

  * **HTML Tag:**
    * **Page URL:** Enter the URL of the page for which you want to set SEO settings.
    * **Meta Title:** Specify the title to be displayed in search engine results.
    * **Meta Description:** Provide a concise description for the page.
    * **Meta Keywords:** Add relevant keywords for the page.
  * **Twitter Media Tag:**
    * Configure the fields required for Twitter.
  * **Google+ Media Tag:**
    * Set the fields required for Google+.
  * **Facebook Media Tag:**
    * Define the fields required for Facebook.
  * **CSS Selector Class:**
    * This field can typically be left empty unless you need to specify a CSS class for styling purposes.

## <mark style="color:red;">Step 4: Adding Bulk SEO Settings​</mark> <a href="#step-4-adding-bulk-seo-settings" id="step-4-adding-bulk-seo-settings"></a>

* On the SEO Settings page, you have the option to use the **Add Bulk SEO Settings** button located in the upper-right corner. This feature allows you to add multiple SEO settings at once by uploading a file in XLS or CSV format.
* Ensure that your file includes fields for Title, URL, Description, Keywords, and Attributes for Twitter titles.<br>

  <figure><img src="https://3333414532-files.gitbook.io/~/files/v0/b/gitbook-x-prod.appspot.com/o/spaces%2FIbwGN7KwvYi0iLbjtnXz%2Fuploads%2FRxEeRDx8EZzUz0jSwxGg%2Fimage.png?alt=media&amp;token=d1d24cf9-7379-4cc7-96aa-2391b854b1e8" alt=""><figcaption></figcaption></figure>
* Additionally, you can download a template for the file you will upload by clicking on the **Download Add Bulk SEO Setting Template File** button at the bottom of the page and view the necessary fields.<br>

  <figure><img src="https://3333414532-files.gitbook.io/~/files/v0/b/gitbook-x-prod.appspot.com/o/spaces%2FIbwGN7KwvYi0iLbjtnXz%2Fuploads%2FctWMuiKsNqJRsIBHRX0z%2Fimage.png?alt=media&amp;token=d5f95cba-1a90-4539-a426-bec6e8a1e450" alt=""><figcaption></figcaption></figure>

## <mark style="color:red;">Step 5: Deleting SEO Settings​</mark> <a href="#step-5-deleting-seo-settings" id="step-5-deleting-seo-settings"></a>

* Select the desired SEO setting to be deleted from the list. Multiple SEO settings can be selected.
* From the dropdown menu at the top of the list, select the **Delete Selected Items** option, then click the **Apply** button.<br>

  <figure><img src="https://3333414532-files.gitbook.io/~/files/v0/b/gitbook-x-prod.appspot.com/o/spaces%2FIbwGN7KwvYi0iLbjtnXz%2Fuploads%2FSUjgWuvKIfA994HogMho%2Fimage.png?alt=media&amp;token=93757ad9-0898-4bdb-a2b7-350a8d59e692" alt=""><figcaption></figcaption></figure>


# How to Configure URL Redirects and Settings in Omnitron?​

This screen will enable you to 301 redirect the old URLs to the desired target URL. Please see further instructions to achieve this goal and be cautious when intended to change slugs due to its SEO important nature.

## <mark style="color:red;">Step 1: Access to Omnitron​</mark> <a href="#step-1-access-to-omnitron" id="step-1-access-to-omnitron"></a>

* Access the Omnitron panel through your URL.
* Insert your granted *Username* and *Password*, and click the **Sign In** button.\
  ![](https://3333414532-files.gitbook.io/~/files/v0/b/gitbook-x-prod.appspot.com/o/spaces%2FIbwGN7KwvYi0iLbjtnXz%2Fuploads%2FQnfNjX72in5Qcy4LZzGH%2Fimage.png?alt=media\&token=7777dd02-19d8-44cd-af84-d258bc07ab2b)

## <mark style="color:red;">Step 2: Navigate to URL Redirections Page​</mark> <a href="#step-2-navigate-to-url-redirections-page" id="step-2-navigate-to-url-redirections-page"></a>

* Follow through the **Sales Channels > Marketing** sidebar and click the **URL Redirects** page.<br>

  <figure><img src="https://3333414532-files.gitbook.io/~/files/v0/b/gitbook-x-prod.appspot.com/o/spaces%2FIbwGN7KwvYi0iLbjtnXz%2Fuploads%2FSrOtpZZVcAtQuyPO5VtL%2Fimage.png?alt=media&amp;token=673be4fe-4897-4593-b055-132258108472" alt=""><figcaption></figcaption></figure>
* Once you click the URL Redirects page, you will find a filtering area to help you sort and find specific old and new URLs for redirection.
* There is a redirection list that displays existing URL redirects. Clicking a row in this list will take you to the Edit URL Redirection page, where you can modify the settings of a particular redirection.

  <figure><img src="https://3333414532-files.gitbook.io/~/files/v0/b/gitbook-x-prod.appspot.com/o/spaces%2FIbwGN7KwvYi0iLbjtnXz%2Fuploads%2FN2hvxIT1T0XthSxy68CZ%2Fimage.png?alt=media&amp;token=e19ce6ae-d79a-437a-b58b-7fa111ad2e24" alt=""><figcaption></figcaption></figure>

  <figure><img src="https://3333414532-files.gitbook.io/~/files/v0/b/gitbook-x-prod.appspot.com/o/spaces%2FIbwGN7KwvYi0iLbjtnXz%2Fuploads%2FSfNzb2ytiNXITAUlugoy%2Fimage.png?alt=media&amp;token=e77f01dc-bfdb-449b-ab52-297c0887939e" alt=""><figcaption></figcaption></figure>

## <mark style="color:red;">Step 3: Creating a New Redirection​</mark> <a href="#step-3-creating-a-new-redirection" id="step-3-creating-a-new-redirection"></a>

* To create a new URL redirection, click the **+ New Redirect** button, located in the upper-right corner.
* You will be directed to a form where you can define the redirection settings.<br>

  <figure><img src="https://3333414532-files.gitbook.io/~/files/v0/b/gitbook-x-prod.appspot.com/o/spaces%2FIbwGN7KwvYi0iLbjtnXz%2Fuploads%2FSRuniV256X7bgOlTbkt6%2Fimage.png?alt=media&amp;token=623b7104-b71a-4748-a3e8-4f6f4ae86585" alt=""><figcaption></figcaption></figure>

  <figure><img src="https://3333414532-files.gitbook.io/~/files/v0/b/gitbook-x-prod.appspot.com/o/spaces%2FIbwGN7KwvYi0iLbjtnXz%2Fuploads%2Fv6LTZHAD6xDYjOoaB63q%2Fimage.png?alt=media&amp;token=e81d4267-001f-40bc-918d-e6bbdc66b4ba" alt=""><figcaption></figcaption></figure>

### <mark style="color:red;">**Add/Edit URL Redirection​**</mark>

Fill out following fields with the appropriate URLs you desire to redirect. This is useful for managing broken links or changing URL structures.

* **Old URL:** Enter the old URL that is no longer in use. This is the URL you want to redirect from.
* **New URL:** Enter the URL to which users will be redirected when they click on the old URL. This is the destination URL.

Click the **REDIRECT** button after filling the fields.

**Add/Update URL Redirection Bulk (Optional)​**

On the URL Redirects page, you have the option to perform Bulk URL Redirections, which can be useful when you need to redirect multiple URLs at once.

* To add or update the URL redirection settings in bulk, click **+ New URL Redirect** button, which may have a section specifically designed for bulk actions.
* Follow the on-screen instructions to redirect URLs in bulk with a file.

## <mark style="color:red;">How to Configure URL Settings?​</mark> <a href="#how-to-configure-url-settings" id="how-to-configure-url-settings"></a>

URL Settings are crucial for maintaining website structure and SEO. Often used for products and categories along with the rest of the single pages that adds to the link structure of the e-commerce website, ensuring a standardized URL structure.

URL Settings are divided into 3 main categories under the roof of URL Settings, respectively, **URL Settings, Product URL Settings, Category URL Settings.**

{% hint style="info" %}
Product & Category URL settings are automatically created by the system with considering their SEO structure and should not be altered without proper guidance.
{% endhint %}

<figure><img src="https://3333414532-files.gitbook.io/~/files/v0/b/gitbook-x-prod.appspot.com/o/spaces%2FIbwGN7KwvYi0iLbjtnXz%2Fuploads%2FsqRyjx9GDUs5q5NbCo4Z%2Fimage.png?alt=media&amp;token=0f8e2c4b-095d-47f2-bd25-41a317f38694" alt=""><figcaption></figcaption></figure>

### <mark style="color:red;">Step 1: URL Settings​</mark> <a href="#step-1-url-settings" id="step-1-url-settings"></a>

Follow through the **Sales Channels > Marketing** sidebar and click the **URL Settings** page.

* Insert the **Language** of the link setting desired to be done, this will clarify which language your root domain targeted, as in /en, /ar extensions.
* Insert the **Old URL** to be redirected which is often assigned by the system but does not match with the URL structure of your website, as in the example /category/643.
* Insert the **New URL** that matches with your content and URL structure for example /bags/.

This section can be used as URL redirections as we studied above since its 301 redirection nature and it will store all your redirected links from both screens; URL Settings and URL Redirections.

<figure><img src="https://3333414532-files.gitbook.io/~/files/v0/b/gitbook-x-prod.appspot.com/o/spaces%2FIbwGN7KwvYi0iLbjtnXz%2Fuploads%2FCcF6uxmpddv5HkG5l7AH%2Fimage.png?alt=media&amp;token=5002eaf9-24ff-4ea5-aaa3-444215c5862e" alt=""><figcaption></figcaption></figure>

### <mark style="color:red;">Step 2: Product URL Settings​</mark> <a href="#step-2-product-url-settings" id="step-2-product-url-settings"></a>

Product URL Settings are created to standardize the URL structure of single products pages that exist on your e-commerce site.

For instance, when a new product is registered on your website, the Old URL is automatically generated. When the product is moved to a specific category, a unique URL is generated for the product and entered in the New URL field.

Often used with the combination of (domain)/(category) - **Product Name-Base Code.**

* While domain is stable and not changeable, category will be dependent on the category tree where you desired your product to be stored, this will help you build a healthy breadcrumb strategy, and product name/base code combination will be coming from the key section of **Product Url Settings** and can be combined with more keys as desired.

{% hint style="info" %}
See more in the following feature, Category URL settings to see how category links are generated.
{% endhint %}

<figure><img src="https://3333414532-files.gitbook.io/~/files/v0/b/gitbook-x-prod.appspot.com/o/spaces%2FIbwGN7KwvYi0iLbjtnXz%2Fuploads%2FWIwy273XFZ6SqTuqUr9V%2Fimage.png?alt=media&amp;token=3602f314-e87c-4377-8f40-95dd56865056" alt=""><figcaption></figcaption></figure>

### <mark style="color:red;">Step 3: Category URL Settings​</mark> <a href="#step-3-category-url-settings" id="step-3-category-url-settings"></a>

Category URL Settings are designed to standardize the URL structure of categories displayed on your e-commerce website.

Whenever you create or modify a category, these settings ensure that the URL structure remains consistent and user-friendly.

It is often used with the keys of parent-name, which refers to the parent category in the category tree, in this example let's say ‘women’ and name will be referred as the category name, in this example we can call it ‘shoes’ to be explained more clearly. But can be enriched as desired by consulting your authorized person who is assigned to your e-commerce brand.

<figure><img src="https://3333414532-files.gitbook.io/~/files/v0/b/gitbook-x-prod.appspot.com/o/spaces%2FIbwGN7KwvYi0iLbjtnXz%2Fuploads%2Fu3jlq0k3RabLKJ38hSEG%2Fimage.png?alt=media&amp;token=1469ffe4-46f1-437b-819d-871917e8be64" alt=""><figcaption></figcaption></figure>


# How to Manage Promotions in Omnitron?

## <mark style="color:red;">Campaigns</mark>​ <a href="#campaigns" id="campaigns"></a>

* If the campaign to be created will not be applied to all products of the brand, a collection must first be created for the campaign.
* Steps to Follow for Creating Collections: **Omnitron > Products and Catalogs > Collections**, followed by clicking on *Add New Collection* and filling in the fields below.<br>

  <figure><img src="https://3333414532-files.gitbook.io/~/files/v0/b/gitbook-x-prod.appspot.com/o/spaces%2FIbwGN7KwvYi0iLbjtnXz%2Fuploads%2FqKmbMPZUAaCAuWQnNCFe%2Fimage.png?alt=media&amp;token=923030f5-760d-4c44-a0ce-2e363cd8bfa5" alt=""><figcaption></figcaption></figure>

**Collection Name:** The name given to the created collection.

**Catalog:** The sales channel for the created collection is selected.

**Collection Type:** Static or dynamic collection is selected. In *Static Collection,* the products are added to the collection manually, whereas in *Dynamic Collection*, a product list is prepared according to certain filters.

<figure><img src="https://3333414532-files.gitbook.io/~/files/v0/b/gitbook-x-prod.appspot.com/o/spaces%2FIbwGN7KwvYi0iLbjtnXz%2Fuploads%2FnOFpUaN135yGIZCy2RRo%2Fimage.png?alt=media&amp;token=6fa0a7e1-07ae-41f6-91b5-6590ed2e25d4" alt=""><figcaption></figcaption></figure>

**Status:** *Active/Passive* status of the collection is determined.

### <mark style="color:red;">Creating a Campaign​</mark> <a href="#creating-a-campaign" id="creating-a-campaign"></a>

* Steps to Follow: **Omnitron > Sales Channels > Marketing > Campaigns**.
* This is followed by clicking on *Add New Campaign*.
* Each campaign is created exclusively for the relevant **Sales Channel**.

#### <mark style="color:red;">**Campaign Information​**</mark>

<figure><img src="https://3333414532-files.gitbook.io/~/files/v0/b/gitbook-x-prod.appspot.com/o/spaces%2FIbwGN7KwvYi0iLbjtnXz%2Fuploads%2FGMygyeqROKTYKm6n0Uw8%2Fimage.png?alt=media&amp;token=dfcb267b-5661-4c2f-a27f-7abc050c8876" alt=""><figcaption></figcaption></figure>

| Title                                            | Description                                                                                                                                           | Example                                                                                                                                                                                                                                       |
| ------------------------------------------------ | ----------------------------------------------------------------------------------------------------------------------------------------------------- | --------------------------------------------------------------------------------------------------------------------------------------------------------------------------------------------------------------------------------------------- |
| **Campaign Name**                                | The name given to the campaign                                                                                                                        |                                                                                                                                                                                                                                               |
| **Campaign Slug**                                | Campaign Slug                                                                                                                                         |                                                                                                                                                                                                                                               |
| **Campaign Message**                             | The message that will appear in the filter and/or basket when the campaign is applied                                                                 | *“You have won X TRY!”, “You have X TRY more to spend”* etc.                                                                                                                                                                                  |
| **Maximum Number of Application (per Basket)**   | Information on how many times a campaign will be used in a basket                                                                                     | In a case where the Maximum Number of Application is 1, when there is a 50% discount campaign if you buy three products, only 50% discount is provided both for the person who buys three products, and for the person who buys six products. |
| **Maximum Number of Application (per Customer)** | Information on how much a customer can benefit from a campaign.                                                                                       |                                                                                                                                                                                                                                               |
| **Priority**                                     | The field to determine which campaign will be applied first in case there is more than one campaign for a product.                                    | Example Campaign: *Discount of 10% for the first product, 20% for the second product, 30% for the third product*; in such case, the order of priority for three different campaigns must be provided in the correct order.                    |
| **Start Date**                                   | Campaign Start Date                                                                                                                                   |                                                                                                                                                                                                                                               |
| **End Date**                                     | Campaign End Date                                                                                                                                     |                                                                                                                                                                                                                                               |
| **Status**                                       | Campaign Activity Status                                                                                                                              | `Pasive` and `Active` options are available.                                                                                                                                                                                                  |
| **Can be combined with other campaigns**         | The checkbox that will decide whether the relevant product will benefit from other campaigns in case a product is included in more than one campaign. |                                                                                                                                                                                                                                               |
| **Show on Product Detail**                       | The checkbox that decides whether to show the relevant campaign on the Product Detail Page.                                                           |                                                                                                                                                                                                                                               |
| **Show on Product List**                         | The checkbox that decides whether to show the relevant campaign in the Product List.                                                                  |                                                                                                                                                                                                                                               |

#### <mark style="color:red;">**Campaign Conditions​**</mark>

<figure><img src="https://3333414532-files.gitbook.io/~/files/v0/b/gitbook-x-prod.appspot.com/o/spaces%2FIbwGN7KwvYi0iLbjtnXz%2Fuploads%2FRPlJKjQZl8qrX51ynw4h%2Fimage.png?alt=media&amp;token=395a5bf3-df6c-4164-a7ed-29a9199911d8" alt=""><figcaption></figcaption></figure>

For the created collection, the campaign conditions may be entered through **Total Amount, Total Quantity, Payment Step Discount** subject to the **Condition Type** restrictions below.

<figure><img src="https://3333414532-files.gitbook.io/~/files/v0/b/gitbook-x-prod.appspot.com/o/spaces%2FIbwGN7KwvYi0iLbjtnXz%2Fuploads%2Fuh0smOijUOLZYJ6SAos4%2Fimage.png?alt=media&amp;token=647df640-712c-42b5-b473-4c5511d1eb53" alt=""><figcaption></figcaption></figure>

**Total Amount:** The campaign is valid for orders that match the determined total amount and the upper amount limit.

**Total Quantity:** The campaign is valid for orders that comply with the determined total quantity and upper quantity limit.

**Payment Step Discount:** The campaign is valid for orders that meet the following conditions in the Payment Step.

**Condition Types:**

<figure><img src="https://3333414532-files.gitbook.io/~/files/v0/b/gitbook-x-prod.appspot.com/o/spaces%2FIbwGN7KwvYi0iLbjtnXz%2Fuploads%2FtitfU1TTbS6SIJ4mrl7V%2Fimage.png?alt=media&amp;token=55e3620e-b9a1-4a06-952e-78be81c9427d" alt=""><figcaption></figcaption></figure>

| Condition Types                                | Explanations                                                                    | Can be Applied To                                     |
| ---------------------------------------------- | ------------------------------------------------------------------------------- | ----------------------------------------------------- |
| **By Card Type**                               | By Card Type in Omnitron                                                        | *Payment Step Discount*                               |
| **According to Installments**                  | According to the Installments to be Applied to the Products                     | *Payment Step Discount*                               |
| **By Bank**                                    | By All Banks Coming By Default After Omnitron Installation                      | *Payment Step Discount*                               |
| **By Payment Type**                            | By Payment Types such as Credit Card, Money Order, Pay-On-Delivery etc.         | *Payment Step Discount*                               |
| **Minimum Basket Amount**                      |                                                                                 | *Total Amount, Total Quantity, Payment Step Discount* |
| **e-mail Extension**                           | By Group/Company E-Mail Addresses                                               | *Total Amount, Total Quantity, Payment Step Discount* |
| **e-mail**                                     | By Specific E-Mail Address                                                      | *Total Amount, Total Quantity, Payment Step Discount* |
| **Bin Number**                                 | By the First Six Digits of the Credit Card                                      | *Payment Step Discount*                               |
| **User Feature**                               | According to the Specific Features of the User Signed Up on the Brand Shop Page | *Total Amount, Total Quantity, Payment Step Discount* |
| **Minimum Number of Products Added to Basket** |                                                                                 | *Total Amount, Total Quantity, Payment Step Discount* |
| **Shopping Platform**                          | By Sales Channel                                                                | *Total Amount, Total Quantity, Payment Step Discount* |
| **By User Membership Date**                    |                                                                                 | *Total Amount, Total Quantity, Payment Step Discount* |

**User Warning Message:** The warning message that will encourage the user to qualify for the discount, ”{remaining}” shows the information about the remaining amount for the user to qualify for the campaign. \* For instance, *“Add {remaining} more items to your basket and get free shipping.”, “Add {remaining} more items to your basket and get the third one for free.”*

**Price Type:** Unit/Discount/Retail price options are available. The campaign can be based on these price types.

<figure><img src="https://3333414532-files.gitbook.io/~/files/v0/b/gitbook-x-prod.appspot.com/o/spaces%2FIbwGN7KwvYi0iLbjtnXz%2Fuploads%2FW7sWUz32Slb6eWYQfSiR%2Fimage.png?alt=media&amp;token=2fd0dd58-772a-499a-bd2f-2a2722b4c56c" alt=""><figcaption></figcaption></figure>

**Application Type:** Application type of the campaign is selected from the options below.

<figure><img src="https://3333414532-files.gitbook.io/~/files/v0/b/gitbook-x-prod.appspot.com/o/spaces%2FIbwGN7KwvYi0iLbjtnXz%2Fuploads%2FxsF9lVqGiF59XO2l8e0W%2Fimage.png?alt=media&amp;token=e8c5fbf4-422d-4f3c-a7a3-2d4b6439d18b" alt=""><figcaption></figcaption></figure>

\- **Campaign products can be included in other campaigns:** If a product is in more than one collection/campaign, the user can benefit from both campaigns.

\- **Products affected by the campaign cannot be included in other campaigns.**

\- **The campaign is implemented independently from other campaigns:** Even if a product is in more than one campaign, the user may only benefit from this campaign. It does not matter if other campaigns are more advantageous or not.

#### <mark style="color:red;">**Campaign Action​**</mark>

<figure><img src="https://3333414532-files.gitbook.io/~/files/v0/b/gitbook-x-prod.appspot.com/o/spaces%2FIbwGN7KwvYi0iLbjtnXz%2Fuploads%2FwYsSHH84XuFXPMDMVtOf%2Fimage.png?alt=media&amp;token=cc4cfa14-b7d8-4e31-990e-6d70f2f5455b" alt=""><figcaption></figcaption></figure>

**Select Collection:** A collection different than the collection on the Campaign Conditions page can be selected. The goal is to provide discounts for different collections when different products are purchased. For instance, offering a discount for *ski boots* with the purchase of a *ski jacket*.

**Action Type:**

<figure><img src="https://3333414532-files.gitbook.io/~/files/v0/b/gitbook-x-prod.appspot.com/o/spaces%2FIbwGN7KwvYi0iLbjtnXz%2Fuploads%2FLG681pRZU7uh1Mnn4VQE%2Fimage.png?alt=media&amp;token=31420775-510e-4760-9e9e-5e09ef3913c6" alt=""><figcaption></figcaption></figure>

| Action Type            | Definition                                                                                                                                                                                                                                                                                                                                                                                                                                                                        | Example                                                                                                                                                                                                                                                                                                                                              |
| ---------------------- | --------------------------------------------------------------------------------------------------------------------------------------------------------------------------------------------------------------------------------------------------------------------------------------------------------------------------------------------------------------------------------------------------------------------------------------------------------------------------------- | ---------------------------------------------------------------------------------------------------------------------------------------------------------------------------------------------------------------------------------------------------------------------------------------------------------------------------------------------------- |
| **Price Discount**     | The products under the selected collection that meet the campaign conditions are given a discount equal to the **Discounted Price** value according to **Price Type and Application Type**.                                                                                                                                                                                                                                                                                       |                                                                                                                                                                                                                                                                                                                                                      |
| **Cheapest Item Free** | One of the *Percent Discount/ Price Discount/ Fixed Price/ Fixed Total Price* campaigns may be applied with the *Distributing to Products that Meet the Terms of Discount* option depending on the *Gradual Discount/ Discount for the Cheapest Product/ Discount to the Most Expensive Product* options for the products under the selected collection that meet the campaign conditions according to the **Price Type, Application Type and Number of Products to be Applied**. | **“Buy 6, Pay 4" Campaign:** **Campaign Conditions** - *“Total Quantity”, Total Quantity = 6*, **Campaign Actions** - *Action Type = Cheapest Item Free, Percent Discount = 100, Number of Products to be Applied = 2*. Depending on the *Application Type*, the relevant campaign can be used in every six products. (Buy 12 Pay 8, Buy 18 Pay 12…) |
| **Percent Discount**   | The products under the selected collection that meet the campaign conditions are given a discount equal to the **Percent Discount** value according to **Price Type and Application Type**.                                                                                                                                                                                                                                                                                       |                                                                                                                                                                                                                                                                                                                                                      |
| **Free Shipping**      | The products under the selected collection that meet the campaign conditions are shipped for free.                                                                                                                                                                                                                                                                                                                                                                                |                                                                                                                                                                                                                                                                                                                                                      |
| **Coupon**             | Coupons are defined for the users who meet the campaign conditions, with the **Conditions and Actions** being specified with the coupons.                                                                                                                                                                                                                                                                                                                                         |                                                                                                                                                                                                                                                                                                                                                      |
| **Discount Code**      | Discount Codes are shared with the users who meet the campaign conditions, with the **Conditions and Actions** being specified with the codes.                                                                                                                                                                                                                                                                                                                                    |                                                                                                                                                                                                                                                                                                                                                      |

#### Discount Codes

* These are codes that will provide users with a one-time discount or discounts for certain periods when entered in the Add to Basket or Payment Steps.
* Discount codes are created automatically by Omnitron; they can be user-based, or can be used by anyone who enters the relevant code.

#### Creating a Discount Code​ <a href="#creating-a-discount-code" id="creating-a-discount-code"></a>

* Steps to Follow: **Omnitron > Sales Channels > Marketing > Discount Codes**.
* This is followed by clicking on *Add New Discount Code*.
* Each discount code is created exclusively for the relevant **Sales Channel**.

#### <mark style="color:red;">**Discount Code Information​**</mark>

<figure><img src="https://3333414532-files.gitbook.io/~/files/v0/b/gitbook-x-prod.appspot.com/o/spaces%2FIbwGN7KwvYi0iLbjtnXz%2Fuploads%2F4Cgie3TFGmNXaEUEAnpN%2Fimage.png?alt=media&amp;token=1bc4db65-1256-4ba9-a826-59d26f6f119e" alt=""><figcaption></figcaption></figure>

In addition to what is described under the **Campaign Information** heading, the **Discount Code** related to the *User* input can be user-based.

| Title                                            | Description                                                                                                                                           | Example                                                                                                                                                                                                                    |
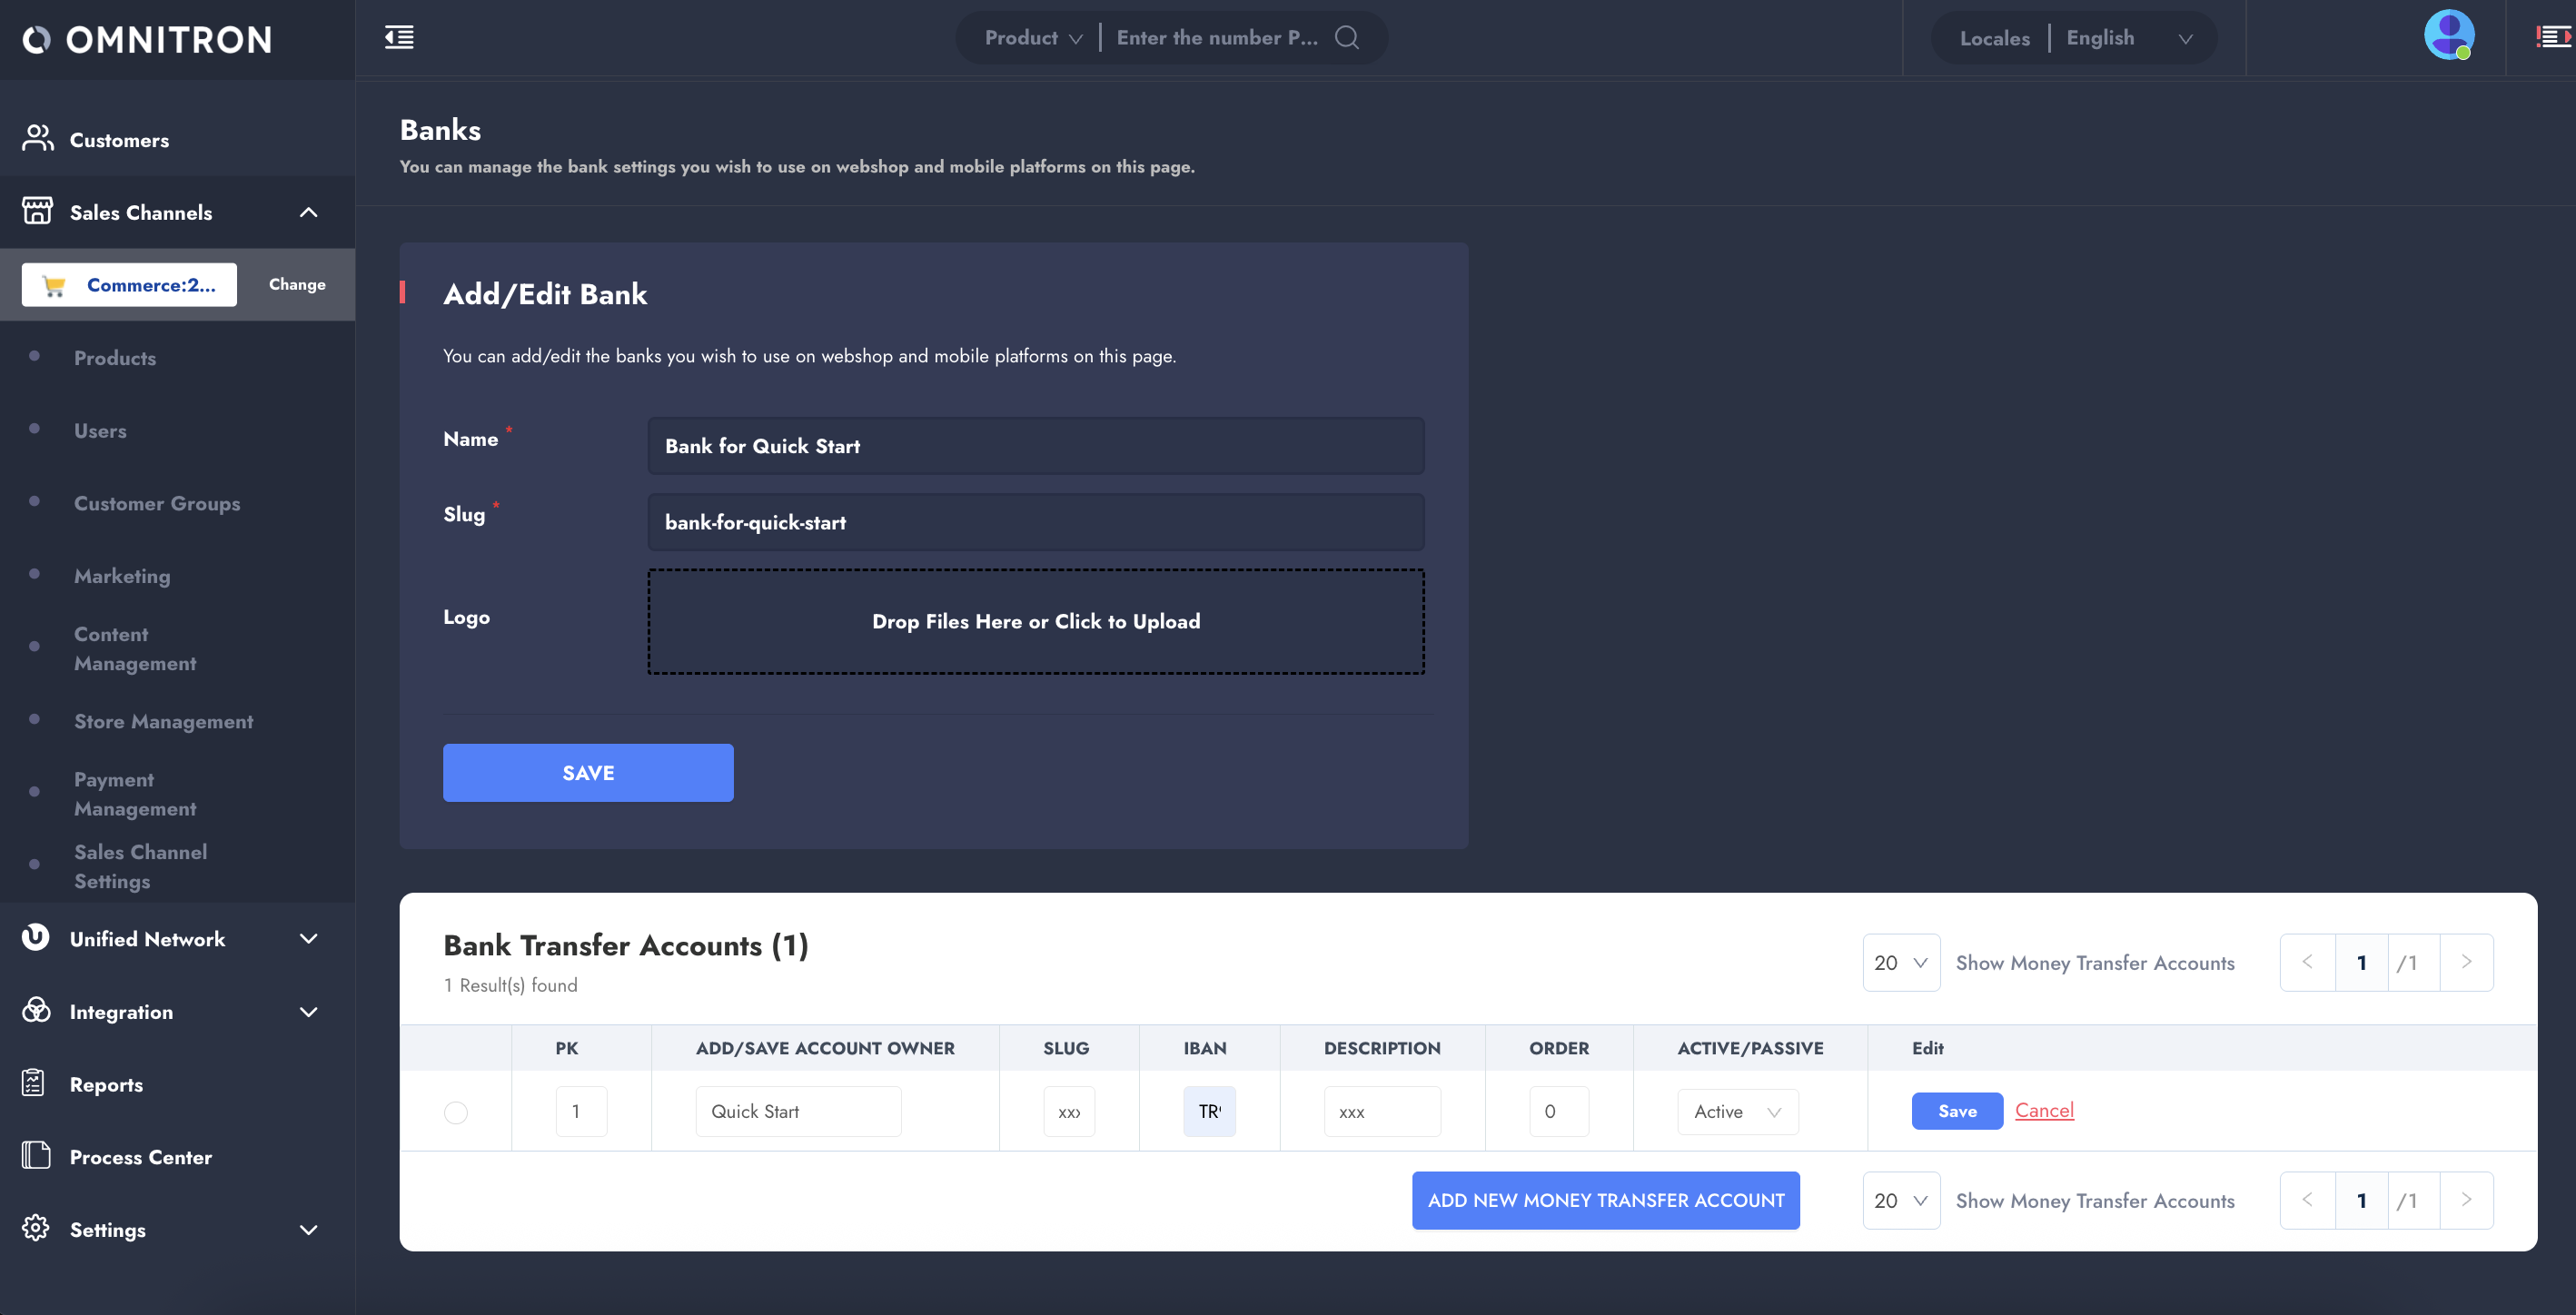
| ------------------------------------------------ | ----------------------------------------------------------------------------------------------------------------------------------------------------- | -------------------------------------------------------------------------------------------------------------------------------------------------------------------------------------------------------------------------- |
| **Discount Name**                                | The name given to the discount                                                                                                                        |                                                                                                                                                                                                                            |
| **Discount Slug**                                | Discount Slug                                                                                                                                         |                                                                                                                                                                                                                            |
| **Discount Code**                                | Discount Code Automatically Generated by Omnitron upon clicking on the *Generate Discount Code* button                                                | `0A9762DE`                                                                                                                                                                                                                 |
| **Discount Message**                             | Discount code message that will be shown in the filter and/or the basket                                                                              |                                                                                                                                                                                                                            |
| **Maximum Number of Application (Per Basket)**   | Information on how many times a discount can be used in a basket                                                                                      | In a case where the **Maximum Number of Application** is 1, a discount code can only be used once in the basket.                                                                                                           |
| **Maximum Number of Application (Per Customer)** | Information on how many times a customer can benefit from a discount.                                                                                 |                                                                                                                                                                                                                            |
| **User**                                         | Information on the user for whom the discount code has been defined.                                                                                  |                                                                                                                                                                                                                            |
| **Priority**                                     | The field to determine which campaign will be applied first in case there is more than one campaign for a product.                                    | Example Campaign: *Discount of 10% for the first product, 20% for the second product, 30% for the third product*; in such case, the order of priority for three different campaigns must be provided in the correct order. |
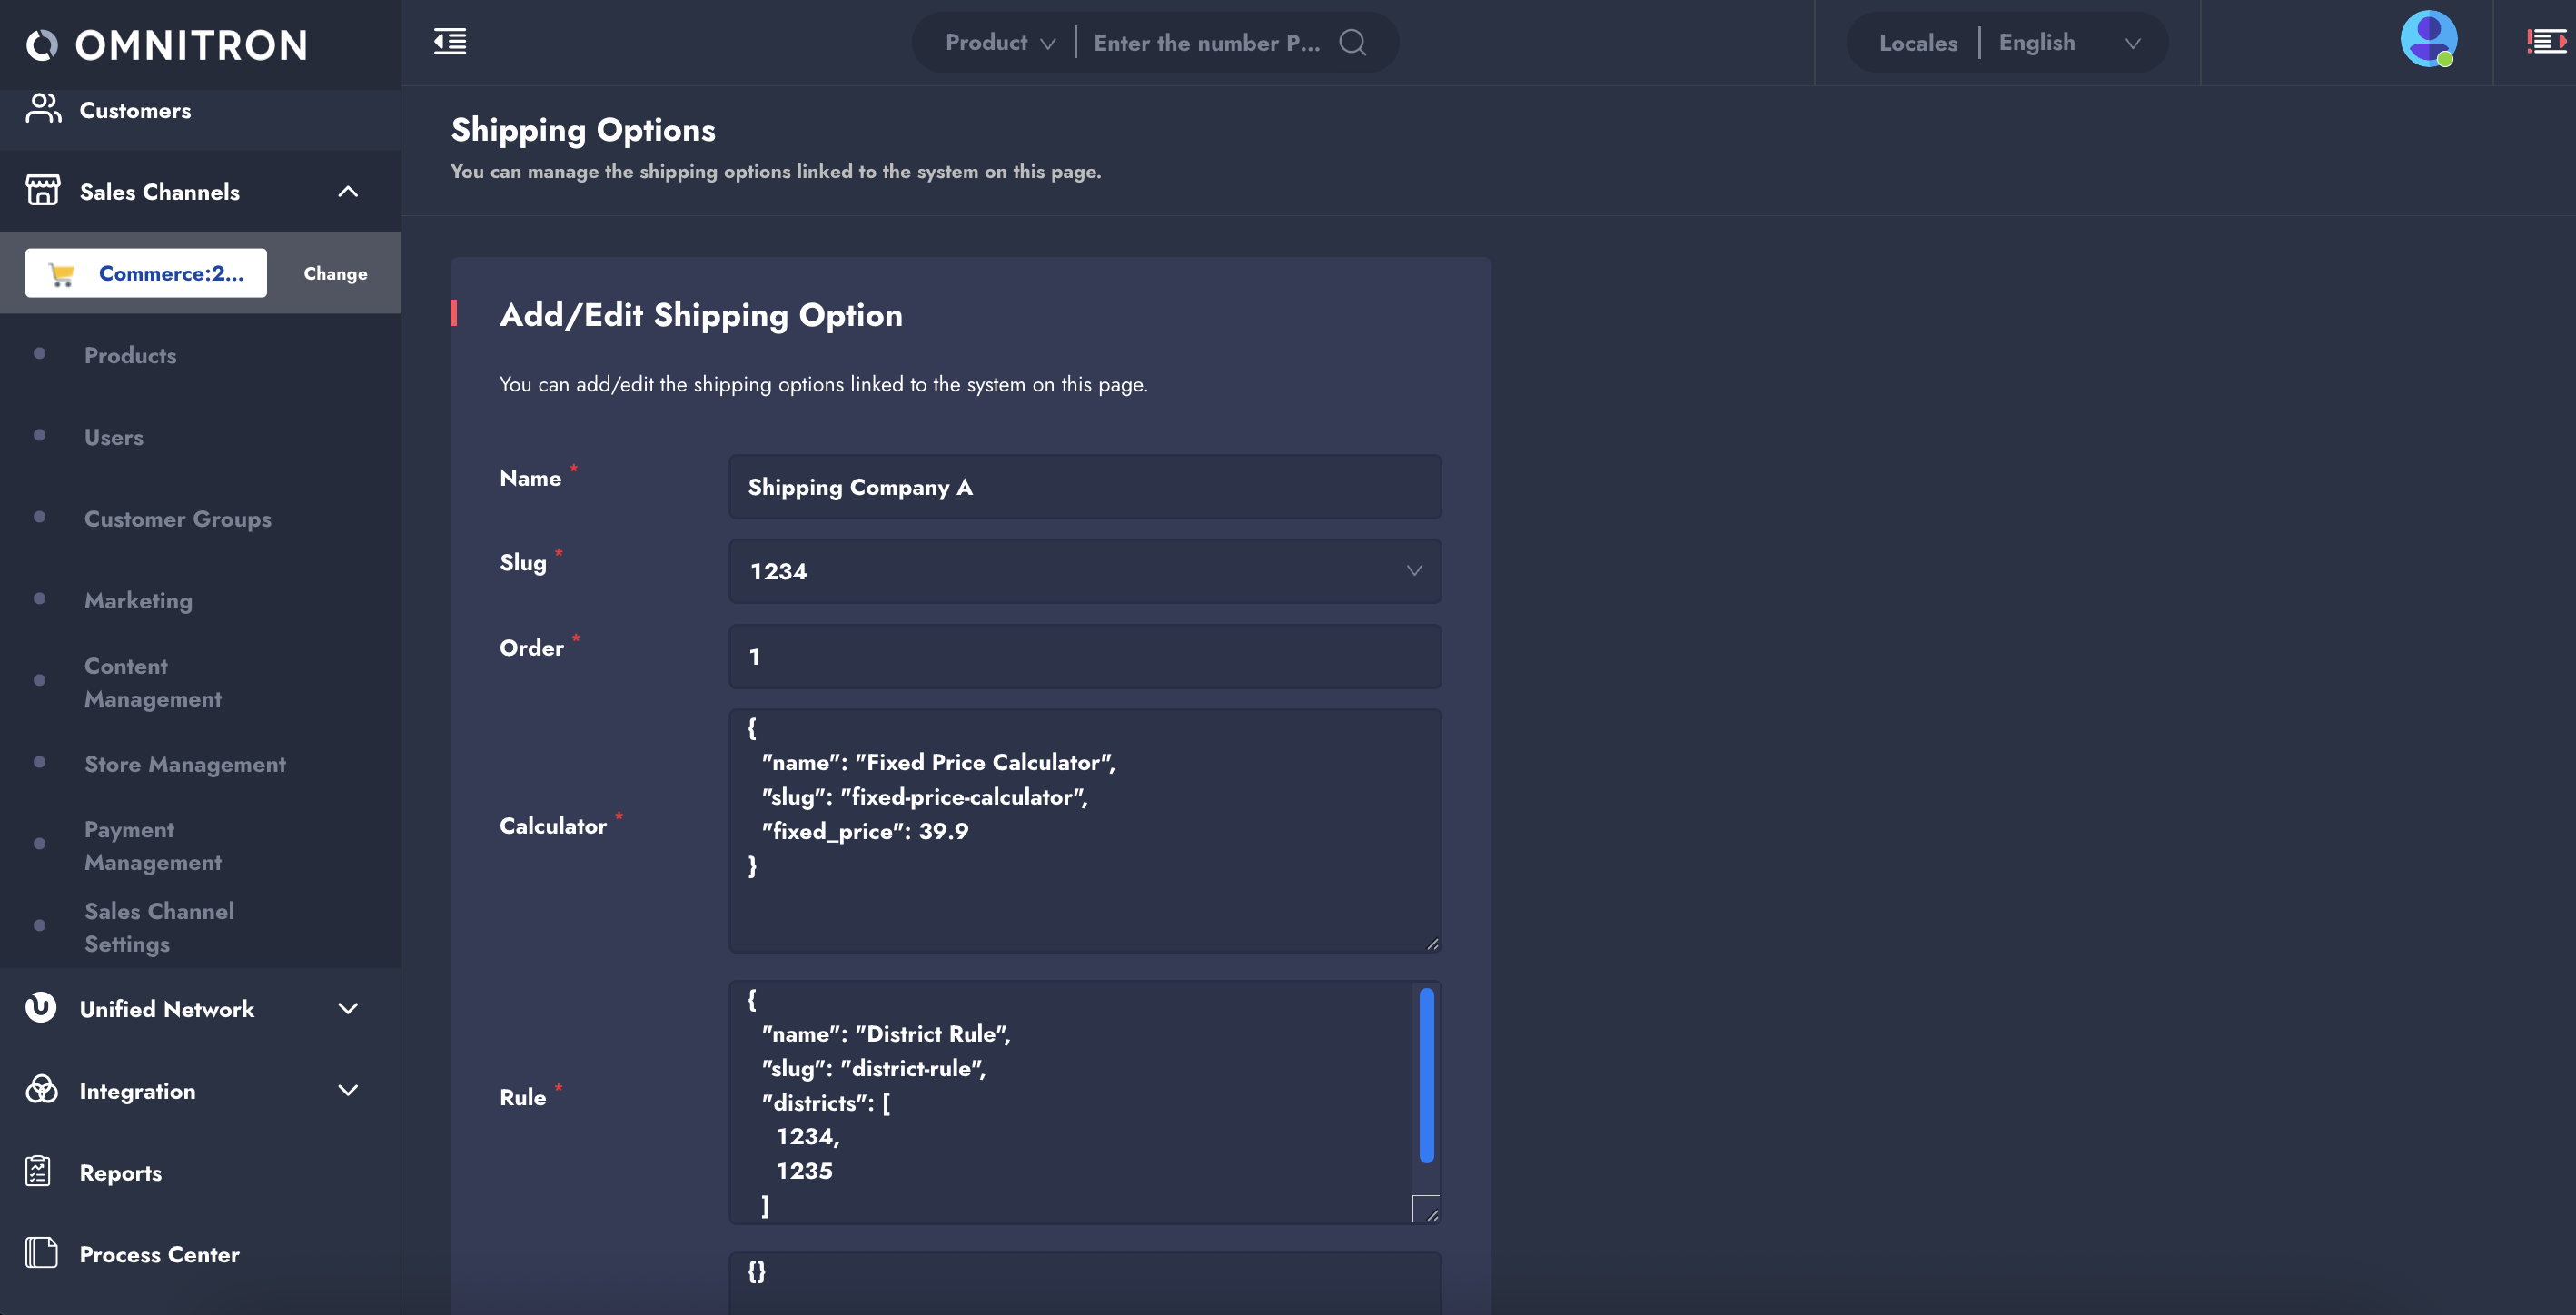
| **Start Date**                                   | Discount Start Date                                                                                                                                   |                                                                                                                                                                                                                            |
| **End Date**                                     | Discount End Date                                                                                                                                     |                                                                                                                                                                                                                            |
| **Status**                                       | Discount Activity Status                                                                                                                              | `Pasive` and `Active` options are available.                                                                                                                                                                               |
| **Can Be Combined with Other Campaigns**         | The checkbox that will decide whether the relevant product will benefit from other campaigns in case a product is included in more than one campaign. |                                                                                                                                                                                                                            |
| **Show on Product Detail**                       | The checkbox that decides whether to show the relevant discount on the Product Detail Page.                                                           |                                                                                                                                                                                                                            |

#### <mark style="color:red;">**Discount Conditions​**</mark>

<figure><img src="https://3333414532-files.gitbook.io/~/files/v0/b/gitbook-x-prod.appspot.com/o/spaces%2FIbwGN7KwvYi0iLbjtnXz%2Fuploads%2FEkTEoK5swLtlA6XvjhoA%2Fimage.png?alt=media&amp;token=f016306a-4824-42af-94e0-fd37e73a9a38" alt=""><figcaption></figcaption></figure>

As described under the **Campaign Conditions** heading, the **Discount Conditions** are created with *Collection* and *Condition Types* selections.

#### <mark style="color:red;">**Discount Action​**</mark>

<figure><img src="https://3333414532-files.gitbook.io/~/files/v0/b/gitbook-x-prod.appspot.com/o/spaces%2FIbwGN7KwvYi0iLbjtnXz%2Fuploads%2FzO3tm5nWbWb3DXVocajS%2Fimage.png?alt=media&amp;token=042c7f38-5738-43b4-91dc-4179e23127a3" alt=""><figcaption></figcaption></figure>

As described under the **Campaign Action** heading, the **Discount Action** is created with *Collection* and *Action Type* selections.

Action Types listed for Discount Action can be seen below.

**Action Type:**

| Action Type            | Definition                                                                                                                                                                                                                                                                                                                                                                                             |
| ---------------------- | ------------------------------------------------------------------------------------------------------------------------------------------------------------------------------------------------------------------------------------------------------------------------------------------------------------------------------------------------------------------------------------------------------ |
| **Price Discount**     | The products under the selected collection that meet the discount conditions are given a discount equal to the **Discounted Price** value according to **Price Type and Application Type**.                                                                                                                                                                                                            |
| **Cheapest Item Free** | One of the *Percent Discount/ Price Discount/ Fixed Price/ Fixed Total Price* campaigns may be applied depending on the *Gradual Discount/ Discount for the Cheapest Product/ Discount to the Most Expensive Product* options for the products under the selected collection that meet the campaign conditions according to the **Price Type, Application Type and Number of Products to be Applied**. |
| **Percent Discount**   | The products under the selected collection that meet the discount conditions are given a discount equal to the **Percent Discount** value according to **Price Type and Application Type**.                                                                                                                                                                                                            |
| **Free Shipping**      | The products under the selected collection that meet the discount conditions are shipped for free.                                                                                                                                                                                                                                                                                                     |

## <mark style="color:red;">Coupons</mark>

### <mark style="color:red;">Creating a Coupon​</mark> <a href="#creating-a-coupon" id="creating-a-coupon"></a>

* Steps to Follow: **Omnitron > Sales Channels > Marketing > Coupons**.
* This is followed by clicking on *Add a New Coupon*.

#### <mark style="color:red;">**Coupon Operations​**</mark>

Just as in **Campaigns** and **Discount Codes**, Coupons are created by entering the details of the coupon in the **Coupon Information** page,

<figure><img src="https://3333414532-files.gitbook.io/~/files/v0/b/gitbook-x-prod.appspot.com/o/spaces%2FIbwGN7KwvYi0iLbjtnXz%2Fuploads%2FTq9jlZjbNgv9NRyOOpzZ%2Fimage.png?alt=media&amp;token=6d229a82-1437-4bdf-8674-e905a1c790f9" alt=""><figcaption></figcaption></figure>

determining the coupon conditions in the **Coupon Conditions** page,

<figure><img src="https://3333414532-files.gitbook.io/~/files/v0/b/gitbook-x-prod.appspot.com/o/spaces%2FIbwGN7KwvYi0iLbjtnXz%2Fuploads%2FLOfYMkrl2WH0hvt6XTrL%2Fimage.png?alt=media&amp;token=adfff960-39ef-45c2-9b52-dadde9bb0b68" alt=""><figcaption></figcaption></figure>

and determining the coupon actions in the **Coupon Actions** page.

<figure><img src="https://3333414532-files.gitbook.io/~/files/v0/b/gitbook-x-prod.appspot.com/o/spaces%2FIbwGN7KwvYi0iLbjtnXz%2Fuploads%2FrwzAYx9CxoJQT3dY7IaA%2Fimage.png?alt=media&amp;token=a1589539-d130-4752-83a0-0140ea5ac477" alt=""><figcaption></figcaption></figure>

Coupons differ from **Campaigns** and **Discount Codes** in that they are defined directly for the user. The user of the coupon can be selected from the *User* dropdown menu on the **Coupon Information** page.

As soon as the selected user signs in under the relevant brand, the defined coupon becomes `Active`, and the user does not need to do anything else.


# Content Management


# How to Manage Widgets in Omnitron?

This tutorial provides step-by-step instructions for managing widget content for channels like banners and sliders, and how to effectively control and customize the content displayed on your web pages through widgets in Omnitron.

## <mark style="color:red;">Step 1: Navigate to Widget Management​</mark> <a href="#step-1-navigate-to-widget-management" id="step-1-navigate-to-widget-management"></a>

* Navigate to the Omnitron platform and log into your account.
* Follow the **Sales Channels** > **Content Management** sidebar and click the **Widget Management** page.<br>

  <figure><img src="https://3333414532-files.gitbook.io/~/files/v0/b/gitbook-x-prod.appspot.com/o/spaces%2FIbwGN7KwvYi0iLbjtnXz%2Fuploads%2FZdRPJ4AdkKsgczPaFCue%2Fimage.png?alt=media&amp;token=5a4356b6-b40f-42b4-913b-7a6c75cc25f9" alt=""><figcaption></figcaption></figure>

## <mark style="color:red;">Step 2: Filtering Widgets​</mark> <a href="#step-2-filtering-widgets" id="step-2-filtering-widgets"></a>

* On the Widget Management page, the filter panel and the list of existing widgets are displayed.
* You can filter the widgets based on their characteristics such as Widget Type, Widget Name, and Slug. The selected filters are displayed in the active filters row.

## <mark style="color:red;">Step 3: Creating a New Widget​</mark> <a href="#step-3-creating-a-new-widget" id="step-3-creating-a-new-widget"></a>

* To create a new widget, click the **+ New Widget** button located in the upper-right corner.<br>

  <figure><img src="https://3333414532-files.gitbook.io/~/files/v0/b/gitbook-x-prod.appspot.com/o/spaces%2FIbwGN7KwvYi0iLbjtnXz%2Fuploads%2F68qi21QnwKcEzttML5od%2Fimage.png?alt=media&amp;token=6c7c72f4-142e-470a-a1cf-6963746ccaea" alt=""><figcaption></figcaption></figure>
* Fill in the required fields, including:
  * **Widget Name:** Provide a name for the widget you intend to add. You can also specify the name of the page it will be displayed on for future reference.
  * **Widget Slug**: Enter a descriptive tag for the widget, ensuring you avoid using spaces, special characters, or capital letters. You can use a hyphen (-) for spaces.
  * **Widget Type:** Select one of the widget types from the drop-down menu that has been added in the Widget Schema Management screen.
  * **Template:** Input the file folder location where the widget's HTML code is stored. This information will be supplied by the project manager.
* Click **SAVE & CLOSE** after filling all necessary fields.<br>

  <figure><img src="https://3333414532-files.gitbook.io/~/files/v0/b/gitbook-x-prod.appspot.com/o/spaces%2FIbwGN7KwvYi0iLbjtnXz%2Fuploads%2FIl0jbX6eS7E4O3L0KirZ%2Fimage.png?alt=media&amp;token=8eca1564-b899-4d91-99eb-baef75212b01" alt=""><figcaption></figcaption></figure>

{% hint style="info" %}
Please note that each widget type comes with its own set of fields. Selecting a widget type will reveal the fields specifically defined for that widget, which can be found in the Widget Schema Management screen.
{% endhint %}

## <mark style="color:red;">Step 4: Updating Widgets​</mark> <a href="#step-4-updating-widgets" id="step-4-updating-widgets"></a>

* To make updates, click on the row of an existing widget in the list.
* You will be directed to the detail screen where you can make the necessary changes.<br>

  <figure><img src="https://3333414532-files.gitbook.io/~/files/v0/b/gitbook-x-prod.appspot.com/o/spaces%2FIbwGN7KwvYi0iLbjtnXz%2Fuploads%2FxoMzpCIdRCIQ5y5hAyWF%2Fimage.png?alt=media&amp;token=dc150c55-562b-4f55-9e0e-0fb516250213" alt=""><figcaption></figcaption></figure>


# How to Manage Widget Schema in Omnitron?

This tutorial provides step-by-step instructions for managing widget schemas on your site and mobile platforms in Omnitron.

## <mark style="color:red;">Step 1: Navigate to Widget Schema Management​</mark> <a href="#step-1-navigate-to-widget-schema-management" id="step-1-navigate-to-widget-schema-management"></a>

* Navigate to the Omnitron platform and log into your account.
* Follow the **Sales Channels** > **Content Management** sidebar and click the **Widget Schema Management** page.<br>

  <figure><img src="https://3333414532-files.gitbook.io/~/files/v0/b/gitbook-x-prod.appspot.com/o/spaces%2FIbwGN7KwvYi0iLbjtnXz%2Fuploads%2FVzVCqR35mnNb559IObcP%2Fimage.png?alt=media&amp;token=c1bd8ec5-d2e4-476d-ba62-6e4c87c99f08" alt=""><figcaption></figcaption></figure>

## <mark style="color:red;">Step 2: Filtering Widget Schemas​</mark> <a href="#step-2-filtering-widget-schemas" id="step-2-filtering-widget-schemas"></a>

* On the Widget Schema Management page, the filter panel and the list of existing widget schemas are displayed.
* You can filter the widget schemas based on Widget Type. The selected filters are displayed in the active filters row.

## <mark style="color:red;">Step 3: Creating a New Widget Schema​</mark> <a href="#step-3-creating-a-new-widget-schema" id="step-3-creating-a-new-widget-schema"></a>

To add a new widget to the Storefront, the first step is to create a **Widget Schema**.

* To create a new widget schema, click the **+ New Widget Schema** button located in the upper-right corner.<br>

  <figure><img src="https://3333414532-files.gitbook.io/~/files/v0/b/gitbook-x-prod.appspot.com/o/spaces%2FIbwGN7KwvYi0iLbjtnXz%2Fuploads%2FF1PnYphSOQ1iv6lQPOTk%2Fimage.png?alt=media&amp;token=67433dc4-7cc6-48c2-b851-8c617c42e314" alt=""><figcaption></figcaption></figure>
* Fill in the required fields, including:
  * **Widget Type:** Provide a name for the widget type.
  * **Schema:** This field defines the widget areas to be displayed on the Storefront in JSON format. It is used to specify the areas that will be included within a widget, subsequently added to the Storefront under the Widget Management menu. Please contact your project manager for assistance in completing this field.
* Click **Save** after filling all necessary fields.<br>

  <figure><img src="https://3333414532-files.gitbook.io/~/files/v0/b/gitbook-x-prod.appspot.com/o/spaces%2FIbwGN7KwvYi0iLbjtnXz%2Fuploads%2F7G7G5VtpwkEm2wj3guCA%2Fimage.png?alt=media&amp;token=482d7ce3-9960-494c-a600-cdbd5fb2c4b2" alt=""><figcaption></figcaption></figure>

## <mark style="color:red;">Step 4: Updating Widget Schemas​</mark> <a href="#step-4-updating-widget-schemas" id="step-4-updating-widget-schemas"></a>

* To make updates, click on the row of an existing widget schema in the list.
* You will be directed to the detail screen where you can make the necessary changes.<br>

  <figure><img src="https://3333414532-files.gitbook.io/~/files/v0/b/gitbook-x-prod.appspot.com/o/spaces%2FIbwGN7KwvYi0iLbjtnXz%2Fuploads%2FbNnhZ4AmVDFCiPitcmja%2Fimage.png?alt=media&amp;token=4f749038-6abb-4647-985b-4e53bd1c6796" alt=""><figcaption></figcaption></figure>


# How to Manage Flat Pages in Omnitron?

Flat pages are characterized with the usage for blogs and news content, as well as for general examples such as "About Us" and "Contact Us", often referred to as static pages. This page allows you to dynamically create pages using HTML editors, and you can also enhance them with templates based on your requirements. To leverage all of these features, please reach out to your authorized project manager, as the template names may vary, and the page structure can be customized through scripts.

## <mark style="color:red;">Step 1: Access to Omnitron​</mark> <a href="#step-1-access-to-omnitron" id="step-1-access-to-omnitron"></a>

* Access the **Omnitron** panel through your URL.
* Insert your granted *Username* and *Password*, and click the **Sign In** button.\
  ![](https://3333414532-files.gitbook.io/~/files/v0/b/gitbook-x-prod.appspot.com/o/spaces%2FIbwGN7KwvYi0iLbjtnXz%2Fuploads%2FQnfNjX72in5Qcy4LZzGH%2Fimage.png?alt=media\&token=7777dd02-19d8-44cd-af84-d258bc07ab2b)

## <mark style="color:red;">Step 2: Navigate to Flat Page Management Page​</mark> <a href="#step-2-navigate-to-flat-page-management-page" id="step-2-navigate-to-flat-page-management-page"></a>

* Follow through the **Sales Channels > Content Management** sidebar and click the **Flat Page Management** page.<br>

  <figure><img src="https://3333414532-files.gitbook.io/~/files/v0/b/gitbook-x-prod.appspot.com/o/spaces%2FIbwGN7KwvYi0iLbjtnXz%2Fuploads%2FT4ylBhJpkxYUJVVlcNHy%2Fimage.png?alt=media&amp;token=f5a7ee0f-e290-4120-b6d6-92bcc7a27b98" alt=""><figcaption></figcaption></figure>

## <mark style="color:red;">Step 3: Filtering Flat Pages​</mark> <a href="#step-3-filtering-flat-pages" id="step-3-filtering-flat-pages"></a>

* Pages created within Flat Page Management can be conveniently filtered by *Title, Template Name, Link, and Authentication* to facilitate easy navigation and search.<br>

  <figure><img src="https://3333414532-files.gitbook.io/~/files/v0/b/gitbook-x-prod.appspot.com/o/spaces%2FIbwGN7KwvYi0iLbjtnXz%2Fuploads%2FCyGOuQlX6GIFcL4vjVuO%2Fimage.png?alt=media&amp;token=fd5d1b11-6ff8-4541-9a74-80dda49e569e" alt=""><figcaption></figcaption></figure>

## <mark style="color:red;">Step 4: Adding a New Flat Page​</mark> <a href="#step-4-adding-a-new-flat-page" id="step-4-adding-a-new-flat-page"></a>

* To add a new flat page, click the **+ New Flat Page** button.<br>

  <figure><img src="https://3333414532-files.gitbook.io/~/files/v0/b/gitbook-x-prod.appspot.com/o/spaces%2FIbwGN7KwvYi0iLbjtnXz%2Fuploads%2FOWGHA82c0wJFz7kpbil6%2Fimage.png?alt=media&amp;token=2e377275-3545-4b60-8912-5a403bc30c60" alt=""><figcaption></figcaption></figure>
* Complete the form by filling in the following fields:
  * **Title:** Provide a title for your flat page. This will appear on the breadcrumb trail (located right below the header menu) of your e-commerce site, such as *Homepage > Blog > **Cushion Bags***. Your chosen title will also assist in filtering.
  * **Content Type:** Choose the appropriate content type based on the content you intend to add in the next parameter.
  * **Content:** Edit your page content using either the HTML editor or Plain Text. Utilizing the rich HTML editor enables you to create a visually appealing layout and implement SEO practices effectively.
  * **Link (tr-tr), Link (en-en)**: Enter the desired link, which will be reflected as `domain/lorem-ipsum/`. For example, if `/lorem-ipsum/` is your chosen link, it will be integrated into your e-commerce site accordingly.
  * **Template:** Insert the preferred template provided by the authorized project manager of your brand. In most cases, the default flat page template would be `flatpage/index.html`.
  * **Authentication:** Indicate your authentication preference as Yes/No. Please select "Yes" if users are expected to log in to access this specific flat page URL on your e-commerce site.
  * **Site:** Choose the appropriate site for your flat page.
* After filling out the mandatory fields, click **Save**.<br>

  <figure><img src="https://3333414532-files.gitbook.io/~/files/v0/b/gitbook-x-prod.appspot.com/o/spaces%2FIbwGN7KwvYi0iLbjtnXz%2Fuploads%2F9QRWK16EaXW6sHVsSSX4%2Fimage.png?alt=media&amp;token=aeda9f8e-34ee-4650-b158-eb5d44f7b6d7" alt=""><figcaption></figcaption></figure>


# How to Manage Custom/Campaign Pages in Omnitron?

Custom/Campaign Pages are a great tool for creating a customized page structure by combining collections. Users can list collection items with different variant types and add custom SEO content, along with banner images that have internal links to direct users to another page URLs. This will eventually boost the e-commerce site's conversion rate.

## <mark style="color:red;">Step 1: Access to Omnitron​</mark> <a href="#step-1-access-to-omnitron" id="step-1-access-to-omnitron"></a>

* Access the **Omnitron** panel through your URL.
* Insert your granted *Username* and *Password*, and click the **Sign In** button.\
  ![](https://3333414532-files.gitbook.io/~/files/v0/b/gitbook-x-prod.appspot.com/o/spaces%2FIbwGN7KwvYi0iLbjtnXz%2Fuploads%2FQnfNjX72in5Qcy4LZzGH%2Fimage.png?alt=media\&token=7777dd02-19d8-44cd-af84-d258bc07ab2b)

## <mark style="color:red;">Step 2: Navigate to Custom/Campaign Page​</mark> <a href="#step-2-navigate-to-customcampaign-page" id="step-2-navigate-to-customcampaign-page"></a>

* Follow through the **Sales Channels** > **Content Management** sidebar and click the **Custom/Campaign Pages**.<br>

  <figure><img src="https://3333414532-files.gitbook.io/~/files/v0/b/gitbook-x-prod.appspot.com/o/spaces%2FIbwGN7KwvYi0iLbjtnXz%2Fuploads%2FQVTOINZbeO9ribExBXQ6%2Fimage.png?alt=media&amp;token=bc373229-8ce6-4ae1-a91c-c9f25823ee76" alt=""><figcaption></figcaption></figure>

## <mark style="color:red;">Step 3: Filtering Custom/Campaign Pages​</mark> <a href="#step-3-filtering-customcampaign-pages" id="step-3-filtering-customcampaign-pages"></a>

* On the Custom/Campaign page, the filter panel and the list of existing special pages are displayed.
* Users can filter the special pages based on *Page Name, Page Url, Page Template, Collection, Status, First & Last Creation Date, First & Last Updated Date*. The selected filters will be displayed in the active filters row.<br>

  <figure><img src="https://3333414532-files.gitbook.io/~/files/v0/b/gitbook-x-prod.appspot.com/o/spaces%2FIbwGN7KwvYi0iLbjtnXz%2Fuploads%2Fl4PrxGBe3Fk6n5AH2fTD%2Fimage.png?alt=media&amp;token=645c54ef-7d99-4ee1-909f-799394ba54f1" alt=""><figcaption></figcaption></figure>

## <mark style="color:red;">Step 4: Creating a New Custom Page​</mark> <a href="#step-4-creating-a-new-custom-page" id="step-4-creating-a-new-custom-page"></a>

* To create a new custom page, click the **+ New Custom Page** button located in the upper-right corner.<br>

  <figure><img src="https://3333414532-files.gitbook.io/~/files/v0/b/gitbook-x-prod.appspot.com/o/spaces%2FIbwGN7KwvYi0iLbjtnXz%2Fuploads%2FKSVFYydcRBLigxHbF2hb%2Fimage.png?alt=media&amp;token=7452c615-1c1e-4ed1-b976-7ef5472268f8" alt=""><figcaption></figcaption></figure>
* Complete the form by filling in the required fields, including:
  * **Page Name:** Provide the name of the page. Once active, it will appear as a breadcrumb, for example, 'homepage > example page name', positioned to the right below the header menu.
  * **Page URL**: Input the URL extension of the page. Additional URL fields should be created for multiple language options. Separate URLs are required for each language.
  * **Page Template:** If you prefer to use a template other than the default, specify the file folder containing the HTML code of the widget to be used. This determination is made by the project manager; please consult them for further details.
  * **Banner:** Upload the image to be displayed at the top of the page.
  * **Mobile Banner:** Upload the image to be displayed at the top of the page on the mobile application.
  * **Video Embedded Code:** Optionally, insert the video’s embed link from YouTube.
  * **Banner URL:** Enter the URL extension of the page to be displayed upon clicking the banner. This will help increase conversions and enhance the average time spent on the e-commerce website.
  * **Select Collection:** Choose a collection from the list previously created in the *Products and Catalogs* module to display it on the campaign page. Detailed instructions for creating collections can be found in the [Collections](/tutorials/omnitron/products-and-catalogs/how-to-create-and-manage-collections-in-omnitron) document.
  * **List Variants Type:** Select the default variant type to be displayed on that specific page.
  * **Description:** Provide the description to be displayed to the user.
  * **Status:** Specify the page’s active/passive status. Selecting "Passive" means the page will not be displayed to the user.
* After filling out the necessary fields, click **Save**.<br>

  <figure><img src="https://3333414532-files.gitbook.io/~/files/v0/b/gitbook-x-prod.appspot.com/o/spaces%2FIbwGN7KwvYi0iLbjtnXz%2Fuploads%2F33JV5a8t1CRLH45M18xS%2Fimage.png?alt=media&amp;token=bf371d55-455c-46b1-8ace-f636bba84907" alt=""><figcaption></figcaption></figure>

## <mark style="color:red;">Step 5: Updating Custom Pages​</mark> <a href="#step-5-updating-custom-pages" id="step-5-updating-custom-pages"></a>

* To update a custom page, click on the row of an existing custom page in the list. You will then be directed to the detail page where you can make the necessary changes. Finally, click **Save** to apply the changes.<br>

  <figure><img src="https://3333414532-files.gitbook.io/~/files/v0/b/gitbook-x-prod.appspot.com/o/spaces%2FIbwGN7KwvYi0iLbjtnXz%2Fuploads%2FaZIx0pQs5t96VOUCBHMy%2Fimage.png?alt=media&amp;token=5e6079a8-f6a1-4911-b719-2617864cae94" alt=""><figcaption></figcaption></figure>


# How to Manage Navigations/Menus in Omnitron?

Each website will have a header menu for desktop and hamburger menu for mobile for navigation purposes. The Navigation/Menu functionality of Omnitron enables you to establish an ordered tree structure for menu items, assign names to them, and link them to their respective pages. Additionally, you have the option to apply background colors and text styles if desired. For further instructions on execution, please refer to this article.

## <mark style="color:red;">Step 1: Access to Omnitron​</mark> <a href="#step-1-access-to-omnitron" id="step-1-access-to-omnitron"></a>

* Access the **Omnitron** panel through your URL.
* Insert your granted *Username* and *Password*, and click the **Sign In** button.\
  ![](https://3333414532-files.gitbook.io/~/files/v0/b/gitbook-x-prod.appspot.com/o/spaces%2FIbwGN7KwvYi0iLbjtnXz%2Fuploads%2FQnfNjX72in5Qcy4LZzGH%2Fimage.png?alt=media\&token=7777dd02-19d8-44cd-af84-d258bc07ab2b)

## <mark style="color:red;">Step 2: Navigate to Navigation/Menu Page​</mark> <a href="#step-2-navigate-to-navigationmenu-page" id="step-2-navigate-to-navigationmenu-page"></a>

* Navigate to **Sales Channels > Content Management > Navigation/Menu** from the sidebar.<br>

  <figure><img src="https://3333414532-files.gitbook.io/~/files/v0/b/gitbook-x-prod.appspot.com/o/spaces%2FIbwGN7KwvYi0iLbjtnXz%2Fuploads%2FNf9OR5preiQ7sTmwmV0l%2Fimage.png?alt=media&amp;token=84608338-771c-4a04-bf6b-8e5f2d553d81" alt=""><figcaption></figcaption></figure>

## <mark style="color:red;">Step 3: Adding a New Navigation/Menu​</mark> <a href="#step-3-adding-a-new-navigationmenu" id="step-3-adding-a-new-navigationmenu"></a>

The navigation menu can contain multiple sub-menus, but initially, you should create the Main Menu. To do this:

* Click on "Add Main Menu".
* Enter the Menu Name and URL.
* Click "Save".<br>

  <figure><img src="https://3333414532-files.gitbook.io/~/files/v0/b/gitbook-x-prod.appspot.com/o/spaces%2FIbwGN7KwvYi0iLbjtnXz%2Fuploads%2FAg0rqqbLgQDL8sR0pOsr%2Fimage.png?alt=media&amp;token=441e455d-4fe3-40a6-b57e-76744a71a41e" alt=""><figcaption></figcaption></figure>

After creating the Main Menu, you can proceed to create sub-menus and their corresponding inner menus. Follow these steps:

* Click the "+" icon next to the menu item.
* Enter the Menu Name and Menu URL.
* Click "Save".<br>

  <figure><img src="https://3333414532-files.gitbook.io/~/files/v0/b/gitbook-x-prod.appspot.com/o/spaces%2FIbwGN7KwvYi0iLbjtnXz%2Fuploads%2F4TUWbMsgjZM5JO7hs5Wc%2Fimage.png?alt=media&amp;token=4b084ec1-7bde-4729-a828-1645421c80cf" alt=""><figcaption></figcaption></figure>
* Successfully adding each menu item will result in the menu tree displayed as follows:<br>

  <figure><img src="https://3333414532-files.gitbook.io/~/files/v0/b/gitbook-x-prod.appspot.com/o/spaces%2FIbwGN7KwvYi0iLbjtnXz%2Fuploads%2FMsPs73TTiZ6OnMBR4ZG7%2Fimage.png?alt=media&amp;token=bf93ca9f-a0db-4387-9bef-89ff93de6c98" alt=""><figcaption></figcaption></figure>
* The menu item tree can be modified by dragging and dropping the respective row. The blue outline, as shown in the screenshot, will indicate which menu items will be moved as submenus or interchanged within the main menus.<br>

  <figure><img src="https://3333414532-files.gitbook.io/~/files/v0/b/gitbook-x-prod.appspot.com/o/spaces%2FIbwGN7KwvYi0iLbjtnXz%2Fuploads%2F54m6mFAZlT7AByXo9IPe%2Fimage.png?alt=media&amp;token=89df9d5d-c271-4391-a7d3-b99bf2174158" alt=""><figcaption></figcaption></figure>

## <mark style="color:red;">Step 3: Edit the Menus​</mark> <a href="#step-3-edit-the-menus" id="step-3-edit-the-menus"></a>

According to the schema integrated into the Navigation/Menu Page, specific functions may vary depending on the project. However, several default settings can be applied for editing the menus. Click on the pen icon next to the menu item to proceed with the edits.

* **Menu Name:** You can change the menu name here.
* **Menu URL:** Add/Edit the desired link of that respective menu item.
* **Navigation Slider Images:** You can add visual internal links to the navigation menu from here, those will only shown on desktop.
* **Desktop Menu Features:** You will be able to change the text weight, text color, background color of the menu and underline the text.
* As a plus, you will be able to request such functionalities as;

1. **Boolean “No Follow” Tag:** Enabling the Boolean "No follow" tag will instruct search engines not to follow your menu link. This means that the link will not contribute to the distribution of link juice. This strategy is crucial for SEO purposes. For instance, if there are already one or more homepage links on the same page, an additional homepage link may not necessarily need to be indexed by Google. To minimize this, you can opt for the header menu items URL.
2. **Image Variations as Sub Content**: Using different image variations allows you to create column-based image URLs. This feature proves particularly beneficial for catalog characteristics links, such as "/shoes/80s-fashion" or "/sofas/bubble-fashion".
3. **Boolean Show on Mobile Menu:** This feature allows you to specify whether the header menu items should be included or excluded from the hamburger menu on mobile devices. By default, there will be synchronization between them, ensuring consistency across both menu types.<br>

   <figure><img src="https://3333414532-files.gitbook.io/~/files/v0/b/gitbook-x-prod.appspot.com/o/spaces%2FIbwGN7KwvYi0iLbjtnXz%2Fuploads%2FYkRLXeFUekzLvqZ0h9nl%2Fimage.png?alt=media&amp;token=29c8da1c-308d-46b2-a334-9e8d338f4103" alt=""><figcaption></figcaption></figure>


# How to Manage Mailing Templates in Omnitron?

This tutorial provides step-by-step instructions for managing Mailing Templates in Omnitron.

## <mark style="color:red;">Step 1: Access to Omnitron​</mark> <a href="#step-1-access-to-omnitron" id="step-1-access-to-omnitron"></a>

* Get access to the Omnitron panel.
* Enter your Username and Password, and then click the **Sign In** button.\
  ![](https://3333414532-files.gitbook.io/~/files/v0/b/gitbook-x-prod.appspot.com/o/spaces%2FIbwGN7KwvYi0iLbjtnXz%2Fuploads%2FL1sAi0Wa7yceeQM3tJhA%2Fimage.png?alt=media\&token=f21533e2-c19c-4fa3-8506-b56dab42f399)

## <mark style="color:red;">Step 2: Navigate to Mailing Template Page​</mark> <a href="#step-2-navigate-to-mailing-template-page" id="step-2-navigate-to-mailing-template-page"></a>

* Follow the **Sales Channels > Content Management** sidebar and click the **Mailing Templates** page.<br>

  <figure><img src="https://3333414532-files.gitbook.io/~/files/v0/b/gitbook-x-prod.appspot.com/o/spaces%2FIbwGN7KwvYi0iLbjtnXz%2Fuploads%2FFrhNdxgXVcHgyyPqPoYn%2Fimage.png?alt=media&amp;token=f1b0062d-ff1f-43d2-a68e-3c50d6767612" alt=""><figcaption></figcaption></figure>
* This page displays mailing templates for management purposes.<br>

  <figure><img src="https://3333414532-files.gitbook.io/~/files/v0/b/gitbook-x-prod.appspot.com/o/spaces%2FIbwGN7KwvYi0iLbjtnXz%2Fuploads%2FyMePhTSsejQEtxEaQKCs%2Fimage.png?alt=media&amp;token=085129fb-3558-4d14-8a49-afa61f187b2e" alt=""><figcaption></figcaption></figure>

## <mark style="color:red;">Step 3: Adding Mailing Templates​</mark> <a href="#step-3-adding-mailing-templates" id="step-3-adding-mailing-templates"></a>

* To add a new mailing template , click the **+ New Mailing Templates** button. Complete the form by filling in the following fields:
  * **Name:** Select one of the default email templates, e.g., for sending a welcome email upon user registration.
  * **Status:** Select whether the template is active or inactive.
  * **Language:** Select the language for the mailing template from the options available in Omnitron, aligning with local languages.
  * **Content:** Input the email content in HTML format.
* Once the relevant fields are completed, click the **Save** button.<br>

  <figure><img src="https://3333414532-files.gitbook.io/~/files/v0/b/gitbook-x-prod.appspot.com/o/spaces%2FIbwGN7KwvYi0iLbjtnXz%2Fuploads%2FYuBiaFJDR0EKaHqPh9rK%2Fimage.png?alt=media&amp;token=306963d4-7920-4e46-9ae5-fdb6ef2bb0e3" alt=""><figcaption></figcaption></figure>

## <mark style="color:red;">Step 4: Dynamic Mailing Templates for Order Cancellations​</mark> <a href="#step-4-dynamic-mailing-templates-for-order-cancellations" id="step-4-dynamic-mailing-templates-for-order-cancellations"></a>

The `Dynamic_Cancel_Mail_Template_Url` in the `api/v1/dynamic setting` serves to create a custom mail template for order cancellations based on primary keys representing cancellation reasons. It is essential to define the `Dynamic_Cancel_Mail_Template_Url` with the CancellationReason primary key as the key and the corresponding template path as the value.

The process follows these rules:

1. The system checks the cancellation reasons associated with the primary keys of the order items that trigger the email. If a custom template is specified in `Dynamic_Cancel_Mail_Template_Url`, that template takes precedence.
2. In case there is no match within the definitions of `Dynamic_Cancel_Mail_Template_Url`, the system retrieves the template information specified in the channel's configuration details under `cancel_mail_template_url`.
3. If, even then, no cancel\_mail\_template\_url is found, the system resorts to reading the template value in the `Cancel_Mail_Template_Url` setting.
4. In scenarios where the Cancellation Reasons for the canceled order items vary, the system selects the template based on the first one specified in `Dynamic_Cancel_Mail_Template_Url`.


# How to Configure Merchant Feed Adapter?

This document provides a comprehensive guide for configuring and managing **Merchant Feed Adapters** within the **Omnitron**, an essential tool for exporting structured product data to external platforms.

Merchant feeds are used to display products on comparison shopping engines, search engines, or affiliate platforms—allowing users to view product details, prices, and availability without visiting the brand’s actual e-commerce site. To support this, Omnitron enables merchants to generate and customize **XML feed files** based on their own schema requirements, language preferences, pricing lists, and filtering logic.

Whether you are creating a feed for a single market or managing a complex multi-language, multi-region catalog, this tutorial walks you through:

* Setting up new feed adapters through the Omnitron
* Structuring feed content using `schema_data`
* Mapping product attributes with flexible rule-based logic
* Filtering the feed by SKU or base code using uploaded files
* Managing multiple feeds by language and pricing combinations
* Manually or automatically triggering feed generation
* Accessing the final XML output via a generated file URL

By the end of this guide, you will be able to confidently configure and launch feeds that are optimized for your sales channels, meet third-party specifications, and scale across multiple locales with ease.

## <mark style="color:red;">Add Merchant Feed Adapter in Omnitron</mark>

To begin creating a Google Merchant Feed Adapter, follow the steps below.

### <mark style="color:red;">Navigate to the Feed Adapter Section</mark>

{% stepper %}
{% step %}
Go to **Sales Channels > Content Management > Google Merchant Feed Adapter.**
{% endstep %}

{% step %}
From this page, you can **view existing adapters**, **edit them**, or **add new ones**.
{% endstep %}

{% step %}
Click on **“+ New Google Merchant Feed Adapter”** to open the adapter creation form.

<figure><img src="https://3333414532-files.gitbook.io/~/files/v0/b/gitbook-x-prod.appspot.com/o/spaces%2FIbwGN7KwvYi0iLbjtnXz%2Fuploads%2F5hgYtYK50JCBmgswTMie%2Fimage.png?alt=media&amp;token=724a5efe-5116-42a8-86bf-da130861c107" alt=""><figcaption></figcaption></figure>
{% endstep %}
{% endstepper %}

### <mark style="color:red;">Fill in Basic Adapter Settings</mark>

{% stepper %}
{% step %}
At the top of the page, you’ll see a set of core fields to define the adapter:

<table><thead><tr><th width="133.0625">Field</th><th>Description</th></tr></thead><tbody><tr><td><strong>Name</strong></td><td>A unique name for the feed adapter. This is used to distinguish between different feeds, especially in multi-language or multi-region setups.<br><em>Example:</em> <code>insider</code>, <code>google_feed_en</code>, <code>feed_ar_uae</code></td></tr><tr><td><strong>Adapter Type</strong></td><td>Defines which adapter class will handle feed generation. Select <code>base</code> unless your project includes a custom implementation.</td></tr><tr><td><strong>Status</strong></td><td>Set this to <code>Active</code> to allow the adapter to be used during scheduled or manual feed generation. If set to <code>Passive</code>, it will be ignored by automatic processes.</td></tr><tr><td><strong>One time</strong></td><td>Check this box if you want the feed to only be triggered manually. This disables scheduled executions.</td></tr><tr><td><strong>File URL</strong></td><td>This field is automatically filled after feed generation. It provides a direct link for the generated XML file.</td></tr><tr><td><strong>Choose File</strong></td><td>(Optional) Upload a filter file in <code>.csv</code> or <code>.xls</code> format. The system will convert it to base64. The file should contain <code>sku</code> or <code>base_code</code> headers to restrict which products are included in the feed.</td></tr></tbody></table>

<figure><img src="https://3333414532-files.gitbook.io/~/files/v0/b/gitbook-x-prod.appspot.com/o/spaces%2FIbwGN7KwvYi0iLbjtnXz%2Fuploads%2FHA1lFmGN0qFAs4s3bSnx%2Fimage.png?alt=media&amp;token=680646ae-2f88-458d-a793-d6e9eebdb425" alt="" width="438"><figcaption></figcaption></figure>
{% endstep %}

{% step %}
If you're generating feeds for multiple markets, it's a best practice to name the adapter accordingly (e.g., `google_feed_ar_ksa`) and define separate adapters per language/price list.
{% endstep %}
{% endstepper %}

### <mark style="color:red;">Configure Feed Schema (</mark><mark style="color:red;">`config`</mark> <mark style="color:red;">field)</mark>

Once the basic adapter settings are filled, the next critical step is configuring how the feed will be generated. This is done through the **`config` field**, which is a JSON object that defines the structure, behavior, and formatting rules for the XML file that will be generated.

This configuration directly determines:

* Which product attributes are included
* What the output file is named
* How images, categories, and language-specific values are handled
* Whether out-of-stock products are shown
* How visual content (like cropped images or additional images) is formatted

#### Example Configuration:

```json
{
  "chunk_size": 100,
  "schema_data": [
    {
      "tag": "description",
      "attr_type": null
    },
    {
      "tag": "g:gender",
      "attr_type": null,
      "default_value": "Default"
    },
    {
      "tag": "title",
      "attr_type": null,
      "default_value": "title"
    }
  ],
  "EXTRA_IMAGES": true,
  "feed_filename": "insider/insider-feed_en.xml",
  "IS_ALL_SMALL_IMAGE": true,
  "url_attribute_data": null,
  "THUMBNAIL_CROP_TYPE": "Center",
  "extra_image_configs": [
    {
      "tag_name": "g:image_link",
      "tag_option": {
        "crop": "Center",
        "width": 1080,
        "height": 1080
      }
    }
  ],
  "IS_REQUIRED_SMALL_IMAGE": true,
  "category_attribute_data": [
    "category_name_en-us"
  ],
  "include_stock_out_products": true,
  "price_list_id": 1,
  "stock_list_id": 3,
  "category_name_translate_key": "category_name_en-us",
  "MERCHANT_FEED_VISILABS_IMAGE_TAG": "g:additional_image_link",
  "MERCHANT_FEED_VISILABS_IMAGE_SIZE": {
    "crop": "Center",
    "width": 1080,
    "height": 1080
  },
  "CUSTOM_CATEGORY_MAPPING_ENABLED": true,
  "category_ids_dict": {
    "00010001": "custom category id"
  },
  "category_dict": {
    "00010001": "custom category name"
  }
}
```

#### Explanation of Key Fields:

<table><thead><tr><th width="270.16015625">Field</th><th>Description</th></tr></thead><tbody><tr><td><code>chunk_size</code></td><td>Number of products processed per task run. Useful for optimizing large feeds. Must be greater than 0 and less than 1000.<br><em>Setting a value outside this range may result in validation errors or failed feed generation.</em></td></tr><tr><td><code>schema_data</code></td><td>List of tags to be included in the feed. Each item defines one XML tag. Optionally include a <code>default_value</code> if the mapped attribute is missing.</td></tr><tr><td><code>EXTRA_IMAGES</code></td><td>Enables inclusion of first product image in the feed.</td></tr><tr><td><code>feed_filename</code></td><td>Path + filename for the output feed. This should be unique per language/market.</td></tr><tr><td><code>IS_ALL_SMALL_IMAGE</code></td><td>Ensures small image versions are used where applicable.</td></tr><tr><td><code>url_attribute_data</code></td><td>Usually null unless custom logic is used for URL mapping.</td></tr><tr><td><code>THUMBNAIL_CROP_TYPE</code></td><td>Cropping strategy for image thumbnails. Options may include <code>Center</code>, <code>Top</code>, <code>Bottom</code>, etc.</td></tr><tr><td><code>extra_image_configs</code></td><td>Defines how extra images (e.g., <code>g:image_link</code>) should be rendered, including size and crop strategy.</td></tr><tr><td><code>IS_REQUIRED_SMALL_IMAGE</code></td><td>Forces the presence of small-sized images in the feed.</td></tr><tr><td><code>category_attribute_data</code></td><td>List of category-related product attributes. These are used when building the product's category tree or name.</td></tr><tr><td><code>include_stock_out_products</code></td><td>If <code>true</code>, includes products that are out of stock.</td></tr><tr><td><code>price_list_id</code> / <code>stock_list_id</code></td><td>Used to pull price and stock info from specific price/stock lists configured in Omnitron. Useful for multi-market feeds.</td></tr><tr><td><code>category_name_translate_key</code></td><td>Attribute key used to get the translated category name (e.g., for localized feeds).</td></tr><tr><td><code>MERCHANT_FEED_VISILABS_IMAGE_TAG</code></td><td>Specifies the tag under which additional images for Visilabs integration are exported.</td></tr><tr><td><code>MERCHANT_FEED_VISILABS_IMAGE_SIZE</code></td><td>Image dimensions and crop settings used for Visilabs-specific image feeds.</td></tr><tr><td><code>CUSTOM_CATEGORY_MAPPING_ENABLED</code></td><td>Enables manual category mapping by path. If set to <code>true</code>, feed category values can be overridden using <code>category_ids_dict</code> and <code>category_dict</code>.</td></tr><tr><td><code>category_ids_dict</code></td><td>Dictionary to override <code>&#x3C;category_code></code> based on category <code>path</code> value.<br>Format: <code>"{path}": "custom_code_value"</code><br>See: <a href="https://apidocs.akinon.com/commerce-openapis/data-warehouse/catalogs">Getting category path information</a></td></tr><tr><td><code>category_dict</code></td><td>Dictionary to override <code>&#x3C;category_name></code> based on category <code>path</code> value.<br>Format: <code>"{path}": "custom_name_value"</code></td></tr><tr><td><code>duplicate_fields</code></td><td>Copies the value of an existing tag into a new tag under a different name. Accepts a list of <code>{"source": ..., "target": ...}</code> objects. The duplication runs <strong>after</strong> all other tags are generated, so the target always mirrors the final value of the source.<br><em>Example:</em> <code>[{"source": "g:sale_price", "target": "sale_price"}]</code></td></tr></tbody></table>

### <mark style="color:red;">Price and Discount Configuration</mark>

By default, the feed derives its price tags from the product's price and retail (list) price:

* `g:price` → the **retail/list price** (the "struck-through" price) when the product has a discount.
* `g:sale_price` → the **actual selling price**.

When the product has no discount (no retail price, or price ≥ retail price), only `g:price` is written. You can fine-tune this behavior with the flags below—all of them are optional and belong in the same `config` JSON object.

<table><thead><tr><th width="300">Field</th><th>Description</th></tr></thead><tbody><tr><td><code>CONCAT_PRICE_CURRENCY</code></td><td>Boolean, default <code>true</code>. Appends the currency code to every price value (e.g. <code>995.00 TRY</code>). Set to <code>false</code> to output the numeric value only (e.g. <code>995.00</code>).</td></tr><tr><td><code>ALWAYS_INCLUDE_SALE_PRICE</code></td><td>Boolean, default <code>false</code>. When a product has no discount, still emits an empty <code>&#x3C;g:sale_price></code> tag instead of omitting it. Useful for platforms that require the tag to always be present.</td></tr><tr><td><code>SALE_PRICE_WITH_BASKET_OFFERS</code></td><td>Boolean, default <code>false</code>. <strong>Overwrites</strong> <code>g:sale_price</code> with the discounted price of the product's single-unit (quantity = 1) basket offer, so the sale price reflects the basket promotion. Requires the <code>OFFER_SHOW_LISTING_KWARGS</code> dynamic setting to be enabled (see hint below). Note: this replaces the real sale price—use <code>INCLUDE_BASKET_OFFER_PRICE</code> instead if you need to keep both.</td></tr><tr><td><code>INCLUDE_BASKET_OFFER_PRICE</code></td><td>Boolean, default <code>false</code>. Emits an <strong>additional</strong> <code>&#x3C;g:basket_price></code> tag containing the discounted price of the product's single-unit (quantity = 1) basket offer, <strong>without</strong> touching <code>g:price</code> or <code>g:sale_price</code>. The tag is only written when the product actually has a matching offer. Requires the <code>OFFER_SHOW_LISTING_KWARGS</code> dynamic setting to be enabled.</td></tr><tr><td><code>add_sale_price_as_price</code></td><td>Boolean, default <code>false</code>. If a sale price exists, moves it into <code>g:price</code> and drops <code>g:sale_price</code>, so the feed exposes a single (discounted) price.</td></tr></tbody></table>

#### Showing three separate prices (list, sale, and basket-offer price)

A common requirement is to expose the struck-through price, the sale price, **and** a separate basket-offer price at the same time. Enable `INCLUDE_BASKET_OFFER_PRICE` and leave `SALE_PRICE_WITH_BASKET_OFFERS` off:

```json
{
  "INCLUDE_BASKET_OFFER_PRICE": true
}
```

For a product with a list price of 2095.00, a sale price of 995.00, and a single-unit basket offer of 696.50, the feed then outputs:

```xml
<g:price>2095.00 TRY</g:price>
<g:sale_price>995.00 TRY</g:sale_price>
<g:basket_price>696.50 TRY</g:basket_price>
```

{% hint style="info" %}
`SALE_PRICE_WITH_BASKET_OFFERS` and `INCLUDE_BASKET_OFFER_PRICE` are independent. Enabling `SALE_PRICE_WITH_BASKET_OFFERS` overwrites `g:sale_price` with the offer price (losing the real sale price), whereas `INCLUDE_BASKET_OFFER_PRICE` keeps `g:sale_price` intact and adds the offer price as a separate `g:basket_price` tag. There is no need to also duplicate the sale price via `duplicate_fields` when you use `INCLUDE_BASKET_OFFER_PRICE`.
{% endhint %}

{% hint style="warning" %}
Both basket-offer flags rely on the offer's listing data (`discounted_total_price`), which is only exposed when the **`OFFER_SHOW_LISTING_KWARGS`** dynamic setting is enabled for the project. If that setting is off, the basket-offer price will not appear even when the flag is set.
{% endhint %}

### <mark style="color:red;">Upload Filter Files (Optional)</mark>

To include only specific products in the feed, you can upload a filter file—**CSV** or **XLS**—containing product identifiers. Filter files help reduce feed size or tailor feeds to campaign-specific product lists. For example, if you want to export only a selection of SKUs for a seasonal collection, use a filter.

{% stepper %}
{% step %}
Go to the **Choose File** field in the adapter form.
{% endstep %}

{% step %}
Upload a `.csv` or `.xls` file.
{% endstep %}

{% step %}
File must contain a `sku` or `base_code` column.

{% hint style="warning" %}
If the file format or header is incorrect, the system will return an error:\
`No valid header found in file headers.`
{% endhint %}
{% endstep %}

{% step %}
You can also combine the uploaded filter file with additional config-based filters via the `filter_arguments` key in the config:

```json
"filter_arguments": {
  "is_listable": true
}
```

This way, only listable products **that also match the uploaded SKUs** are included in the feed.
{% endstep %}
{% endstepper %}

### <mark style="color:red;">Save and Generate the Feed</mark>

Once you’ve completed the **Basic Adapter Settings**, added your **config JSON**, and optionally uploaded a **filter file**, it’s time to save the adapter:

* Click **“Save”.**
* If your `config` field is valid and includes a `schema_data` section, the page will reload and reveal a new section called **Mapper Settings**.
* This section allows you to define the transformation logic for each XML tag listed in your `schema_data`.

{% hint style="warning" %}
If you skip the config or forget to include `schema_data`, the Mapper Settings section will **not** be displayed.
{% endhint %}

## <mark style="color:red;">Attribute Mapping with Rules and Actions</mark>

After configuring your feed schema using the `config` field, the next crucial step is to **define how each XML field (tag) retrieves its data** from the product catalog. This is done using the **Mapper Settings** section in the adapter interface.

Each XML tag listed under `schema_data` must have a corresponding **mapper**, which includes:

* A **rule** that determines when the mapping should be applied
* An **action** that defines how to fetch or transform the data

Together, these enable complex conditional logic, localization, and formatting for your feeds—ensuring data consistency and compatibility with platforms like Google Merchant Center.

<figure><img src="https://3333414532-files.gitbook.io/~/files/v0/b/gitbook-x-prod.appspot.com/o/spaces%2FIbwGN7KwvYi0iLbjtnXz%2Fuploads%2FlrrGaVHATXWfeJPoIbam%2Fimage.png?alt=media&amp;token=560f22e3-1b06-4481-aa5a-fdcfe3e882f6" alt="" width="375"><figcaption></figcaption></figure>

Each mapper is a JSON object with two main parts:

#### 1. `rule`: *When should this mapping be applied?*

Defines the condition that must be true for the action to run.

#### 2. `action`: *How should the value be retrieved or constructed?*

Specifies how to fetch, format, or combine values.

### <mark style="color:red;">Rule Types (When)</mark>

<table><thead><tr><th width="217.21875">Rule Type</th><th>Description</th></tr></thead><tbody><tr><td><code>always</code></td><td>Always applies the action, regardless of product data</td></tr><tr><td><code>attributeexists</code></td><td>Applies only if a specific attribute exists on the product</td></tr><tr><td><code>multiattributeexists</code></td><td>Checks if multiple attributes exist (can be all or any)</td></tr><tr><td><code>query</code></td><td>Applies if a certain query condition is met (advanced)</td></tr><tr><td><code>in_dict</code></td><td>Checks if a field exists in a predefined dictionary</td></tr></tbody></table>

### <mark style="color:red;">Action Types (How)</mark>

<table><thead><tr><th width="221.8515625">Action Type</th><th>Description</th></tr></thead><tbody><tr><td><code>attrgetter</code></td><td>Retrieves a single attribute value</td></tr><tr><td><code>attrformatter</code></td><td>Formats an attribute using a custom template</td></tr><tr><td><code>multiattrformatter</code></td><td>Combines multiple attributes into a single string</td></tr><tr><td><code>outputdict</code></td><td>Uses a dictionary to map internal values to output values</td></tr><tr><td><code>stdout</code></td><td>Outputs a static value (useful for fixed tags)</td></tr></tbody></table>

#### Basic Example: Simple Attribute Getter

This mapper fetches the `description` field from the product data and maps it directly to the `<description>` XML tag.

```json
{
  "rule": {
    "rule_type": "always"
  },
  "action": {
    "action_type": "attrgetter",
    "action_kwargs": {
      "input_key": "description"
    }
  }
}
```

#### Example: Formatting Gender Using Output Dictionary

If your internal values for gender are stored as `M`, `F`, and `U`, but Google requires `male`, `female`, and `unisex`, use this:

```json
{
  "rule": {
    "rule_type": "always"
  },
  "action": {
    "action_type": "outputdict",
    "action_kwargs": {
      "input_key": "gender",
      "mapping_dict": {
        "M": "male",
        "F": "female",
        "U": "unisex"
      }
    }
  }
}
```

#### Combine Multiple Attributes

Use this action when you need to generate a value from multiple fields (e.g., combining brand + title + size).

```json
{
  "rule": {
    "rule_type": "always"
  },
  "action": {
    "action_type": "multiattrformatter",
    "action_kwargs": {
      "input_keys": ["brand", "title", "size"],
      "format_str": "{0} - {1} ({2})",
      "delimiter": " "
    }
  }
}
```

**Output Example:** `Nike - Air Max (42)`

### <mark style="color:red;">Handling Localized Fields</mark>

When generating feeds in **multiple languages**, you need to retrieve the correct **language-specific values** from product data. The format of your `input_key` inside the **mapper's `action_kwargs`** will vary depending on:

* Whether the feed is for the **default language**
* Whether the field is a **text** or **dropdown** attribute

#### <mark style="color:red;">For Default Language Feeds</mark>

If you're generating a feed in your **default language**, product attribute values can be accessed using this structure:

```json
"input_key": "attributes__{{attr_code}}"
```

This directly pulls the attribute from the product's default data.

#### <mark style="color:red;">For Localized Feeds (Non-Default Languages)</mark>

For other languages (e.g., Arabic, Turkish, English (US)), you need to reference **localized fields**. The structure depends on the **type of attribute**.

#### For text fields:

Use `localized_attributes` for retrieving translated text fields such as `title`, `description`, or `long_name`.

***Pattern:***

```
localized_attributes__{{language_code}}__{{attribute_code}}
```

***Example:***

```json
[
  {
    "rule": {
      "rule_type": "always",
      "rule_kwargs": {}
    },
    "action": {
      "action_type": "attrgetter",
      "action_kwargs": {
        "input_key": "localized_attributes__en-us__l_name"
      }
    },
    "shared_kwargs": {}
  }
]
```

#### For dropdown fields:

For dropdown attributes that have translated options (e.g., brand, material, gender), use the `attributes_kwargs` structure to access the translated label.

***Pattern:***

```
attributes_kwargs__{{attribute_code}}___translations__{{language_code}}__label
```

***Example:***

```json
[
  {
    "rule": {
      "rule_type": "always",
      "rule_kwargs": {}
    },
    "action": {
      "action_type": "attrgetter",
      "action_kwargs": {
        "input_key": "attributes_kwargs__brand___translations__ar__label"
      }
    },
    "shared_kwargs": {}
  }
]
```

{% hint style="warning" %}
Use the appropriate `language_code` (e.g., `en`, `ar`, `tr`) depending on the feed’s target market.
{% endhint %}

## <mark style="color:red;">Triggering and Monitoring Feed Generation</mark>

Once your Merchant Feed Adapter is configured and saved, it's time to **generate the actual XML feed file**. Omnitron provides both **automated** and **manual** triggering methods for this purpose. You can also **track the status** of the generation process and retrieve the final file URL programmatically.

**Automatic vs. Manual Triggering:**

<table><thead><tr><th width="216.5">Trigger Type</th><th>Description</th></tr></thead><tbody><tr><td><strong>Automatic (Scheduled)</strong></td><td>If the adapter's <code>One Time</code> checkbox is <strong>unchecked</strong>, Omnitron will automatically run the feed generation task every 3 hours.</td></tr><tr><td><strong>Manual (One-Time)</strong></td><td>If <code>One Time</code> is checked, the feed must be triggered manually via the API or Omnitron UI. This is useful for test feeds, campaign-based feeds, or ad-hoc exports.</td></tr></tbody></table>

### <mark style="color:red;">Trigger Feed Generation Manually (API)</mark>

To manually trigger feed generation for a specific adapter:

#### **Endpoint:**

```bash
POST /api/v1/remote/1/product_merchant_feeds/{adapter_pk}/trigger_task/
```

Replace `{adapter_pk}` with the ID of the adapter you want to trigger.

#### Example Request:

```bash
curl --location --request POST 'https://your-commerce-url/api/v1/remote/1/product_merchant_feeds/268/trigger_task/' \
--header 'Authorization: Token your_token_here'
```

#### Example Response

```json
{
  "cache_key": "6c27bc5a8f06442f96044302e6168d7a"
}
```

### <mark style="color:red;">Monitor Progress of Feed Generation</mark>

You can track the progress of the feed task using the returned `cache_key`.

#### Endpoint:

```bash
GET /api/v1/remote/1/product_merchant_feeds/{adapter_pk}/trigger_status/?cache_key={cache_key}
```

#### Example Request:

```bash
curl --location 'https://your-commerce-url/api/v1/remote/1/product_merchant_feeds/268/trigger_status/?cache_key=6c27bc5a8f06442f96044302e6168d7a' \
--header 'Authorization: Token your_token_here'
```

#### Example Response:

```json
{
  "completed_tasks": 1,
  "data": [
    {
      "progress": [1, 1],
      "completed": true,
      "chunk_count": 1
    }
  ],
  "progress_count": 1
}
```

{% hint style="warning" %}
**`progress: [x, y]`** represents **x completed chunks out of y total**. You can calculate progress percentage as:\
`(x / y) * 100`
{% endhint %}

### <mark style="color:red;">Get Feed File URL</mark>

Once the task is completed, the file will be available at the adapter’s detail endpoint.

#### Endpoint:

```bash
GET /api/v1/remote/1/product_merchant_feeds/{adapter_pk}/
```

#### Example Request:

```bash
curl --location 'https://your-commerce-url/api/v1/remote/1/product_merchant_feeds/268/' \
--header 'Authorization: Token your_token_here'
```

#### Example Response:

```json
{
  ...
  "file_url": "https://cdn.akinoncloud.com/google/insider-feed_en.xml"
}
```

You can now use this file URL in your Google Merchant Center, comparison shopping platforms, or campaign tracking tools.

### <mark style="color:red;">Error Handling</mark>

If a feed task is already in progress and a new one is triggered:

#### Example Response:

```json
{
  "non_field_errors": "Google Merchant Feed task is already running. Please wait until the current task is completed before starting a new one.",
  "error_code": "google_merchant_feed_adapter_100_2"
}
```

{% hint style="warning" %}
Always check if a task is running before triggering a new one to avoid queue conflicts.
{% endhint %}

### <mark style="color:red;">Triggering Feed Manually via Omnitron</mark>

In addition to using API calls, you can also **manually trigger feed generation directly from the Omnitron interface**—with just a few clicks.

{% stepper %}
{% step %}
**Select the Feed Adapter(s):**

Use the checkbox on the left to select the adapter(s) you want to run. You can select one or multiple rows.
{% endstep %}

{% step %}
**Open the "Select Action" Dropdown:**

At the top of the list, open the **Select Action** dropdown.
{% endstep %}

{% step %}
**Click “Trigger Task with Selected Items”:**

This option will immediately initiate the feed generation task for the selected adapters.

<figure><img src="https://3333414532-files.gitbook.io/~/files/v0/b/gitbook-x-prod.appspot.com/o/spaces%2FIbwGN7KwvYi0iLbjtnXz%2Fuploads%2FjBDwY7pTokaDn0IgYdjT%2Fimage.png?alt=media&amp;token=b49aaf23-9595-49f1-bad0-d9da784f5c86" alt=""><figcaption></figcaption></figure>
{% endstep %}

{% step %}
**Click “Apply”:**

The task will be queued and executed via Celery. You can monitor the task’s status using the API or check the file URL once generation is complete.

<figure><img src="https://3333414532-files.gitbook.io/~/files/v0/b/gitbook-x-prod.appspot.com/o/spaces%2FIbwGN7KwvYi0iLbjtnXz%2Fuploads%2FpsEKIhyRFKIG9JPyOcpt%2Fimage.png?alt=media&amp;token=7ba1ce75-0550-465c-a573-a05bb1d09ace" alt=""><figcaption></figcaption></figure>
{% endstep %}
{% endstepper %}

## <mark style="color:red;">Feed URL Usage</mark>

Once the feed generation is complete, the XML file becomes accessible via the provided `file_url`.\
For example, you can access the generated feed directly at:

{% embed url="<https://2c1676.s3.amazonaws.com/insider/insider-feed_en.xml>" %}

<figure><img src="https://3333414532-files.gitbook.io/~/files/v0/b/gitbook-x-prod.appspot.com/o/spaces%2FIbwGN7KwvYi0iLbjtnXz%2Fuploads%2FOifLMaVFUXG1CIiLDR1Z%2Fimage.png?alt=media&amp;token=0652ed13-3ec4-4df0-81dc-87f5b1fc082e" alt=""><figcaption></figcaption></figure>

You can now use this URL to upload the feed to Google Merchant Center or share it with external platforms that support scheduled product feed imports.

{% hint style="warning" %}
This URL remains valid as long as the feed is not deleted or regenerated under a different filename.
{% endhint %}


# Store Management


# How to Manage Stores in Omnitron?

This tutorial provides step-by-step instructions for managing stores in Omnitron.

## <mark style="color:red;">Step 1: Access to Omnitron​</mark> <a href="#step-1-access-to-omnitron" id="step-1-access-to-omnitron"></a>

* Access the **Omnitron** panel through your URL.
* Insert your granted *Username* and *Password*, and click the **Sign In** button.\
  ![](https://3333414532-files.gitbook.io/~/files/v0/b/gitbook-x-prod.appspot.com/o/spaces%2FIbwGN7KwvYi0iLbjtnXz%2Fuploads%2FQnfNjX72in5Qcy4LZzGH%2Fimage.png?alt=media\&token=7777dd02-19d8-44cd-af84-d258bc07ab2b)

## <mark style="color:red;">Step 2: Navigate to Stores Page​</mark> <a href="#step-2-navigate-to-stores-page" id="step-2-navigate-to-stores-page"></a>

* Navigate to the Omnitron platform and log into your account.
* Follow the **Sales Channels** > **Store Management** sidebar and click the **Stores** page.<br>

  <figure><img src="https://3333414532-files.gitbook.io/~/files/v0/b/gitbook-x-prod.appspot.com/o/spaces%2FIbwGN7KwvYi0iLbjtnXz%2Fuploads%2FDeAEnhWZwfSWOqtXJuBx%2Fimage.png?alt=media&amp;token=fa527759-b0c9-44fa-847e-4132ee0e5077" alt=""><figcaption></figcaption></figure>

## <mark style="color:red;">Step 3: Filtering Stores​</mark> <a href="#step-3-filtering-stores" id="step-3-filtering-stores"></a>

* On the Stores page, the filter panel and the list of existing stores are displayed.
* You can filter the stores based on Store Name, ERP code, etc. The selected filters are displayed in the active filters row.

## <mark style="color:red;">Step 4: Creating a New Store​</mark> <a href="#step-4-creating-a-new-store" id="step-4-creating-a-new-store"></a>

To create a new custom page, click the **+ New Store** button located in the upper-right corner.

<figure><img src="https://3333414532-files.gitbook.io/~/files/v0/b/gitbook-x-prod.appspot.com/o/spaces%2FIbwGN7KwvYi0iLbjtnXz%2Fuploads%2FeDH186Yb9tEobLYEXcim%2Fimage.png?alt=media&amp;token=64afebce-27d5-45ec-80c0-ffc1f4d764e2" alt=""><figcaption></figcaption></figure>

* **Store Name:** Enter the name of the store which will be displayed to users.
* **ERP Code:** Enter the code specified for the store within the client’s own ERP software.
* **Country, City, Township, District:** Select these from the displayed drop-down menu.
* **Address:** Enter the full address of the store.
* **Phone:** Enter the store’s phone number.
* **Fax**: Enter the store’s phone number.
* **Store Image:** Upload a store image by browsing the files on your computer.
* **Work Hours:** Enter the work hours of the store for each day.
* **Status**: Select the active/passive status of the store.
* **Delivery from Store**: Select whether this store will be available among options to deliver from the store, regarding orders placed via the website.
* **Store Type:** Select a store type that is defined in the backend.
* **Channel**: Select the sales channel to which the store will be added.
* **Sorting**: In storefront, you enter the order in which it will be displayed in the list.
* **Coordinates:** Hold and slide the map indicator to mark the location of the map or manually enter the coordinates in the related fields. If the latter option is used, the map indicator is automatically moved to the specified location.

Click **Save** after filling all necessary fields.

<figure><img src="https://3333414532-files.gitbook.io/~/files/v0/b/gitbook-x-prod.appspot.com/o/spaces%2FIbwGN7KwvYi0iLbjtnXz%2Fuploads%2FtSUccQK4A00ouuheuuDf%2Fimage.png?alt=media&amp;token=fc908f96-61c1-4114-938c-d734820d9da0" alt=""><figcaption></figcaption></figure>

<figure><img src="https://3333414532-files.gitbook.io/~/files/v0/b/gitbook-x-prod.appspot.com/o/spaces%2FIbwGN7KwvYi0iLbjtnXz%2Fuploads%2FQY5oymz65hDb1qFP3Yo6%2Fimage.png?alt=media&amp;token=51757d48-a529-441a-bf5a-715f0c5400bf" alt=""><figcaption></figcaption></figure>

## <mark style="color:red;">Step 5: Add/Remove Buddy Stores​</mark> <a href="#step-5-addremove-buddy-stores" id="step-5-addremove-buddy-stores"></a>

Buddy stores are local businesses that have formed partnerships to support each other's operations.

* Select buddy stores for the corresponding store by clicking the "**+**" button, where all the stores on the Omnitron are listed.
* You will then see the selected buddy store in the data table above.
* If necessary, you can remove it from the selected list by clicking the "**-**" button.<br>

  <figure><img src="https://3333414532-files.gitbook.io/~/files/v0/b/gitbook-x-prod.appspot.com/o/spaces%2FIbwGN7KwvYi0iLbjtnXz%2Fuploads%2FGLSv7wCE8RUScVtX88Fp%2Fimage.png?alt=media&amp;token=a85de565-843f-4355-9c50-c150e6d68903" alt=""><figcaption></figcaption></figure>

## <mark style="color:red;">Step 6: Add/Edit Store Page​</mark> <a href="#step-6-addedit-store-page" id="step-6-addedit-store-page"></a>

* To edit the store page, simply click on one of the existing store rows, make the desired changes as outlined above, and then click on the **Save** button.<br>

  <figure><img src="https://3333414532-files.gitbook.io/~/files/v0/b/gitbook-x-prod.appspot.com/o/spaces%2FIbwGN7KwvYi0iLbjtnXz%2Fuploads%2FXFdzO18hdz1io0PgX7ZV%2Fimage.png?alt=media&amp;token=bc485856-81bc-4a47-a5ee-147a98e71101" alt=""><figcaption></figcaption></figure>


# How to Manage Instore Store Employees in Omnitron?

The Instore Store Management Page primarily displays a list of stores available under the brand. After bulk configuration is completed by the Project Associates, you will be able to manage it by changing passwords and adjusting the status of specific stores.

## <mark style="color:red;">Step 1: Access to Omnitron​</mark> <a href="#step-1-access-to-omnitron" id="step-1-access-to-omnitron"></a>

* Access the **Omnitron** panel through your URL.
* Insert your granted *Username* and *Password*, and click the **Sign In** button.\
  ![](https://3333414532-files.gitbook.io/~/files/v0/b/gitbook-x-prod.appspot.com/o/spaces%2FIbwGN7KwvYi0iLbjtnXz%2Fuploads%2FQnfNjX72in5Qcy4LZzGH%2Fimage.png?alt=media\&token=7777dd02-19d8-44cd-af84-d258bc07ab2b)

## <mark style="color:red;">Step 2: Navigate to the Store Employees Page​</mark> <a href="#step-2-navigate-to-the-store-employees-page" id="step-2-navigate-to-the-store-employees-page"></a>

* Navigate to **Sales Channels > Content Management > Store Employees** from the menu.<br>

  <figure><img src="https://3333414532-files.gitbook.io/~/files/v0/b/gitbook-x-prod.appspot.com/o/spaces%2FIbwGN7KwvYi0iLbjtnXz%2Fuploads%2FmychKaFiDOxtlKzbdGwh%2Fimage.png?alt=media&amp;token=b83aeb0f-f0ab-4930-a860-2d28e4202b0d" alt=""><figcaption></figcaption></figure>

## <mark style="color:red;">Step 3: Filtering the Store Employees​</mark> <a href="#step-3-filtering-the-store-employees" id="step-3-filtering-the-store-employees"></a>

* On the Store Employees page, the filter panel and the list of existing store employees are displayed.
* You can filter the store on employee first name, employee email, store name and status.
* The selected filters will be displayed in the active filters row.<br>

  <figure><img src="https://3333414532-files.gitbook.io/~/files/v0/b/gitbook-x-prod.appspot.com/o/spaces%2FIbwGN7KwvYi0iLbjtnXz%2Fuploads%2Fb7tyLFYWF46lcepc4bSF%2Fimage.png?alt=media&amp;token=6126577b-0370-427a-86e0-859cfdc3ac6d" alt=""><figcaption></figcaption></figure>

## <mark style="color:red;">Step 4: Creating New Employee​</mark> <a href="#step-4-creating-new-employee" id="step-4-creating-new-employee"></a>

To create a new employee;

* Click the “**+ New Employee**” button located in the upper-right corner.
* **Employee First Name:** Insert the First Name.
* **Employee Last Name:** Insert the Last Name.
* **Employee Email:** Insert the corporate e-mail address of the new employee.
* **Affiliated Store:** Insert the store assigned to the employee.
* **Employee ID:** Insert the unique ID given to the employee
* **Select Status:** Select the status as “Active” or “Passive”.
* **Password:** Create a password manually or click “Generate Strong Password“
* **New Passport Again:** Insert the password chosen once again.
* Click **Save**.

  <figure><img src="https://3333414532-files.gitbook.io/~/files/v0/b/gitbook-x-prod.appspot.com/o/spaces%2FIbwGN7KwvYi0iLbjtnXz%2Fuploads%2F9riD7FG8eeASaGg5ByfP%2Fimage.png?alt=media&amp;token=77158ee4-8e15-47b8-93ed-5e4bb3dce4eb" alt=""><figcaption></figcaption></figure>

  <figure><img src="https://3333414532-files.gitbook.io/~/files/v0/b/gitbook-x-prod.appspot.com/o/spaces%2FIbwGN7KwvYi0iLbjtnXz%2Fuploads%2Fx4NAfLItJEIuEmauebKh%2Fimage.png?alt=media&amp;token=6d1bace7-dc8d-4801-b6a6-1b3d834001f1" alt=""><figcaption></figcaption></figure>

## <mark style="color:red;">Step 5: Changing the Password of the Employee​</mark> <a href="#step-5-changing-the-password-of-the-employee" id="step-5-changing-the-password-of-the-employee"></a>

If intended to renew the password of the existing employee;

* Click on the **Change Password** button to set a new password. You can use the **Generate Strong Password** button for an automatically generated strong password.
* After making changes, click the **Save** button to apply the modifications. The password for the store employee in the Instore application will be updated.<br>

  <figure><img src="https://3333414532-files.gitbook.io/~/files/v0/b/gitbook-x-prod.appspot.com/o/spaces%2FIbwGN7KwvYi0iLbjtnXz%2Fuploads%2F0jx01duEOzdibI2x0BMl%2Fimage.png?alt=media&amp;token=e00703f0-2d4d-4edd-a2e0-ac7b29a6f784" alt=""><figcaption></figcaption></figure>


# How to Manage Instore Store from Omnitron?

The Instore Store Management Page primarily displays a list of stores available under the brand. After bulk configuration is completed by the Project Associates, you will be able to manage it by changing passwords and adjusting the status of specific stores.

## <mark style="color:red;">Step 1: Access to Omnitron​</mark> <a href="#step-1-access-to-omnitron" id="step-1-access-to-omnitron"></a>

* Access the **Omnitron** panel through your URL.
* Insert your granted *Username* and *Password*, and click the **Sign In** button.\
  ![](https://3333414532-files.gitbook.io/~/files/v0/b/gitbook-x-prod.appspot.com/o/spaces%2FIbwGN7KwvYi0iLbjtnXz%2Fuploads%2FQnfNjX72in5Qcy4LZzGH%2Fimage.png?alt=media\&token=7777dd02-19d8-44cd-af84-d258bc07ab2b)

## <mark style="color:red;">Step 2: Navigate to the Instore Store Management Page​</mark> <a href="#step-2-navigate-to-the-instore-store-management-page" id="step-2-navigate-to-the-instore-store-management-page"></a>

* Navigate to **Sales Channels > Content Management > Instore Store Management** from the menu.

{% hint style="info" %}
**Instore Store Management** cardbox appears only when the selected sales channel type is web. In other words, for shop-type of sales channels, this cardboard appears.
{% endhint %}

<figure><img src="https://3333414532-files.gitbook.io/~/files/v0/b/gitbook-x-prod.appspot.com/o/spaces%2FIbwGN7KwvYi0iLbjtnXz%2Fuploads%2FTejBlfUdRgu6noqefzoi%2Fimage.png?alt=media&amp;token=e983efd9-82cf-4d5b-a453-4456f04cd688" alt=""><figcaption></figcaption></figure>

## <mark style="color:red;">Step 3: Filtering​</mark> <a href="#step-3-filtering" id="step-3-filtering"></a>

On the In-Store Store Management page, you'll find both the filter panel and the list of existing stores.You can filter stores by Store Name, ERP code, and Status. The selected filters will be displayed in the Active Filters row.

<figure><img src="https://3333414532-files.gitbook.io/~/files/v0/b/gitbook-x-prod.appspot.com/o/spaces%2FIbwGN7KwvYi0iLbjtnXz%2Fuploads%2FWplqIVVvFOtr9ONs6LVt%2Fimage.png?alt=media&amp;token=aee1d99a-35f2-4b28-a3f4-7330bc4773b0" alt=""><figcaption></figcaption></figure>

## <mark style="color:red;">Step 4: Changing Instore Passwords​</mark> <a href="#step-4-changing-instore-passwords" id="step-4-changing-instore-passwords"></a>

To update the passwords of the stores:

* Click on the "Change Password" button to set a new password.
* You can utilize the "Generate Strong Password" button for an automatically generated strong password.
* After making changes, click the "Save" button to apply the modifications.
* The password for the store in the Instore application will be updated accordingly.

  <figure><img src="https://3333414532-files.gitbook.io/~/files/v0/b/gitbook-x-prod.appspot.com/o/spaces%2FIbwGN7KwvYi0iLbjtnXz%2Fuploads%2F8IMKQq5JCZaoprx0cmSz%2Fimage.png?alt=media&amp;token=990a30ac-c191-44ff-9a7f-78ce4c2ca200" alt=""><figcaption></figcaption></figure>

{% hint style="info" %}
During the integration of stores via the ERP code, initial passwords are automatically generated.
{% endhint %}

## <mark style="color:red;">Step 5: Editing the Instore Status​</mark> <a href="#step-5-editing-the-instore-status" id="step-5-editing-the-instore-status"></a>

* Click on the **Edit** button for the desired store.
* Choose the desired status from the editable dropdown menu.
* Click "Save" or "Cancel" to confirm or discard the changes.

{% hint style="info" %}
If the Instore status is updated as "Passive", the store will not be accessible on the instore systems.
{% endhint %}

<figure><img src="https://3333414532-files.gitbook.io/~/files/v0/b/gitbook-x-prod.appspot.com/o/spaces%2FIbwGN7KwvYi0iLbjtnXz%2Fuploads%2FlcbxSDDa3fC4YrbcZxj5%2Fimage.png?alt=media&amp;token=873e1152-9aac-467c-8eab-8ca1aff53681" alt=""><figcaption></figcaption></figure>


# How to Manage Store Delivery Points in Omnitron?

To manage your store's delivery points effectively, follow these steps to navigate to the Store Delivery Points page, filter the store list, and update delivery points.

## <mark style="color:red;">Step 1: Navigate to Store Delivery Points Page​</mark> <a href="#step-1-navigate-to-store-delivery-points-page" id="step-1-navigate-to-store-delivery-points-page"></a>

* Navigate to the Omnitron platform and log into your account.
* Follow the **Sales Channels** > **Store Management** sidebar and click the **Store Delivery Points** page.<br>

  <figure><img src="https://3333414532-files.gitbook.io/~/files/v0/b/gitbook-x-prod.appspot.com/o/spaces%2FIbwGN7KwvYi0iLbjtnXz%2Fuploads%2F5AkamhiBZhbWqTqIS2KP%2Fimage.png?alt=media&amp;token=98dee6e8-77ff-4115-a391-7a52fa3b54ed" alt=""><figcaption></figcaption></figure>

## <mark style="color:red;">Step 2: Filtering Store Delivery Points Page​</mark> <a href="#step-2-filtering-store-delivery-points-page" id="step-2-filtering-store-delivery-points-page"></a>

* On the store delivery points page, the filter panel and the list of existing stores are displayed.
* You can filter the stores based on Store Name, Store Type, ERP Code, Status etc. The selected filters are displayed in the active filters row.<br>

  <figure><img src="https://3333414532-files.gitbook.io/~/files/v0/b/gitbook-x-prod.appspot.com/o/spaces%2FIbwGN7KwvYi0iLbjtnXz%2Fuploads%2FZEQRr7Twd6Ykx0czpNeC%2Fimage.png?alt=media&amp;token=143658c8-d527-4464-bed0-5dbfa83b9602" alt=""><figcaption></figcaption></figure>

## <mark style="color:red;">Step 3: Updating Store Delivery Points​</mark> <a href="#step-3-updating-store-delivery-points" id="step-3-updating-store-delivery-points"></a>

* To update delivery points for a store, locate the store in the list of existing stores and click on the row.<br>

  <figure><img src="https://3333414532-files.gitbook.io/~/files/v0/b/gitbook-x-prod.appspot.com/o/spaces%2FIbwGN7KwvYi0iLbjtnXz%2Fuploads%2FBChmiSJADlC38OFdKuSH%2Fimage.png?alt=media&amp;token=8b4b23f2-2b78-4adb-8239-4605b2b04bf0" alt=""><figcaption></figcaption></figure>
* You will be directed to the detail screen where you can make the necessary changes.
* Select the district for the store’s delivery point:
  * Among the neighborhoods within this district, click on the **"+"** icon next to the desired neighborhood to select it, adding it to the selected neighborhood area.
  * To remove a neighborhood from the selected list, click the **"—"** icon.
* After entering the Quota Settings (Maximum number of deliveries for the selected district), click the **"+ Save"** button.<br>

  <figure><img src="https://3333414532-files.gitbook.io/~/files/v0/b/gitbook-x-prod.appspot.com/o/spaces%2FIbwGN7KwvYi0iLbjtnXz%2Fuploads%2FaTUMqWsIRpbHwI46BNpl%2Fimage.png?alt=media&amp;token=ac187a8a-de08-47ea-bba1-6d5738290171" alt=""><figcaption></figcaption></figure>


# How to Manage Slots and Retail Store Groups?

The **Slot & Retail Store Group** functionality in Omnitron allows users to configure and manage delivery hours for specific stores or groups based on defined time intervals and date ranges. By navigating through **Sales Channels > Store Management,** users can access a centralized interface to set up delivery schedules, assign quotas, and handle store group configurations efficiently.

This document provides an overview of the following key processes:

* Configuring delivery hours and managing quotas.
* Creating and managing passive date ranges for store groups.
* Grouping retail stores and assigning delivery slots.
* Handling slot closures for processing.

With these tools, users can tailor delivery schedules to meet operational requirements while ensuring a streamlined and organized approach to managing store delivery times.

## <mark style="color:red;">Store Delivery Times​</mark> <a href="#store-delivery-times" id="store-delivery-times"></a>

The **Store Delivery Times** feature in Omnitron allows users to configure and manage specific delivery schedules for stores, ensuring operational efficiency and customer satisfaction. By navigating to **Sales Channels > Store Management > Store Delivery Times**, users can define delivery hour intervals, set quotas, and manage availability for specific date ranges.

<figure><img src="https://3333414532-files.gitbook.io/~/files/v0/b/gitbook-x-prod.appspot.com/o/spaces%2FIbwGN7KwvYi0iLbjtnXz%2Fuploads%2FoBO6VNIYtthzfKGTiNtW%2Fimage.png?alt=media&amp;token=1d7c4bd7-c579-4cfb-a378-018b53e191fe" alt=""><figcaption></figcaption></figure>

### <mark style="color:red;">Creating Store Delivery Times​</mark> <a href="#creating-store-delivery-times" id="creating-store-delivery-times"></a>

In the **Add/Edit Delivery Hours** form, the **Start-End Time**, **Disable Time (minutes)**, and **Quota** fields are filled in, and records are created by clicking the (+) icon.

* **Start-End Time**: Represents the respective delivery hour intervals.
* **Disable Time (min.)**: Indicates the last time the interval will be displayed in the store. For example, if the end time is 12:00 and the disable time is set to 15 minutes, this interval will no longer be visible in the store after 11:45.
* **Quota**: Represents the maximum number of orders that can be accepted within the interval.

  <figure><img src="https://3333414532-files.gitbook.io/~/files/v0/b/gitbook-x-prod.appspot.com/o/spaces%2FIbwGN7KwvYi0iLbjtnXz%2Fuploads%2FoFL5fhwS7bolHhqVAtHn%2Fimage.png?alt=media&amp;token=61af7791-2fea-4997-b3b4-c6a420df9860" alt=""><figcaption></figcaption></figure>

{% hint style="info" %}
Different **Disable Time** or **Quota** values can be entered for the same time interval. The **Start Time** value cannot exceed the **End Time** value.
{% endhint %}

### <mark style="color:red;">Selecting Store Delivery Hours for Date Ranges​</mark> <a href="#selecting-store-delivery-hours-for-date-ranges" id="selecting-store-delivery-hours-for-date-ranges"></a>

In the **Add/Remove Passive Date** form, users can create date ranges by entering the **Start Date** and **End Date** fields, selecting **Assigned Store Group**, and clicking the **+ NEW SLOT** button.

* **Start-End Date**: Represents the desired specific date range.
  * Only one passive date can be created for an existing date range. For example, if a passive date already exists for **(02.03.2025 - 01.04.2025)**, a new passive date cannot be created for **(08.03.2025 - 07.06.2025)** because it overlaps with the existing range **(08.03.2025 - 01.04.2025)**.
* **Assigned Store Group:** Refers to the group of stores that the delivery hours configuration will apply to.<br>

  <figure><img src="https://3333414532-files.gitbook.io/~/files/v0/b/gitbook-x-prod.appspot.com/o/spaces%2FIbwGN7KwvYi0iLbjtnXz%2Fuploads%2FDGlwK7c75UtWnGhWtKx8%2Fimage.png?alt=media&amp;token=42cea44a-9413-4bb6-b6ee-f1760ef24fcb" alt=""><figcaption></figcaption></figure>

Created passive dates automatically include inactive time intervals configured via the **Add/Edit Delivery Hours** form.

Delivery hours can be added to the selected passive dates by clicking the **(+)** icon. Delivery hours activated for passive dates can be removed by clicking the **(-)** icon next to the relevant interval.

Delivery hours with overlapping time intervals cannot be selected together for the same passive date. For instance, delivery hours with the intervals **(08:00 - 12:00)** and **(09:00 - 13:00)** cannot be selected simultaneously for a passive date because they both overlap with the interval **(09:00 - 12:00)**.

Passive dates can be deactivated by clicking the **(-) Delete** button in the row displaying the respective date range.

## <mark style="color:red;">Retail Store Groups​</mark> <a href="#retail-store-groups" id="retail-store-groups"></a>

The **Retail Store Groups** feature in Omnitron allows users to efficiently manage and organize groups of stores. By navigating to **Sales Channels > Store Management > Retail Store Groups**, users can view and filter store groups, access detailed information, and create or modify groups as needed.

{% hint style="info" %}
**Retail Store Groups** cardbox appears only when the selected sales channel type is web. In other words, for *shop-type* of sales channels, this cardboard appears.
{% endhint %}

<figure><img src="https://3333414532-files.gitbook.io/~/files/v0/b/gitbook-x-prod.appspot.com/o/spaces%2FIbwGN7KwvYi0iLbjtnXz%2Fuploads%2F1bnpG0Wy4sWE2fjfCZbu%2Fimage.png?alt=media&amp;token=57a02cb7-b071-4765-b151-b0c3124894f0" alt=""><figcaption></figcaption></figure>

The **Retail Store Groups List** displays the names, statuses, and slugs of retail store groups.

The list can be filtered based on the stores included in the groups. For example, if stores A, B, and C belong to store group X, selecting A, B, or C in the **Stores** filter will display group X.

<figure><img src="https://3333414532-files.gitbook.io/~/files/v0/b/gitbook-x-prod.appspot.com/o/spaces%2FIbwGN7KwvYi0iLbjtnXz%2Fuploads%2FNe3xv5MDnFA0A9U7pIQo%2Fimage.png?alt=media&amp;token=3d4029e9-cbca-4fc1-9652-0d10f5697dc0" alt=""><figcaption></figcaption></figure>

Clicking on a store group in the list opens the **Retail Store Group Details** page.

<figure><img src="https://3333414532-files.gitbook.io/~/files/v0/b/gitbook-x-prod.appspot.com/o/spaces%2FIbwGN7KwvYi0iLbjtnXz%2Fuploads%2FEZXdqUyVzbpLSUIxc5kx%2Fimage.png?alt=media&amp;token=9adc87ac-f3ac-49c3-8697-d85bff3c448b" alt=""><figcaption></figcaption></figure>

### <mark style="color:red;">Creating Retail Store Group​</mark> <a href="#creating-retail-store-group" id="creating-retail-store-group"></a>

In the **Retail Store Group** form, users can create or update store groups by filling in the fields and clicking **SAVE RETAIL STORE GROUP**.

* **Name**: Represents the name of the retail store group.
* **Status**: Represents the active/inactive status of the group.
* **Slug**: Represents the slug of the group.
* **All Stores:** Lists the available stores that can be added to the group.
* **Added Stores**: Displays the stores already added to the group. This section organizes the stores by their locations and includes options to remove stores.

{% hint style="info" %}
A store can belong to only one group.
{% endhint %}

<figure><img src="https://3333414532-files.gitbook.io/~/files/v0/b/gitbook-x-prod.appspot.com/o/spaces%2FIbwGN7KwvYi0iLbjtnXz%2Fuploads%2Fl3TiFs8cDXSfLoOWFenX%2Fimage.png?alt=media&amp;token=df5ae1ff-51dc-4ee6-978b-cc1e8564e978" alt=""><figcaption></figcaption></figure>

## <mark style="color:red;">Assigning Delivery Hours (Slots) to Retail Store Groups​</mark> <a href="#assigning-delivery-hours-slots-to-retail-store-groups" id="assigning-delivery-hours-slots-to-retail-store-groups"></a>

The **Assigning Delivery Hours (Slots) to Retail Store Groups** functionality in Omnitron enables users to assign specific delivery hours to designated store groups. By navigating to **Sales Channels > Store Management > Marketplace Slots** (Assign Slots to Groups), users can configure time intervals for various store groups based on passive date ranges.

<figure><img src="https://3333414532-files.gitbook.io/~/files/v0/b/gitbook-x-prod.appspot.com/o/spaces%2FIbwGN7KwvYi0iLbjtnXz%2Fuploads%2FHTFFxmVoL8SR5BrpZb6r%2Fimage.png?alt=media&amp;token=a72965cd-314d-48c4-914d-014a8036b85d" alt=""><figcaption></figcaption></figure>

In the dropdown menu shown below, a Retail Store Group can be selected. After making a selection, time intervals can be configured for the selected Retail Store Group.

<figure><img src="https://3333414532-files.gitbook.io/~/files/v0/b/gitbook-x-prod.appspot.com/o/spaces%2FIbwGN7KwvYi0iLbjtnXz%2Fuploads%2FuNzIMArQnloX0ebL7ibG%2Fimage.png?alt=media&amp;token=bc400dba-2a77-43fc-8397-05b40b4c7265" alt=""><figcaption></figcaption></figure>

The **Selectable Slot** list displays available time intervals for the selected store group. The **Selected Slot** list displays the intervals already chosen.

Selectable Slot - Time Ranges can be added by clicking the **(+)** icon. Selected Slot - Time Ranges can be removed by clicking the **(-)** icon.

<figure><img src="https://3333414532-files.gitbook.io/~/files/v0/b/gitbook-x-prod.appspot.com/o/spaces%2FIbwGN7KwvYi0iLbjtnXz%2Fuploads%2FV6xUXdMDM5pSh51t0pby%2Fimage.png?alt=media&amp;token=c8e5db4f-691f-4124-b38c-3ed60764b654" alt=""><figcaption></figcaption></figure>

The lists of Selectable and Selected Time Ranges within the Add/Remove Passive Date form contain the active Delivery Hours specific to their respective records. For instance, in the screenshot above, only the time intervals (09:00 - 12:00, 12:00 - 22:00) are displayed for the Passive Date (28.12.2024 - 28.01.2025) since these delivery hours have been activated.

{% hint style="info" %}
Multiple time intervals can be selected for a Retail Store Group.
{% endhint %}

### <mark style="color:red;">Closing Store Delivery Hours (Slots) for Processing​</mark> <a href="#closing-store-delivery-hours-slots-for-processing" id="closing-store-delivery-hours-slots-for-processing"></a>

User can close slots for processing from a specific date for store groups or all stores using the following methods:

* Create a retail store group for the stores whose slots will be closed.
* Define the date ranges for closed slots in the **Add/Remove Passive Date** form. Do not select any delivery hours for the defined passive date.
* Assign the stores to the created group.
* Navigate to **Marketplace Slots (Assign Slots to Groups)** and select the passive date for the store group without selecting delivery hours.

<figure><img src="https://3333414532-files.gitbook.io/~/files/v0/b/gitbook-x-prod.appspot.com/o/spaces%2FIbwGN7KwvYi0iLbjtnXz%2Fuploads%2FgioRVh4Fjk9uUzGTbIS7%2Fimage.png?alt=media&amp;token=025b16e2-9436-4487-b7d8-8a5bb619ca84" alt=""><figcaption></figcaption></figure>

As shown in the screenshot above, no delivery time has been selected within the Slot - Time Ranges for Retail Store Group 1. Consequently, slots for the stores belonging to Retail Store Group 1 will not appear on the shop page during the specified time ranges.

### <mark style="color:red;">Key Points​</mark> <a href="#key-points" id="key-points"></a>

* Multiple slots can be selected for a single Retail Store Group. Additionally, the same slot can be assigned to multiple Retail Store Groups.
* Delivery Hours that are not assigned to any Retail Store Group on the Marketplace Slots (Assign Slots to Groups) page will be valid for all stores not assigned to any Retail Store Group during the relevant passive date range.
* A store listed under Added Stores on the Retail Store Group Details page cannot be displayed under the All Stores list of a different Retail Store Group, regardless of the active/passive status of the group to which it belongs.
* To disable slots for all stores, all Delivery Hours can be deleted from the Add/Edit Delivery Hours form on the Store Delivery Times page.
* Instead of individually removing a specific time interval from multiple inactive dates, the quota can be set to 0. In this way, the relevant time interval can be disabled for all inactive dates with a single change, avoiding the need for it to be removed one by one.


# Payment Management


# How to Manage POS Integrations in Omnitron?

This tutorial provides step-by-step instructions for managing Pos Integration in Omnitron.

## <mark style="color:red;">Step 1: Access to Omnitron​</mark> <a href="#step-1-access-to-omnitron" id="step-1-access-to-omnitron"></a>

* Get access to the Omnitron panel.
* Enter your Username and Password, and then click the **Sign In** button.\
  ![](https://3333414532-files.gitbook.io/~/files/v0/b/gitbook-x-prod.appspot.com/o/spaces%2FIbwGN7KwvYi0iLbjtnXz%2Fuploads%2FQnfNjX72in5Qcy4LZzGH%2Fimage.png?alt=media\&token=7777dd02-19d8-44cd-af84-d258bc07ab2b)

## <mark style="color:red;">Step 2: Navigate to POS Integration Page​</mark> <a href="#step-2-navigate-to-pos-integration-page" id="step-2-navigate-to-pos-integration-page"></a>

* Follow the **Sales Channels > Payment Management** sidebar and click the **Add/Edit POS Integration** page.<br>

  <figure><img src="https://3333414532-files.gitbook.io/~/files/v0/b/gitbook-x-prod.appspot.com/o/spaces%2FIbwGN7KwvYi0iLbjtnXz%2Fuploads%2FXelyfJTL91Jody7lWcWD%2Fimage.png?alt=media&amp;token=097f6e95-2727-4372-aabe-b048ea389240" alt=""><figcaption></figcaption></figure>
* This page displays the POS information that is essential for payment processes related to the selected sales channel. Users are granted the capability to modify existing POS Integrations or create new ones.<br>

  <figure><img src="https://3333414532-files.gitbook.io/~/files/v0/b/gitbook-x-prod.appspot.com/o/spaces%2FIbwGN7KwvYi0iLbjtnXz%2Fuploads%2F0cR84VQy9fL7dtyoQGwr%2Fimage.png?alt=media&amp;token=e5be8443-367e-4e81-b12f-0420f0ab9da8" alt=""><figcaption></figcaption></figure>

## <mark style="color:red;">Step 3: Adding New POS​</mark> <a href="#step-3-adding-new-pos" id="step-3-adding-new-pos"></a>

* To add a new POS, click the **+ New POS** button. Complete the form by filling in the following fields:
  * **Name:** Specify the name for this POS integration.
  * **Slug:** Define a unique slug for this POS integration.
  * **Gateway:** Select the payment gateway to be used for this POS integration. Completed third-party developments for gateways will be listed in the gateway dropdown. Depending on the schema selected in this field, the form dynamically adjusts to reveal new inputs. For instance, selecting "Masterpass" will unveil additional inputs according to that specific gateway.
  * **Resource URL:** Input the resource URL for this POS integration.
  * **3D Resource URL:** Input the 3D resource URL for this POS integration.
* Once the relevant fields are completed, click the **Save** button.<br>

  <figure><img src="https://3333414532-files.gitbook.io/~/files/v0/b/gitbook-x-prod.appspot.com/o/spaces%2FIbwGN7KwvYi0iLbjtnXz%2Fuploads%2FJCVaFp9C2qh9olgBx76c%2Fimage.png?alt=media&amp;token=049918ed-6091-496d-83f3-a655cd75688d" alt=""><figcaption></figcaption></figure>


# How to Manage Banks in Omnitron?

This tutorial provides step-by-step instructions for managing Banks in Omnitron.

## <mark style="color:red;">Step 1: Access to Omnitron​</mark> <a href="#step-1-access-to-omnitron" id="step-1-access-to-omnitron"></a>

* Get access to the Omnitron panel.
* Enter your *Username* and *Password*, and then click the **Sign In** button.\
  ![](https://3333414532-files.gitbook.io/~/files/v0/b/gitbook-x-prod.appspot.com/o/spaces%2FIbwGN7KwvYi0iLbjtnXz%2Fuploads%2FL1sAi0Wa7yceeQM3tJhA%2Fimage.png?alt=media\&token=f21533e2-c19c-4fa3-8506-b56dab42f399)

## <mark style="color:red;">Step 2: Navigate to Banks Page​</mark> <a href="#step-2-navigate-to-banks-page" id="step-2-navigate-to-banks-page"></a>

* Follow the **Sales Channels > Payment Management** sidebar and click the **Banks** page.<br>

  <figure><img src="https://3333414532-files.gitbook.io/~/files/v0/b/gitbook-x-prod.appspot.com/o/spaces%2FIbwGN7KwvYi0iLbjtnXz%2Fuploads%2FYLq7ZPyMnqNeNInRwFB6%2Fimage.png?alt=media&amp;token=01d40dc5-1662-44f6-81dc-422db00a7fbe" alt=""><figcaption></figcaption></figure>
* This page displays the available banks on the selected sales channel.<br>

  <figure><img src="https://3333414532-files.gitbook.io/~/files/v0/b/gitbook-x-prod.appspot.com/o/spaces%2FIbwGN7KwvYi0iLbjtnXz%2Fuploads%2FxCMOx8WUQf50pEhUppMB%2Fimage.png?alt=media&amp;token=a25cb395-b224-4667-9824-0df31e83b82e" alt=""><figcaption></figcaption></figure>

## <mark style="color:red;">Step 3: Adding New Bank​</mark> <a href="#step-3-adding-new-bank" id="step-3-adding-new-bank"></a>

* Users have the option to add banks individually by using the **+New Bank** button.<br>

  <figure><img src="https://3333414532-files.gitbook.io/~/files/v0/b/gitbook-x-prod.appspot.com/o/spaces%2FIbwGN7KwvYi0iLbjtnXz%2Fuploads%2Fc8ichaVToxGUGNzhlEgU%2Fimage.png?alt=media&amp;token=d90157dd-e830-461d-af6b-e953127a70df" alt=""><figcaption></figcaption></figure>
* Fill in the required fields, including:
  * **Name:** Specify the name for this bank.
  * **Slug:** Define a unique slug for this bank.
  * **Logo:** Upload an image for this bank.
* Once the relevant fields are completed, click the **Save** button.<br>

  <figure><img src="https://3333414532-files.gitbook.io/~/files/v0/b/gitbook-x-prod.appspot.com/o/spaces%2FIbwGN7KwvYi0iLbjtnXz%2Fuploads%2FkYPo82eENuBUbGiDWvdx%2Fimage.png?alt=media&amp;token=b9fa5962-138d-497f-97a4-9ec08882a037" alt=""><figcaption></figcaption></figure>

## <mark style="color:red;">Step 4: Adding New Bank with File​</mark> <a href="#step-4-adding-new-bank-with-file" id="step-4-adding-new-bank-with-file"></a>

* Users have the option to add banks in bulk by using the **+New Bank with File** button, allowing them to upload a .CSV or .XLS file. The file should contain essential information, including **slug** and **name**. To proceed, click the **+New Bank with File** button, select the relevant file, and observe the newly added banks as they populate in the list.<br>

  <figure><img src="https://3333414532-files.gitbook.io/~/files/v0/b/gitbook-x-prod.appspot.com/o/spaces%2FIbwGN7KwvYi0iLbjtnXz%2Fuploads%2F8IX7QZtCLHt7c6GQXVJV%2Fimage.png?alt=media&amp;token=12b5eece-a95c-4355-a086-bc6f53351811" alt=""><figcaption></figcaption></figure>

## <mark style="color:red;">Step 5: Adding a Bank Account for Wire Transfers​</mark> <a href="#step-5-adding-a-bank-account-for-wire-transfers" id="step-5-adding-a-bank-account-for-wire-transfers"></a>

* Upon adding a new bank, it is essential to formally include payment information for wire transfer transactions under the corresponding bank. To achieve this, users should click the **Add New Money Transfer Account** button. Subsequently, fields will be provided for the required information to be filled out.<br>

  <figure><img src="https://3333414532-files.gitbook.io/~/files/v0/b/gitbook-x-prod.appspot.com/o/spaces%2FIbwGN7KwvYi0iLbjtnXz%2Fuploads%2FTpYnY9SUYZTOk9Aaqh0R%2Fimage.png?alt=media&amp;token=490dbb99-8044-47d9-965c-ce6fd817ed02" alt=""><figcaption></figcaption></figure>
* Complete the raw by filling in the following fields:
  * **PK:** Filling out this field is not required; it will be automatically generated after pressing the **Save** button.
  * **Add/Save Account Owner:** Enter the name of the IBAN holder.
  * **Slug:** Define a unique slug for this bank account.
  * **IBAN:** Input the IBAN value associated with the bank.
  * **Description:** Optionally, provide a description for the bank account.
  * **Order:** Specify the order of the bank account.
  * **Active/Passive:** Set the active or inactive status of the bank account.
* After completing the relevant fields, click the **Save** button.


# How to Manage Card Types in Omnitron?

This tutorial provides step-by-step instructions for managing Card Types in Omnitron.

## <mark style="color:red;">Step 1: Access to Omnitron​</mark> <a href="#step-1-access-to-omnitron" id="step-1-access-to-omnitron"></a>

* Get access to the Omnitron panel.
* Enter your Username and Password, and then click the **Sign In** button.\
  ![](https://3333414532-files.gitbook.io/~/files/v0/b/gitbook-x-prod.appspot.com/o/spaces%2FIbwGN7KwvYi0iLbjtnXz%2Fuploads%2FL1sAi0Wa7yceeQM3tJhA%2Fimage.png?alt=media\&token=f21533e2-c19c-4fa3-8506-b56dab42f399)

## <mark style="color:red;">Step 2: Navigate to Card Types Page​</mark> <a href="#step-2-navigate-to-card-types-page" id="step-2-navigate-to-card-types-page"></a>

* Follow the **Sales Channels > Payment Management** sidebar and click the **Card Types** page.<br>

  <figure><img src="https://3333414532-files.gitbook.io/~/files/v0/b/gitbook-x-prod.appspot.com/o/spaces%2FIbwGN7KwvYi0iLbjtnXz%2Fuploads%2FIljVoHZgb6eUQ42fB0Is%2Fimage.png?alt=media&amp;token=428b1cd8-7ee1-4794-9f17-d314e724ed97" alt=""><figcaption></figcaption></figure>
* This page displays the available card types for payments on the selected sales channel.<br>

  <figure><img src="https://3333414532-files.gitbook.io/~/files/v0/b/gitbook-x-prod.appspot.com/o/spaces%2FIbwGN7KwvYi0iLbjtnXz%2Fuploads%2F0sP386LT3RdqeriQhYla%2Fimage.png?alt=media&amp;token=1222f572-45c0-4099-82b3-4f58c8626d6b" alt=""><figcaption></figcaption></figure>

## <mark style="color:red;">Step 3: Adding Card Type​</mark> <a href="#step-3-adding-card-type" id="step-3-adding-card-type"></a>

* To add or edit a card type, click the **+ New Card Type** button or the name of any card type on the list. This action will direct you to the **Add/Edit Card Type** form, which presents fields for Name, Slug, and Logo. Existing card types can also be edited using this form.
  * **Name:** Specify the name for this card type.
  * **Slug:** Define a unique slug for this card type.
  * **Logo:** Upload an image for this card type.
* Once the relevant fields are completed, click the **Save** button.<br>

  <figure><img src="https://3333414532-files.gitbook.io/~/files/v0/b/gitbook-x-prod.appspot.com/o/spaces%2FIbwGN7KwvYi0iLbjtnXz%2Fuploads%2FsBCzcBqD68lz0ajtu9ah%2Fimage.png?alt=media&amp;token=3eb25759-a077-45cf-a5a5-0a17aff5f3fa" alt=""><figcaption></figcaption></figure>


# How to Manage Payment Options in Omnitron?

This tutorial provides step-by-step instructions for managing Payment Options in Omnitron.

## <mark style="color:red;">Step 1: Access to Omnitron​</mark> <a href="#step-1-access-to-omnitron" id="step-1-access-to-omnitron"></a>

* Get access to the Omnitron panel.
* Enter your Username and Password, and then click the **Sign In** button.\
  ![](https://3333414532-files.gitbook.io/~/files/v0/b/gitbook-x-prod.appspot.com/o/spaces%2FIbwGN7KwvYi0iLbjtnXz%2Fuploads%2FL1sAi0Wa7yceeQM3tJhA%2Fimage.png?alt=media\&token=f21533e2-c19c-4fa3-8506-b56dab42f399)

## <mark style="color:red;">Step 2: Navigate to Payment Options Page​</mark> <a href="#step-2-navigate-to-payment-options-page" id="step-2-navigate-to-payment-options-page"></a>

* Follow the **Sales Channels > Payment Management** sidebar and click the **Payment Options** page.<br>

  <figure><img src="https://3333414532-files.gitbook.io/~/files/v0/b/gitbook-x-prod.appspot.com/o/spaces%2FIbwGN7KwvYi0iLbjtnXz%2Fuploads%2FvFbfoaOZx38Hd4FKcQWT%2Fimage.png?alt=media&amp;token=b67733de-2b4b-4a0c-894c-88980735cf2c" alt=""><figcaption></figcaption></figure>
* This page displays the available payment options for the selected sales channel. The listed payment options can be filtered based on Slug, Name, Status, and Payment Option values. Users have the option to add a new payment option by clicking the **+New Payment Option** button.<br>

  <figure><img src="https://3333414532-files.gitbook.io/~/files/v0/b/gitbook-x-prod.appspot.com/o/spaces%2FIbwGN7KwvYi0iLbjtnXz%2Fuploads%2FOHExohUhY66kmzVlP7Ev%2Fimage.png?alt=media&amp;token=d8308433-5f9b-4683-a6cd-ad1364ec6a96" alt=""><figcaption></figcaption></figure>

{% hint style="info" %}
The credit card payment option is singular, allowing only one instance.
{% endhint %}

## <mark style="color:red;">Step 3: Adding Payment Option​</mark> <a href="#step-3-adding-payment-option" id="step-3-adding-payment-option"></a>

* To add or edit a payment option, either click the **+New Payment Option** button or the name of any payment option on the list. This action will direct you to the **Add/Edit Payment Option** form, where you can modify the details. The form presents fields such as Payment Type, Payment Option Name, Payment Option Slug, Priority, Config, and Status. Existing payment options can also be edited using this form.
  * **Payment Type:** Select the payment option to be configured.
  * **Name:** Specify the name for this payment option.
  * **Slug:** Define a unique slug for this payment option.
  * **Priority:** Set the priority for this payment option among others.
  * **Config:** Configure rules for this payment option.
  * **Status:** Set the Active/Passive status for this payment option.
* Once the relevant fields are completed, click the **Save** button.<br>

  <figure><img src="https://3333414532-files.gitbook.io/~/files/v0/b/gitbook-x-prod.appspot.com/o/spaces%2FIbwGN7KwvYi0iLbjtnXz%2Fuploads%2FglRwFw7JdIf5tzso9krj%2Fimage.png?alt=media&amp;token=6a3e0534-1163-493d-8ec9-cb9ff5562264" alt="" width="563"><figcaption></figcaption></figure>


# How to Manage Card Settings in Omnitron?

This tutorial provides step-by-step instructions for managing Card Settings in Omnitron.

## <mark style="color:red;">Step 1: Access to Omnitron​</mark> <a href="#step-1-access-to-omnitron" id="step-1-access-to-omnitron"></a>

* Get access to the Omnitron panel.
* Enter your Username and Password, and then click the **Sign In** button.\
  ![](https://3333414532-files.gitbook.io/~/files/v0/b/gitbook-x-prod.appspot.com/o/spaces%2FIbwGN7KwvYi0iLbjtnXz%2Fuploads%2FL1sAi0Wa7yceeQM3tJhA%2Fimage.png?alt=media\&token=f21533e2-c19c-4fa3-8506-b56dab42f399)

## <mark style="color:red;">Step 2: Navigate to Card Settings Page​</mark> <a href="#step-2-navigate-to-card-settings-page" id="step-2-navigate-to-card-settings-page"></a>

* Follow the **Sales Channels > Payment Management** sidebar and click the **Card Settings** page.<br>

  <figure><img src="https://3333414532-files.gitbook.io/~/files/v0/b/gitbook-x-prod.appspot.com/o/spaces%2FIbwGN7KwvYi0iLbjtnXz%2Fuploads%2FcPDj4FK6vdpnZmD5d4KE%2Fimage.png?alt=media&amp;token=9efdae61-fec1-48db-824b-8ccd73ba5b8a" alt=""><figcaption></figcaption></figure>
* This page displays the available card settings for payments on the selected sales channel. The listed card settings can be filtered based on Slug, Name, Bank, Payment Type, Card Type, Cash, Payment by Installments, 3D Payment, and Commercial Card values.<br>

  <figure><img src="https://3333414532-files.gitbook.io/~/files/v0/b/gitbook-x-prod.appspot.com/o/spaces%2FIbwGN7KwvYi0iLbjtnXz%2Fuploads%2FN0Xwwm5OWQh7mC81tImr%2Fimage.png?alt=media&amp;token=f99aca3d-b227-49e7-94f0-761ca063ba37" alt=""><figcaption></figcaption></figure>

## <mark style="color:red;">Step 3: Adding Card Settings​</mark> <a href="#step-3-adding-card-settings" id="step-3-adding-card-settings"></a>

* To add a new card setting, click on the **+ New Card Setting** button or the name of any card setting in the list to access the Add/Edit Card Setting form. The displayed form dynamically changes based on whether you are adding or editing a card setting.
* The Add Card Setting form presents fields such as Card Name, Slug, Single Payment POS Infrastructure, Installments POS Infrastructure, 3D POS Infrastructure, Card Payment Type, Card Type, Bank, and Commercial Card. Additionally, the Edit Card Setting form includes fields for Currencies, Interest Commission Rates, and Card BINs.
* On the Add/Edit Card Settings page, users can configure POS infrastructure with currencies and BIN numbers. The required fields to be filled in include:
  * **Card Name:** Specify the name for this card.
  * **Slug:** Define a unique slug for this card.
  * **Single Payment POS Infrastructure:** Select the POS infrastructure for single payment processes with this card.
  * **Installments POS Infrastructure:** Select the POS infrastructure for payments by installment with this card.
* After completing the relevant fields, click the **Save** button.

  <figure><img src="https://3333414532-files.gitbook.io/~/files/v0/b/gitbook-x-prod.appspot.com/o/spaces%2FIbwGN7KwvYi0iLbjtnXz%2Fuploads%2FNJbJj1xhrCu1WtJ1K95M%2Fimage.png?alt=media&amp;token=7fcfd64b-bc49-450a-906f-62b87c50782b" alt=""><figcaption></figcaption></figure>

  <figure><img src="https://3333414532-files.gitbook.io/~/files/v0/b/gitbook-x-prod.appspot.com/o/spaces%2FIbwGN7KwvYi0iLbjtnXz%2Fuploads%2FC08DeM7zwWF17mzWLNAX%2Fimage.png?alt=media&amp;token=bc23cb05-3ca5-4d04-8aa0-156c94020cb2" alt=""><figcaption></figcaption></figure>
* Users have the option to select the POS based on the currency used. In a shop with multiple currencies accepted for payment, options for Single Payment, Installment, and 3D POS Infrastructure are provided. Users have the ability to input settings for multiple currencies.
* Once the currency and POS-related inputs have been filled in, click the **Save** button to finalize the configuration.<br>

  <figure><img src="https://3333414532-files.gitbook.io/~/files/v0/b/gitbook-x-prod.appspot.com/o/spaces%2FIbwGN7KwvYi0iLbjtnXz%2Fuploads%2FfAX9fWfc0XbnGBnSWflR%2Fimage.png?alt=media&amp;token=14655784-a7a5-46b4-92f4-dd0c9e3b1e32" alt=""><figcaption></figcaption></figure>

## <mark style="color:red;">Step 4: Adding New Commission Rate Linked to the POS​</mark> <a href="#step-4-adding-new-commission-rate-linked-to-the-pos" id="step-4-adding-new-commission-rate-linked-to-the-pos"></a>

* To introduce a new commission rate, begin by clicking the **Add New Commission Rate** button. Subsequently, fill in the fields for Expiration Number, Expiration Definition, Expiration Difference Rate (%), Min Limit, Max Limit, and specify the Active/Passive status. It's important to note that the pk value should remain unchanged during the editing process.<br>

  <figure><img src="https://3333414532-files.gitbook.io/~/files/v0/b/gitbook-x-prod.appspot.com/o/spaces%2FIbwGN7KwvYi0iLbjtnXz%2Fuploads%2FrPpGEI8vfPxVkstkWKwZ%2Fimage.png?alt=media&amp;token=f17158db-f3a3-4ed2-898f-827c5571e496" alt=""><figcaption></figcaption></figure>

{% hint style="warning" %}
If you want to set minimum and/or maximum basket amount limits for installment options, make sure to define the `basket_amount` filter in the dynamic `INSTALLMENT_FILTERS` setting in Commerce. Without this filter, the validation based on basket amount will not work. For detailed information, please refer to [Installment Filters](https://docs.akinon.com/tutorials/omnitron/sales-channels/payment-management/spaces/lQinVPnOffBiOp126ldR/pages/ufqWx7BjiprXrNvTVelW#id-7.-basket-amount-filter) documentation.

<img src="https://3333414532-files.gitbook.io/~/files/v0/b/gitbook-x-prod.appspot.com/o/spaces%2FIbwGN7KwvYi0iLbjtnXz%2Fuploads%2FGZ9S5o1c7io83Qqq2ULh%2Fimage.png?alt=media&amp;token=7eb94752-221e-43f1-9d53-a08cd3f1a5dc" alt="" data-size="original">
{% endhint %}

## <mark style="color:red;">Step 5: Adding the Bin Number Linked to the POS​</mark> <a href="#step-5-adding-the-bin-number-linked-to-the-pos" id="step-5-adding-the-bin-number-linked-to-the-pos"></a>

* At the bottom of the page, a list displaying the added BIN numbers linked to the POS is available. This list provides information on BIN numbers associated with this card. The determination of the card setting for credit/debit card payments is based on the assigned card setting for the BIN value of the respective card.
* By clicking the **Add BIN Number** button, users can add a single BIN number.
* By clicking the **Add Bulk BIN Number** button, users can add bulk BIN numbers through a file.
  * The .CSV file used for bulk addition should include the bin\_number parameter.<br>

    <figure><img src="https://3333414532-files.gitbook.io/~/files/v0/b/gitbook-x-prod.appspot.com/o/spaces%2FIbwGN7KwvYi0iLbjtnXz%2Fuploads%2Fm6CJz4KgBVEazmIqytCx%2Fimage.png?alt=media&amp;token=41495ff5-3565-4266-b06d-553221e0ecf9" alt=""><figcaption></figcaption></figure>


# How to Manage Checkout Providers in Omnitron?

This tutorial provides step-by-step instructions for managing Checkout Provider in Omnitron.

## <mark style="color:red;">Step 1: Access to Omnitron​</mark> <a href="#step-1-access-to-omnitron" id="step-1-access-to-omnitron"></a>

* Get access to the Omnitron panel.
* Enter your Username and Password, and then click the **Sign In** button.\
  ![](https://3333414532-files.gitbook.io/~/files/v0/b/gitbook-x-prod.appspot.com/o/spaces%2FIbwGN7KwvYi0iLbjtnXz%2Fuploads%2FL1sAi0Wa7yceeQM3tJhA%2Fimage.png?alt=media\&token=f21533e2-c19c-4fa3-8506-b56dab42f399)

## <mark style="color:red;">Step 2: Navigate to Orders Page​</mark> <a href="#step-2-navigate-to-orders-page" id="step-2-navigate-to-orders-page"></a>

* Follow the **Sales Channels > Payment Management** sidebar and click the **Checkout Provider** page.<br>

  <figure><img src="https://3333414532-files.gitbook.io/~/files/v0/b/gitbook-x-prod.appspot.com/o/spaces%2FIbwGN7KwvYi0iLbjtnXz%2Fuploads%2F9aH6THGLfRvk37SZ06Mv%2Fimage.png?alt=media&amp;token=db5c1ec6-0e2a-4765-bb15-95ee27f7c4bc" alt=""><figcaption></figcaption></figure>
* This page displays checkout providers (such as Akifast and third-party applications) for management purposes. The listed checkout providers can be filtered based on their Name and Slug values.<br>

  <figure><img src="https://3333414532-files.gitbook.io/~/files/v0/b/gitbook-x-prod.appspot.com/o/spaces%2FIbwGN7KwvYi0iLbjtnXz%2Fuploads%2FYt8DYPOMKhvuE7hzAWj9%2Fimage.png?alt=media&amp;token=ea0ed35b-882f-4271-af1b-adb47840c976" alt=""><figcaption></figcaption></figure>

## <mark style="color:red;">Step 3: Adding Checkout Provider​</mark> <a href="#step-3-adding-checkout-provider" id="step-3-adding-checkout-provider"></a>

* To add a new provider, click the **+ New Checkout Provider** button. Complete the form by filling in the following fields:
  * **Name:** Specify the name for this checkout provider.
  * **Priority:** Assign the priority value for this checkout provider.
  * **Slug:** Define a unique slug for this checkout provider.
  * **Config:** Enter configuration details, including authorization information, in JSON format. (Parameters will be provided by the Akifast team.)
    * **Sample Config:**

      ```
      {"auth":{"password":"password","oauth_resource_url":"https://oauth.akifast.com/","merchant_id":"merchant_id","oauth_client_secret":"akinon_oauth_client_secret"}}
      ```
  * **Status:** Set the Active/Passive status for this checkout provider.
  * **Resource URL:** Provide the resource URL associated with this checkout provider.
  * **Gateway:** Currently, this field offers the "Akifast" option, which is embedded in the code.
  * **Translations:** Enter translations in JSON format.
* Once you have filled in the relevant fields, click the **Save** button.<br>

  <figure><img src="https://3333414532-files.gitbook.io/~/files/v0/b/gitbook-x-prod.appspot.com/o/spaces%2FIbwGN7KwvYi0iLbjtnXz%2Fuploads%2FPNzZDPgnIWhy3g4BJnp3%2Fimage.png?alt=media&amp;token=9b1134ab-9b04-46cc-aeaf-d42b9166e228" alt=""><figcaption></figcaption></figure>


# Category Management


# How to Automatically Assign Category Mapping Rules in Omnitron?

This tutorial provides step-by-step instructions for automatically assigning rules for category mapping operations in Omnitron.

## <mark style="color:red;">Step 1: Access to Omnitron​</mark> <a href="#step-1-access-to-omnitron" id="step-1-access-to-omnitron"></a>

* Get access to the **Omnitron** panel.
* Enter your *Username* and *Password*, and then click the **Sign In** button.\
  ![](https://3333414532-files.gitbook.io/~/files/v0/b/gitbook-x-prod.appspot.com/o/spaces%2FIbwGN7KwvYi0iLbjtnXz%2Fuploads%2FL1sAi0Wa7yceeQM3tJhA%2Fimage.png?alt=media\&token=f21533e2-c19c-4fa3-8506-b56dab42f399)

## <mark style="color:red;">Step 2: Navigate to Category Mapping Page​</mark> <a href="#step-2-navigate-to-category-mapping-page" id="step-2-navigate-to-category-mapping-page"></a>

* Follow the **Products and Catalogs > Catalogs > Category Tree** or **Sales Channels > Category Management** steps and click on the **Auto Assign Rules** button to reach the **Category Mapping** page.
* *Category Mapping* is used for automatically assigning the category node to products for related Sales Channel.
  * *Category Mapping* action can be taken for both marketplaces and web-type of sales channels. The path may change as above depending on the sales channel where the action will be taken.

<figure><img src="https://3333414532-files.gitbook.io/~/files/v0/b/gitbook-x-prod.appspot.com/o/spaces%2FIbwGN7KwvYi0iLbjtnXz%2Fuploads%2FsevxxHMvAkD1EPEuLYW1%2Fimage.png?alt=media&amp;token=2501004b-d2e4-4c6c-bd2f-0aa4a05657d5" alt=""><figcaption></figcaption></figure>

*Auto Assign Rules* button, following **Products and Catalogs > Catalogs > Category Tree** steps

<figure><img src="https://3333414532-files.gitbook.io/~/files/v0/b/gitbook-x-prod.appspot.com/o/spaces%2FIbwGN7KwvYi0iLbjtnXz%2Fuploads%2FOJjRE1QZoWnA8IGMScXf%2Fimage.png?alt=media&amp;token=8acf5804-0847-401e-9d0c-a661b2f393ce" alt=""><figcaption></figcaption></figure>

*Auto Assign Rules* button, following **Sales Channels > Category Management** steps

<figure><img src="https://3333414532-files.gitbook.io/~/files/v0/b/gitbook-x-prod.appspot.com/o/spaces%2FIbwGN7KwvYi0iLbjtnXz%2Fuploads%2Fa69Q1rDUx9yTdEcMNURW%2Fimage.png?alt=media&amp;token=84bd3155-3586-4075-a8eb-98b820bb4404" alt=""><figcaption></figcaption></figure>

## <mark style="color:red;">Step 3: View Category Mapping Page​</mark> <a href="#step-3-view-category-mapping-page" id="step-3-view-category-mapping-page"></a>

* By clicking on the **Auto Assign Rules**, the **Category Mapping** page can be seen.
* Category Mapping page includes two different tabs,
  * *Category to Category* tab
    * In which different categories from different catalogs can be mapped directly.
  * *Rules (Product to Category)* tab
    * In which rule-based product to category mapping can be made.<br>

      <figure><img src="https://3333414532-files.gitbook.io/~/files/v0/b/gitbook-x-prod.appspot.com/o/spaces%2FIbwGN7KwvYi0iLbjtnXz%2Fuploads%2Fa69Q1rDUx9yTdEcMNURW%2Fimage.png?alt=media&amp;token=84bd3155-3586-4075-a8eb-98b820bb4404" alt=""><figcaption></figcaption></figure>
* Users can;
  * view the *Source Category Tree* for the Category to Category mapping,
  * view the *Source Category Nodes* and map these nodes to the selected Sales Channel’s Category Nodes (*Target Category Nodes*)
  * make Category to Category mapping ignored
  * filter Category to Category Mappings by *Excluding Ignored Categories* or *Showing Categories That Need Mapping,*
  * view the schema of the *Target Category Nodes* on the *Category to Category* tab.<br>

    <figure><img src="https://3333414532-files.gitbook.io/~/files/v0/b/gitbook-x-prod.appspot.com/o/spaces%2FIbwGN7KwvYi0iLbjtnXz%2Fuploads%2FlJIjMx9AP7W3OzQfddxU%2Fimage.png?alt=media&amp;token=b1d3ea2a-d239-46b9-a2d6-2548ed059dac" alt=""><figcaption></figcaption></figure>
* Users also can;
  * view, create, update and delete the Category Mapping Rules,
  * filter Rules with respect to the *Status* and *Target Category Name* on the *Rules (Product to Category*) tab.<br>

    <figure><img src="https://3333414532-files.gitbook.io/~/files/v0/b/gitbook-x-prod.appspot.com/o/spaces%2FIbwGN7KwvYi0iLbjtnXz%2Fuploads%2FJ79wUJerROfH8bL2J0vf%2Fimage.png?alt=media&amp;token=05f22e74-d8d5-4df7-877b-4142e1ac3d55" alt=""><figcaption></figcaption></figure>

## <mark style="color:red;">Step 4: Add/Update “Category to Category” Mapping​</mark> <a href="#step-4-addupdate-category-to-category-mapping" id="step-4-addupdate-category-to-category-mapping"></a>

* After selecting a *Source Category Tree* and clicking on the **Apply** button, the selected Category Tree can be seen on the **Category to Category** tab.<br>

  <figure><img src="https://3333414532-files.gitbook.io/~/files/v0/b/gitbook-x-prod.appspot.com/o/spaces%2FIbwGN7KwvYi0iLbjtnXz%2Fuploads%2FYzCyI7UUvEZDuokghxaG%2Fimage.png?alt=media&amp;token=85617108-1914-4707-a5ce-9950131b3cd7" alt=""><figcaption></figcaption></figure>
* Listed source categories can be mapped
  * by clicking on the dropdown and selecting the target category nodes, or
  * by clicking on the schema icon and selecting the target category nodes.
* Mapped categories can be edited by the same steps above.
* Mapped categories can be deleted by clicking on the *Delete Icon.*

For products added to the catalog, category assignments are automatically made to the target category node with respect to the relevant *Category to Category Mapping*.

<figure><img src="https://3333414532-files.gitbook.io/~/files/v0/b/gitbook-x-prod.appspot.com/o/spaces%2FIbwGN7KwvYi0iLbjtnXz%2Fuploads%2FwUyvenWm7T4AQFXxGWn7%2Fimage.png?alt=media&amp;token=4eccb8c7-7afd-4815-8961-6d5bc07c2676" alt=""><figcaption></figcaption></figure>

*Creating / Updating “Category to Category Mapping” by clicking on the dropdown and selecting the target category nodes*

<figure><img src="https://3333414532-files.gitbook.io/~/files/v0/b/gitbook-x-prod.appspot.com/o/spaces%2FIbwGN7KwvYi0iLbjtnXz%2Fuploads%2Fmx0MFELNb1ssdWOVsPI7%2Fimage.png?alt=media&amp;token=b28a0143-9a6d-43b5-9144-4855ef87e705" alt=""><figcaption></figcaption></figure>

*Creating / Updating “Category to Category Mapping” by clicking on the schema icon and selecting the target category nodes.*

{% hint style="info" %}
Please note that the “*adding products to the catalog*” operation should be done after the *Category to Category Mapping* is completed.
{% endhint %}

{% hint style="info" %}
Please note that only the “leaf” source and target categories can be mapped to each other (leaf categories: sub-category nodes that do not have any child category nodes).
{% endhint %}

## <mark style="color:red;">Step 5: Add/Update Category Mapping Rule​</mark> <a href="#step-5-addupdate-category-mapping-rule" id="step-5-addupdate-category-mapping-rule"></a>

* Clicking on the **Rules** button on the Category Mapping page, **Category Mapping Rules** can be seen as a list.<br>

  <figure><img src="https://3333414532-files.gitbook.io/~/files/v0/b/gitbook-x-prod.appspot.com/o/spaces%2FIbwGN7KwvYi0iLbjtnXz%2Fuploads%2FJ79wUJerROfH8bL2J0vf%2Fimage.png?alt=media&amp;token=05f22e74-d8d5-4df7-877b-4142e1ac3d55" alt=""><figcaption></figcaption></figure>
* By clicking on the **+ New Category Mapping Rule** button, or clicking on the **Edit** icon on the listed category mapping rules, **Add / Edit Category Mapping Rule** **Form** can be opened.<br>

  <figure><img src="https://3333414532-files.gitbook.io/~/files/v0/b/gitbook-x-prod.appspot.com/o/spaces%2FIbwGN7KwvYi0iLbjtnXz%2Fuploads%2F88Q6ZNkBHAqQUKssYWPt%2Fimage.png?alt=media&amp;token=80a703cd-7d7e-4016-bb14-5cbc15717925" alt=""><figcaption></figcaption></figure>
* Users can;
  * select a *Target Category Name*,
  * give rule(s) to the *Target Category Node* by selecting one or multiple *Attribute Name, Condition Processor* and *Attribute Value* for the *Category Mapping Rule*.

For products added to the catalog, category assignments are automatically made to the target category node with respect to the relevant *Category Mapping Rule*.

<figure><img src="https://3333414532-files.gitbook.io/~/files/v0/b/gitbook-x-prod.appspot.com/o/spaces%2FIbwGN7KwvYi0iLbjtnXz%2Fuploads%2F8PihUUwBniX84EN4MzYO%2Fimage.png?alt=media&amp;token=fb56f15f-45fb-4335-ae05-68b0df09cf88" alt=""><figcaption></figcaption></figure>

*One Rule can include multiple Attribute Name, Condition, Attribute Value groups*

{% hint style="info" %}
The “*adding products to the catalog*” operation should be done after the *Category Mapping Rule* is created.
{% endhint %}

{% hint style="info" %}
Only the “leaf” source and target categories can be mapped to each other (leaf categories: sub-category nodes that do not have any child category nodes).
{% endhint %}

{% hint style="info" %}
*Category to Category Mapping* and *Category Mapping Rules* can be formed for the same *Target Category Node*. In this case, the product assignment to the Target Category Node, provided that the product has been added to the catalog, is automatically made with respect to both mapping rules.
{% endhint %}

## <mark style="color:red;">Step 6: Delete Category Mapping Rule​</mark> <a href="#step-6-delete-category-mapping-rule" id="step-6-delete-category-mapping-rule"></a>

* Listed Category Mapping Rules can be deleted by selecting the “Delete Selected Items” option and clicking on the **Apply** button.<br>

  <figure><img src="https://3333414532-files.gitbook.io/~/files/v0/b/gitbook-x-prod.appspot.com/o/spaces%2FIbwGN7KwvYi0iLbjtnXz%2Fuploads%2Fa0e2a2KOSW3Japl5Gcny%2Fimage.png?alt=media&amp;token=ab085088-12bf-435e-8810-b72d10906125" alt=""><figcaption></figcaption></figure>


# Sales Channel Settings


# How to Configure Marketplace Attribute Mapping in Omnitron?

Omnitron Marketplace Mapper enables users to configure and match their product attributes and attribute values for Marketplace Sales Channels. It also allows users to verify the correctness of product features and values prior to listing them for sale.

<figure><img src="https://3333414532-files.gitbook.io/~/files/v0/b/gitbook-x-prod.appspot.com/o/spaces%2FIbwGN7KwvYi0iLbjtnXz%2Fuploads%2FpU2PresVfAJ2YAE8GY6M%2Fimage.png?alt=media&amp;token=cb67e8bf-3546-4c94-92f6-cbd705e5ffc9" alt=""><figcaption></figcaption></figure>

## <mark style="color:red;">Marketplace Attributes​</mark> <a href="#marketplace-attributes" id="marketplace-attributes"></a>

The **Marketplace Attributes** page lists the attributes for the related Marketplace. On this page, Users can view the *PK (Primary Key), Name, Related Mapping Rule Set Name and Updated Date* of the Marketplace Attributes, and filter Marketplace Attributes with respect to *Attribute Name* and/or *Attribute Set* values.

<figure><img src="https://3333414532-files.gitbook.io/~/files/v0/b/gitbook-x-prod.appspot.com/o/spaces%2FIbwGN7KwvYi0iLbjtnXz%2Fuploads%2F2xGmo7mMsZQXx1oD8Yz1%2Fimage.png?alt=media&amp;token=6fa137c3-57f8-42ec-9931-bacf7bc89953" alt=""><figcaption></figcaption></figure>

## <mark style="color:red;">Marketplace Attribute Values​</mark> <a href="#marketplace-attribute-values" id="marketplace-attribute-values"></a>

The **Marketplace Attribute Values** page lists the attribute values of the related Marketplace’s attributes. On this page, users can view the *Primary Key (PK), Attribute, Name, Value, Updated Date* of the Marketplace Attribute Values and filter Marketplace Attribute Values with respect to *Name, Attribute,* and/or *Attribute Set* values.

<figure><img src="https://3333414532-files.gitbook.io/~/files/v0/b/gitbook-x-prod.appspot.com/o/spaces%2FIbwGN7KwvYi0iLbjtnXz%2Fuploads%2FH4e4YyWmRtjGDWZyb4V8%2Fimage.png?alt=media&amp;token=f8fe445e-bac1-4b02-b97a-2a501e7732a7" alt=""><figcaption></figcaption></figure>

* **Primary Key:** ID of the relevant attribute value, has to be unique.
* **Attribute:** Attribute that the relevant attribute value depends on.
* **Name (Attribute Value’s Label):** Label of the attribute value. For example, there can be an attribute value with a label of “White” and a value of “0001”. In other words the Name of the attribute value.
* **Value (Attribute Value):** Attribute Value identifier, has to be unique.

### <mark style="color:red;">Mapper​</mark> <a href="#mapper" id="mapper"></a>

The **Mapper** page lists predefined Mapping Rule Sets of rules for Marketplace Attributes. A Mapping Rule can be described as the set of attribute value mappings between the Omnitron and related Marketplace. Users can create a New Mapping Rule Set by clicking on the **+ Add New Attribute Mapping Rule** button, or edit existing rule sets by clicking on the **Edit** button on the row.

Additionally, users can filter Mapping Rules with respect to *Rule Set Name, Target Attribute, Target Attribute Set, Creation Date and Updated Date* on this page. This allows them to conveniently find and manage the specific mapping rules they need for their products listed on the marketplace.

<figure><img src="https://3333414532-files.gitbook.io/~/files/v0/b/gitbook-x-prod.appspot.com/o/spaces%2FIbwGN7KwvYi0iLbjtnXz%2Fuploads%2Fgfyr3EXEisBm7ZaxHxUQ%2Fimage.png?alt=media&amp;token=b70c12de-93f9-4dcd-963a-9038d1df9f8d" alt=""><figcaption></figcaption></figure>

#### <mark style="color:red;">Add/Edit Mapping Rule Form​</mark> <a href="#addedit-mapping-rule-form" id="addedit-mapping-rule-form"></a>

By clicking the **+ Add New Attribute Mapping Rule** button or the **Edit** button in the list, users can access **Add/Edit Mapping Rule Form**. To create a set of attribute value mappings between the Omnitron and related Marketplace, users must complete the *Mapping Rule Name* and *Target Attribute (Related Marketplace Attribute)* fields. If the mapping rule requires customization based on categories, users can select the specific category for customization in the **Target Attribute Set** field, located next to the **Target Attribute.**

{% hint style="info" %}
Target Attributes can be filtered by clicking on the “Show only required target attributes” checkbox.
{% endhint %}

<figure><img src="https://3333414532-files.gitbook.io/~/files/v0/b/gitbook-x-prod.appspot.com/o/spaces%2FIbwGN7KwvYi0iLbjtnXz%2Fuploads%2FsHPD5QsfFFzCAYu044xH%2Fimage.png?alt=media&amp;token=45c1bbdf-3c88-4185-9fbe-23274520b215" alt=""><figcaption></figcaption></figure>

Users can create or edit Mapping Rules for Omnitron Attributes and related Marketplace Attributes by choosing the four primary Mapping Methods that Akinon Mapper offers:

* Standard Mapping
* Fixed Value Mapping
* Merge Fields Mapping
* Custom Mapping

#### <mark style="color:red;">**Standard Mapping​**</mark>

The Standard Mapping method is used to directly map Omnitron Attribute & Attribute Values to Marketplace Attribute & Attribute values. Users can select which Omnitron Attribute Value will be matched to which Marketplace Attribute Value. After selecting the *Standard* Mapping Method, users should select the *Source Attribute (Related Omnitron Attribute)* for direct mapping.

If users want to manually match their Source Attribute Values to Target Attribute Values, the *Add static value to value mapping* checkbox should be marked. With this action, all of the Source Attribute Values will be listed, and users can select the related Target Attribute Values for each.

{% hint style="info" %}
If both the Source and Target Attributes’ data types are “dropdown”, an auto-mapping is performed with respect to the *attribute values*. Auto-mapped attribute values can be distinguished from the corresponding green checkbox icon. This feature can be used only for **Adding a New Mapping Rule**.
{% endhint %}

<figure><img src="https://3333414532-files.gitbook.io/~/files/v0/b/gitbook-x-prod.appspot.com/o/spaces%2FIbwGN7KwvYi0iLbjtnXz%2Fuploads%2FcSljvrfuSgLurfaUSrCk%2Fimage.png?alt=media&amp;token=f6d8a077-d08b-4387-859b-21dbd288fc23" alt=""><figcaption></figcaption></figure>

{% hint style="info" %}
If the *Show Description* checkbox is checked, target and source *attribute labels* can be seen, if not, attribute values can be seen on the Attribute Values list.
{% endhint %}

On the other hand, if users want to send their Source Attribute Values directly to the related Target Attribute, the *Add static value to value mapping* checkbox should not be marked. Please note that Source Attribute Values’ parameter should either be present as a Marketplace Attribute Value or the related Marketplace Attribute accepts free-text inputs for the Target Attribute while the checkbox is not marked.

<figure><img src="https://3333414532-files.gitbook.io/~/files/v0/b/gitbook-x-prod.appspot.com/o/spaces%2FIbwGN7KwvYi0iLbjtnXz%2Fuploads%2F2NwzqgIGpyNS9yYsPJ2n%2Fimage.png?alt=media&amp;token=85f6e8d2-3064-457b-9447-11c967b54c53" alt=""><figcaption></figcaption></figure>

#### <mark style="color:red;">**Fixed Value Mapping​**</mark>

The Fixed Value mapping method is used to assign a fixed value to a Marketplace Attribute for all the products being sent. There are three options for the fixed Marketplace Attribute Value:

* **Null:** Target Attribute Value is sent as null for all marketplace products (e.g., `"Origin":null`).
* **Empty String:** Target Attribute Value is sent as an empty string for all marketplace products (e.g., `"Origin":""`).
* **Custom:** A specified custom value is sent for all marketplace products (e.g., `"Size": "Standard"`).<br>

  <figure><img src="https://3333414532-files.gitbook.io/~/files/v0/b/gitbook-x-prod.appspot.com/o/spaces%2FIbwGN7KwvYi0iLbjtnXz%2Fuploads%2F1N4tvYmUqNwKoMvTo1he%2Fimage.png?alt=media&amp;token=cebc5b93-41eb-471d-a95b-08b47e7f1776" alt=""><figcaption></figcaption></figure>

#### <mark style="color:red;">**Merge Fields Mapping​**</mark>

The Merge Fields mapping method allows users to create an attribute value by combining Source Attribute Values or Fixed Values into a corresponding Marketplace Attribute Value.

By selecting the *Concatenate* function under the **Function** tab, users can merge one or more Source Attributes with Fixed Values in the **Content** tab. The **Output Preview** field displays the template (showing which Source Attributes and/or Fixed Values were used to create the Marketplace Attribute Value) and the resulting value under the "Preview Output Template" and "Sample Output Value" sections, respectively.

<figure><img src="https://3333414532-files.gitbook.io/~/files/v0/b/gitbook-x-prod.appspot.com/o/spaces%2FIbwGN7KwvYi0iLbjtnXz%2Fuploads%2F9VdZMKLh00qDmvBL9Idt%2Fimage.png?alt=media&amp;token=72df45aa-3217-4a1d-b2f4-12babb0c89c9" alt=""><figcaption></figcaption></figure>

<figure><img src="https://3333414532-files.gitbook.io/~/files/v0/b/gitbook-x-prod.appspot.com/o/spaces%2FIbwGN7KwvYi0iLbjtnXz%2Fuploads%2FzrySbAseJ99ehdJFixR6%2Fimage.png?alt=media&amp;token=d87f21fa-652e-4b15-a369-a7f1e28ef031" alt=""><figcaption></figcaption></figure>

#### <mark style="color:red;">**Custom Mapping​**</mark>

The Custom mapping method is used for more complex mappings that cannot be handled by the other three mapping methods. Some of the Rule Set components are explained below.

* **type:** Defines the Mapping Type and can be one of the following:
  * **attribute:** Maps a source attribute to a target attribute.
  * **attribute\_kwargs:** Maps a source attribute to a target attribute as an object.
  * **field:** Uses various fields (such as SKU, base code, or localized attribute values) as the target attribute value.
  * ***stdout:*** Uses fixed values as the target attribute value.
  * **mapping:** Maps source attribute values to target attribute values individually.
* **key:** Source Attribute Key, required when the Type is set to attribute, attribute\_kwargs, or field.
* **condition:** The condition that must be met for Marketplace Attribute Value integration. For example, when the Source Attribute Value is `"Unisex Child"` or `"Child"`, the attribute value mapping will integrate accordingly.

  ```
    {
        "query": {
            "attributes__integration_gender__in": [
                "Unisex Child",
                "Child"
            ]
        },
        "condition_type": "liquer"
    }
  ```
* **is\_object:** Indicates whether the rule’s output will be sent as an object.
  * `is_object: true` output example:

    ```
         "size": {
              "label": "36",
              "value": "0012",
              "data_type": "dropdown",
              "_translations": {
                  "us": {
                      "label": "6"
                  }
              }
          }
    ```
  * `is_object: false` output example:

    ```
      "size": "0012"
    ```
* **order:** The priority value of the rule.
* **concat:** Specifies whether the rule’s output should be concatenated with other rules. This is a boolean parameter.
* **prefix:** The prefix value for the target Marketplace Attribute Value, which is used when the *concat* parameter is set to true.
* **default\_value:** The fallback Marketplace Attribute Value if the mapping fails.
* **mapping\_dict:** A dictionary mapping Source Attribute Values to Marketplace Attribute Values. It must be used when the *Type* is set to *mapping*.
  * Example of `mapping_dict`:

    ```
    {
        "Red": "0005",
        "Blue": "0001",
        "Grey": "0004",
        "Brown": "0007",
        "White": "0002",
        "Yellow": "0006"
    }
    ```

    <figure><img src="https://3333414532-files.gitbook.io/~/files/v0/b/gitbook-x-prod.appspot.com/o/spaces%2FIbwGN7KwvYi0iLbjtnXz%2Fuploads%2FmQb1PDe9rO3NNhfmSkv4%2Fimage.png?alt=media&amp;token=f493254d-e48a-45c6-9cb8-3a0725b3bc7d" alt=""><figcaption></figcaption></figure>

**Custom Mapping Example:**

{% hint style="info" %}
The field *If fails*, send a default value as; located at the bottom of the page is used to send a fixed value to the respective target attribute in case an error occurs during the mapping process, as defined in the mappings above.
{% endhint %}

<figure><img src="https://3333414532-files.gitbook.io/~/files/v0/b/gitbook-x-prod.appspot.com/o/spaces%2FIbwGN7KwvYi0iLbjtnXz%2Fuploads%2FUeks8ULPXtEImOMR2FxA%2Fimage.png?alt=media&amp;token=11ae78d5-8129-49fa-82b3-a89cefe65d98" alt=""><figcaption></figcaption></figure>

After the relevant Mapping Method and mapping configuration are filled out, by clicking on the *Save* button, a *Mapping Rule* can be created/edited. By clicking on the *Clear the Rule* button, relevant *Mapping Rule* can be cleared. In other words, the mapping rule still exists, but without any configuration.

## <mark style="color:red;">Mapping Control​</mark> <a href="#mapping-control" id="mapping-control"></a>

The Mapping Control function enables users to verify which values will be sent to the marketplace for the attributes of a product after the mapping processes.

When the **Mapping Control** list page is opened, all products on the catalog for the related Marketplace are listed. Users can view the products that are in the Marketplace Catalog with respect to their all attributes, SKU, Base Code, Category, etc information, filter the Marketplace-Catalog products with respect to all-product-attributes, preview & download the Marketplace Attributes and Marketplace Attribute Values for filtered products on this page.

<figure><img src="https://3333414532-files.gitbook.io/~/files/v0/b/gitbook-x-prod.appspot.com/o/spaces%2FIbwGN7KwvYi0iLbjtnXz%2Fuploads%2FX4nO59L6VXbb2i1ldIjS%2Fimage.png?alt=media&amp;token=e788c9c0-75b1-4ea4-91e8-123e5617e506" alt=""><figcaption></figcaption></figure>

After filtering the Marketplace-Catalog Products, clicking on the Show Mapping Result button opens the Mapping Control pop-up, in which the Marketplace Attributes and Marketplace Attributes can be seen and downloaded by the users.

<figure><img src="https://3333414532-files.gitbook.io/~/files/v0/b/gitbook-x-prod.appspot.com/o/spaces%2FIbwGN7KwvYi0iLbjtnXz%2Fuploads%2FQfUQTFvDR2CqfB1svT5t%2Fimage.png?alt=media&amp;token=45bfbb9d-50c6-45f5-b235-7ddbe1c44ae8" alt=""><figcaption></figcaption></figure>

**Warning​**

1. Mapper page and its functions can also be used for Marketplaces with the Sales Channel type.
2. However, when editing schemas created under **Sales Channel**, users are warned about the possibility of function loss.\
   ![](https://3333414532-files.gitbook.io/~/files/v0/b/gitbook-x-prod.appspot.com/o/spaces%2FIbwGN7KwvYi0iLbjtnXz%2Fuploads%2F0N4gTdCGQVHfZnxHXQSo%2Fimage.png?alt=media\&token=02006d63-b7c5-4a58-b054-4c6b567c1e2d)
3. In marketplaces with Sales Channel type, the old mapping screens (Schema, Attribute Mapping, Category Attribute Mapping) cannot be used.<br>

   <figure><img src="https://3333414532-files.gitbook.io/~/files/v0/b/gitbook-x-prod.appspot.com/o/spaces%2FIbwGN7KwvYi0iLbjtnXz%2Fuploads%2Fk18NlAoI5cFBgaZ9fe2T%2Fimage.png?alt=media&amp;token=71167ae7-96b8-48bc-9f38-70ecfb93fed3" alt=""><figcaption></figcaption></figure>
4. The **Mapping Control** function is only applicable to Marketplaces with the Sales Channel type.


# How to Manage Marketplace Mapping in Omnitron?

This tutorial provides step-by-step instructions for managing Marketplace Mapping operations in Omnitron.

## <mark style="color:red;">Step 1: Access to Omnitron​</mark> <a href="#step-1-access-to-omnitron" id="step-1-access-to-omnitron"></a>

* Get access to the **Omnitron** panel.
* Enter your *Username* and *Password*, and then click the **Sign In** button.\
  ![](https://3333414532-files.gitbook.io/~/files/v0/b/gitbook-x-prod.appspot.com/o/spaces%2FIbwGN7KwvYi0iLbjtnXz%2Fuploads%2FL1sAi0Wa7yceeQM3tJhA%2Fimage.png?alt=media\&token=f21533e2-c19c-4fa3-8506-b56dab42f399)

## <mark style="color:red;">Step 2: Navigate to Marketplace Mapping Menu​</mark> <a href="#step-2-navigate-to-marketplace-mapping-menu" id="step-2-navigate-to-marketplace-mapping-menu"></a>

* Follow the **Sales Channels** sidebar and click on the **Sales Channel Settings** menu.
* Click on the **Marketplace Mapping** cardbox to reach the **Marketplace Mapping** menu.

{% hint style="info" %}
**Marketplace Mapping** cardbox appears only when the selected sales channel type is **not** web. In other words, for *Marketplace-type* of sales channels (*Unified* included), this cardboard appears.
{% endhint %}

<figure><img src="https://3333414532-files.gitbook.io/~/files/v0/b/gitbook-x-prod.appspot.com/o/spaces%2FIbwGN7KwvYi0iLbjtnXz%2Fuploads%2F0sOsGZTBGcjhZWDkcHdq%2Fimage.png?alt=media&amp;token=e89c3dcd-e04e-4731-ae20-634838a0a11b" alt=""><figcaption></figcaption></figure>

* On the **Marketplace Mapping** menu,
  * Omnitron Attribute Values and Marketplace Attribute Values can be mapped on the **Mapper** page,
  * Defined Marketplace Mappings can be controlled product by product on the **Mapping Control** page,
  * Marketplace Attributes and Marketplace Attribute Values can be seen on **Marketplace Attributes** and **Marketplace Attribute Values** pages.<br>

    <figure><img src="https://3333414532-files.gitbook.io/~/files/v0/b/gitbook-x-prod.appspot.com/o/spaces%2FIbwGN7KwvYi0iLbjtnXz%2Fuploads%2F2jhAefy9WiXhW9uApmSu%2Fimage.png?alt=media&amp;token=cceb9acc-72ee-4418-83fe-39bb0327f1d3" alt=""><figcaption></figcaption></figure>

## <mark style="color:red;">Step 3: View/Filter Marketplace Attributes​</mark> <a href="#step-3-viewfilter-marketplace-attributes" id="step-3-viewfilter-marketplace-attributes"></a>

* Clicking on the **Marketplace Attributes** cardbox on the **Marketplace Mapping** menu, the **Marketplace Attributes** page can be seen.
* Users can;
  * view the *Name* of the Marketplace Attributes,
  * filter Marketplace Attributes with respect to *Attribute Name and/ or Attribute Set* values on the **Marketplace Attributes** page.<br>

    <figure><img src="https://3333414532-files.gitbook.io/~/files/v0/b/gitbook-x-prod.appspot.com/o/spaces%2FIbwGN7KwvYi0iLbjtnXz%2Fuploads%2FxER4FYl0DpO0ZDmkhHVh%2Fimage.png?alt=media&amp;token=575cb6cf-4508-4b51-aca5-39105de10f25" alt=""><figcaption></figcaption></figure>

{% hint style="info" %}
In addition to *Name,* after being filtered with *Attribute Set, Remote ID, Is Required, Is Variant, Is Custom, Is Meta, Attribute Set Name, Updated Date* columns can be seen, too.
{% endhint %}

<figure><img src="https://3333414532-files.gitbook.io/~/files/v0/b/gitbook-x-prod.appspot.com/o/spaces%2FIbwGN7KwvYi0iLbjtnXz%2Fuploads%2Fdqq0BUffm1ZNSOVqjK49%2Fimage.png?alt=media&amp;token=2c6f92f5-cdfb-47e5-a8b4-ebadd7c81245" alt=""><figcaption></figcaption></figure>

## <mark style="color:red;">Step 4: View/Filter Marketplace Attribute Values​</mark> <a href="#step-4-viewfilter-marketplace-attribute-values" id="step-4-viewfilter-marketplace-attribute-values"></a>

* Clicking on the **Marketplace Attribute Values** cardbox on the **Marketplace Mapping** menu, the **Marketplace Attribute Values** page can be seen.
* Users can;
  * view the *Primary Key (PK), Attribute, Attribute Value’s Label, Attribute Value, Updated Date* of the Marketplace Attribute Values.
    * **Primary Key:** ID of the relevant attribute value, has to be unique.
    * **Attribute*****:*** Attribute that the relevant attribute value depends on.
    * **Attribute Value’s Label:** Label of the attribute value. For example, there can be an attribute value with a label of “White” and a value of “0001”. In other words the *Name* of the attribute value.
    * **Attribute Value:** Attribute Value identifier, has to be unique.
  * filter Marketplace Attribute Values with respect to *Attribute Label, Attribute, and/ or Attribute Set* values on the **Marketplace Attribute Values** page.<br>

    <figure><img src="https://3333414532-files.gitbook.io/~/files/v0/b/gitbook-x-prod.appspot.com/o/spaces%2FIbwGN7KwvYi0iLbjtnXz%2Fuploads%2F7oIF0B03UX41FugnTDdT%2Fimage.png?alt=media&amp;token=753f7d07-22ae-430e-a17d-bd5800c48d4f" alt=""><figcaption></figcaption></figure>

## <mark style="color:red;">Step 5: View/Filter Mapping Rules on Mapper Page​</mark> <a href="#step-5-viewfilter-mapping-rules-on-mapper-page" id="step-5-viewfilter-mapping-rules-on-mapper-page"></a>

* Clicking on the **Mapper** cardbox on the **Marketplace Mapping** menu, the **Mapper** page can be seen. Users have the option to view, filter, add/edit Mapping Rules for related marketplace.
  * *A Mapping Rule can be described as the mapping between an Omnitron Attribute and a Marketplace Attribute.*
* Users can;
  * view the *Mapping Rule Name, Creation Date, Update Start Date* of Mapping Rules,
  * filter Mapping Rules with respect to *Rule Set Name, Target Attribute, Target Attribute Set, Creation Date and Updated Date*
    * *Target = Marketplace, Source = Omnitron*
  * add a New Mapping Rule,
  * edit an existing Mapping Rule,
  * delete one / multiple Mapping Rule(s) on the **Mapper** page.<br>

    <figure><img src="https://3333414532-files.gitbook.io/~/files/v0/b/gitbook-x-prod.appspot.com/o/spaces%2FIbwGN7KwvYi0iLbjtnXz%2Fuploads%2F1rUtaaRblDQP7UjyPwzg%2Fimage.png?alt=media&amp;token=27166b37-d62f-43f7-8a7f-66ebcf505804" alt=""><figcaption></figcaption></figure>

## <mark style="color:red;">Step 6: Add/Edit Mapping Rule​</mark> <a href="#step-6-addedit-mapping-rule" id="step-6-addedit-mapping-rule"></a>

* Clicking on **+ Add New Attribute Mapping Rule** button or clicking on the **Edit** icon on listed Mapping Rules, users can reach the **Add/Edit Attribute Mapping Rule** form.
* Users can;
  * name the *Mapping Rule*,
  * select the *Target Attribute*,
  * select the relevant *Mapping Method,*
  * select a default value for mapping in case an error occurs for the mapping rule.
* Target Attributes (Marketplace Attributes) can be filtered by clicking on the *“Show only required target attributes”* checkbox.<br>

  <figure><img src="https://3333414532-files.gitbook.io/~/files/v0/b/gitbook-x-prod.appspot.com/o/spaces%2FIbwGN7KwvYi0iLbjtnXz%2Fuploads%2F2HDaIi0HQTBbnPsbS2Xt%2Fimage.png?alt=media&amp;token=63b2922b-a30e-45fa-a65c-5c0e15086ba5" alt=""><figcaption></figcaption></figure>

There are four different types of *Mapping Methods* available in **Marketplace Mapping Rule Form**:

**Standard:​**

In which an Omnitron Attribute & Attribute Values are mapped directly with the Marketplace Attribute & Attribute Values.

{% hint style="info" %}
In *Standard* *Mapping Method*, if both the Source (Omnitron) and Target (Marketplace) Attributes’ data types are “*dropdown”*, an auto-mapping is performed with respect to the attribute values. Auto-mapped attribute values can be distinguished from the corresponding green checkbox icon.
{% endhint %}

This feature can be used only for **Adding a New Mapping Rule**.

<figure><img src="https://3333414532-files.gitbook.io/~/files/v0/b/gitbook-x-prod.appspot.com/o/spaces%2FIbwGN7KwvYi0iLbjtnXz%2Fuploads%2FJzDPX8Ksk0duAV7IJPPO%2Fimage.png?alt=media&amp;token=105dfbaf-9b4f-4e45-a4de-66407890edb6" alt=""><figcaption></figcaption></figure>

**Fixed Value:​**

In which a fixed attribute value can be given to selected Marketplace Attribute for all Marketplace Products.

<figure><img src="https://3333414532-files.gitbook.io/~/files/v0/b/gitbook-x-prod.appspot.com/o/spaces%2FIbwGN7KwvYi0iLbjtnXz%2Fuploads%2FB1XJCM1KQnspP1vnRsJc%2Fimage.png?alt=media&amp;token=ac5a5ad7-be66-4d31-a266-88a51cd8f097" alt=""><figcaption></figcaption></figure>

**Merge Fields:​**

In which multiple fixed values and / or Omnitron attributes can be concatenated and are mapped with the selected Marketplace Attribute.

<figure><img src="https://3333414532-files.gitbook.io/~/files/v0/b/gitbook-x-prod.appspot.com/o/spaces%2FIbwGN7KwvYi0iLbjtnXz%2Fuploads%2FxTNV4s6xRmLkmKkFgyoH%2Fimage.png?alt=media&amp;token=142bc4e5-677f-410e-bbec-c23df7fd93ad" alt=""><figcaption></figcaption></figure>

**Custom:​**

In which a JSON Type of configuration can be given for the mapping of Marketplace Attribute.

<figure><img src="https://3333414532-files.gitbook.io/~/files/v0/b/gitbook-x-prod.appspot.com/o/spaces%2FIbwGN7KwvYi0iLbjtnXz%2Fuploads%2FmiZQ8YYW0hXsxoQlR1v6%2Fimage.png?alt=media&amp;token=47fcadc2-4a50-4409-94b6-442667202178" alt=""><figcaption></figcaption></figure>

* After the relevant *Mapping Method* and mapping configuration are filled out, by clicking on the **Save** button, a Mapping Rule can be created/edited.
* By clicking on the **Clear the Rule** button, relevant Mapping Rule can be cleared. In other words, the mapping rule still exists, but without any configuration.

## <mark style="color:red;">Step 7: Delete Mapping Rule​</mark> <a href="#step-7-delete-mapping-rule" id="step-7-delete-mapping-rule"></a>

* On the **Mapper** page, by selecting the listed Mapping Rules, the “Delete Selected Mapping Rule(s)” option and clicking on the **Apply** button, users can delete existing Mapping Rule(s).<br>

  <figure><img src="https://3333414532-files.gitbook.io/~/files/v0/b/gitbook-x-prod.appspot.com/o/spaces%2FIbwGN7KwvYi0iLbjtnXz%2Fuploads%2FBAca164WRdBaoU1n1lXD%2Fimage.png?alt=media&amp;token=19715748-e8be-4fad-abc3-f0acecd29647" alt=""><figcaption></figcaption></figure>

## <mark style="color:red;">Step 8: Control Marketplace Mapping​</mark> <a href="#step-8-control-marketplace-mapping" id="step-8-control-marketplace-mapping"></a>

* Clicking on the **Mapping Control** cardbox on the **Marketplace Mapping** menu, the **Mapping Control** page can be seen.
* Users can;
  * view the products that are in the Marketplace Catalog with respect to their all attributes, SKU, Base Code, Category, etc information,
  * filter the Marketplace-Catalog products with respect to all-product-attributes,
  * preview & Download the Marketplace Attributes and Marketplace Attribute Values for filtered products on the **Mapping Control** page.<br>

    <figure><img src="https://3333414532-files.gitbook.io/~/files/v0/b/gitbook-x-prod.appspot.com/o/spaces%2FIbwGN7KwvYi0iLbjtnXz%2Fuploads%2FX4nO59L6VXbb2i1ldIjS%2Fimage.png?alt=media&amp;token=e788c9c0-75b1-4ea4-91e8-123e5617e506" alt=""><figcaption></figcaption></figure>
* After filtering the Marketplace-Catalog Products, clicking on the **Show Mapping Result** button opens the Mapping Control pop-up, in which the Marketplace Attributes and Marketplace Attributes can be seen and downloaded by the user.<br>

  <figure><img src="https://3333414532-files.gitbook.io/~/files/v0/b/gitbook-x-prod.appspot.com/o/spaces%2FIbwGN7KwvYi0iLbjtnXz%2Fuploads%2FQfUQTFvDR2CqfB1svT5t%2Fimage.png?alt=media&amp;token=45bfbb9d-50c6-45f5-b235-7ddbe1c44ae8" alt=""><figcaption></figcaption></figure>

{% hint style="info" %}
This menu is only available for sales-channel-type of Marketplaces.
{% endhint %}


# How to Manage Marketplace Operations?

This tutorial provides step-by-step instructions for managing marketplace operations in Omnitron.

## <mark style="color:red;">Step 1: Access to Omnitron​</mark> <a href="#step-1-access-to-omnitron" id="step-1-access-to-omnitron"></a>

* Get access to the **Omnitron** panel.
* Enter your *Username* and *Password*, and then click the **Sign In** button.\
  ![](https://3333414532-files.gitbook.io/~/files/v0/b/gitbook-x-prod.appspot.com/o/spaces%2FIbwGN7KwvYi0iLbjtnXz%2Fuploads%2FL1sAi0Wa7yceeQM3tJhA%2Fimage.png?alt=media\&token=f21533e2-c19c-4fa3-8506-b56dab42f399)

## <mark style="color:red;">Step 2: Navigate to Marketplace Operations Menu​</mark> <a href="#step-2-navigate-to-marketplace-operations-menu" id="step-2-navigate-to-marketplace-operations-menu"></a>

* Follow the **Sales Channels** sidebar and click on the **Sales Channel Settings** menu.
* Click on the **Marketplace Operations** cardbox to reach the **Marketplace Operations** menu.

{% hint style="info" %}
The **Marketplace Operations** cardbox appears only when the selected sales channel type is **not** web. In other words, for *Marketplace-type* of sales channels (*Unified* included), this cardboard appears.
{% endhint %}

<figure><img src="https://3333414532-files.gitbook.io/~/files/v0/b/gitbook-x-prod.appspot.com/o/spaces%2FIbwGN7KwvYi0iLbjtnXz%2Fuploads%2FPGWHw0M6VrOPBd5IQPOQ%2Fimage.png?alt=media&amp;token=2799f602-0f81-43ef-bffa-ed02051ab034" alt=""><figcaption></figcaption></figure>

* In the **Marketplace Operations** menu:
  * **Product**, **Stock** and **Price** Information for marketplace products can be updated from Omnitron to the related marketplace.
  * **Orders** can be updated from the related marketplace.
  * The latest **Attribute Set** configurations can be gathered from Unified Marketplace.<br>

    <figure><img src="https://3333414532-files.gitbook.io/~/files/v0/b/gitbook-x-prod.appspot.com/o/spaces%2FIbwGN7KwvYi0iLbjtnXz%2Fuploads%2FaF8x22H1RSQ3F29GZ0RL%2Fimage.png?alt=media&amp;token=3dfe6fbd-7775-4bea-86ca-ce7f67af1477" alt=""><figcaption></figcaption></figure>

## <mark style="color:red;">Step 3: View/Filter/Update Marketplace Product Info​</mark> <a href="#step-3-viewfilterupdate-marketplace-product-info" id="step-3-viewfilterupdate-marketplace-product-info"></a>

* By clicking on the **Product Update** cardbox on the **Marketplace Operations** menu, the **Product Update** page can be accessed.
* Users can:
  * View the *Products* of the related Marketplace Catalog.
  * Filter *Products* with respect to all attribute values.
  * Update selected *Products’* information on the related Marketplace on the **Product Update** page.<br>

    <figure><img src="https://3333414532-files.gitbook.io/~/files/v0/b/gitbook-x-prod.appspot.com/o/spaces%2FIbwGN7KwvYi0iLbjtnXz%2Fuploads%2FLW6rH9pRrIEFtO2yNnVZ%2Fimage.png?alt=media&amp;token=4ad1297b-36ad-4a51-a7cc-3b90a89bae17" alt=""><figcaption></figcaption></figure>

## <mark style="color:red;">Step 4: View/Filter/Update Product Stock Values​</mark> <a href="#step-4-viewfilterupdate-product-stock-values" id="step-4-viewfilterupdate-product-stock-values"></a>

* By clicking on the **Stock Update** cardbox on the **Marketplace Operations** menu, the **Stock Update** page can be accessed.
* Users can:
  * View the *all Stock Lists.*<br>

    <figure><img src="https://3333414532-files.gitbook.io/~/files/v0/b/gitbook-x-prod.appspot.com/o/spaces%2FIbwGN7KwvYi0iLbjtnXz%2Fuploads%2FXBtvTnHvBsscjrLHplbW%2Fimage.png?alt=media&amp;token=ebf31687-28b0-47a0-a728-0967dde2540b" alt=""><figcaption></figcaption></figure>
  * View the *Products under these Stock Lists.*
  * Filter *Products* with respect to all attribute values.
  * Update selected Products’ stock value on the related marketplace (By selecting products under the related stock list and by clicking on the *Stock Update* action) on the **Stock Update** page.<br>

    <figure><img src="https://3333414532-files.gitbook.io/~/files/v0/b/gitbook-x-prod.appspot.com/o/spaces%2FIbwGN7KwvYi0iLbjtnXz%2Fuploads%2F5iv2Bv1rtpBjswbJmYyJ%2Fimage.png?alt=media&amp;token=2ccff8ef-947a-449d-9c4c-9c0becf164fd" alt=""><figcaption></figcaption></figure>

## <mark style="color:red;">Step 5: View/Filter/Update Product Price Values​</mark> <a href="#step-5-viewfilterupdate-product-price-values" id="step-5-viewfilterupdate-product-price-values"></a>

* By clicking on the **Price Update** cardbox on the **Marketplace Operations** menu, the **Price Update** page can be accessed.
* Users can:
  * View the *all Price Lists.*<br>

    <figure><img src="https://3333414532-files.gitbook.io/~/files/v0/b/gitbook-x-prod.appspot.com/o/spaces%2FIbwGN7KwvYi0iLbjtnXz%2Fuploads%2FZfgQKjRcDPPjCtwgZGLk%2Fimage.png?alt=media&amp;token=bc304b9b-054d-4389-a15f-b16f3f50bd8c" alt=""><figcaption></figcaption></figure>
  * View the *Products under these Price Lists.*
  * Filter *Products* with respect to all attribute values.
  * Update selected Products’ price value on the related marketplace. (By selecting products under the related price list and by clicking on the *Price Update* action) on the **Price Update** page.<br>

    <figure><img src="https://3333414532-files.gitbook.io/~/files/v0/b/gitbook-x-prod.appspot.com/o/spaces%2FIbwGN7KwvYi0iLbjtnXz%2Fuploads%2FBtQl3FKiouRbpEiNAe0h%2Fimage.png?alt=media&amp;token=11b4992a-cffc-4213-bbe8-5855e1e68b94" alt=""><figcaption></figcaption></figure>

## <mark style="color:red;">Step 6: Update Marketplace Order(s)​</mark> <a href="#step-6-update-marketplace-orders" id="step-6-update-marketplace-orders"></a>

* By clicking on the **Order Update** cardbox on the **Marketplace Operations** menu, the **Order Update** page can be accessed.
* Users can fetch latest order information by filtering:
  * Start & End Dates
  * and/or Order Numbers from the marketplace.<br>

    <figure><img src="https://3333414532-files.gitbook.io/~/files/v0/b/gitbook-x-prod.appspot.com/o/spaces%2FIbwGN7KwvYi0iLbjtnXz%2Fuploads%2FKCVXHOT0edJv0UbdtK8z%2Fimage.png?alt=media&amp;token=4d2d6ee6-051b-47d0-92b3-867e509b9aa3" alt=""><figcaption></figcaption></figure>

## <mark style="color:red;">Step 7: View/Filter/Update Attribute Sets​</mark> <a href="#step-7-viewfilterupdate-attribute-sets" id="step-7-viewfilterupdate-attribute-sets"></a>

* By clicking on the **Attribute Set Update** cardbox on the **Marketplace Operations** menu, the **Attribute Set Update** page can be accessed.
* Users can:
  * View the *Marketplace Attribute Sets.*
  * Update selected Attribute Sets’ information to get the latest configuration (by selecting attribute sets and by clicking on the *Update Selected Attribute Sets* action) on the **Attribute Set Update** page.<br>

    <figure><img src="https://3333414532-files.gitbook.io/~/files/v0/b/gitbook-x-prod.appspot.com/o/spaces%2FIbwGN7KwvYi0iLbjtnXz%2Fuploads%2FYm3AQgxwZeVSUXJzdYoj%2Fimage.png?alt=media&amp;token=29dd7bb7-4e5b-4b00-9850-6a647ffda857" alt=""><figcaption></figcaption></figure>


# How to Manage Address Mapping in Omnitron?

This tutorial provides step-by-step instructions for managing Address Mapping in Omnitron.

## <mark style="color:red;">Step 1: Access to Omnitron​</mark> <a href="#step-1-access-to-omnitron" id="step-1-access-to-omnitron"></a>

* Get access to the Omnitron panel.
* Enter your Username and Password, and then click the **Sign In** button.\
  ![](https://3333414532-files.gitbook.io/~/files/v0/b/gitbook-x-prod.appspot.com/o/spaces%2FIbwGN7KwvYi0iLbjtnXz%2Fuploads%2FL1sAi0Wa7yceeQM3tJhA%2Fimage.png?alt=media\&token=f21533e2-c19c-4fa3-8506-b56dab42f399)

## <mark style="color:red;">Step 2: Navigate to Address Mapping Page​</mark> <a href="#step-2-navigate-to-address-mapping-page" id="step-2-navigate-to-address-mapping-page"></a>

* Follow the **Sales Channels>Sales Channel Settings** sidebar and click the **Address Mapping** page.<br>

  <figure><img src="https://3333414532-files.gitbook.io/~/files/v0/b/gitbook-x-prod.appspot.com/o/spaces%2FIbwGN7KwvYi0iLbjtnXz%2Fuploads%2F0Ny8CnrgK1svPASGLXUk%2Fimage.png?alt=media&amp;token=00535109-4ec4-4c52-8ffd-078615616889" alt=""><figcaption></figcaption></figure>
* During the initial configuration of the Omnitron project, the address mapping section is automatically set up, incorporating default Turkish data retrieved from the Post Telegraph Corporation.
* On the Address Mapping page, a wizard panel dedicated to the country, city, district, and neighborhood is provided. The existing mappings are listed at the bottom of the page.
* The listed mappings correspond to various integration types for the respective country, city, district, and neighborhood.

## <mark style="color:red;">Step 3: Upload Address Mapping with .CSV File​</mark> <a href="#step-3-upload-address-mapping-with-csv-file" id="step-3-upload-address-mapping-with-csv-file"></a>

* Before starting the address mapping update process, a template can be downloaded by clicking on the **.CSV download** button next to "Drop Files Here or Click to Upload." Following the template download, the updated order information can be entered into the CSV file.<br>

  <figure><img src="https://3333414532-files.gitbook.io/~/files/v0/b/gitbook-x-prod.appspot.com/o/spaces%2FIbwGN7KwvYi0iLbjtnXz%2Fuploads%2Fs9viDbxZtswBvTOmOWup%2Fimage.png?alt=media&amp;token=8be89d04-4563-4931-b6f4-40bc415d234d" alt=""><figcaption></figcaption></figure>
* The fields to be updated include:
  * **country\_name:** The country name should be entered.
  * **country\_code:** The relevant country code value should be added to the file.
  * **city\_name** : The city value to be added to the address mapping should be added to the file.
  * **township\_name** : The country name should be entered.
  * **district\_name** : The relevant district name value should be added to the file.
  * **Zipcode**: The zipcode value can be added.
* After preparing the file, take the action **Drop Files Here or Click to Upload**, and the bulk process will begin. Once the process is completed, the page will display the newly added mapping.<br>

  <figure><img src="https://3333414532-files.gitbook.io/~/files/v0/b/gitbook-x-prod.appspot.com/o/spaces%2FIbwGN7KwvYi0iLbjtnXz%2Fuploads%2FfqePmTh7xF88jzYWhcIO%2Fimage.png?alt=media&amp;token=746ab0b2-0cff-4dfd-8f5b-e1e7a0f77b2a" alt=""><figcaption></figcaption></figure>

## <mark style="color:red;">Step 4: Navigate to Country Detail Page​</mark> <a href="#step-4-navigate-to-country-detail-page" id="step-4-navigate-to-country-detail-page"></a>

* Clicking on a specific entry in the current country list allows users to view details about the existing mapping, including the integration type used for its creation.
* The listed mappings correspond to various integration types specific to the respective country, city, district, and neighborhood.
* By clicking the **+ Add Mapping** button, a form is opened, and the following fields should be filled in:
  * **Code**: Enter the country code (e.g., TR, etc.).
  * **Integration** **Type**: Select the integration type to be used for mapping.<br>

    <figure><img src="https://3333414532-files.gitbook.io/~/files/v0/b/gitbook-x-prod.appspot.com/o/spaces%2FIbwGN7KwvYi0iLbjtnXz%2Fuploads%2F6T7ZuyPUeFrMOYwcB3fP%2Fimage.png?alt=media&amp;token=02dafc0b-2667-4a0d-b6d4-f98da9a8c2a3" alt=""><figcaption></figcaption></figure>
* After completing the relevant fields, click the **Save** button.<br>

  <figure><img src="https://3333414532-files.gitbook.io/~/files/v0/b/gitbook-x-prod.appspot.com/o/spaces%2FIbwGN7KwvYi0iLbjtnXz%2Fuploads%2FfFil6s3xpx7hIgDJyyE0%2Fimage.png?alt=media&amp;token=c09c5e6c-5a53-4e1f-94be-a0892340d115" alt=""><figcaption></figcaption></figure>

## <mark style="color:red;">Step 5: Navigate to City Detail Page​</mark> <a href="#step-5-navigate-to-city-detail-page" id="step-5-navigate-to-city-detail-page"></a>

* Users can view existing mappings by clicking on the city in the wizard panel.
* City names can be filtered based on the country.
* The mappings listed in this section correspond to various integration types specific to the respective country, city, district, and neighborhood.<br>

  <figure><img src="https://3333414532-files.gitbook.io/~/files/v0/b/gitbook-x-prod.appspot.com/o/spaces%2FIbwGN7KwvYi0iLbjtnXz%2Fuploads%2FAyDZEk1nFtS66eBs4jtO%2Fimage.png?alt=media&amp;token=ebc485b1-1a37-4a68-9719-73f854dd3fa5" alt=""><figcaption></figcaption></figure>
* When a particular entry in the current city list is clicked, detailed information about the existing mapping, including the integration type used for its creation, becomes visible.
* Clicking the **+ Add Mapping** button opens a form where the following fields need to be filled:
  * **Code**: Enter the city code.
  * **Integration Type**: Select the integration type to be used for mapping.
* Once the relevant fields are completed, click the **Save** button.<br>

  <figure><img src="https://3333414532-files.gitbook.io/~/files/v0/b/gitbook-x-prod.appspot.com/o/spaces%2FIbwGN7KwvYi0iLbjtnXz%2Fuploads%2FDs1UEysFUI9K6ljxHKIu%2Fimage.png?alt=media&amp;token=1cc40344-e03f-4be1-8f68-0edab173206f" alt=""><figcaption></figcaption></figure>

## <mark style="color:red;">Step 6: Navigate to District Detail Page​</mark> <a href="#step-6-navigate-to-district-detail-page" id="step-6-navigate-to-district-detail-page"></a>

* Users can view existing mappings by clicking on the district in the wizard panel.
* The city and district names can be filtered according to the country.
* The mappings listed in this section correspond to a variety of integration types for the respective country, city, district, and neighborhood.<br>

  <figure><img src="https://3333414532-files.gitbook.io/~/files/v0/b/gitbook-x-prod.appspot.com/o/spaces%2FIbwGN7KwvYi0iLbjtnXz%2Fuploads%2FmZscryQ6uJXa4LHcPoHQ%2Fimage.png?alt=media&amp;token=cd388b47-cd43-4f23-913b-e36b59e74fbe" alt=""><figcaption></figcaption></figure>
* When a particular entry in the current district list is clicked, detailed information about the existing mapping, including the integration type used for its creation, becomes visible.
* Clicking the **+ Add Mapping** button opens a form where the following fields need to be filled:
  * **Code**: Enter the district code.
  * **Integration Type**: Select the integration type for mapping.
* Once the relevant fields are completed, click the **Save** button.<br>

  <figure><img src="https://3333414532-files.gitbook.io/~/files/v0/b/gitbook-x-prod.appspot.com/o/spaces%2FIbwGN7KwvYi0iLbjtnXz%2Fuploads%2FxbT4g79fQplM7oF8BYdY%2Fimage.png?alt=media&amp;token=558269e1-0f9f-41cb-8589-77e54ddcd5e3" alt=""><figcaption></figcaption></figure>

## <mark style="color:red;">Step 7: Navigate to Neighborhood Detail Page​</mark> <a href="#step-7-navigate-to-neighborhood-detail-page" id="step-7-navigate-to-neighborhood-detail-page"></a>

* Users can view existing mappings by clicking on the neighborhood in the wizard panel.
* The city, district, neighborhood names can be filtered according to the country.
* The mappings listed in this section correspond to a variety of integration types for the respective country, city, district, and neighborhood.<br>

  <figure><img src="https://3333414532-files.gitbook.io/~/files/v0/b/gitbook-x-prod.appspot.com/o/spaces%2FIbwGN7KwvYi0iLbjtnXz%2Fuploads%2FRKFBpv6yaxmAUyPz6OTT%2Fimage.png?alt=media&amp;token=6757c837-5f9a-422a-ab8a-38fe4c8f0ec7" alt=""><figcaption></figcaption></figure>
* When a specific entry in the current neighborhood list is clicked, details about the existing mapping, including the integration type used for its creation, can be viewed.
* Clicking the **+ Add Mapping** button opens a form to fill in the following fields:
  * **Code**: Enter the neighborhood code.
  * **Integration Type**: Select the integration type for mapping.
* Once the relevant fields are completed, click the **Save** button.<br>

  <figure><img src="https://3333414532-files.gitbook.io/~/files/v0/b/gitbook-x-prod.appspot.com/o/spaces%2FIbwGN7KwvYi0iLbjtnXz%2Fuploads%2FIMbda22xpMQxPi97mykm%2Fimage.png?alt=media&amp;token=4c6da26c-83c5-4d42-8a1c-e22652e5b3f5" alt=""><figcaption></figcaption></figure>


# How to Manage Social Accounts in Omnitron?

The Social Accounts feature in Omnitron enables integration with various social platforms, such as Google, Apple, Facebook, Turkcell and Akifast. This functionality allows users to authenticate and manage their social connections directly within the Omnitron panel, ensuring a streamlined and secure experience.

Before proceeding with the steps outlined in this guide, **ensure that the necessary configurations have been completed on the relevant platform (Developers Facebook, Developers Google, etc.)**. This guide will then walk you through accessing the panel, navigating the settings, and adding new social account providers to effectively configure and utilize the Social Accounts feature for your business needs.

## <mark style="color:red;">Step 1: Access to Omnitron​</mark> <a href="#step-1-access-to-omnitron" id="step-1-access-to-omnitron"></a>

* Get access to the Omnitron panel.
* Enter your Username and Password, and then click the **Sign In** button.\
  ![](https://3333414532-files.gitbook.io/~/files/v0/b/gitbook-x-prod.appspot.com/o/spaces%2FIbwGN7KwvYi0iLbjtnXz%2Fuploads%2FL1sAi0Wa7yceeQM3tJhA%2Fimage.png?alt=media\&token=f21533e2-c19c-4fa3-8506-b56dab42f399)

## <mark style="color:red;">Step 2: Navigate to Social Accounts Page​</mark> <a href="#step-2-navigate-to-social-accounts-page" id="step-2-navigate-to-social-accounts-page"></a>

* Follow the **Sales Channels > Sales Channels Settings** sidebar and click the **Social Accounts** page.<br>

  <figure><img src="https://3333414532-files.gitbook.io/~/files/v0/b/gitbook-x-prod.appspot.com/o/spaces%2FIbwGN7KwvYi0iLbjtnXz%2Fuploads%2F2NINZf2z3CAcbmBQ2FZ9%2Fimage.png?alt=media&amp;token=a016b589-23a2-43be-83f9-eb2ce7d9eecc" alt=""><figcaption></figcaption></figure>
* This page displays various social accounts, including Akifast and applications. It allows users to log in using platforms like Google, Akifast, or Facebook, among others.<br>

  <figure><img src="https://3333414532-files.gitbook.io/~/files/v0/b/gitbook-x-prod.appspot.com/o/spaces%2FIbwGN7KwvYi0iLbjtnXz%2Fuploads%2FejOv2vrzIxcg3N6ycVaq%2Fimage.png?alt=media&amp;token=52415f84-26ff-4561-9742-ad797c451b58" alt=""><figcaption></figcaption></figure>

## <mark style="color:red;">Step 3: Adding Social Account​</mark> <a href="#step-3-adding-social-account" id="step-3-adding-social-account"></a>

* To add a new social account, click the + New Social Account button. Complete the form by filling in the following fields:
  * **Provider:** Select a provider, such as Akifast, Facebook, etc.
  * **Name:** Enter the name for this social account.
  * **Client Id:** The unique client value for this social account.
  * **Secret:** The unique secret value for this social account.
  * **Key:** The unique key value for this social account.
  * **Site:** Select the site on which it is located.
  * **Certificate:** Optionally fill in this field for certificate usage.
* Once you have filled in the relevant fields, click the **Save** button.<br>

  <figure><img src="https://3333414532-files.gitbook.io/~/files/v0/b/gitbook-x-prod.appspot.com/o/spaces%2FIbwGN7KwvYi0iLbjtnXz%2Fuploads%2FryxizWOzDA2nY6ND0eiW%2Fimage.png?alt=media&amp;token=23973eda-6a85-481e-a2ab-b9059a8e48d2" alt=""><figcaption></figcaption></figure>

{% hint style="warning" %}
**Important Note for Project Zero Integration**

To ensure the system functions correctly, it is essential to configure the `USE_X_FORWARDED_HOST` setting appropriately for different environments:

* **ACC and Project Zero Projects:** The `USE_X_FORWARDED_HOST = True` setting must be read from the environment variables. Ensure this configuration is correctly defined in the respective environment files.
* **Other Projects:** For all other projects, the `USE_X_FORWARDED_HOST = True` setting should be added to the `settings.py` file within the project.
  {% endhint %}


# How to Manage Loyalty Integration Settings?

This tutorial provides step-by-step instructions for managing loyalty integration settings operations in Omnitron.

## <mark style="color:red;">Step 1: Access to Omnitron​</mark> <a href="#step-1-access-to-omnitron" id="step-1-access-to-omnitron"></a>

* Get access to the **Omnitron** panel.
* Enter your *Username* and *Password*, and then click the **Sign In** button.\
  ![](https://3333414532-files.gitbook.io/~/files/v0/b/gitbook-x-prod.appspot.com/o/spaces%2FIbwGN7KwvYi0iLbjtnXz%2Fuploads%2FL1sAi0Wa7yceeQM3tJhA%2Fimage.png?alt=media\&token=f21533e2-c19c-4fa3-8506-b56dab42f399)

## <mark style="color:red;">Step 2: Navigate to Loyalty Integration Settings Page​</mark> <a href="#step-2-navigate-to-loyalty-integration-settings-page" id="step-2-navigate-to-loyalty-integration-settings-page"></a>

* Follow the **Sales Channels > Sales Channel Settings** steps and click on the **Loyalty Integration Settings** cardbox.

{% hint style="info" %}
**Loyalty Integration Settings** cardbox appears only when the selected sales channel type is web. In other words, for *shop-type* of sales channels, this cardboard appears.
{% endhint %}

<figure><img src="https://3333414532-files.gitbook.io/~/files/v0/b/gitbook-x-prod.appspot.com/o/spaces%2FIbwGN7KwvYi0iLbjtnXz%2Fuploads%2FvZPkOs56BeRYtR3fFNkt%2Fimage.png?alt=media&amp;token=965523a2-5d98-4aac-8973-9d43bb2abc02" alt=""><figcaption></figcaption></figure>

## <mark style="color:red;">Step 3: View Loyalty Integration Settings​</mark> <a href="#step-3-view-loyalty-integration-settings" id="step-3-view-loyalty-integration-settings"></a>

* By clicking on the **Loyalty Integration Settings** cardbox on the **Sales Channel Settings** menu, the **Loyalty Integration Settings** page can be accessed.
  * A Loyalty Integration Settings can be described as the loyalty card integration for the related Sales Channel.
* Users can;
  * view the *Loyalty Integration Settings* for the related Sales Channel,
  * add a *New Loyalty Integration Setting*,
  * edit an existing *Loyalty Integration Setting* on the **Loyalty Integration Settings** page.<br>

    <figure><img src="https://3333414532-files.gitbook.io/~/files/v0/b/gitbook-x-prod.appspot.com/o/spaces%2FIbwGN7KwvYi0iLbjtnXz%2Fuploads%2F70UcLkpowZdTD9eyQqXx%2Fimage.png?alt=media&amp;token=95544800-9930-496d-bab8-269cd3db896b" alt=""><figcaption></figcaption></figure>

## <mark style="color:red;">Step 4: Add/Edit Loyalty Integration Settings​</mark> <a href="#step-4-addedit-loyalty-integration-settings" id="step-4-addedit-loyalty-integration-settings"></a>

* Clicking on **+ New Loyalty Integration Setting** button or clicking on the listed Loyalty Integration Settings, users can reach the **Add/Edit Loyalty Integration Setting** form.
* Users can;
  * give value to the *name, infrastructure,*
  * fill in the *config* field with JSON format,
  * select the *status* value for the Loyalty Integration Setting.<br>

    <figure><img src="https://3333414532-files.gitbook.io/~/files/v0/b/gitbook-x-prod.appspot.com/o/spaces%2FIbwGN7KwvYi0iLbjtnXz%2Fuploads%2FwVsgHlqiY2mxDbtRrRWe%2Fimage.png?alt=media&amp;token=08aeef99-c2fc-490b-bcd9-8a758c3fb883" alt=""><figcaption></figcaption></figure>


# How to Manage Store Stock Settings?

This tutorial provides step-by-step instructions for managing store stock setting operations in Omnitron.

## <mark style="color:red;">Step 1: Access to Omnitron​</mark> <a href="#step-1-access-to-omnitron" id="step-1-access-to-omnitron"></a>

* Get access to the **Omnitron** panel.
* Enter your *Username* and *Password*, and then click the **Sign In** button.\
  ![](https://3333414532-files.gitbook.io/~/files/v0/b/gitbook-x-prod.appspot.com/o/spaces%2FIbwGN7KwvYi0iLbjtnXz%2Fuploads%2FL1sAi0Wa7yceeQM3tJhA%2Fimage.png?alt=media\&token=f21533e2-c19c-4fa3-8506-b56dab42f399)

## <mark style="color:red;">Step 2: Navigate to Store Stock Settings Page​</mark> <a href="#step-2-navigate-to-store-stock-settings-page" id="step-2-navigate-to-store-stock-settings-page"></a>

* Follow the **Sales Channels** sidebar and click on the **Sales Channel Settings** menu, **Store Stock Settings** cardbox can be seen.

{% hint style="info" %}
**Store Stock Settings** cardbox appears only when the selected sales channel type is web. In other words, for *shop-type* of sales channels, this cardboard appears.
{% endhint %}

<figure><img src="https://3333414532-files.gitbook.io/~/files/v0/b/gitbook-x-prod.appspot.com/o/spaces%2FIbwGN7KwvYi0iLbjtnXz%2Fuploads%2FTBOSvwpl9TWbhxJH88kg%2Fimage.png?alt=media&amp;token=135c5a1c-b75c-4e02-8efa-c2bc3fe02134" alt=""><figcaption></figcaption></figure>

{% hint style="info" %}
**Store Stock Settings** connect users' ERPs with Omnitron and transfers information to the shop where the products are available.
{% endhint %}

## <mark style="color:red;">Step 3: Add a New Store Stock Setting​</mark> <a href="#step-3-add-a-new-store-stock-setting" id="step-3-add-a-new-store-stock-setting"></a>

* By clicking on the **Store Stock Settings** cardbox on the **Sales Channel Settings** menu, the **Store Stock Settings** page can be accessed.
* To add a new Store Stock Setting, click on the **+ New Store Stock Setting** button.<br>

  <figure><img src="https://3333414532-files.gitbook.io/~/files/v0/b/gitbook-x-prod.appspot.com/o/spaces%2FIbwGN7KwvYi0iLbjtnXz%2Fuploads%2FQLaj5Ld6yJ5bUFQAtOY2%2Fimage.png?alt=media&amp;token=a2de2d04-bd17-45fb-98cd-057d429379b3" alt=""><figcaption></figcaption></figure>
* Complete the form by filling in the following fields:
  * **Name:** Specify the name for this Store Stock Setting.
  * **Infrastructure:** Assign the infrastructure for this Store Stock Setting.
  * **Config:** Enter configuration details for the stock integration between the ERP and Omnitron, in JSON format.
  * **Status:** Assign the status (Active/Passive) of related Store Stock Setting.<br>

    <figure><img src="https://3333414532-files.gitbook.io/~/files/v0/b/gitbook-x-prod.appspot.com/o/spaces%2FIbwGN7KwvYi0iLbjtnXz%2Fuploads%2FI5ef7jRMUg0Kg3isA6Sq%2Fimage.png?alt=media&amp;token=30328d9a-3ab0-4508-9180-fdca2b54ed5a" alt="" width="351"><figcaption></figcaption></figure>

## <mark style="color:red;">Step 4: View/Update Store Stock Settings​</mark> <a href="#step-4-viewupdate-store-stock-settings" id="step-4-viewupdate-store-stock-settings"></a>

* By clicking on the **Store Stock Settings** cardbox on the **Sales Channel Settings** menu, the **Store Stock Settings** page can be accessed.<br>

  <figure><img src="https://3333414532-files.gitbook.io/~/files/v0/b/gitbook-x-prod.appspot.com/o/spaces%2FIbwGN7KwvYi0iLbjtnXz%2Fuploads%2F6Su7Dh2SmcSmpQvIF5sE%2Fimage.png?alt=media&amp;token=b08cec78-d811-48aa-8900-be2fcc3d511f" alt=""><figcaption></figcaption></figure>
* To update existing Store Stock Setting, click on the related Store Stock Setting. You will be redirected to the Add/Edit Store Stock Settings form, complete the editing by filling in the fields described on Step 3.<br>

  <figure><img src="https://3333414532-files.gitbook.io/~/files/v0/b/gitbook-x-prod.appspot.com/o/spaces%2FIbwGN7KwvYi0iLbjtnXz%2Fuploads%2FfzgxgzXB9bEluKUmunBU%2Fimage.png?alt=media&amp;token=f619af5d-0a95-408c-babe-705e0c8f56b0" alt="" width="373"><figcaption></figcaption></figure>


# How to Manage Product List Filter Settings?

This tutorial provides step-by-step instructions for managing product list filter settings operations in Omnitron.

## <mark style="color:red;">Step 1: Access to Omnitron​</mark> <a href="#step-1-access-to-omnitron" id="step-1-access-to-omnitron"></a>

* Get access to the **Omnitron** panel.
* Enter your *Username* and *Password*, and then click the **Sign In** button.\
  ![](https://3333414532-files.gitbook.io/~/files/v0/b/gitbook-x-prod.appspot.com/o/spaces%2FIbwGN7KwvYi0iLbjtnXz%2Fuploads%2FL1sAi0Wa7yceeQM3tJhA%2Fimage.png?alt=media\&token=f21533e2-c19c-4fa3-8506-b56dab42f399)

## <mark style="color:red;">Step 2: Navigate to Product List Filter Settings Page​</mark> <a href="#step-2-navigate-to-product-list-filter-settings-page" id="step-2-navigate-to-product-list-filter-settings-page"></a>

* Follow the **Sales Channels > Sales Channel Settings** steps and click on the **Product List Filter Settings** cardbox.

{% hint style="info" %}
**Product List Filter Settings** cardbox appears only when the selected sales channel type is web. In other words, for *shop-type* of sales channels, this cardboard appears.
{% endhint %}

<figure><img src="https://3333414532-files.gitbook.io/~/files/v0/b/gitbook-x-prod.appspot.com/o/spaces%2FIbwGN7KwvYi0iLbjtnXz%2Fuploads%2FEpyJk4JqvuBMrUemUFqQ%2Fimage.png?alt=media&amp;token=a21ca8e1-2557-46c1-a8ac-ec9cce83e9db" alt=""><figcaption></figcaption></figure>

## <mark style="color:red;">Step 3: View/Filter Product List Filter Settings​</mark> <a href="#step-3-viewfilter-product-list-filter-settings" id="step-3-viewfilter-product-list-filter-settings"></a>

* By clicking on the **Product List Filter Settings** cardbox on the **Sales Channel Settings** menu, the **Product List Filter Settings** page can be accessed.
  * A Product List Filter Setting, in other words facet, can be described as the configuration of the filter component that is shown on the shop. *Searchable* type of attributes can be seen on the shop as filters, configuration of these filters (like how they look, how they filter (exact match or includes etc.)) can be made on the **Product List Filter Settings** page.
* Users can;
  * view the *Product List Filter Settings* for the related Sales Channel,
  * filter *Product List Filter Settings* with respect to the *name* and *attribute key* values,
  * add a *New Product List Filter Setting*,
  * edit an existing *Product List Filter Setting* on the **Product List Filter Settings** page.\
    ![](https://3333414532-files.gitbook.io/~/files/v0/b/gitbook-x-prod.appspot.com/o/spaces%2FIbwGN7KwvYi0iLbjtnXz%2Fuploads%2Fc3Av5XhF16qIqnlNAM3B%2Fimage.png?alt=media\&token=5ef23430-a85e-428b-b00e-d4fb805a77b4)

## <mark style="color:red;">Step 4: Add/Edit Product List Filter Settings​</mark> <a href="#step-4-addedit-product-list-filter-settings" id="step-4-addedit-product-list-filter-settings"></a>

* Clicking on **+ New Filter Option** button or clicking on the listed Product List Filter Settings, users can reach the **Add/Edit Product List Filter Setting** form.
* Users can;
  * give value to the *filter option name, attribute key,*
    * *attribute key* input can be one of the attributes on *Products and Catalogs - Product Attributes* list or one of the static attributes, like *price, stock* etc.
  * select the *attribute type, widget type, filter type* value&#x73;*,*
    * *attribute types can be “global” or EAV (entity-attribute-values)”.*
      * If static attributes are to be used, “global” should be selected.
      * If attributes listed on *Products and Catalogs - Product Attributes* list are to be listed “*eav*” should be selected.
    * widget types can be *“multi select”, “category”, “feature value”, “visual color example”, “nested”*
      * Visual customization for filters can be made with combining widget types and widget kwargs values, like selecting “\_visual color example” \_widget type and configuring HEX definitions on colors on widget kwargs.
    * filter types can be “*terms*” or “*range*”
      * For example, if “*between 100-125 EUR*” price filter is to be added to the shop, “*range*” filter type should be selected and relevant widget kwargs and filter kwargs should be configured. Otherwise, “*terms*” should be selected.
  * fill in the *widget kwargs, filter kwargs, settings* fields with JSON format for the *Product List Filter Setting*.

    <figure><img src="https://3333414532-files.gitbook.io/~/files/v0/b/gitbook-x-prod.appspot.com/o/spaces%2FIbwGN7KwvYi0iLbjtnXz%2Fuploads%2FTPraJJwUXjWLlHnMRNCm%2Fimage.png?alt=media&amp;token=ac20aa25-0dc4-40be-8781-28021370ef8d" alt=""><figcaption></figcaption></figure>

    <figure><img src="https://3333414532-files.gitbook.io/~/files/v0/b/gitbook-x-prod.appspot.com/o/spaces%2FIbwGN7KwvYi0iLbjtnXz%2Fuploads%2Fk6c12F4CRKQ2ERxqfoc7%2Fimage.png?alt=media&amp;token=a9da9372-5e3a-4207-9555-5f91e3ca66f0" alt=""><figcaption></figcaption></figure>


# How to Manage Instore Settings in Omnitron?

This tutorial provides step-by-step instructions for managing Instore Settings in Omnitron.

## <mark style="color:red;">Step 1: Access to Omnitron​</mark> <a href="#step-1-access-to-omnitron" id="step-1-access-to-omnitron"></a>

* Get access to the **Omnitron** panel.
* Enter your *Username* and *Password*, and then click the **Sign In** button.\
  ![](https://3333414532-files.gitbook.io/~/files/v0/b/gitbook-x-prod.appspot.com/o/spaces%2FIbwGN7KwvYi0iLbjtnXz%2Fuploads%2FL1sAi0Wa7yceeQM3tJhA%2Fimage.png?alt=media\&token=f21533e2-c19c-4fa3-8506-b56dab42f399)

## <mark style="color:red;">Step 2: Navigate to Instore Settings Page​</mark> <a href="#step-2-navigate-to-instore-settings-page" id="step-2-navigate-to-instore-settings-page"></a>

* Follow the **Sales Channels** sidebar and click on the **Sales Channel Settings** menu.
* Click on the **Instore Settings** cardbox to reach the **Instore Settings Form**.

{% hint style="info" %}
**Instore Settings** cardbox appears only when an *Instore Application* is installed to a related project and connected with the *Omnitron Application*.
{% endhint %}

<figure><img src="https://3333414532-files.gitbook.io/~/files/v0/b/gitbook-x-prod.appspot.com/o/spaces%2FIbwGN7KwvYi0iLbjtnXz%2Fuploads%2F5G1QnoXV9AqcnNNFxV1u%2Fimage.png?alt=media&amp;token=4febac1c-e90d-4356-a736-3f6896c0b0b6" alt=""><figcaption></figcaption></figure>

* On the **Instore Settings** page, *Instore Application Settings* and *Configuration* for selected Sales Channel can be seen and edited.

## <mark style="color:red;">Step 3: View/Edit Application Settings​</mark> <a href="#step-3-viewedit-application-settings" id="step-3-viewedit-application-settings"></a>

* Clicking on the **Application Settings** step on the wizard, users have the option to set *Font, Logo, Button Color, Default Instore Language, Default Page* for related Sales Channel's Instore Application.
  * **Font:** The designated font for the Instore application UI. Users have the option to either use the default font or upload custom fonts according to their preference.
  * **Logo:** The brand logo displayed on the Instore UI.
  * **Favicon:** The Favicon that enhances the brand presence and is visible on the Instore UI.
  * **Button Color:** The color scheme applied to buttons featured in the Instore UI. Users can select their preferred button color through a color-picker pop-up.
  * **Language:** Users can set the default language for the Instore UI.
  * **Default Page:** Users can select the default landing page for the Instore application.<br>

    <figure><img src="https://3333414532-files.gitbook.io/~/files/v0/b/gitbook-x-prod.appspot.com/o/spaces%2FIbwGN7KwvYi0iLbjtnXz%2Fuploads%2FuI2sE5dKxqqE1QUmGJiD%2Fimage.png?alt=media&amp;token=6cd4ca15-b10b-4376-91a3-a52e81cdbd9c" alt=""><figcaption></figcaption></figure>

{% hint style="info" %}
Users can only select;

* *.svg* type documents for *Logo*,
* *.ico* type documents for *Favicon*,
* *.otf, .ttf, .eot, .woff, .woff2* types of documents for *Regular Font*.
  {% endhint %}

## <mark style="color:red;">Step 4: View/Edit Configuration​</mark> <a href="#step-4-viewedit-configuration" id="step-4-viewedit-configuration"></a>

* Clicking on the **Configuration** step on the wizard, users have the option to set *Config Settings* and *Menu Settings* for Instore Application.
* Users can Enable/Disable listed Config Settings, such as “Send SMS When Signing Up, Customer Search with Name, etc.” in the **Config Settings** tab.<br>

  <figure><img src="https://3333414532-files.gitbook.io/~/files/v0/b/gitbook-x-prod.appspot.com/o/spaces%2FIbwGN7KwvYi0iLbjtnXz%2Fuploads%2FP2ZiKt7nFa9gFSq4eqjm%2Fimage.png?alt=media&amp;token=ec3941f2-dd9a-402f-bf34-02d08be7be24" alt=""><figcaption></figcaption></figure>
* Users can Enable/Disable menus that are shown in the Instore Application in the **Menu** tab.<br>

  <figure><img src="https://3333414532-files.gitbook.io/~/files/v0/b/gitbook-x-prod.appspot.com/o/spaces%2FIbwGN7KwvYi0iLbjtnXz%2Fuploads%2FVwhbW311opQyo6C6oVtI%2Fimage.png?alt=media&amp;token=447ccead-7e38-4b4e-bfa3-5784d47c5547" alt=""><figcaption></figcaption></figure>


# How to Manage General Sorting Settings?

This tutorial provides step-by-step instructions for managing general sorting settings operations in Omnitron.

## <mark style="color:red;">Step 1: Access to Omnitron​</mark> <a href="#step-1-access-to-omnitron" id="step-1-access-to-omnitron"></a>

* Get access to the **Omnitron** panel.
* Enter your *Username* and *Password*, and then click the **Sign In** button.\
  ![](https://3333414532-files.gitbook.io/~/files/v0/b/gitbook-x-prod.appspot.com/o/spaces%2FIbwGN7KwvYi0iLbjtnXz%2Fuploads%2FL1sAi0Wa7yceeQM3tJhA%2Fimage.png?alt=media\&token=f21533e2-c19c-4fa3-8506-b56dab42f399)

## <mark style="color:red;">Step 2: Navigate to General Sorting Settings Page​</mark> <a href="#step-2-navigate-to-general-sorting-settings-page" id="step-2-navigate-to-general-sorting-settings-page"></a>

* Follow the **Sales Channels > Sales Channel Settings** steps and click on the **General Sorting Settings** cardbox.

{% hint style="info" %}
**General Sorting Settings** cardbox appears only when the selected sales channel type is web. In other words, for *shop-type* of sales channels, this cardboard appears.
{% endhint %}

<figure><img src="https://3333414532-files.gitbook.io/~/files/v0/b/gitbook-x-prod.appspot.com/o/spaces%2FIbwGN7KwvYi0iLbjtnXz%2Fuploads%2F4x6eFhZR72SiQtymAtkN%2Fimage.png?alt=media&amp;token=678c4664-d374-4b20-a5be-0ea39404be3e" alt=""><figcaption></figcaption></figure>

## <mark style="color:red;">Step 3: View General Sorting Settings​</mark> <a href="#step-3-view-general-sorting-settings" id="step-3-view-general-sorting-settings"></a>

* By clicking on the **General Sorting Settings** cardbox on the **Sales Channel Settings** menu, the **General Sorting Settings** page can be accessed.
  * A General Sorting Setting can be described as the customers’ checkout-step cargo option on related Sales Channel.
* Users can;
  * view the *General Sorting Settings* for the related Sales Channel,
  * add a *New General Sorting Setting*,
  * edit an existing *General Sorting Setting* on the **General Sorting Settings** page.<br>

    <figure><img src="https://3333414532-files.gitbook.io/~/files/v0/b/gitbook-x-prod.appspot.com/o/spaces%2FIbwGN7KwvYi0iLbjtnXz%2Fuploads%2FcN7McSRXOSydRwSkKW3Z%2Fimage.png?alt=media&amp;token=b2eb30ae-2791-4016-a7f9-7c2f8f4fccc4" alt=""><figcaption></figcaption></figure>

## <mark style="color:red;">Step 4: Add/Edit General Sorting Settings​</mark> <a href="#step-4-addedit-general-sorting-settings" id="step-4-addedit-general-sorting-settings"></a>

* Clicking on **+ New General Sorting Setting** button or clicking on the listed Sorting Settings, users can reach the **Add/Edit General Sorting Setting** form.
* Users can;
  * give value to the sorting *name, sorting value* of the General *Sorting Setting,*
    * The *sorting value* of the General Sorting Setting determines the query name which can be seen on the shop (*{shopURL}.com/{relevant\_path}/?sorter=\<sorting\_value>*).
  * select the *sales channel* and *visibility (whether the setting will be visible or not on the Shop)* values,
  * fill in the *Is Default Sorting, Remove Elastic Score Effect* checkboxes
    * Before Elasticsearch starts scoring documents, it first reduces the candidate documents down by applying a boolean test. Based on the match between the document and the query, the score of documents determine how they are rank ordered for relevancy.<br>

      <figure><img src="https://3333414532-files.gitbook.io/~/files/v0/b/gitbook-x-prod.appspot.com/o/spaces%2FIbwGN7KwvYi0iLbjtnXz%2Fuploads%2FxNyH1WHmDNdTFE3YJpOP%2Fimage.png?alt=media&amp;token=fb0fdcfa-e7f3-45ac-a843-5785e90b63c7" alt=""><figcaption></figcaption></figure>

{% hint style="info" %}
To create the General Sorting Setting properly, users should link *Sorting Algorithms* with the relevant *General Sorting Setting.* This operation can be held under the *Sorting* tab on the *Add/Edit General Sorting Setting* form. One or multiple sorting algorithms can be assigned to the relevant General Sorting Setting and their priority can be changed via drag and drop.
{% endhint %}

<figure><img src="https://3333414532-files.gitbook.io/~/files/v0/b/gitbook-x-prod.appspot.com/o/spaces%2FIbwGN7KwvYi0iLbjtnXz%2Fuploads%2FSL1Yr4OrS1fNwFkyuqwE%2Fimage.png?alt=media&amp;token=88e20590-e135-415b-8a72-4d7894bb35fd" alt=""><figcaption></figcaption></figure>


# How to Manage Shipping Options in Omnitron?

This tutorial provides step-by-step instructions for managing shipping options operations in Omnitron.

## <mark style="color:red;">Step 1: Access to Omnitron​</mark> <a href="#step-1-access-to-omnitron" id="step-1-access-to-omnitron"></a>

* Get access to the **Omnitron** panel.
* Enter your *Username* and *Password*, and then click the **Sign In** button.\
  ![](https://3333414532-files.gitbook.io/~/files/v0/b/gitbook-x-prod.appspot.com/o/spaces%2FIbwGN7KwvYi0iLbjtnXz%2Fuploads%2FL1sAi0Wa7yceeQM3tJhA%2Fimage.png?alt=media\&token=f21533e2-c19c-4fa3-8506-b56dab42f399)

## <mark style="color:red;">Step 2: Navigate to Shipping Options Page​</mark> <a href="#step-2-navigate-to-shipping-options-page" id="step-2-navigate-to-shipping-options-page"></a>

* Follow the **Sales Channels > Sales Channel Settings** steps and click on the **Shipping Options** cardbox.

{% hint style="info" %}
**Shipping Options** cardbox appears only when the selected sales channel type is web. In other words, for *shop-type* of sales channels, this cardboard appears.
{% endhint %}

<figure><img src="https://3333414532-files.gitbook.io/~/files/v0/b/gitbook-x-prod.appspot.com/o/spaces%2FIbwGN7KwvYi0iLbjtnXz%2Fuploads%2Fs6Z5CBAI69qpINZv76wj%2Fimage.png?alt=media&amp;token=5b57c15e-b300-4fed-96a3-ea424979a3df" alt=""><figcaption></figcaption></figure>

## <mark style="color:red;">Step 3: View/Filter Shipping Options​</mark> <a href="#step-3-viewfilter-shipping-options" id="step-3-viewfilter-shipping-options"></a>

* By clicking on the **Shipping Options** cardbox on the **Sales Channel Settings** menu, the **Shipping Options** page can be accessed.
  * A Shipping Option can be described as the customers’ checkout-step cargo option on related Sales Channel.
* Users can;
  * view the *Shipping Options* for the related Sales Channel,
  * filter *Shipping Options* with respect to *Name, Slug, Payment Options* and *their Status* values,
  * add a *New Shipping Option*,
  * edit an existing *Shipping Option* on the **Shipping Options** page.<br>

    <figure><img src="https://3333414532-files.gitbook.io/~/files/v0/b/gitbook-x-prod.appspot.com/o/spaces%2FIbwGN7KwvYi0iLbjtnXz%2Fuploads%2FJDsL0fbVTsMp9bMnCQCd%2Fimage.png?alt=media&amp;token=8eeb444d-61b2-4ecf-a3b1-2ad0e12f8a71" alt=""><figcaption></figcaption></figure>

## <mark style="color:red;">Step 4: Add/Edit Shipping Option​</mark> <a href="#step-4-addedit-shipping-option" id="step-4-addedit-shipping-option"></a>

* Clicking on **+ New Shipping Option** button or clicking on the listed Shipping Options, users can reach the **Add/Edit Shipping Option** form.
* Users can;
  * give value to the *name, slug, order* inputs of the *Shipping Option,*
    * The *order* value of the Shipping Option determines the ranking of relevant shipping options on the checkout step.
  * fill in the *calculator, rule* and *description* fields with JSON format,
  * select the *status (Active, Passive)* and *delivery type (In-store, Next Day, Same Day, Standard)* values, for the Shipping Option.

    <figure><img src="https://3333414532-files.gitbook.io/~/files/v0/b/gitbook-x-prod.appspot.com/o/spaces%2FIbwGN7KwvYi0iLbjtnXz%2Fuploads%2FagLThP2EvOHSea49ta3b%2Fimage.png?alt=media&amp;token=a77c538c-7ee1-4523-9338-501ffd23e447" alt=""><figcaption></figcaption></figure>

    <figure><img src="https://3333414532-files.gitbook.io/~/files/v0/b/gitbook-x-prod.appspot.com/o/spaces%2FIbwGN7KwvYi0iLbjtnXz%2Fuploads%2FrnoUNz9U9EC21e1Haut0%2Fimage.png?alt=media&amp;token=cca4f8c4-71f4-4fb3-b209-bdfd105208c8" alt=""><figcaption></figcaption></figure>

{% hint style="info" %}
For more information about the *calculator* and *rule*, the [Shipping Rules Calculator](/technical-guides/commerce/shipping-rules-calculator) document can be seen.
{% endhint %}

{% hint style="info" %}
For a Shipping Option to be listed on the checkout properly, the *Slug* value of the Shipping Option should be the same as the *ERP Code* value of the related Shipping Company, defined in the Settings > Shipping Companies.
{% endhint %}


# How to Manage Delivery Options in Omnitron?

This tutorial provides step-by-step instructions for managing delivery options operations in Omnitron.

## <mark style="color:red;">Step 1: Access to Omnitron​</mark> <a href="#step-1-access-to-omnitron" id="step-1-access-to-omnitron"></a>

* Get access to the **Omnitron** panel.
* Enter your *Username* and *Password*, and then click the **Sign In** button.\
  ![](https://3333414532-files.gitbook.io/~/files/v0/b/gitbook-x-prod.appspot.com/o/spaces%2FIbwGN7KwvYi0iLbjtnXz%2Fuploads%2FL1sAi0Wa7yceeQM3tJhA%2Fimage.png?alt=media\&token=f21533e2-c19c-4fa3-8506-b56dab42f399)

## <mark style="color:red;">Step 2: Navigate to Delivery Options Page​</mark> <a href="#step-2-navigate-to-delivery-options-page" id="step-2-navigate-to-delivery-options-page"></a>

* Follow the **Sales Channels > Sales Channel Settings** steps and click on the **Delivery Options** cardbox.

{% hint style="info" %}
**Delivery Options** cardbox appears only when the selected sales channel type is web. In other words, for *shop-type* of sales channels, this cardboard appears.
{% endhint %}

<figure><img src="https://3333414532-files.gitbook.io/~/files/v0/b/gitbook-x-prod.appspot.com/o/spaces%2FIbwGN7KwvYi0iLbjtnXz%2Fuploads%2Fqcitkpr8c6AZ8NBajRQ6%2Fimage.png?alt=media&amp;token=bbb6632a-3c9f-4f88-b18b-5bf664fef655" alt=""><figcaption></figcaption></figure>

* This page displays Delivery Options that the related brand supports (such as Delivery to Customer, Delivery from the Store etc.).<br>

  <figure><img src="https://3333414532-files.gitbook.io/~/files/v0/b/gitbook-x-prod.appspot.com/o/spaces%2FIbwGN7KwvYi0iLbjtnXz%2Fuploads%2Fv8UCaaUHVSdR7siwfHYM%2Fimage.png?alt=media&amp;token=37acce4d-cddb-4ee2-adc4-57a1ac4203a8" alt=""><figcaption></figcaption></figure>

## <mark style="color:red;">Step 3: Add a Delivery Option​</mark> <a href="#step-3-add-a-delivery-option" id="step-3-add-a-delivery-option"></a>

* To add a new delivery option, click the **+ New Delivery Option** button.<br>

  <figure><img src="https://3333414532-files.gitbook.io/~/files/v0/b/gitbook-x-prod.appspot.com/o/spaces%2FIbwGN7KwvYi0iLbjtnXz%2Fuploads%2FHwy965Hfb7l2Ckw0SSkX%2Fimage.png?alt=media&amp;token=c3d73a45-c901-434d-b84d-7dca8af13f60" alt=""><figcaption></figcaption></figure>
* Complete the form by filling in the following fields:
  * **Name:** Specify the name for this Delivery Option.
  * **Slug:** Define a unique slug for this Delivery Option.
  * **Sorting:** Define the order in which this Delivery Option will be listed.
  * **Delivery Type:** Select one of the pre-defined Delivery Types (Customer, Pickup Location, Retail Store) to which this Delivery Option will be related.
  * **Status:** Define the status of this Delivery Option (Active/Passive).<br>

    <figure><img src="https://3333414532-files.gitbook.io/~/files/v0/b/gitbook-x-prod.appspot.com/o/spaces%2FIbwGN7KwvYi0iLbjtnXz%2Fuploads%2FWPZPHlSSZCPYSwQsgrnX%2Fimage.png?alt=media&amp;token=bf6d2d20-5f07-4e0c-890e-3fcf55ef781b" alt="" width="538"><figcaption></figcaption></figure>

## <mark style="color:red;">Step 4: Edit a Delivery Option​</mark> <a href="#step-4-edit-a-delivery-option" id="step-4-edit-a-delivery-option"></a>

* To edit a Delivery Option, just click on the related Delivery Option to reach the **Add/Edit Delivery Option** form.
* Complete the Edit action by updating the relevant inputs, described at Step 3.


# How to Manage Easy Return Shipping Options in Omnitron?

This tutorial provides step-by-step instructions for managing Easy Return Shipping Options in Omnitron.

## <mark style="color:red;">Step 1: Access to Omnitron​</mark> <a href="#step-1-access-to-omnitron" id="step-1-access-to-omnitron"></a>

* Get access to the **Omnitron** panel.
* Enter your *Username* and *Password*, and then click the **Sign In** button.\
  ![](https://3333414532-files.gitbook.io/~/files/v0/b/gitbook-x-prod.appspot.com/o/spaces%2FIbwGN7KwvYi0iLbjtnXz%2Fuploads%2FL1sAi0Wa7yceeQM3tJhA%2Fimage.png?alt=media\&token=f21533e2-c19c-4fa3-8506-b56dab42f399)

## <mark style="color:red;">Step 2: Navigate to Easy Return Shipping Options Page​</mark> <a href="#step-2-navigate-to-easy-return-shipping-options-page" id="step-2-navigate-to-easy-return-shipping-options-page"></a>

* Follow the **Sales Channels > Sales Channels Settings** sidebar and click the **Easy Return Shipping Options** page.<br>

  <figure><img src="https://3333414532-files.gitbook.io/~/files/v0/b/gitbook-x-prod.appspot.com/o/spaces%2FIbwGN7KwvYi0iLbjtnXz%2Fuploads%2FsMNGw8MmvA8EKjTcZaEW%2Fimage.png?alt=media&amp;token=13de3b4d-78b0-4f9d-a989-212b51772867" alt=""><figcaption></figcaption></figure>
* This page displays the easy return shipping options that are essential for return processes related to the selected sales channel. Users are granted the capability to modify existing options or create new ones.<br>

  <figure><img src="https://3333414532-files.gitbook.io/~/files/v0/b/gitbook-x-prod.appspot.com/o/spaces%2FIbwGN7KwvYi0iLbjtnXz%2Fuploads%2FfPXGZ6TRRMbVzXVKzFiZ%2Fimage.png?alt=media&amp;token=684e0683-107f-4446-817c-1d7399289a11" alt=""><figcaption></figcaption></figure>

## <mark style="color:red;">Step 3: Adding a New Easy Return Shipping Option​</mark> <a href="#step-3-adding-a-new-easy-return-shipping-option" id="step-3-adding-a-new-easy-return-shipping-option"></a>

To add a new option, click the **+ Easy Return Shipping Option** button. Complete the form by filling in the following fields:

* **Shipping Company:** Select a shipping company for this integration.
* **Shipping Company Auth Code:** Enter the required authorization values for the shipping company. If you desire to transmit additional information such as package weight and cubic volume, you can input a JSON configuration to read the attribute values from the product.

  *Example JSON Config for Non-Extension Cargos:*

  ```
  {"url":"https://webservices.akinonkargo.com","client_password":"pasword","client_id":"client_id"}
  ```

  *Example JSON Config for Extension Cargos:*

  ```
  {"username":"akinon","url":"extension_url","easy_return_product_attributes":{"category":"category","deci":"deci"},"send_user_address":true,"password":"password"}
  ```
* **Start Date Gap:** Specifies the number of days after initiating the return request for the return to be processed. If you desire the easy return start date to be the same day as the return request is created, enter 0. *(It is not applicable for extension cargo, so any value can be entered.)*
* **Delivery Time:** Indicates the deadline for return shipping completion. Enter the maximum number of days after initiating the return request within which the return should be delivered. *(It is not applicable for extension cargo, so any value can be entered.)*
* **Shipping Company Prefix:** Enter the prefix to be added when generating the easy return code. *(It is not applicable for extension cargo, so any value can be entered.)*
* **Shipping Company Rules:** Filter items for easy returns based on specific rules by examining product attributes. Ensure the 'Rule' field is not left blank. See the example JSON below.

  *Example JSON Rule:*

  ```
  {"product": {"field_key": "attributes__", "field_values": [[null]]}}
  ```

  An easy return code can be generated based on the shipping address country. The following JSON rule can be referred to for guidance.

  ```
  {"country":{"field_key":"code","field_values":["country_id"]},"product":{"field_key":"attributes__easy_return_method","field_values":[["",null]]},"package_rule":"country"}
  ```
* **Status:** Toggle the easy return shipping option between active and passive states.

Once the relevant fields are completed, click the **Save** button.<br>

<figure><img src="https://3333414532-files.gitbook.io/~/files/v0/b/gitbook-x-prod.appspot.com/o/spaces%2FIbwGN7KwvYi0iLbjtnXz%2Fuploads%2Fy5uqtMWyBs2lzGkmzlYC%2Fimage.png?alt=media&amp;token=e83349cb-eea2-49a9-a059-0b3ebf218b9d" alt="" width="448"><figcaption></figcaption></figure>


# Integration


# Pending Products

This tutorial provides step-by-step instructions for managing Pending Products in Omnitron.

## <mark style="color:red;">Step 1: Access to Omnitron​</mark> <a href="#step-1-access-to-omnitron" id="step-1-access-to-omnitron"></a>

* Get access to the Omnitron panel.
* Enter your Username and Password, and then click the **Sign In** button.\
  ![](https://3333414532-files.gitbook.io/~/files/v0/b/gitbook-x-prod.appspot.com/o/spaces%2FIbwGN7KwvYi0iLbjtnXz%2Fuploads%2FSm1Cc5pafA0lLxEnP9Xm%2Fimage1.png?alt=media\&token=4608fc68-3773-4d86-8542-8beae387d43d)

## <mark style="color:red;">Step 2: Navigate to Pending Products Page​</mark> <a href="#step-2-navigate-to-pending-products-page" id="step-2-navigate-to-pending-products-page"></a>

* Follow the **Integration** sidebar and click the **Pending Products** page.<br>

  <figure><img src="https://3333414532-files.gitbook.io/~/files/v0/b/gitbook-x-prod.appspot.com/o/spaces%2FIbwGN7KwvYi0iLbjtnXz%2Fuploads%2FA3nzhXF1kehaN82CEkkQ%2Fimage2.png?alt=media&amp;token=41eeb7bb-9519-4d16-9095-104e4860922d" alt=""><figcaption></figcaption></figure>
* This page is used to view and manage Pre Products that have been transferred from the client’s ERP system to Omnitron through services but are yet to be fully productized. Any products added from the ERP system are automatically displayed on this page. This screen includes a filtering area and a list of pending products.

{% hint style="info" %}
In order to automatically fetch products onto the pending product list, products need to be active and assigned with related information (such as SKU, Base Code, and Product Name) on the client’s ERP system.
{% endhint %}

<figure><img src="https://3333414532-files.gitbook.io/~/files/v0/b/gitbook-x-prod.appspot.com/o/spaces%2FIbwGN7KwvYi0iLbjtnXz%2Fuploads%2FxV5j6B5X8v3uL4PC1Wa5%2Fimage3.png?alt=media&amp;token=95e73411-a589-4c12-8085-9343b0399f15" alt=""><figcaption></figcaption></figure>

* By default, the system allows users to filter products based on various criteria such as SKU, Base Code, Product Name, Attribute Set Name, Image, and whether the product has an Attribute Set. To customize these filters, users can click the filter icon located in the top-right corner, where additional filters can be added or removed according to their preferences.
* Upon selecting a filter, it is promptly incorporated into both the filtering area and the product list tabs. Moreover, users have the option to employ Exclude filters when listing products. Alternatively, filtering can be achieved by uploading a file in either CSV or XLS format, a feature also accessible in the top-right corner.
* For file uploads, adherence to a specific template is required. This template can be obtained at the bottom of the page by clicking the **Download Pending Products Template** button.
* To export a list of selected products, users can choose the "Export to Excel" option from the Action Select menu, resulting in the generation of an Excel file. Likewise, the "Export to CSV" option allows for downloading the list in CSV format. To remove selected products, users can utilize the "Delete Selected" option found within the same drop-down menu.

## <mark style="color:red;">Step 3: Adding Bulk New Product​</mark> <a href="#step-3-adding-bulk-new-product" id="step-3-adding-bulk-new-product"></a>

Click the **+ New Product** button on the Pending Products page. This button is used to add products before integration between the client's ERP platform and Omnitron. Click the button to upload a CSV file with the related information of the products to be added. The CSV file must include **Product Name** and **SKU** information.

<figure><img src="https://3333414532-files.gitbook.io/~/files/v0/b/gitbook-x-prod.appspot.com/o/spaces%2FIbwGN7KwvYi0iLbjtnXz%2Fuploads%2FpP52GgE7JAGCiecqriKo%2Fimage4.png?alt=media&amp;token=52fd433b-2b30-483b-8ea0-167a77585daa" alt=""><figcaption></figcaption></figure>

## <mark style="color:red;">Step 4: Bulk Product Update​</mark> <a href="#step-4-bulk-product-update" id="step-4-bulk-product-update"></a>

Located in the upper-right corner, the **Bulk Product Update** button can be used for updating pending products in bulk. In order to use this feature, begin by filtering and selecting the desired products from the list. Navigate to the **Select Action** drop-down menu, select **Export Selected to CSV**, and click the **Apply** button. Once you've entered the updated information into the file, proceed to click the **Bulk Product Update** button and upload the new file.

<figure><img src="https://3333414532-files.gitbook.io/~/files/v0/b/gitbook-x-prod.appspot.com/o/spaces%2FIbwGN7KwvYi0iLbjtnXz%2Fuploads%2FKICcYOR2a9dJiIvtLrsT%2Fimage5.png?alt=media&amp;token=e4ee67e7-88d9-4efd-8aa7-e0b933d9b19a" alt=""><figcaption></figcaption></figure>

## <mark style="color:red;">Step 5: Productization of Pending Products​</mark> <a href="#step-5-productization-of-pending-products" id="step-5-productization-of-pending-products"></a>

### <mark style="color:red;">Selecting an Attribute Set​</mark> <a href="#selecting-an-attribute-set" id="selecting-an-attribute-set"></a>

To initiate the process, start by defining attribute sets containing mandatory information like size and color for the pre-products received from the client's ERP software. These sets can be defined within the **Product Attributes** menu under the **Products and Catalogs** module. For example, in the clothing category, attributes such as color and size can be defined. Refer to the related document for detailed information on [Product Attributes & Product Attribute Sets](/tutorials/omnitron/products-and-catalogs/how-to-create-product-attributes-and-attribute-sets-in-omnitron).

Once attribute sets are defined, filter the pending product list to focus on products that require an attribute set selection. Subsequently, select the desired products from the list. Navigate to the **Select Action** drop-down menu, select the **Select Attribute Set** action, and then click the **Apply** button.

A new side menu will appear, displaying attribute sets pre-defined in the **Products and Catalogs** module. Here, select the appropriate attribute set for the product's attributes (e.g., color, size) and assign it to the product. For example, select "Size-Color," which includes both "color" and "size" attributes for an undershirt.

<figure><img src="https://3333414532-files.gitbook.io/~/files/v0/b/gitbook-x-prod.appspot.com/o/spaces%2FIbwGN7KwvYi0iLbjtnXz%2Fuploads%2FbLF6h0YmWWjMkqONEUUD%2Fimage6.png?alt=media&amp;token=2e6216c0-46d1-4089-b0c9-c65980080efc" alt=""><figcaption></figcaption></figure>

### <mark style="color:red;">Approving Products​</mark> <a href="#approving-products" id="approving-products"></a>

To approve products, begin by filtering the pending products list to include those with selected attribute sets. Navigate to the **Select Action** drop-down menu, select the **Approve Selected** option, and click the **Apply** button. Through this process, pre-products that have been approved are productized and moved to the **Product Pool** within the **Products and Catalogs** module. It's important to note that products without selected attribute sets are not approved through this step.

In the event of an error during the approval process, the system generates an Excel file containing a list of products with errors. This file includes detailed information such as the error reason, as well as the product's base code and SKU number.
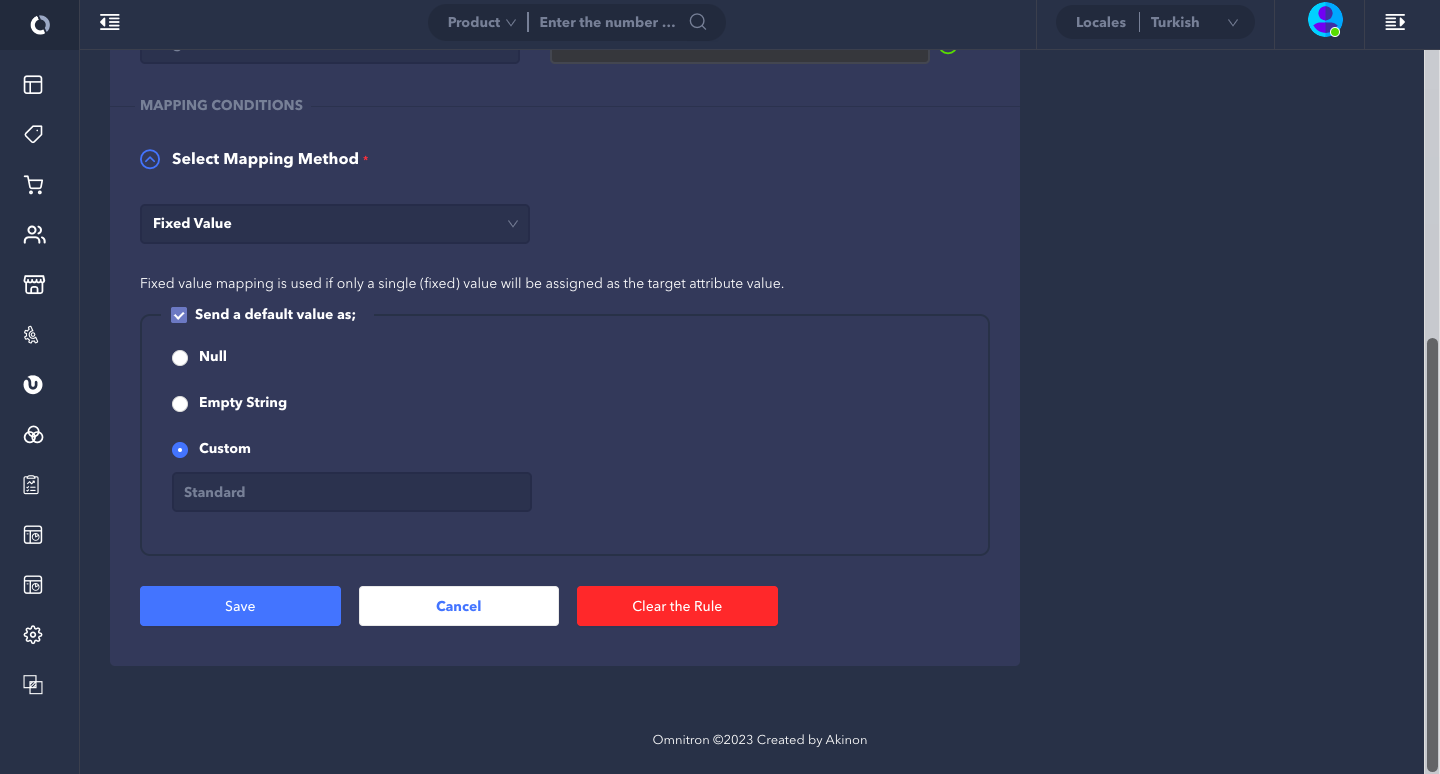
<figure><img src="https://3333414532-files.gitbook.io/~/files/v0/b/gitbook-x-prod.appspot.com/o/spaces%2FIbwGN7KwvYi0iLbjtnXz%2Fuploads%2FQAaXBVaDJofeYaJm1YYV%2Fimage7.png?alt=media&amp;token=c78387d1-f538-499f-84da-570a896ee6a3" alt=""><figcaption></figcaption></figure>

### <mark style="color:red;">Approving All Products​</mark> <a href="#approving-all-products" id="approving-all-products"></a>

To approve all products on the pending list, first, filter products with selected attribute sets. Then, select the **Approve All Products** option from the **Select Action** drop-down menu and click the **Apply** button. This process results in all pre-products being productized and moved to the **Product Pool** within the **Products and Catalogs** module. If any errors occur during the approval, they are processed within the **Errors and Warnings** panel located to the right of the Omnitron panel. Users can view errors here and export them as a CSV file, which includes the error reason, base code, and SKU number of the affected products.

For specific errors:

* For the error **"Product is not valid, missing attributes"**: Users should enter the errored attribute in the Integration>Mapping field.
* For the error **"No defined attribute value"**: Users should enter the attribute in the Products and Catalogs>Product Attributes>Attributes field.
* For the error **"... attribute already exists"**: Users should check the base code via the product pool. If another product with the same attributes exists, it cannot be imported with a different SKU.

{% hint style="info" %}
Three possible reasons for errors during the approval process: no defined attribute value, no mapping, and products previously added to the product pool. For example, if an error occurs while approving red shoes with color and size attributes, possible reasons include overlooking the definition of "Red" as a value for the "Color" attribute on the “Product Attributes” page, missing mapping for the color "Red," on the “Mapping” page or having a product with the same attributes but a different SKU in the product pool. In such cases, users need to investigate the SKU value in the product pool to resolve the error.
{% endhint %}


# City/District Mapping Error Logs

This page provides a guide to the City/District Mapping Error Logs section under the Integration module.

## <mark style="color:red;">Step 1: Navigate to City/District Mapping Error Logs Page​</mark> <a href="#step-1-navigate-to-citydistrict-mapping-error-logs-page" id="step-1-navigate-to-citydistrict-mapping-error-logs-page"></a>

* Get access to the Omnitron panel and log into your account.
* Follow the **Integration** sidebar and click the **City/District Mapping Error Logs** page.<br>

  <figure><img src="https://3333414532-files.gitbook.io/~/files/v0/b/gitbook-x-prod.appspot.com/o/spaces%2FIbwGN7KwvYi0iLbjtnXz%2Fuploads%2FcuLSw09x7khpE6igMB07%2Fimage.png?alt=media&amp;token=c2c879ff-39c9-41ff-b06a-075469f0a4d4" alt=""><figcaption></figcaption></figure>

## <mark style="color:red;">Step 2: Solve Error Logs​</mark> <a href="#step-2-solve-error-logs" id="step-2-solve-error-logs"></a>

* Error logs related to orders with missing city/district data are presented in two separate datatables.
* For incorrect addresses, corrections can be applied. Each row displays the **Country**, **City**, **District**, **Log History**, **Value to Map**, **Error Message**, and available **Transaction**.<br>

  <figure><img src="https://3333414532-files.gitbook.io/~/files/v0/b/gitbook-x-prod.appspot.com/o/spaces%2FIbwGN7KwvYi0iLbjtnXz%2Fuploads%2Fa6URVie1aBwLpnsU6aIN%2Fimage.png?alt=media&amp;token=8530cd9c-4c20-49cb-9003-6455552d2b27" alt=""><figcaption></figcaption></figure>
* At the end of each row, there are **Resolve** and **Remove** buttons.
* Click the **Resolve** button to correct the address. In the ensuing popup window, make the necessary corrections, and clicking the **Resolve** button in the popup saves the corrected data to the system.<br>

  <figure><img src="https://3333414532-files.gitbook.io/~/files/v0/b/gitbook-x-prod.appspot.com/o/spaces%2FIbwGN7KwvYi0iLbjtnXz%2Fuploads%2FymzLywiqoHECop7wxvqL%2Fimage.png?alt=media&amp;token=3b8f38c7-6153-401b-8581-830164e2155d" alt=""><figcaption></figcaption></figure>
* Click the **Remove** button to remove the error log from the list.<br>

  <figure><img src="https://3333414532-files.gitbook.io/~/files/v0/b/gitbook-x-prod.appspot.com/o/spaces%2FIbwGN7KwvYi0iLbjtnXz%2Fuploads%2F0s7SqmcxqQQkFuA1OT5j%2Fimage.png?alt=media&amp;token=bebc4195-1d26-4fe4-a8d8-6ce3dbe94f56" alt=""><figcaption></figcaption></figure>


---

[Next Page](/llms-full.txt/1)