> For the complete documentation index, see [llms.txt](https://docs.akinon.com/llms.txt). Markdown versions of documentation pages are available by appending `.md` to page URLs; this page is available as [Markdown](https://docs.akinon.com/tutorials/ai-studio.md).

# AI Studio

#### <mark style="color:$primary;">From a flat lay to a finished visual</mark>

Start with what every catalogue already has: product photos on a plain studio surface. A garment, a pair of shoes, an accessory — each shot on its own, flat and unstyled. No model, no location, no crew.

<figure><img src="https://3333414532-files.gitbook.io/~/files/v0/b/gitbook-x-prod.appspot.com/o/spaces%2FIbwGN7KwvYi0iLbjtnXz%2Fuploads%2F9Lv8SSo4hsK4gyno5DwE%2FGemini_Generated_Image_chprywchprywchpr.jpeg?alt=media&amp;token=3731d214-1705-40ad-9949-c9d1877984b1" alt="" width="375"><figcaption></figcaption></figure>

**Now consider where they can end up.**

Generative Studio puts a product on a model of your choosing, in a scene of your choosing. Continue the Outfit adds the next piece, then the next — one product at a time, the same model holding her pose while the look builds around her. What comes out is a styled campaign image: the full outfit, worn, lit, and framed.

<figure><img src="https://3333414532-files.gitbook.io/~/files/v0/b/gitbook-x-prod.appspot.com/o/spaces%2FIbwGN7KwvYi0iLbjtnXz%2Fuploads%2FriMr4GOwqlA5kqB4yFM1%2Fimage.png?alt=media&amp;token=db190f9c-88e0-4186-9f9e-7afa1815a9e2" alt="" width="563"><figcaption></figcaption></figure>

Then the Video Generator takes that still and sets it in motion — a slow turn toward the camera, a walk through the scene, light moving across the frame. Seconds of footage, produced from photographs of products lying on a table.

{% embed url="<https://files.gitbook.com/v0/b/gitbook-x-prod.appspot.com/o/spaces%2FIbwGN7KwvYi0iLbjtnXz%2Fuploads%2FreoxPMrKZ3vkLqENzLqg%2F20260820-084320-3a52578c-db79-4d88-ab73-75895a2d2dbe.mp4?alt=media&token=843073a7-237f-4bac-b936-82180e07e39a>" %}

**No photographer. No casting. No location scouting. No reshoot when the campaign direction changes** — you simply pick a different background, a different model, a different pose, and generate again.

**That is the distance AI Studio closes:** from a flat lay to a finished visual, without leaving the product page.

## <mark style="color:$primary;">About AI Studio</mark>

Akinon AI Studio brings AI-powered image and video generation directly into Omnitron. Instead of exporting product photos, editing them in an external tool, and re-uploading the results, you work on your visuals in the same place you manage the product — and save them straight back to the product's gallery.

Everything runs from a single entry point on the **Product** **Detail** page. From there, five tools let you remove or swap backgrounds, change a model's pose, generate fully styled product images with a chosen model and scene, build complete outfits across multiple products, and turn still photos into short videos.

<figure><img src="https://3333414532-files.gitbook.io/~/files/v0/b/gitbook-x-prod.appspot.com/o/spaces%2FIbwGN7KwvYi0iLbjtnXz%2Fuploads%2FjvcESVFRj0S01JGleO7j%2Fimage.png?alt=media&amp;token=8bbdcbc9-5efa-4c41-8d63-7e8f2e986b9b" alt=""><figcaption></figcaption></figure>

#### <mark style="color:$primary;">What you can use it for</mark>

* **Standardising your catalogue** — put every product on the same clean, consistent background, even when the source photos were shot in different conditions.
* **Getting more out of one photoshoot** — generate new poses, camera angles, and scenes from photos you already have, instead of booking another shoot.
* **Campaign and seasonal visuals** — place the same product in a studio, an urban street, or a warm interior to match a campaign's mood.
* **Styling complete looks** — dress a single model in several products to show how items work together.
* **Richer product pages** — add short product videos alongside your still images.
* **Marking AI content** — label generated visuals as AI-generated, or stamp them with your brand name, before they're published.

#### <mark style="color:$primary;">Before you start</mark>

* You need a product in **Product Pool** that already has at least one photo in its gallery. Every tool starts from an existing product photo, so AI Studio can't generate a visual from nothing.
* The clearer your source photo, the better the result. Choose photos where the product is well lit and fully visible.
* When a tool accepts more than one source photo, all selected photos must belong to the same product.

#### <mark style="color:$primary;">How the tools work</mark>

All five tools follow the same pattern, so once you've used one, the rest will feel familiar:

1. **Pick your source photo(s)** from the product's existing gallery.
2. **Configure the tool** — a background, a color, a model, a pose, a motion type, an aspect ratio, and so on.
3. **Check the summary.** The right-hand panel shows a green **Ready to Generate** confirmation listing every choice you've made, so you can review before spending a generation.
4. **Generate.** Results appear in the right-hand panel.
5. **Refine.** Crop, watermark, or download individual results.
6. **Save** with **ADD TO IMAGE GALLERY** — this is the step that writes the result back to the product.

The layout is consistent throughout: your inputs are on the left, and the library you're choosing from (or your results) fill the right. The icon shortcuts down the left edge of the panel let you jump between the five tools at any time.

<figure><img src="https://3333414532-files.gitbook.io/~/files/v0/b/gitbook-x-prod.appspot.com/o/spaces%2FIbwGN7KwvYi0iLbjtnXz%2Fuploads%2FaAE1EIG7thjhlVwLXiek%2Fimage.png?alt=media&amp;token=acc7890f-d567-4df2-9614-d0f665e46b41" alt=""><figcaption></figcaption></figure>

{% hint style="warning" %}
Generated results are not stored on the product until you click **ADD TO IMAGE GALLERY**. If you close the tool before saving, the results are lost.
{% endhint %}

***

## <mark style="color:$primary;">Getting Started: Opening AI Studio</mark>

1. In Omnitron, go to **Products and Catalogs → Product Pool**.
2. Open the product you want to work on. The **Add/Edit Product** page appears.
3. Click the <img src="https://3333414532-files.gitbook.io/~/files/v0/b/gitbook-x-prod.appspot.com/o/spaces%2FIbwGN7KwvYi0iLbjtnXz%2Fuploads%2Fc6Lp7foLmqkOi3llxO4G%2Fimage.png?alt=media&amp;token=e8de1304-df34-450c-aba6-f23d8a57d39c" alt="" data-size="line"> button in the top-right corner of the page.
4. The **Akinon AI Studio** panel opens with five tools:

<table><thead><tr><th width="183.51953125">Tool</th><th>What it does</th></tr></thead><tbody><tr><td><strong>Generative Studio</strong></td><td>Create product images with full control over background, model, and pose.</td></tr><tr><td><strong>Background Remover</strong></td><td>Remove the background from your product images in one click, or replace it with a color.</td></tr><tr><td><strong>Background Changer</strong></td><td>Swap the background of your product images for any scene or setting in one click.</td></tr><tr><td><strong>Pose Changer</strong></td><td>Change your model's pose in one click and get fresh visuals without a new photoshoot.</td></tr><tr><td><strong>Video Generator</strong></td><td>Turn your product photos into videos with one click and bring your products to life.</td></tr></tbody></table>

Click a tool card to open it. You can also switch between tools at any time using the icon shortcuts on the left edge of the AI Studio panel.

<figure><img src="https://3333414532-files.gitbook.io/~/files/v0/b/gitbook-x-prod.appspot.com/o/spaces%2FIbwGN7KwvYi0iLbjtnXz%2Fuploads%2F3nH2D9U4bh80UWRV0vSI%2Fimage.png?alt=media&amp;token=6238ca8c-c8ae-41bc-9620-09d2891850e1" alt=""><figcaption></figcaption></figure>

***

## <mark style="color:$primary;">1. Generative Studio</mark>

Generative Studio brings every generation tool together in one place. Select your source photos, then choose a background, a model, a pose, a camera angle, and an aspect ratio to generate professional product images — all from a single screen.

{% stepper %}
{% step %}

#### <mark style="color:$warning;">**Choose your source photos.**</mark>

* Click **Choose Source Photo**. The product's photos are listed on the right.
* Choose photos that clearly show the product. **All selected photos must belong to the same product.**
* Click one or more photos to select them (selected photos are highlighted), then click **SELECT SOURCE PHOTO**.<br>

  <figure><img src="https://3333414532-files.gitbook.io/~/files/v0/b/gitbook-x-prod.appspot.com/o/spaces%2FIbwGN7KwvYi0iLbjtnXz%2Fuploads%2FaKHodoupbZnnZlvl3vCZ%2Fimage.png?alt=media&amp;token=81a0a7f6-3ab9-4d1f-b7a0-9a6081a18d91" alt=""><figcaption></figcaption></figure>

{% endstep %}

{% step %}

#### <mark style="color:$warning;">**Select a background.**</mark>

* Under **Background**, click **Select a background**. A library of presets opens on the right (for example, *Showroom*, *Urban Street*, *Warm Loft*, *Canvas Grey*, *Grey Studio Floor*, *Raw Concrete*, *Zen Clay*, *Concrete Gate*).
* Click a preset, then click **SELECT BACKGROUND**. The chosen preset appears in the left panel as **Selected Background** — click it again anytime to choose a different one.<br>

  <figure><img src="https://3333414532-files.gitbook.io/~/files/v0/b/gitbook-x-prod.appspot.com/o/spaces%2FIbwGN7KwvYi0iLbjtnXz%2Fuploads%2FoPjkbs0INpdh6m6qbBSs%2Fimage.png?alt=media&amp;token=690f1a99-ddcf-463d-ad98-449c5d56acc1" alt=""><figcaption></figcaption></figure>

{% endstep %}

{% step %}

#### <mark style="color:$warning;">**Select a model.**</mark>

* Under **Model**, browse the model library. Each model is shown with a portrait and a name (for example, *Mateo*, *Lucas*, *James*, *Liam*, *Mia*).
* Click a model, then click **SELECT MODEL**. The selected model will be applied to your product.<br>

  <figure><img src="https://3333414532-files.gitbook.io/~/files/v0/b/gitbook-x-prod.appspot.com/o/spaces%2FIbwGN7KwvYi0iLbjtnXz%2Fuploads%2FIGzSzBYtRjsnq6PMMKSU%2Fimage.png?alt=media&amp;token=1104e977-3c45-488e-90fd-8499c2677e26" alt=""><figcaption></figcaption></figure>

{% endstep %}

{% step %}

#### <mark style="color:$warning;">**Select a pose.**</mark>

* Under **Pose**, pick a pose from the library (for example, *Arms Crossed*, *Dynamic Side Lean*, *Hands-in-Pockets*, *High-Fashion Crouch*, *Walking Mid-Stride*).
* Click a pose, then click **SELECT POSE**. The model in your image will be transformed into this pose.<br>

  <figure><img src="https://3333414532-files.gitbook.io/~/files/v0/b/gitbook-x-prod.appspot.com/o/spaces%2FIbwGN7KwvYi0iLbjtnXz%2Fuploads%2FmgXFSHvIhQctJPkXSiku%2Fimage.png?alt=media&amp;token=42e70939-6c41-4b59-ab9f-21b78718e12b" alt=""><figcaption></figcaption></figure>

{% endstep %}

{% step %}

#### <mark style="color:$warning;">**Choose a camera angle.**</mark>

* Under **Camera Angle**, click one of the options: **Front**, **3/4**, **Back**, or **Side**.
  {% endstep %}

{% step %}

#### <mark style="color:$warning;">**Set the aspect ratio (optional).**</mark>

* Open the **Aspect Ratio** dropdown. Options are **AI Selects Best** (default), **1:1 (Square)**, **3:4**, **4:3**, **9:16 (Portrait)**, **16:9 (Landscape)**, **2:3**, **3:2** etc.
* Leave it on **AI Selects Best** to let AI Studio pick the most suitable ratio.<br>

  <figure><img src="https://3333414532-files.gitbook.io/~/files/v0/b/gitbook-x-prod.appspot.com/o/spaces%2FIbwGN7KwvYi0iLbjtnXz%2Fuploads%2FhzwcFNhJyeiZ0QukO7rC%2Fimage.png?alt=media&amp;token=f75f2201-66e7-46eb-9d73-09e1915118da" alt=""><figcaption></figcaption></figure>

{% endstep %}

{% step %}

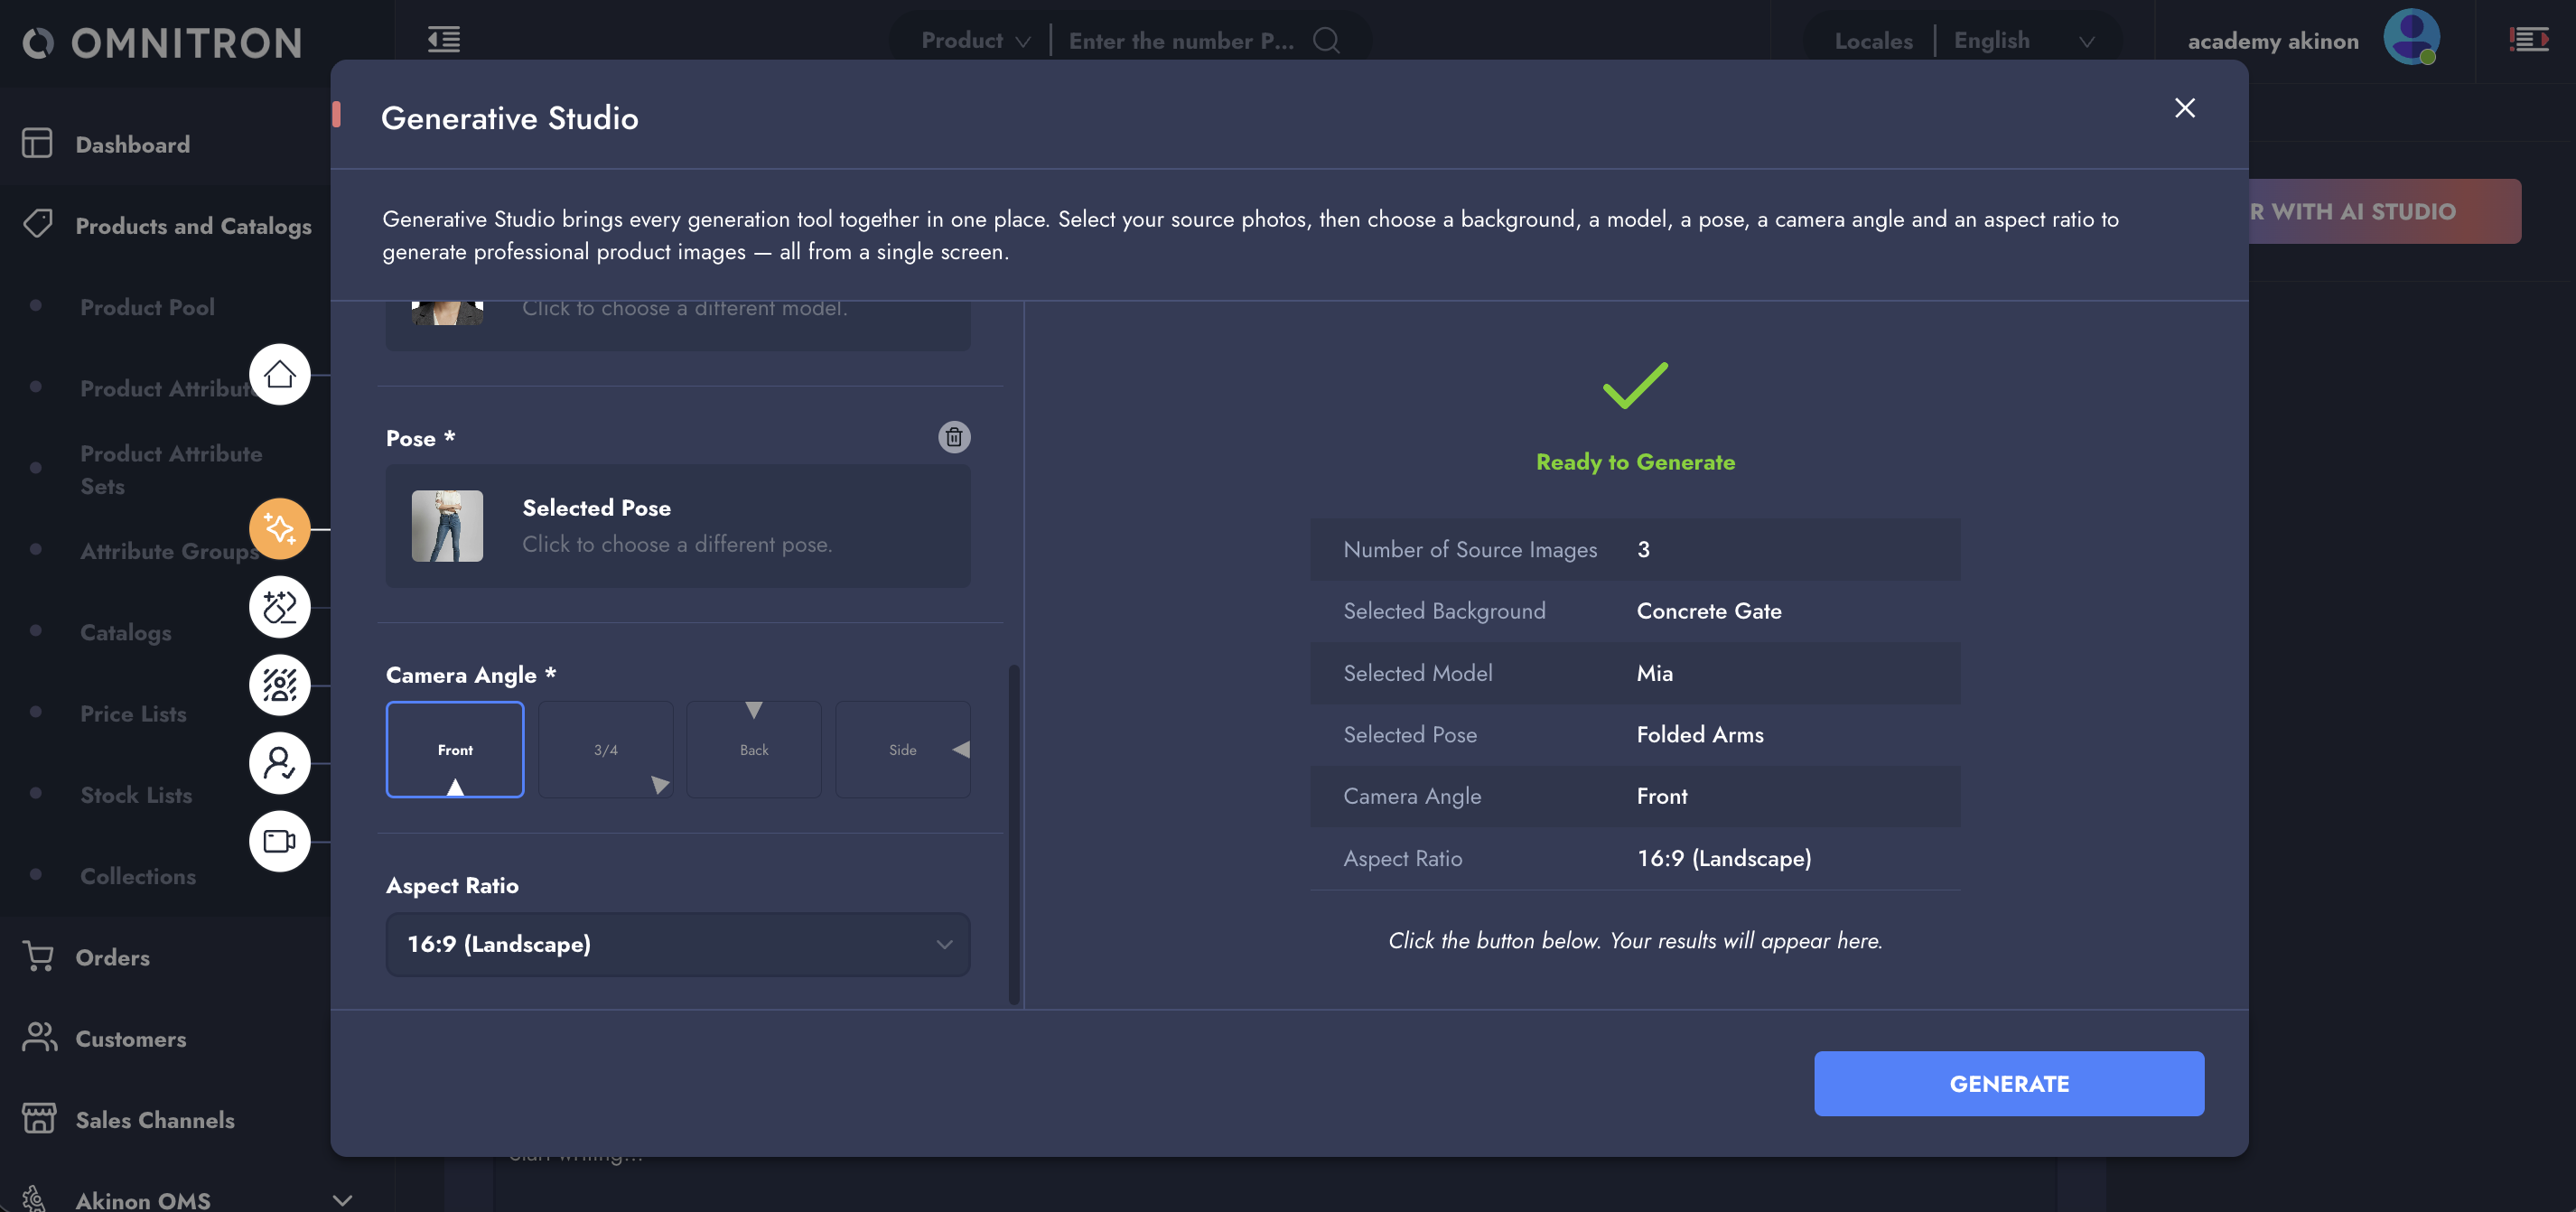
#### <mark style="color:$warning;">**Review the summary and generate.**</mark>

* The right-hand panel confirms **Ready to Generate** and lists everything you've configured: number of source images, background, model, pose, camera angle, and aspect ratio.
* Click **GENERATE.**<br>

  <figure><img src="https://3333414532-files.gitbook.io/~/files/v0/b/gitbook-x-prod.appspot.com/o/spaces%2FIbwGN7KwvYi0iLbjtnXz%2Fuploads%2FJODD07MdNfxUPFy1toKf%2Fimage.png?alt=media&amp;token=e30d3141-d7ac-4192-9529-ed4eba0dfc29" alt=""><figcaption></figcaption></figure>

  <figure><img src="https://3333414532-files.gitbook.io/~/files/v0/b/gitbook-x-prod.appspot.com/o/spaces%2FIbwGN7KwvYi0iLbjtnXz%2Fuploads%2F9R4816NecCMPlJvkbxMj%2Fimage.png?alt=media&amp;token=ed99b4fc-7764-4ed8-a725-a7e429d2b8c8" alt=""><figcaption></figcaption></figure>

{% endstep %}

{% step %}

#### <mark style="color:$warning;">**Review your result.**</mark>

The generated image appears on the right. Hover over it to reveal three tools:

* **Add Watermark** (top-left of the image) — see [Adding a Watermark](#id-6.-adding-a-watermark).
* **Crop** (top-right) — opens the **Crop Image** dialog. Drag the handles to frame the image, then confirm.
* **Download Image** (bottom-right) — saves the image to your computer.<br>

  <figure><img src="https://3333414532-files.gitbook.io/~/files/v0/b/gitbook-x-prod.appspot.com/o/spaces%2FIbwGN7KwvYi0iLbjtnXz%2Fuploads%2F74tn7OTlEYGhj8f40mYS%2Fimage.png?alt=media&amp;token=978d247f-aaa6-4c39-9a96-8b4d039acca4" alt=""><figcaption></figcaption></figure>

{% endstep %}

{% step %}

#### <mark style="color:$warning;">**Save it, or keep building the look.**</mark>

* Click **ADD TO IMAGE GALLERY** to save the image to the product's image gallery.
* Or click **CONTINUE THE OUTFIT** to dress the same model with additional products — see below.
  {% endstep %}
  {% endstepper %}

{% hint style="warning" %}
**Reminder:** the panel prompts you not to forget saving with **Add to Image Gallery**. Results are not stored on the product until you do.
{% endhint %}

### <mark style="color:$primary;">Continue the Outfit</mark>

**Continue the Outfit** lets you keep the model and scene you just generated and dress that same model with more products — building a complete look step by step.

1. On a generated result, click **CONTINUE THE OUTFIT**.
2. The screen switches to outfit-building mode. The image you generated is shown on the left as **Current Outfit**.
3. **Add a product.**
   * Add **one product per step**. Use the **Search by SKU to add a product** field to find it.
   * Type the SKU. Matching products appear below with their name and SKU — click the result to open it.

     <figure><img src="https://3333414532-files.gitbook.io/~/files/v0/b/gitbook-x-prod.appspot.com/o/spaces%2FIbwGN7KwvYi0iLbjtnXz%2Fuploads%2FBuNsu8leFnvmMYGQt2GK%2Fimage.png?alt=media&amp;token=d05a6dc5-ec2c-462f-9eb4-69a8ebf7aae6" alt=""><figcaption></figcaption></figure>
4. **Select that product's photos.**
   * The product's photo gallery expands. Click one or more photos of the product, taken from different angles. Selected photos are numbered.
   * Click **ADD**.

     <figure><img src="https://3333414532-files.gitbook.io/~/files/v0/b/gitbook-x-prod.appspot.com/o/spaces%2FIbwGN7KwvYi0iLbjtnXz%2Fuploads%2FOl1m3IEPHztwGSEuI7fl%2Fimage.png?alt=media&amp;token=c8778408-c387-415b-b2d4-76a6e505d466" alt=""><figcaption></figcaption></figure>
   * The product now appears as a card with your chosen photos and an **Edit Photos** link if you want to change the selection. Use the **×** to remove the product entirely.
   * Click **SELECT PRODUCT PHOTOS** to confirm.
5. **Review and generate.**
   * The right-hand panel confirms **Ready to Generate**, showing the **Product Name** and the **Number of Product Images**.
   * Click **GENERATE**.

     <figure><img src="https://3333414532-files.gitbook.io/~/files/v0/b/gitbook-x-prod.appspot.com/o/spaces%2FIbwGN7KwvYi0iLbjtnXz%2Fuploads%2F42kZIutcHjK12EbQoouJ%2Fimage.png?alt=media&amp;token=af108606-86f0-4ccf-8236-8188ae701127" alt=""><figcaption></figcaption></figure>
6. **Review the new look.**
   * The model now appears wearing or carrying the added product, in the same scene and pose. The same **Add Watermark**, **Crop**, and **Download Image** tools are available on the result.

     <figure><img src="https://3333414532-files.gitbook.io/~/files/v0/b/gitbook-x-prod.appspot.com/o/spaces%2FIbwGN7KwvYi0iLbjtnXz%2Fuploads%2FlUtXE6TcDIZQti8Pbf9C%2Fimage.png?alt=media&amp;token=2ea517e7-8f62-48a1-a944-cbb3cdfaa1cf" alt=""><figcaption></figcaption></figure>
7. **Repeat or finish.**
   * Click **CONTINUE THE OUTFIT** again to add another product — the updated image becomes the new **Current Outfit**.
   * When the look is complete, click **ADD TO IMAGE GALLERY** to save it.

***

## <mark style="color:$primary;">2. Background Remover</mark>

Remove cluttered or distracting backgrounds from your product images with a single click and replace them with the color of your choice. Get clean, professional visuals that put the product front and center — no reshoot required.

{% hint style="warning" %}
Background Remover replaces the background with a **solid color**. It does not export images with a transparent background.
{% endhint %}

{% stepper %}
{% step %}

#### <mark style="color:$warning;">**Choose your source photos.**</mark>

Click **Choose Source Photo**, select one or more photos, then click **SELECT SOURCE PHOTO**.

<figure><img src="https://3333414532-files.gitbook.io/~/files/v0/b/gitbook-x-prod.appspot.com/o/spaces%2FIbwGN7KwvYi0iLbjtnXz%2Fuploads%2F55gahgECVdA23RHGq4zW%2Fimage.png?alt=media&amp;token=d8146353-15da-4f01-8aef-a02a9ea1b5de" alt=""><figcaption></figcaption></figure>
{% endstep %}

{% step %}

#### <mark style="color:$warning;">**Pick a background color.**</mark>

Under **Background Color**, click the swatch and choose your color (for example, `#FFFFFF` for clean white).

<figure><img src="https://3333414532-files.gitbook.io/~/files/v0/b/gitbook-x-prod.appspot.com/o/spaces%2FIbwGN7KwvYi0iLbjtnXz%2Fuploads%2FmHIUSD624UaVeTMAjQKc%2Fimage.png?alt=media&amp;token=1b9adef1-c1bf-4c9d-9186-1443a70bedb6" alt=""><figcaption></figcaption></figure>
{% endstep %}

{% step %}

#### <mark style="color:$warning;">**Review the summary.**</mark>

The right panel shows **Ready to Generate** with the number of source images and the selected color.

<figure><img src="https://3333414532-files.gitbook.io/~/files/v0/b/gitbook-x-prod.appspot.com/o/spaces%2FIbwGN7KwvYi0iLbjtnXz%2Fuploads%2FC3wX8Vm3GFhATSeaLPAF%2Fimage.png?alt=media&amp;token=6a8779fc-adf5-4c3e-8ac3-c14aab691ed9" alt=""><figcaption></figcaption></figure>
{% endstep %}

{% step %}

#### <mark style="color:$warning;">**Generate.**</mark>

Click **REMOVE BACKGROUND**. Each image shows a *Generating image…* indicator while processing.
{% endstep %}

{% step %}

#### <mark style="color:$warning;">**Review and refine.**</mark>

Tick the checkbox on each result you want to keep. Use the crop icon to open **Crop Image**, frame the shot, and click **CONFIRM**. To label a result, use the **Add Watermark** icon — see [Adding a Watermark](#id-6.-adding-a-watermark).
{% endstep %}

{% step %}

#### <mark style="color:$warning;">**Save.**</mark>

Click **ADD TO IMAGE GALLERY**.

<figure><img src="https://3333414532-files.gitbook.io/~/files/v0/b/gitbook-x-prod.appspot.com/o/spaces%2FIbwGN7KwvYi0iLbjtnXz%2Fuploads%2F2d7QsyuybpJoBx3dWsT7%2Fimage.png?alt=media&amp;token=c607950e-aea5-4630-a180-33a74e83e319" alt=""><figcaption></figcaption></figure>
{% endstep %}
{% endstepper %}

***

## <mark style="color:$primary;">3. Background Changer</mark>

Swap the background of your product images for any scene in seconds. Choose a studio setting, a natural location, or a backdrop that fits your campaign to place your products in fresh contexts.

{% stepper %}
{% step %}
Choose your source photos under **Source Photo.**

<figure><img src="https://3333414532-files.gitbook.io/~/files/v0/b/gitbook-x-prod.appspot.com/o/spaces%2FIbwGN7KwvYi0iLbjtnXz%2Fuploads%2F5gcLVS8NbyL2hig7otu6%2Fimage.png?alt=media&amp;token=ceaf7210-2e30-4a94-adc7-278e14c8b646" alt=""><figcaption></figcaption></figure>
{% endstep %}

{% step %}
**Select a background preset.** Click Select a background, choose a preset from the library, then click SELECT BACKGROUND.

<figure><img src="https://3333414532-files.gitbook.io/~/files/v0/b/gitbook-x-prod.appspot.com/o/spaces%2FIbwGN7KwvYi0iLbjtnXz%2Fuploads%2F3PdNGEIfPd1ktB7sFWFK%2Fimage.png?alt=media&amp;token=dd2969a9-aee1-4e11-9744-0704b37e5121" alt=""><figcaption></figcaption></figure>
{% endstep %}

{% step %}
**Set the aspect ratio (optional)** — or leave it on AI Selects Best.
{% endstep %}

{% step %}
**Review and generate.** The panel confirms Ready to Generate with the number of source images, selected background, and aspect ratio. Click CHANGE BACKGROUND.

<figure><img src="https://3333414532-files.gitbook.io/~/files/v0/b/gitbook-x-prod.appspot.com/o/spaces%2FIbwGN7KwvYi0iLbjtnXz%2Fuploads%2F6vpAngJ86clUPk0uAN8g%2Fimage.png?alt=media&amp;token=63d540eb-3b67-4c59-998b-516b9ed217bb" alt=""><figcaption></figcaption></figure>
{% endstep %}

{% step %}
**Review, crop, watermark, and save.** Tick the results you want, refine them ([Adding a Watermark), then click ADD TO IMAGE GALLERY.](#id-6.-adding-a-watermark)

<figure><img src="https://3333414532-files.gitbook.io/~/files/v0/b/gitbook-x-prod.appspot.com/o/spaces%2FIbwGN7KwvYi0iLbjtnXz%2Fuploads%2F3apjSlwg7HnQ9hnrTXJR%2Fimage.png?alt=media&amp;token=d7201112-76c3-4632-add0-d1600b4f1da5" alt=""><figcaption></figcaption></figure>
{% endstep %}
{% endstepper %}

***

## <mark style="color:$primary;">4. Pose Changer</mark>

Change your model's pose in seconds and get different visuals from the same product. Create multiple pose variations from your existing image — without a new photoshoot.

{% stepper %}
{% step %}
**Choose your source photo —** a photo of a model wearing your product.

<figure><img src="https://3333414532-files.gitbook.io/~/files/v0/b/gitbook-x-prod.appspot.com/o/spaces%2FIbwGN7KwvYi0iLbjtnXz%2Fuploads%2FJ9lj3la5NM7dCOgk52ab%2Fimage.png?alt=media&amp;token=1fcc2359-2cff-44bd-92b6-bd71f5c41c56" alt=""><figcaption></figcaption></figure>
{% endstep %}

{% step %}
**Select a pose** from the library, then click **SELECT POSE**. The model in your source photo will be transformed into that pose.

<figure><img src="https://3333414532-files.gitbook.io/~/files/v0/b/gitbook-x-prod.appspot.com/o/spaces%2FIbwGN7KwvYi0iLbjtnXz%2Fuploads%2F9EmqCDkeSfwWTqIuiSkA%2Fimage.png?alt=media&amp;token=781fbdc2-a038-4099-a902-d6f593859772" alt=""><figcaption></figcaption></figure>
{% endstep %}

{% step %}
Set the aspect ratio (optional).
{% endstep %}

{% step %}
**Review and generate.** The panel confirms Ready to Generate with the number of source images, selected pose, and aspect ratio. Click **CHANGE POSE**.

<figure><img src="https://3333414532-files.gitbook.io/~/files/v0/b/gitbook-x-prod.appspot.com/o/spaces%2FIbwGN7KwvYi0iLbjtnXz%2Fuploads%2FxOaPqZJmpg3p9C3qeICf%2Fimage.png?alt=media&amp;token=a7a5b0a4-6557-4061-b814-4809a157ec97" alt=""><figcaption></figcaption></figure>
{% endstep %}

{% step %}
**Review, crop, watermark, and save.** Refine the results ([Adding a Watermark](#id-6.-adding-a-watermark)), then click **ADD TO IMAGE GALLERY**.

<figure><img src="https://3333414532-files.gitbook.io/~/files/v0/b/gitbook-x-prod.appspot.com/o/spaces%2FIbwGN7KwvYi0iLbjtnXz%2Fuploads%2FDbHiv8J3hyPtQ0wJdRMf%2Fimage.png?alt=media&amp;token=a357694f-7f87-44a5-9c30-5419925dc785" alt=""><figcaption></figcaption></figure>
{% endstep %}
{% endstepper %}

***

## <mark style="color:$primary;">5. Video Generator</mark>

Animate your product photos into eye-catching videos in seconds. Choose a motion preset or describe the movement you want with a prompt, and create dynamic product videos from a single image.

{% stepper %}
{% step %}
**Choose your source photo** under **Source Photo**.

<figure><img src="https://3333414532-files.gitbook.io/~/files/v0/b/gitbook-x-prod.appspot.com/o/spaces%2FIbwGN7KwvYi0iLbjtnXz%2Fuploads%2FQWDn3httzM9JBZRYKeuJ%2Fimage.png?alt=media&amp;token=0a0781f2-1e0e-477e-8608-e6b959dcd08a" alt=""><figcaption></figcaption></figure>
{% endstep %}

{% step %}
**Choose how to define the motion.** There are two tabs:

**Option A — Presets**

* On the **Presets** tab, browse the ready-made motion types and click the one that fits your product.
* Click **SELECT MOTION TYPE**.

  <figure><img src="https://3333414532-files.gitbook.io/~/files/v0/b/gitbook-x-prod.appspot.com/o/spaces%2FIbwGN7KwvYi0iLbjtnXz%2Fuploads%2FPg2h5OvYxOnlUTCbKrti%2Fimage.png?alt=media&amp;token=45ae2e7d-5383-42c8-afe9-b6720ba7f070" alt=""><figcaption></figcaption></figure>

**Option B — Prompt**

* Switch to the **Prompt** tab and describe the movement in your own words in the **Describe Your Motion Type** box.
* Click **USE PROMPT**.

  <figure><img src="https://3333414532-files.gitbook.io/~/files/v0/b/gitbook-x-prod.appspot.com/o/spaces%2FIbwGN7KwvYi0iLbjtnXz%2Fuploads%2Fuo7K3ooJkPE2WwFM1gWg%2Fimage.png?alt=media&amp;token=abb083db-4928-467d-b661-ebca577b378d" alt=""><figcaption></figcaption></figure>

{% endstep %}

{% step %}
**Generate and save.** Review the result and add it to the product. To label the video, use the **Add Watermark** icon on the result — see [Adding a Watermark](#id-6.-adding-a-watermark). Saved videos appear under **Product Videos** on the product page.

<figure><img src="https://3333414532-files.gitbook.io/~/files/v0/b/gitbook-x-prod.appspot.com/o/spaces%2FIbwGN7KwvYi0iLbjtnXz%2Fuploads%2FGuRk9wRaIFWkmKFMT2J2%2Fimage.png?alt=media&amp;token=9d524c05-5299-499b-ac43-dcbf079f4467" alt=""><figcaption></figcaption></figure>
{% endstep %}
{% endstepper %}

**Example Video (720p)**

{% embed url="<https://files.gitbook.com/v0/b/gitbook-x-prod.appspot.com/o/spaces%2FIbwGN7KwvYi0iLbjtnXz%2Fuploads%2FreoxPMrKZ3vkLqENzLqg%2F20260820-084320-3a52578c-db79-4d88-ab73-75895a2d2dbe.mp4?alt=media&token=843073a7-237f-4bac-b936-82180e07e39a>" %}

{% hint style="warning" %}
**Tips for best results with prompts:**

* Describe the motion in your own words — think of it as directing a short shot.
* Set the mood of the scene (calm, energetic, editorial, playful).
* Say where the model looks (into the camera, to the side, down).
* Describe how the light falls (soft daylight, warm sunset, bright studio).
* Explain how the body moves (slow turn, walking forward, hair caught in the wind).
* Write in plain sentences — no technical terms needed.
* The more you define, the more controlled and lifelike your video becomes.
  {% endhint %}

***

## <mark style="color:$primary;">6. Adding a Watermark</mark>

Watermarking is available across **all five AI Studio tools**. Wherever a tool produces a result, you can stamp text onto it — either to disclose that the visual was AI-generated, or to mark it with your brand or campaign name before it leaves Omnitron.

The **Add Watermark** dialog and its settings are identical in every tool. Only the point where you open it differs, because each tool presents its results differently.

#### Where to find it in each tool

<table><thead><tr><th width="199.421875">Tool</th><th>Where the Add Watermark icon appears</th></tr></thead><tbody><tr><td><strong>Generative Studio</strong></td><td>On the single generated result, top-left corner of the image. Hover over the image to reveal it, alongside the Crop and Download Image icons. The same applies to results produced by <strong>Continue the Outfit</strong>, so you can watermark the finished look after the last product has been added.</td></tr><tr><td><strong>Background Remover</strong></td><td>On each result in the results grid. Hover over the specific result you want to mark — every result is watermarked individually.</td></tr><tr><td><strong>Background Changer</strong></td><td>On each result in the results grid, the same way as Background Remover.</td></tr><tr><td><strong>Pose Changer</strong></td><td>On each generated pose variation.</td></tr><tr><td><strong>Video Generator</strong></td><td>On the generated video result.</td></tr></tbody></table>

#### <mark style="color:$primary;">Steps</mark>

1. Generate a result in any of the five tools.
2. Hover over the result and click the **Add Watermark** icon.

   <figure><img src="https://3333414532-files.gitbook.io/~/files/v0/b/gitbook-x-prod.appspot.com/o/spaces%2FIbwGN7KwvYi0iLbjtnXz%2Fuploads%2FydQji6gmnVOkEti8YglA%2Fimage.png?alt=media&amp;token=2428fae7-93b1-45dc-92a0-f5d55384d120" alt=""><figcaption></figcaption></figure>
3. The **Add Watermark** dialog opens. A live preview fills the left side of the dialog and the settings panel sits on the right. Every change is reflected in the preview immediately.

   <figure><img src="https://3333414532-files.gitbook.io/~/files/v0/b/gitbook-x-prod.appspot.com/o/spaces%2FIbwGN7KwvYi0iLbjtnXz%2Fuploads%2FHG8wRMpqCv3xNS6xphSx%2Fimage.png?alt=media&amp;token=38d3ea62-3563-4765-a5d6-d08329c52103" alt=""><figcaption></figcaption></figure>
4. Adjust the settings below until the preview looks right.
5. Click **APPLY**.

The watermark is applied and the dialog closes. You can then crop, download, or save the result exactly as you would an unmarked one.

#### <mark style="color:$primary;">Settings</mark>

<table data-search="true"><thead><tr><th width="192.83203125">Setting</th><th>What it controls</th></tr></thead><tbody><tr><td><strong>Watermark Text</strong></td><td>The text itself. It comes pre-filled with <strong>✦ AI GENERATED</strong>.</td></tr><tr><td><strong>Insert</strong></td><td>Two sparkle glyph buttons that insert a decorative ✦ / ✧ symbol into the text.</td></tr><tr><td><strong>Font</strong></td><td>Typeface for the watermark (for example, <em>Jost</em>).</td></tr><tr><td><strong>Weight</strong></td><td>Font weight (for example, <em>Medium</em>).</td></tr><tr><td><strong>Size</strong></td><td>Text size in pixels (for example, 24 px).</td></tr><tr><td><strong>Color</strong></td><td>Text color, entered as a hex value (for example, <code>#2C2C2C</code>).</td></tr><tr><td><strong>Rotate</strong></td><td>Rotation angle of the watermark (for example, 0°).</td></tr><tr><td><strong>Opacity</strong></td><td>Transparency slider, from faint to fully opaque (for example, 100%).</td></tr><tr><td><strong>Text Shadow → Color</strong></td><td>Shadow color behind the text, as a hex value (for example, <code>#FFFFFF</code>) — useful for keeping the watermark legible on busy backgrounds.</td></tr><tr><td><strong>Position</strong></td><td>A 3×3 grid for placing the watermark in any corner, edge, or the center of the result.</td></tr></tbody></table>

#### Tips

* Keep the default **✦ AI GENERATED** text if your goal is to disclose that the visual was AI-generated.
* Use **Text Shadow** when the watermark sits over a busy or mid-tone area — a contrasting shadow keeps the text readable without having to increase its size.
* Lower the **Opacity** for a subtle mark that doesn't compete with the product.
* Check the preview before applying: once applied, the watermark becomes part of the result, so removing it means generating it again.
* If you plan to crop as well, crop first — cropping afterwards can cut off a watermark placed near an edge.
* Use the same settings across a product set so your gallery stays visually consistent.

***

## <mark style="color:$primary;">7. After Generation: Managing Your Assets</mark>

* **Product Pictures:** Images added to the gallery appear under **Product Pictures** on the Add/Edit Product page. You can also drop files here or click to upload manually.
* **Product Videos:** Generated videos appear under **Product Videos**.

<figure><img src="https://3333414532-files.gitbook.io/~/files/v0/b/gitbook-x-prod.appspot.com/o/spaces%2FIbwGN7KwvYi0iLbjtnXz%2Fuploads%2FvyUYrrRW291VovKjW7nF%2Fimage.png?alt=media&amp;token=990c8ec1-1548-4474-a3bc-396a97819f99" alt=""><figcaption></figcaption></figure>


---

# Agent Instructions
This documentation is published with GitBook. GitBook is the documentation platform designed so that both humans and AI agents can read, navigate, and reason over technical content effectively. Learn more at gitbook.com.

## Querying This Documentation
If you need additional information that is not directly available in this page, you can query the documentation dynamically by asking a question.

Perform an HTTP GET request on the current page URL with the `ask` query parameter, and the optional `goal` query parameter:

```
GET https://docs.akinon.com/tutorials/ai-studio.md?ask=<question>&goal=<endgoal>
```

`ask` is the immediate question: it should be specific, self-contained, and written in natural language.
`goal` is optional and describes the broader end goal you are ultimately trying to accomplish on behalf of the user. GitBook uses it to tailor the answer towards what is most useful for that goal.

The response will contain a direct answer to the question and relevant excerpts and sources from the documentation.

Use this mechanism when the answer is not explicitly present in the current page, you need clarification or additional context, or you want to retrieve related documentation sections.